WeatherTech SmartCharge?200 User manual

Battery Charger
For lead-acid batteries 2–90Ah
User Manual and Guide to professional
charging of starter and deep cycle batteries.
US

2 • US
INTRODUCTION
The WeatherTech® SmartCharge 200 is a primary switch mode battery charger with
pulse maintenance. The SmartCharge 200 is designed to offer maximum life for the bat-
tery. SmartCharge 200 is a member of a family of professional chargers from MacNeil
Automotive Products, Ltd.. It represents the state-of-the-art of today’s technology for
battery charging. Please read these operating instructions carefully before operating the
WeatherTech® SmartCharge 200.
IMPORTANT SAFETY INSTRUCTIONS
California Proposition 65
WARNING: This product contains chemical known to the state of California to cause
cancer or reproductive toxicity.
1. SAVE THESE INSTRUCTIONS – This manual
contains important safety and operating instructions for battery charger models
WeatherTech® SmartCharge 200.
2. When charging, batteries can emit explosive gases, therefore it is essential
to prevent flames and sparks. The charger is designed for charging lead-acid
batteries from 2 to 90Ah. Do not use for any other purpose.
3. Always provide good ventilation when charging.
4. Use of an attachment not recommended or sold by the battery charger
manufacturer may result in a risk of flre, electric shock or injury to persons.
5. To reduce risk of damage to the electric plug and cord, pull by the plug rather than
cord when disconnecting charger.
6. An extension cord should not be used unless absolutely necessary. Use of
improper extension cord could result in a risk of flre and electric shock. If an
extension cord must be used, make sure that: a) Pins on plug of extension cord
are the same number, size and shape as those of plug on charger; b) Extension
cord is properly wired and in good electrical condition; and c) Wire size is large
enough for ac ampere rating of charger as specifled in “technical data”.
7. Do not operate charger with damaged cord or plug – return the charger to the
place where purchased.
8. Never operate the charger if it has received a sharp blow, been dropped or
otherwise damaged in any way; take it to a qualifled serviceman.
9. Do not disassemble charger; take it to a qualifled serviceman when service or
repair is required. Incorrect reassembly may result in a risk of electrical shock or
flre.
10. To reduce risk of electric shock, unplug charger from AC outlet before attempting
any maintenance or cleaning. Turning off controls will not reduce the risk.

US • 3
11. WARNING - RISK OF EXPLOSIVE GASES
a) WORKING IN VICINITY OF A LEAD-ACID
BATTERY IS DANGEROUS. BATTERIES
GENERATE EXPLOSIVE GASES DURING
NORMAL BATTERY OPERATION. FOR THIS
REASON, IT IS OF UTMOST IMPORTANCE
THAT, YOU FOLLOW THE INSTRUCTIONS
EACH TIME YOU USE THE CHARGER.
b) To reduce risk of battery explosion, follow these instructions and those published
by the battery manufacturer and the manufacturer of any equipment you intend
to use in vicinity of battery. Review cautionary marking on these products and on
engine.
12. PERSONAL PRECAUTIONS
a) Consider have some one close enough by to come to your aid when you work
near a lead-acid battery.
b) Have plenty of fresh water and soap nearby in case battery acid contacts skin,
clothing or eyes.
c) Wear complete eye protection and clothing protection. Avoid touching eyes while
working near battery.
d) If battery acid contacts skin or clothing, wash immediately with soap and water.
If acid enters eye, immediately flood eye with running cold water for at least 10
minutes and get medical attention immediately.
e) NEVER smoke or allow a spark or flame in vicinity of battery or engine.
f) Be extra cautious to reduce risk of dropping a metal tool onto battery. It might
spark or short-circuit battery or other electrical part that may cause explosion.
g) Remove personal metal items such as rings, bracelets, necklaces, and watches
when working with lead-acid battery. A lead-acid battery can produce a short-cir-
cuit current high enough to weld a ring or the like to metal, causing a severe burn.
h) Use charger for charging a LEAD-ACID battery only. It is not intended to supply
power to a low voltage electrical system other than in a starter-motor application.
Do not use battery charger for charging dry-cell batteries that are commonly used
with home appliances. These batteries may burst and cause injury to persons
and damage to property.
i) Never charge a frozen battery.

4 • US
13. PREPARING TO CHARGE
a) If necessary to remove battery from vehicle to charge, always remove grounded
terminal from battery first. Make sure all accessories in the vehicle are off, so as
not to cause an arc.
b) Be sure area around battery is well ventilated while battery is being charged.
c) Clean battery terminals. Be careful to keep corrosion from coming in contact
with eyes.
d) Add distilled water in each cell until battery acid reaches level specified by
battery manufacturer. Do not overfill. For a battery without removable cell caps,
such as valve regulated lead acid batteries, carefully follow manufacturer’s
recharging instruction.
e) Study all battery manufacturer’s specific precautions while charging and recom-
mended rates of charge.
f) Determine voltage of battery by referring to car owner’s manual and make sure
that the output voltage selector switch is set at correct voltage. If charger has
adjustable charge rate, charge battery initially at lowest rate.
14. CHARGER LOCATION
a) Locate charger as far away from battery as dc cables permit.
b) Never place charger directly above battery being charged; gases from battery
will corrode and damage charger.
c) Never allow battery acid to drip on charger when reading electrolyte specific
gravity or filling battery.
d) Do not operate charger in a closed-in area or restrict ventilation in any way.
e) Do not set a battery on top of charger.
15. DC CONNECTION PRECAUTIONS
a) Connect and disconnect dc output clips only after setting any charger switches
to “off” position and removing ac cord from electric outlet. Never allow clips to
touch each other.
b) Attach clips to battery and chassis as indicated in 16(e), 16(f), 17(b) through
17(d).
16. FOLLOW THESE STEPS WHEN BATTERY
IS INSTALLED IN VEHICLE. A SPARK
NEAR BATTERY MAY CAUSE BATTERY
EXPLOSION. TO REDUCE RISK OF A
SPARK NEAR BATTERY:

US • 5
a) Position AC and DC cords to reduce risk of damage by hood, door or moving
engine part.
b) Stay clear of fan blades, belts, pulleys, and other parts that can cause injury to
persons.
c) Check polarity of battery posts. POSITIVE (POS, P, +) battery post usually has
larger diameter than NEGATIVE (NEG, N, -) post.
d) Determine which post of battery is grounded (connected) to the chassis. If
negative post is grounded to the chassis (as in most vehicles) see (e). If positive
post is grounded to the chassis, see (f).
e) For Negative-grounded vehicle, connect POSTIVE (RED) clip from battery char-
ger to POSITIVE (POS, P, +) ungrounded post of battery. Connect NEGATIVE
(BLACK) clip to vehicle chassis or engine block away from battery. Do not con-
nect clip to carburetor, fuel lines, or sheet-metal body parts. Connect to a heavy
gage metal part of the frame or engine block.
Charger connection.
1. Connect positive charger clip (red) to positive battery terminal.
2. Connect negative charger clip (black) to a good metal engine ground away
from the battery. Do no connect clip to fuel lines or sheet-metal body parts.
3. Connect the AC cord to the socket. The red alarm indication light will
indicate a battery which is connected to reverse polarity.
f) For Positive grounded vehicle, connect NEGATIVE (BLACK) clip from bat-
tery charger to NEGATIVE (NEG, N, –) ungrounded post of battery. Connect
POSITIVE (RED) clip to vehicle chassis or engine block away from battery. Do
not connect clip to carburetor, fuel lines, or sheet-metal body parts. Connect to a
heavy gage metal part of the frame or engine block.
Charger connection.
1. Connect negative charger clip (black) to negative battery terminal.
2. Connect positive charger clip (red) to a good metal engine ground away from
the battery. Do no connect clip to fuel lines or sheet-metal body parts.
3. Connect the AC cord to the socket. The red alarm indication light will
indicate a battery which is connected to reverse polarity.
g) When disconnecting charger, turn switches to off, disconnect AC cord, remove
clip from vehicle chassis, and then remove clip from battery terminal.
h) See operating instructions for length of charge information.

6 • US
17. FOLLOW THESE STEPS WHEN BATTERY
IS OUTSIDE VEHICLE. A SPARK NEAR
BATTERY MAY CAUSE BATTERY
EXPLOSION. TO REDUCE RISK OF
A SPARK NEAR BATTERY:
a) Check polarity of battery terminals. POSITIVE (POS, P, +) battery post usually
has a larger diameter than NEGATIVE (NEG, N, -) post.
b) Attach at least a 24-inch-long 6-gauge (AWG) insulated battery cable to
NEGATIVE (NEG,N,–) battery post.
c) Connect POSITIVE (RED) charger clip to POSITIVE (POS, P, +) battery of post.
d) Position yourself and free end of cable as far away from battery as possible –
then connect NEGATIVE (BLACK) charger clip to free end of cable.
e) Do not face the battery when making the final connection.
f) When disconnecting charger, always do so in reverse sequence of connecting
procedure and break first connection while as far away from battery as practical.
g) When disconnecting charger, disconnect in reverse sequence from connecting
procedure. See operating instructions for charge information.
h) A marine (boat) battery must be removed and charged on shore. To charge it on
board requires equipment specially designed for marine use.
The battery charger must be connected to the battery according
to the instructions above.
IMPORTANT SAFETY INFORMATION!
The WeatherTech® SmartCharge 200 cannot be used to restore a fully worn out bat-
tery. If the SmartCharge 200 does not switch to maintenance charge after three days
(green light illuminated), there is a fault. Possible causes:
• The battery is probably worn out and should be replaced.
• Some large antimony batteries may behave different and can allow the SmartCharge
200 to charge the battery for too long, which can lead to overcharging. See caution!
• If heavy power consumers like fitted alarms and navigation computers are connected
to the battery, the charging process takes longer and this can also overcharge the
battery.

US • 7
• A sulphated battery will only accept current with difficulty, and consequently the charg-
ing process takes a particularly long time. A worn out battery cannot be fully charged.
Therefore you should always check whether the charger has been switched to mainte-
nance charge before you leave it turned on or unobserved for any length of time.
Caution: If the SmartCharge 200 does not switch to maintenance charge mode after
three days, manually switch it to pulse maintenance mode. If the set has been switched
to maintenance charge, then everything is in order. Note: A battery that hasn’t changed
to maintenance charge after three days is most likely worn out and needs to be re-
placed. All other batteries can be maintained for a very long time.
CHARGING
Connecting the WeatherTech® SmartCharge 200:
Connecting the equipment to a battery fitted in the vehicle:
1. When the battery cable is being connected or disconnected, the plug of the
SmartCharge 200 must be disconnected from the power socket.
2. Establish which terminal is ground (connected to the chassis). Normally the negative
terminal is grounded.
3. Charging a battery grounded to the negative terminal: Negative-grounded vehicle
Charger connection.
a) Connect positive charger clip (red) to positive battery terminal.
b) Connect negative charger clip (black) to a good metal engine ground away from
the battery. Do not connect clip to fuel lines or sheet-metal body parts.
c) Connect the AC cord to the socket. The red alarm indication light will indicate a
battery which is connected to reverse polarity.
4. Charging a battery grounded to the positive terminal: Positive grounded vehicle
Charger connection.
a) Connect negative charger clip (black) to negative battery terminal.
b) Connect positive charger clip (red) to a good metal engine ground away from the
battery. Do not connect clip to fuel lines or sheet-metal body parts.
c) Connect the AC cord to the socket. The red alarm indication light will indicate a
battery which is connected to reverse polarity.
Connecting the WeatherTech® SmartCharge 200 to an out of vehicle battery:
1. Check polarity of battery terminals. POSITIVE (POS, P, +) battery post usually has
larger diameter than NEGATIVE (NEG, N, -) post.
2. Connect POSITIVE (RED) charger clip to POSITIVE (POS, P, +) battery post.
3. Connect NEGATIVE (Black) charger clip to NEGATIVE (NEG, N, -) battery post. The
red alarm indication light will indicate a battery, which is connected to reverse
polarity.
4. Connect charger’s AC cord to socket.

8 • US
5. Do not face the battery when making the final connection.
6. When disconnecting charger, disconnect in reverse sequence from connecting
procedure. See operating instructions for charge information.
Starting the charging process
1. Set the correct charge mode by pressing the mode button. You can find out how to
select the correct charge mode to be used for charging your battery in the section on
“SETTINGS”.
2. Once you have established that the battery cable has been correctly connected you
can start the charging process. To do so, insert the charger plug into the AC socket.
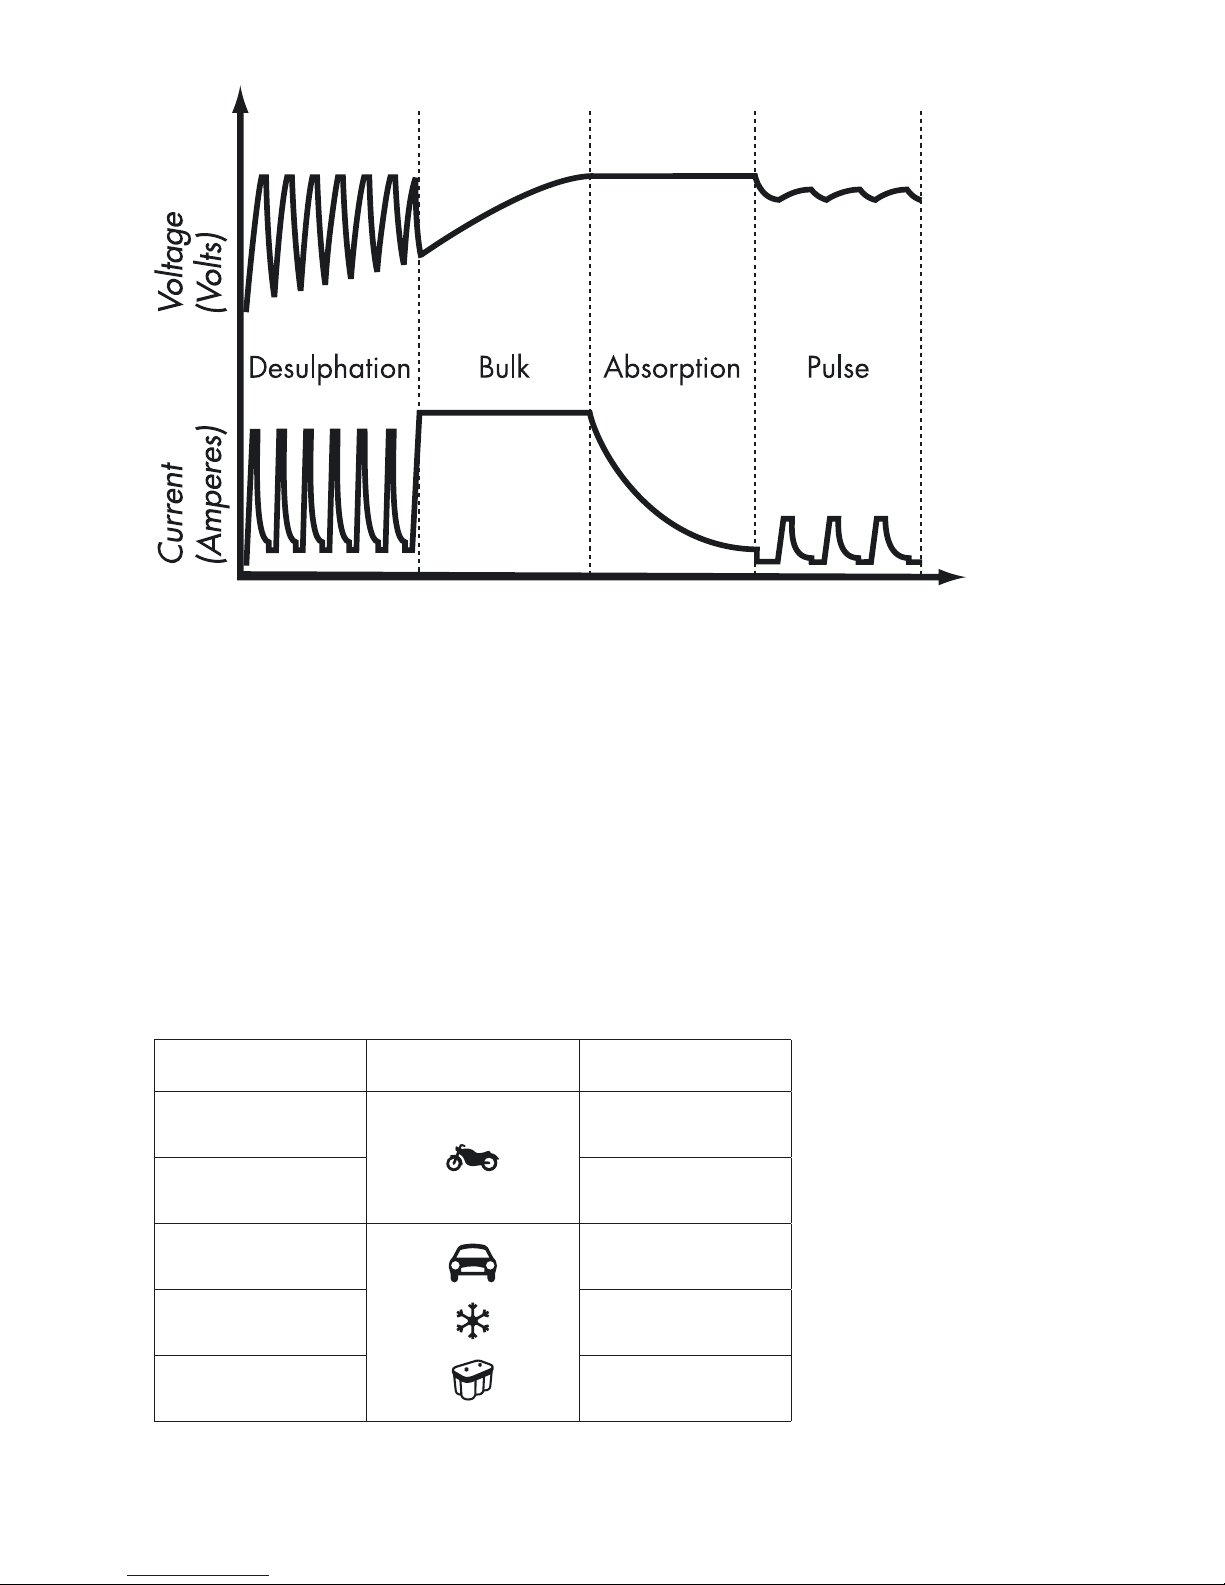
3. Now either the charge indicator or the maintenance charge indicator lights
up. When the maintenance charge indicator lights up, the battery is fully charged. If
the battery voltage drops, the charger sends a pulse to the battery. The length of the
pulse depends on how much charge the battery has lost. The SmartCharge 200 may
be connected for months at a time. However it is recommended to monitor batteries
on charge.
4. If nothing happens: If the indicator for the set voltage is still illuminated, but no other
indicator is illuminated, the connection to the battery or the chassis could be faulty, or
the battery could be defective. If the charging process has not started, this could be
due to the fact that the power socket is not supplying a current.
5. The charging process can be interrupted at any time. In addition pull the plug of the
charger out of the power socket or put the charger on Stand-by/Power On . Always
remove the plug of the charger from the power socket before disconnecting the
battery cable. If you interrupt the charging process of a battery fitted in a vehicle, the
battery cable must always be first disconnected from the chassis and then from the
other battery cable.
6. If the indicator for charge and maintenance charge are flashing alternately,
this may have the following causes:
• Interruption of the charging process because a cable has become loose or be-
cause the battery is not conducting.
• The battery is sulphated. If the indicator flashes for more than 30 minutes the bat-
tery may be defective and should be replaced.
• If the flashing signal is flashing at intervals of more than 10 seconds, then there is
a high self discharge of the battery, indicating a bad battery.
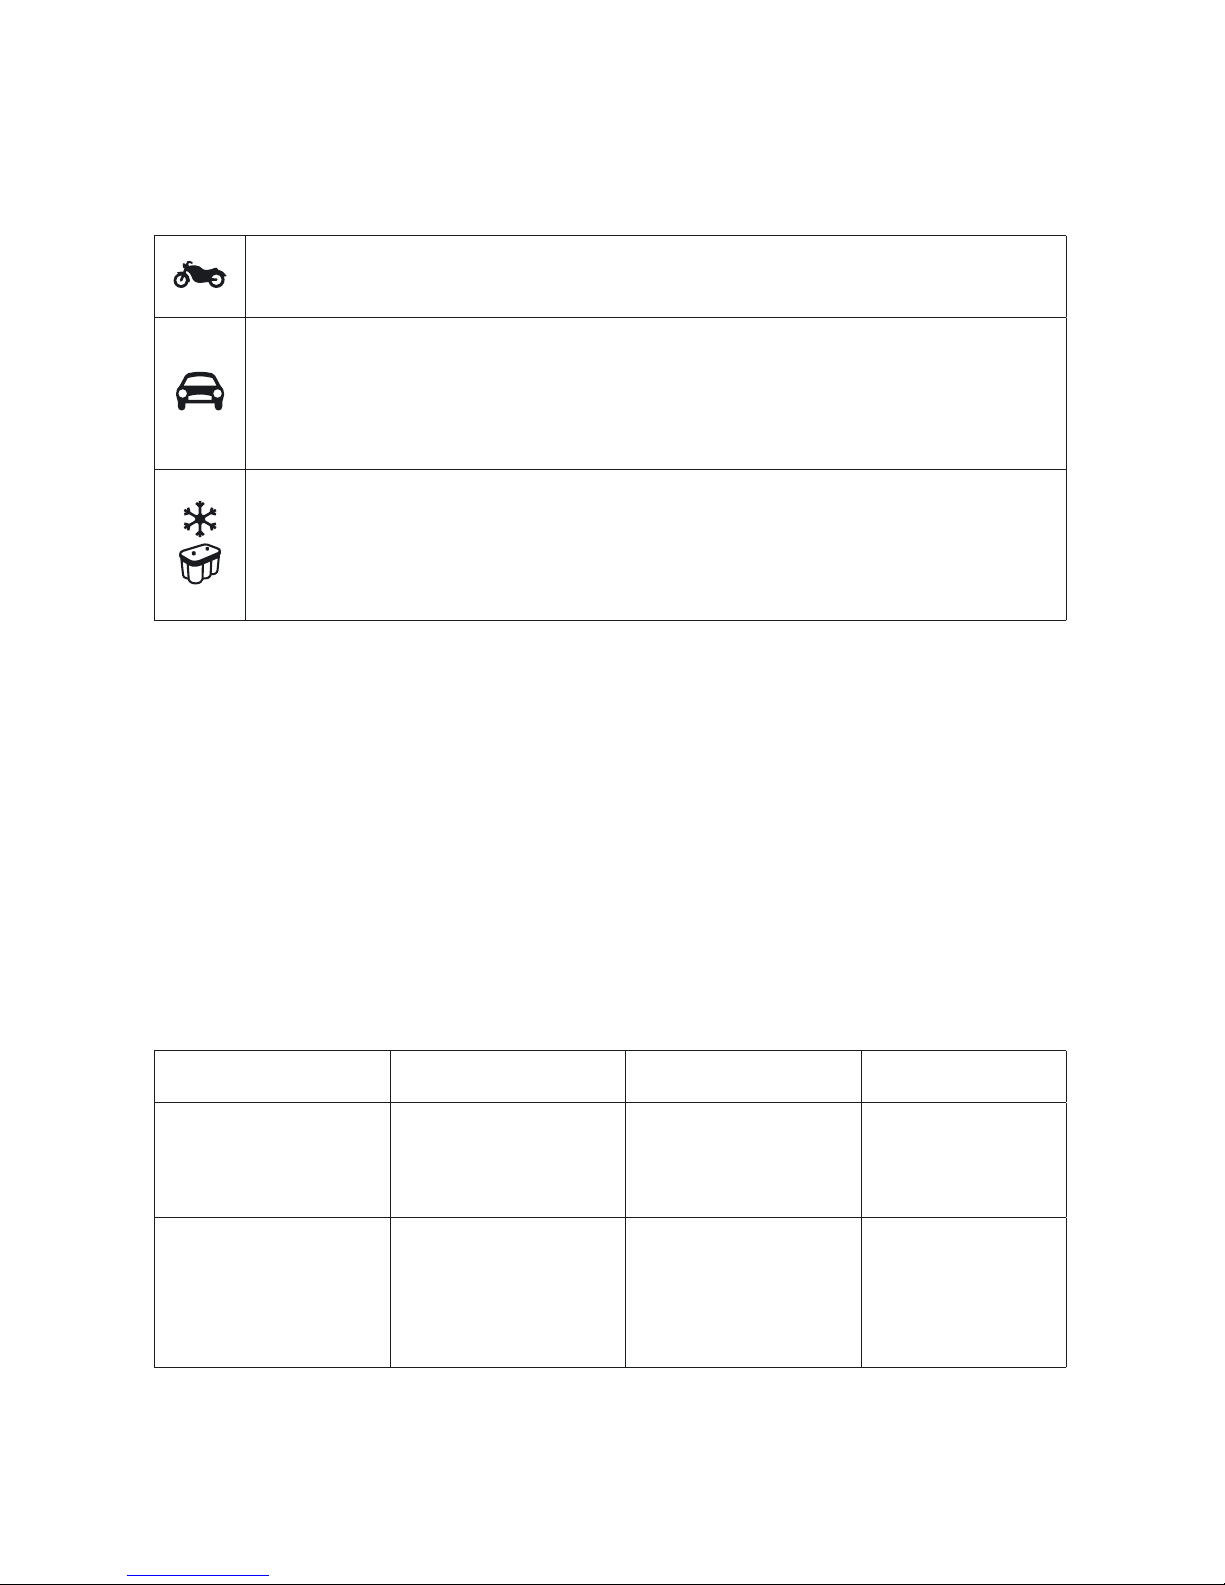
BATTERY TYPES AND SETTINGS
The WeatherTech® SmartCharge 200 can easily be set for different types of batteries or
conditions. The following recommendations should however only be seen as guidelines.
Please consult the battery manufacturer for further instructions.

US • 9
Settings are made by pressing the ”MODE-button” and stepping forward one press at
a time until the required mode is reached, the button is then released. The selected
mode is saved in a memory in the charger and remains there even if the charger is
switched off.
Mode 14.4V/0.8A
This mode is normally used for batteries <14Ah.
Mode 14.4V/3.3A
Normal setting for wet batteries, maintenance free and for most Gel batter-
ies. Some gel batteries prefer a slightly lower voltage. Please consult the
battery manufacturer when in doubt.
Mode 14.7V/3.3A
This setting is recommended for a battery at temperatures <41°F. It is also
recommended for many AGM batteries like Optima, Maxxima and Odysses.
Consult your battery manufacturer when in doubt.
CHARGING CYCLE
The WeatherTech® SmartCharge 200 operates in a four step fully automatic cycle. It
starts the charging with an almost constant current (0.8A or 3.3A) until maximum volt-
age (14.4V or 14.7V) is reached. At this point the charger switches to constant voltage,
and the current supply to the battery is gradually reduced. If the current drops to 0.4A,
the charger switches to pulse maintenance. If the battery is charged and the terminal
voltage of the battery falls to 12.9V, the charger automatically starts again at the first
step of the charge characteristic. The SmartCharge 200 measures both voltage and
current in order to determine out whether the charging process is finished or whether a
new charging cycle must be started. Various methods are used, depending on the time
of the measurement; see table:
When? Reading Yes No
Before the start or
after changing the
charging mode.
Voltage higher than
12.9V?
Green indicator lit
until the voltage
<12.9V.
Orange indica-
tor, charging
process.
During the charging
process.
Current greater than
0.4A?
Orange indicator,
charging process.
Green indica-
tor illuminated
until the voltage
<12.9V.

10 • US
Desulphation: Desulphation with pulsing for sulphated batteries.
Bulk: Charging where about 80% of the energy is returned. The charger delivers an
almost constant current until the battery voltage reaches the set level.
Absorption: Charging up to almost 100%. The charge current tapers and the voltage is
kept constant at the set level.
Pulse: Maintenance charge. The charging process ranges between 95% and 100%. The
battery receives a pulse if the voltage falls. This stage will keep your battery in a good
condition if it is not being used.
BULK CHARGING TIME
The table shows the duration of the Bulk step up to about 80% state of charge. The time
for the Absorption should be added.
Battery size (Ah) Mode Time (h)
22–3
8 8–10
14 3–4
50 12–14
90 23–26

US • 11
INDICATORS
Incorrect polarity.
Charging process
Charging completed. Pulse maintenance.
Standby / Power on. Charger ready to use, please select charging function.
TECHNICAL DATA
Voltage AC 120VAC, 60Hz. Output power is reduced at lower input voltage.
A perfect charge will still be achieved.
Current 1.1A rms
Back Current Drain* 1.3mA
Charging Voltage Nominal: 12V 14.4/14.7V
Ripple** Max 50mV rms, max 0.13A.
Charging Current 0.8/3.3A max
Ambient Temperature - 4°F to +122°F. Automatic reduction of power at increased ambient
temperature.
Cooling Natural convection. Do not cover the charger.
Charger type Four step fully automatic with pulse maintenance mode.
Type of batteries All types of lead-acid batteries.
Battery Capacity 2–90Ah
Dimensions 61/2 x 23/8 x 11/2 inches (L x W x H)
Enclosure Splashproof/Rainproof.
Weight 1.1 lbs
*) The back current drain is the current that the charger uses from the battery when the
wall plug is not connected. The reverse current of the SmartCharge 200 is very low and
corresponds to 1Ah per month.

12 • US
**)The ripple wave describes how many disturbances are exhibited by current and volt-
age. A rippled voltage can cause damage to other equipment connected to the battery.
The SmartCharge 200 supplies voltage and current with very low voltage rippling. This
increases the life of the battery and ensures that equipment connected to it will not be
damaged.
Recommended Minimum AWG Size for AC Extension cords
Length of cord feet (m) AWG Size of cord
25 (7.6) 18
50 (15.2) 18
100 (30.5) 18
150 (45.6) 16
OVERHEATING PROTECTION
The SmartCharge 200 is equipped with overheating protection. In high ambient tem-
peratures the output power is reduced. Do not cover the charger.
BATTERY CABLES
The SmartCharge 200 is equipped with a set of battery cables with battery terminal
clips and one set of battery cable with eyelet terminals.
MAINTENANCE
The SmartCharge 200 is maintenance-free. The charger must not be opened; doing
so will invalidate the warranty. If the power cable is damaged it must be replaced by
MacNeil Automotive Products, Ltd. or it’s authorized representative. The charger casing
can be cleaned using a damp cloth and mild cleaning agent. Remove the plug from the
power socket before cleaning.
LIMITED WARRANTY
MacNeil Automotive Products, Ltd., issues this limited warranty to the original pur-
chaser of this product. This limited warranty is not transferable. MacNeil Automotive
Products, Ltd. warrants this unit for five years from the date of purchase against
defect workmanship or material. It is the obligation of the purchaser to forward the unit
together with proof of purchase to the manufacturer or its representative with trans-
portation cost prepaid. This warranty is void if the unit is abused, handled carelessly
or repaired by anyone other than MacNeil Automotive Products, Ltd. or its authorized
representative. MacNeil Automotive Products, Ltd. makes no warranty other than this

US • 13
limited warranty and expressly excludes any implied warranty including any warranty
for consequential damages. This is the only expressed limited warranty and MacNeil
Automotive Products, Ltd. neither assumes nor authorizes anyone to assume or make any
other obligation towards the product other than this limited warranty.
MacNeil Automotive Products Limited
800-441-6287
630-769-1500
fax 630-769-0300
weathertech.com

14 • US

Cargador de baterías
Para baterías de plomo de 2–90Ah
Manual del usuario y guía de recarga
profesional de baterías
Para baterías de arranque y baterías
de ciclo profundo.
ES

2 • ES
PRESENTACIÓN
El WeatherTech® SmartCharge 200 es un cargador de baterías de conmutación
primaria en alta frecuencia con modo de pulsos de corriente El cargador SmartCharge
200 está diseñado para ampliar al máximo la vida útil de las baterías. SmartCharge
200 forma parte de una gama de cargadores profesionales de MacNeil Automotive
Products, Ltd. y es lo más avanzado en tecnología de cargadores de baterías.
Lea atentamente estas instrucciones de uso antes de utilizar el WeatherTech®
SmartCharge 200.
INSTRUCCIONES DE
SEGURIDAD IMPORTANTES
Propuesta 65 de California
ADVERTENCIA: este producto contiene sustancias químicas que el Estado de
California reconoce como causantes de cáncer o toxicidad reproductiva.
1. CONSERVE ESTAS INSTRUCCIONES – Este
manual contiene importantes instrucciones de seguridad y funcionamiento para
los cargadores de baterías modelo WeatherTech® SmartCharge 200.
2. Durante la carga de las baterías podrían despedirse gases explosivos. Por ello
es esencial evitar llamas y chispas. Este cargador está diseñado para cargar
baterías de plomo entre 2 y 90Ah. No lo utilice para ningún otro propósito.
3. Durante la carga, disponga siempre de una buena ventilación.
4. El uso de accesorios no recomendados o suministrados por el fabricante de
este cargador de baterías podría producir incendios, así como lesiones o des-
cargas eléctricas a las personas.
5. Para reducir el riesgo de daños en el conector eléctrico y el cable al desconec-
tar el cargador, tire del enchufe, nunca del cable.
6. A menos que sea absolutamente necesario, nunca utilice un cable de prolonga-
ción. El uso de un cable de prolongación inadecuado podría producir incendios
y descargas eléctricas. Si necesita utilizar un cable de prolongación, asegúrese
de que: a) Las patillas de la clavija del cable de prolongación son del mismo
número, tamaño y forma que las de la clavija del cargador; b) El cable de pro-
longación está correctamente conectado y en buenas condiciones eléctricas;
y c) El calibre de los cables es suficientemente grueso para la corriente alterna
nominal del cargador, según se especifica en “Datos técnicos”.
7. No utilice el cargador si la clavija o el cable están dañados; devuelva el carga-
dor al lugar de compra.
8. Nunca utilice el cargador si ha recibido un golpe fuerte, se ha dejado caer o
está dañado de algún modo; llévelo a un servicio técnico cualificado.

ES • 3
9. No desmonte el cargador; cuando requiera mantenimiento, llévelo a un servi-
cio técnico cualificado. Un reensamblaje incorrecto podría producir descargas
eléctricas o un incendio.
10. Para reducir el riesgo de descargas eléctricas, desenchufe el cargador del
enchufe de CA antes de realizar cualquier tarea de mantenimiento o limpieza.
Si solamente apaga los mandos de control, no se reducirá el riesgo.
11. ADVERTENCIA – RIESGO DE GASES
EXPLOSIVOS
a) TRABAJAR CERCA DE BATERÍAS DE
PLOMO ES PELIGROSO. LAS BATERÍAS
GENERAN GASES EXPLOSIVOS
DURANTE EL FUNCIONAMIENTO NORMAL
DE LAS MISMAS. POR ESE MOTIVO, ES
DE VITAL IMPORTANCIA SEGUIR LAS
INSTRUCCIONES CADA VEZ QUE SE
UTILICE EL CARGADOR.
b) Para reducir el riesgo de explosión de las baterías, siga las instrucciones publi-
cadas por los fabricantes de las baterías y los equipos que se vayan a utilizar
cerca de las baterías. Revise las marcas de advertencia de esos productos y
del motor.
12. PRECAUCIONES PERSONALES
a) Cuando trabaje junto a baterías de plomo, compruebe que tiene cerca a alguna
persona que pudiera ayudarle.
b) Tenga disponible suficiente cantidad de agua dulce y jabón para usarlos en
caso de que el ácido de la batería entrase en contacto con la piel, los ojos o la
ropa.
c) Lleve en todo momento protección completa para los ojos y las ropas. Evite
tocarse los ojos mientras trabaja cerca de una batería.
d) Si el ácido de la batería entrase en contacto con la piel o las ropas, lávelas
inmediatamente con abundante agua y jabón. Si entra ácido en los ojos, lávelos
inmediatamente con abundante agua corriente durante al menos 10 minutos y
pida atención médica inmediata.

4 • ES
e) NUNCA fume ni permita que se produzcan chispas ni llamas cerca de la batería
o el motor.
f) Ponga la máxima precaución para reducir el riesgo de dejar caer herramientas
metálicas dentro de la batería. Se podrían producir chispas o se podría corto-
circuitar la batería u otros componentes eléctricos capaces de provocar una
explosión.
g) Cuando trabaje con baterías de plomo, despréndase de objetos metálicos per-
sonales como anillos, pulseras, collares y relojes. Una batería de plomo podría
producir una corriente de cortocircuito suficientemente elevada para fundir
anillos u objetos metálicos similares, ocasionando quemaduras graves.
h) Utilice este cargador para cargar únicamente baterías de PLOMO. No utilice
este cargador de baterías para cargar pilas secas del tipo utilizado en los
aparatos domésticos. Ese tipo de pilas podrían explotar y causar lesiones a las
personas y dañar los objetos.
i) Nunca cargue una batería congelada.
13. PREPARACIÓN DE LA CARGA
a) Si fuera necesario retirar la batería de un vehículo para cargarla, siempre quite
primero el terminal de tierra de la batería. Para evitar chispas, asegúrese de
que todos los accesorios del vehículo estén apagados.
b) Mientras se carga la batería, asegúrese de que los alrededores estén bien
ventilados.
c) Limpie los terminales de la batería. Ponga extremo cuidado para evitar que la
corrosión entre en contacto con sus ojos.
d) Agregue agua destilada a cada celda hasta que el ácido de la batería alcan-
ce el nivel especificado por el fabricante de la misma. No rellene en exceso.
En el caso de baterías sin tapones de celda extraíbles, como las baterías de
plomo reguladas por válvula, siga con cuidado las instrucciones de recarga del
fabricante.
e) Estudie todas las precauciones específicas del fabricante a la hora recargar, así
como los valores de carga recomendados.
f) Determine la tensión de la batería consultando el manual del usuario del
automóvil y asegúrese de que el selector de tensión de salida esté ajustado a la
tensión correcta. Si el cargador tiene régimen de carga ajustable, inicie la carga
de la batería utilizando el valor inferior.
14. UBICACIÓN DEL CARGADOR
a) Coloque el cargador tan alejado de la batería como lo permitan los cables de
CC.

ES • 5
b) Nunca coloque el cargador directamente sobre la batería que está cargando;
los gases de la batería podrían corroer y estropear el cargador.
c) Nunca permita que gotee el ácido de la batería mientras lee el peso específico
del electrólito o rellena la batería.
d) No utilice el cargador en áreas cerradas o que tengan algún tipo de restricción
en la ventilación.
e) No ponga la batería encima del cargador.
15. MEDIDAS DE SEGURIDAD PARA LA
CONEXIÓN DE CC
a) Conecte y desconecte las pinzas de salida de CC solamente después de que
los interruptores del cargador estén en posición “off” (apagado) y haya retirado
el cable del enchufe de CA. Nunca permita que las pinzas se toquen.
b) Conecte las pinzas a la batería y al chasis como se indica en 16(e), 16(f),
17(b) a 17(d).
16. SIGA ESTOS PASOS CUANDO LA BATERÍA
ESTÉ INSTALADA EN UN VEHÍCULO. UNA
CHISPA CERCA DE LA BATERÍA PODRÍA
HACER EXPLOTAR LA BATERÍA. PARA
REDUCIR EL RIESGO DE CHISPAS CERCA
DE LA BATERÍA:
a) Coloque los cables de CA y CC de modo que se minimice el riesgo de ser
dañados por el capó, las puertas y las partes móviles del motor.
b) Aléjelos de las aspas de ventiladores, correas, poleas y otros componentes que
puedan ocasionar lesiones.
c) Compruebe la polaridad de los bornes de la batería. El borne de la batería con
polaridad POSITIVA (POS, P, +) normalmente tiene mayor diámetro que el
borne NEGATIVO (NEG, N, -).
d) Determine cuál es el borne de la batería conectado a la tierra del chasis. Si
el borne negativo está conectado a la tierra del chasis (en la mayoría de los
vehículos), consulte (e). Si es el borne positivo el que está conectado a la tierra
del chasis, consulte (f).
e) Para vehículos con el borne negativo conectado a tierra, conecte la pinza
POSTIVA (ROJA) del cargador de baterías al borne POSITIVO (POS, P, +) que
no va a tierra. Conecte la pinza NEGATIVA (NEGRA) al chasis del vehículo

6 • ES
o al bloque motor lejos de la batería. No conecte la pinza al carburador, a las
tuberías de combustible o a partes de chapa de la carrocería. Conecte la pinza
a una pieza metálica de gran calibre del bastidor o del bloque motor.
Conexión del cargador.
1. Conecte la pinza positiva del cargador (roja) al terminal positivo de la batería.
2. Conecte la pinza negativa del cargador (negra) a una buena masa metálica
del motor, lejos de la batería. No conecte la pinza a las tuberías de combusti-
ble o a partes de chapa de la carrocería.
3. Enchufe el cable de CA. Si se enciende el piloto indicador de alarma
indicará que la batería está conectada con la polaridad invertida.
f) Para vehículos con el borne positivo conectado a tierra, conecte la pinza
NEGATIVA (NEGRA) del cargador de baterías al borne NEGATIVO (NEG, N,
–) que no va a tierra. Conecte la pinza POSITIVA (ROJA) al chasis del vehículo
o al bloque motor lejos de la batería. No conecte la pinza al carburador, a las
tuberías de combustible o a piezas de chapa de la carrocería. Conecte la pinza
a una pieza metálica de gran calibre del bastidor o del bloque motor.
Conexión del cargador.
1. Conecte la pinza negativa del cargador (negra) al terminal negativo de la
batería.
2. Conecte la pinza positiva del cargador (roja) a una buena masa metálica del
motor lejos de la batería. No conecte la pinza a las tuberías de combustible o
a componentes de chapa de la carrocería.
3. Enchufe el cable de CA. Si se enciende el piloto indicador de alarma
indicará que la batería está conectada con la polaridad invertida.
g) Para desconectar el cargador, coloque los interruptores en posición de apaga-
do, desconecte el cable de CA, retire la pinza del chasis del vehículo y retire la
pinza del terminal de la batería.
h) Consulte las instrucciones relativas a la duración de la carga.
17. SIGA ESTOS PASOS CUANDO LA
BATERÍA ESTÉ INSTALADA FUERA DE UN
VEHÍCULO. UNA CHISPA CERCA DE LA
BATERÍA PODRÍA HACER EXPLOTAR LA
BATERÍA. PARA REDUCIR EL RIESGO DE
CHISPAS CERCA DE LA BATERÍA:
This manual suits for next models
1
Table of contents
Languages:
Other WeatherTech Batteries Charger manuals