manuals.online logo
Brands
  1. Home
  2. •
  3. Brands
  4. •
  5. Weefine
  6. •
  7. Camera Accessories
  8. •
  9. Weefine WFH TG-6 User manual

Weefine WFH TG-6 User manual

Please read the manually carefully before using the case
USER’S GUIDE
1. Press the case lock safety button. 2. Turn the housing lock clockwise
for 90°, until the lock
reaches the “Open” position as
shown .
1. Close the case while the housing is
in the “Open” position.
2. Turn the case lock anti-clockwise
for 90°, until the lock reaches the
“lock” position as shown.
Lock knob
Shutter lever
ON/OFF button
Zoom lever
Accessory mount
Diffuser
Open/Close
dial
Tripod seat
Indicator
Vacuum Button
INFO button
Control dial
lock safety button
Mode dial knob
Button/
REC button
OK/AFL button
MENU/Wi-Fi
button
Button/
Play button
Button/
Waterproof cover(Outside)
Release port(Inside)
Arrow pad
① TG-6 Waterproof Case ② Spare O-ring x 1pcs
③ Silicone oil ④ Black Hand Rope ⑤ O-ring Remover
WFH TG-6
To open the case:
To lock the case:
OPENING AND LOCKING THE CASE
SPECIFICATIONS
PACKAGE CONTENTS
IDENTIFICATION OF PARTS
Aluminium alloy
Hard anodised
Abrasion resistant polycarbonate
161.4mm*74.2mm**121.2mm
685g (land)
Slightly negative
100 metres
Olympus Tough TG-5/TG-6
Housing body
Surface treatment
Display window
Dimensions
Weight
Buoyancy
Depth rating
Compatible cameras
①
② ③
* Do not disassemble the case.
* Do not leave the case explosed to a heat source or store it in a high
temperature location. (e.g., in a locked car parked in the sun)
* Remove the battery if the case will not be used for long periods of time. (e,g.,
between dive trips)
* To avoid leaks the O-rings should be checked to ensure that they are free from
any dirt, sand, hair and dust every time before you open and close the case. Use
a soft cloth to the O-rings if required. The O-rings should also be carefully
checked for cracks or blemishes. Gently and evenly apply a thin coat of grease to
the entire O-rings regularly to prolong O-ring life. Be care not to scratch the
O-rings surface. If cracks or blemishes occur, the rings should be replaced
immediately.
* Do not open the case when using in the water.
* Wash the exterior of the case thoroughly with clean fresh water immediately
after use. Soaking the case in fresh water will help to remove salt deposits prior
to storage.
* Please remove all water before opening the case. Allowing wate to come in
contact with the internal device may casue damage to the case.
* Do not disassemble, modify, remanufacture, puncture or damage the case
The dealers provides a warranty against manufacturer defects for 1 year starting
from the date of purchase. Manufacturer defects occuring within 15 days of the
date of purchase will result in an exchange of product at the vendor. All other
manufacturer defects occuring within 1 year of the purchase will be repaired
at no cost. Proof of purchase is required for warranty support.
The warranty does not cover failures or defects resulting from misuse (e.g;
modification; damage), natural disasters, or battery issues, including incorrect
battery installation.
3.After pumping,if the red and green flashing state appears again,
it shows bad sealing of the waterproof case,and should be checked
to use.
1.before use,Open the waterproof cover and then press the
vacuum system switch for air extraction,When the indicator will
flash alternately from red to green,The green light will be on
normally,which means the pumping is completed,Then close the
waterproof cover tightly,
◆ Using the vacuum system
The red light is flashing before pumping
The red and green lights flash alternately during pumping
The green light is flashing after pumping
2.If the Green light of indicator flashing after 30 minutes, The
waterproof case can be used normally.
4.After use, before opening the waterproof case, it is necessary to
unscrew the waterproof cover and press the exhaust valve to open
the waterproof case with air injection.
CAUTION:
If the advance test shows water leakage with normal handling, stop using
the Case and contact your dealer.
BATTERY APPLICATION
GENERAL WARNINGS AND INSTRUCTIONS
TO INSTALL THE CAMERA INTO THE CASE
WARRANTY
Camera
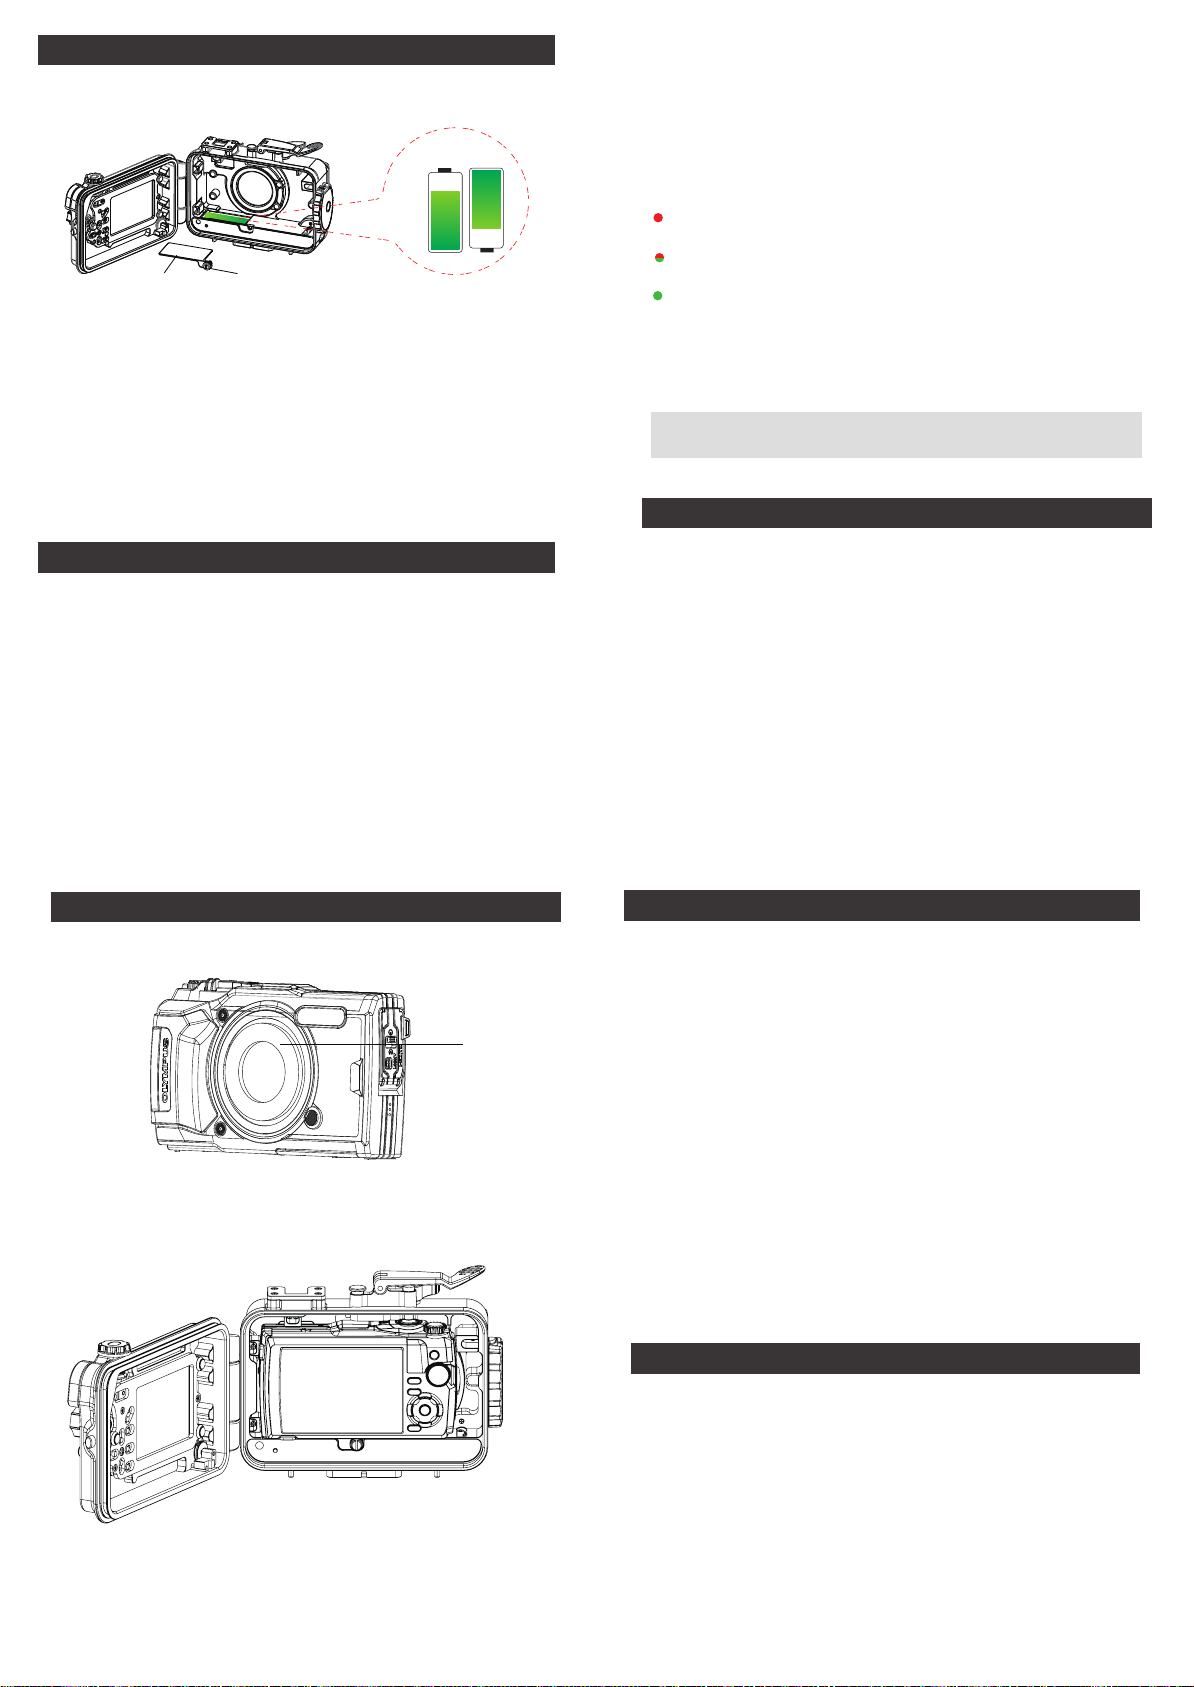
1. Place the camera inside the case as shown.
2. Close the housing and confirm that all the controls of the housing are
correctly engaged.
Lens Ring
** The camera lens ring must be removed before installing the case
1. Advance check before use
This Case has been the subject of thorough quality control for the parts
during the manufacturing process and thorough function inspections
during the assembly. In addition, a water pressure test is performed with
water pressure tester for all products to confirm that the performance
onforms to the specifications.
However, depending on the carrying and storage conditions, the
maintenance status, etc., the waterproof function may be damaged,
Before using, always perform the following advance checks.
ADVANCE CHECK OF THE CASE
* A water-tight test without the camera inside the housing is highly recommended
* please ensure adequate power.Replace the battery after about 30 times
of electric pumping
Check the digital camera before loading it in the Case.
1.Battery Confirmation
The flash is used very frequently durig underwater shooting.
Before diving, make sure that you have enough ramaining battery power.
2.Confirmation of the remaining number of pictures to be taken.
Confirm that the image storage has sufficient remaining number of pictures to
be taken.
3.Remove the hand strap from the digital camera.
When a digital camera is loaded without removing the strap, the strap get
caught between the Case lids and may cause water leakage.
4.Remove the lens ring from the digital camera then put it into the
underwater housing.
CHECK THE DIGITAL CAMERA
⑤
⑥ ⑦
④
1. Turn the screw, open the battery cover, and install two AAA batteries
(make sure the polarity battery must match the polarity of the diving
light contacts.)
2. Install the battery cover and tighten the screws.
AAA Battery * 2pcs
Screw
Battery cover
使用说明书
1. 按下防水壳锁扣 2. 将锁盘顺时针旋转90°到达能打开的位
置即可
1. 对准锁盘缺口位置关上防水壳 2. 将锁盘往逆时针旋转90°到锁紧位置即
可
WFH TG-6
打开防水壳:
关闭防水壳:
打开和关闭防水壳
规格
包装
组件
铝合金
阳极氧化
耐磨聚碳酸酯
161.4毫米*74.2毫米**121.2毫米
685g (陆地)
略负
100 米
奥林巴斯 TG-5/TG-6
材质
表面处理
显示窗口
尺寸
重量
浮力
防水深度
适用相机
①
② ③
防水壳
使用前请详细阅读说明书
锁扣
快门
开关按钮
变焦
冷靴座
光纤组件固定板
锁盘
防水盖(外)
排气阀(里)
固定座
真空系统开关
指示灯
信息键
控制旋钮
模式旋钮
上翻
录制键
OK/AFL 键
菜单/Wi-Fi 键
下翻
播放键
右翻
左翻
①WFH TG-6 防水壳 ② 备用O圈
③ 硅油 ④手绳 ⑤O圈翘片
自购买日起1年内,我们对制造商的缺陷提供保修;自购买日期后15天内发生的制造商
缺陷导致卖方产品的交换和所有其他制造商在采购1年内出现的缺陷将免费维修。购买证明需
要保证支持。
保修不包括因使用不当而导致的故障或缺陷(例如:修改;损坏),自然灾害,或电池
问题,包括不正确的电池安装。
电池安装及使用
产品安全及产品信息须知
安装相机
保修
相机
1. 如图所示,将相机放入防水壳内。
2. 关闭防水壳并确认外壳的所有控制装置都正确使用。
镜头环
** 相机装入防水壳前,必须取下相机镜头环
检查数码相机
⑤
⑥ ⑦
④
装进防水壳前请务必检查数码相机
1.确认电池
闪光在水下摄影经常使用到。
在潜水之前,确保给电池充满电。
2.确认数码相机内存量.
确保相机储存照片张数量足够
3.从数码相机上取下手带。
如果数码相机没有移除手带的情况下被加载时,手带可能会被夹在相机缝隙之间,并
可能导致漏水。
4.取下数码相机镜头环,然后将其装在防水壳外。
1.使用前,应拧开抽气孔防水盖,然后按下真空系统开关,进行抽气。抽气时指示灯会
红灯~绿灯 交替闪烁,绿灯常亮,代表抽气完成;然后盖紧防水盖。
◆ 漏水功能检测
抽气前红灯为闪烁状态
抽气时红绿灯交替闪烁状态
抽气完成绿灯为闪烁状态
2.将防水壳静置于陆地上30分钟,30分钟过后,此时漏水检测指示灯绿灯闪烁则为密
封良好,方可下水使用。
4.使用后,打开防水壳前,需拧开防水盖,按下排气阀,注入气体方能打开防水壳。
3.抽气完成后,若再出现红绿交替闪烁状态,则表示防水壳密封性差,须检查排除后
才能使用
注意:
如果按正常操作测试显示漏水情况,请停止使用防水壳并联系经销商。
1. 旋动螺丝,打开电池盖装入2节7号电池(注意正负极)
2. 盖上电池盖,拧紧螺丝。
检查防水壳
* 强烈建议在没有装入相机的防水壳进行防水测试
* 请确保电量充足,使用大约30次电动抽气后需更换电池。
1. 使用前检查
本产品在生产过程中对部件质量控制严格要求,并在装配过程中进行彻底的功能检测
。此外,还对所有产品进行水压试验,以确定其性能是否符合规范。
由于搬运和储存条件,维护状态等,防水功能可能会损坏,在使用前,一定要执行以
下预检。
* 请勿自行拆卸本防水壳,避免人为拆卸导致损坏不能进行维修。
* 不要将防水壳长期放置于阳光直射处或者高温环境下。
* 长时间不使用本防水壳时,请及时将电池取出,存放于干燥阴凉处。
* 在使用本产品前必须仔细检查密封圈,确保密封圈无破损,无砂子等杂物
附在密封圈上。防水圈拆下清洗时,请使用附件中的拆除翘片,不能用锋利
的工具操作,以免损坏密封圈,勿使用有机溶液,避免密封圈老化、变形。
* 务必使用原厂润滑油及原厂密封圈。
* 水下使用时,不能打开防水壳。
* 使用离开水面后,请务必将防水壳表面的水擦拭去除干净后才可打开,避免
防水壳上的水珠进入内部损坏内部零件。
* 使用完毕后,请务必将防水壳置于淡水中摇晃清洗并浸泡30分钟时间,以便
于清除掉附在潜水记录仪上的盐分及杂质,避免防水壳上的金属零件被腐蚀生
锈。如因使用后未清洗导致零件生锈,影响防水功能以致漏水,维修费用必须
由用户承担。
7号电池 * 2节
螺丝
电池盖

Other Weefine Camera Accessories manuals

Weefine Smart Focus 3500 User manual

Weefine

Weefine Smart Focus 3500 User manual

Weefine WFH TG-Pro User manual

Weefine

Weefine WFH TG-Pro User manual

Weefine Smart Focus 1200 User manual

Weefine

Weefine Smart Focus 1200 User manual

Popular Camera Accessories manuals by other brands

Flex PS 10.8 manual

Flex

Flex PS 10.8 manual

Solahart GoodWe Lynx Home F Series quick start guide

Solahart

Solahart GoodWe Lynx Home F Series quick start guide

Power works 2903473 Operator's manual

Power works

Power works 2903473 Operator's manual

Nikon SK-E900 instruction manual

Nikon

Nikon SK-E900 instruction manual

Solar MD SS4143-01 installation manual

Solar MD

Solar MD SS4143-01 installation manual

Filmcity FC-05 instruction manual

Filmcity

Filmcity FC-05 instruction manual

EnerSys NexSys CORE ATEX instruction manual

EnerSys

EnerSys NexSys CORE ATEX instruction manual

Teledyne Linea 2K CL user manual

Teledyne

Teledyne Linea 2K CL user manual

Energizer E95 Product data sheet

Energizer

Energizer E95 Product data sheet

Godox X1 instruction manual

Godox

Godox X1 instruction manual

SBL LFP-24V50AHBLH Manual instruction

SBL

SBL LFP-24V50AHBLH Manual instruction

Sanyo N-1300SCR Cadnica Specifications

Sanyo

Sanyo N-1300SCR Cadnica Specifications

Rotolight RingLight Stealth Edition RL48-B quick start guide

Rotolight

Rotolight RingLight Stealth Edition RL48-B quick start guide

Nauticam 87501 instruction manual

Nauticam

Nauticam 87501 instruction manual

DUR-line SF 2450 B manual

DUR-line

DUR-line SF 2450 B manual

PROAIM P-WV-2PL Assembly manual

PROAIM

PROAIM P-WV-2PL Assembly manual

Vivid CLV-402 user manual

Vivid

Vivid CLV-402 user manual

Makita TD00000111 instruction manual

Makita

Makita TD00000111 instruction manual

manuals.online logo
manuals.online logoBrands
  • About & Mission
  • Contact us
  • Privacy Policy
  • Terms and Conditions

Copyright 2025 Manuals.Online. All Rights Reserved.