Weimer We-1400 User manual

2017:1
/ŶƐƚƌƵĐƟŽŶD ĂŶƵĂů
ĚŝƟŽŶϮϬϭϱ ϭ
K ƌŝŐŝŶĂůŝŶƐƚƌƵĐƟŽŶƐ
Winch
We -1400 / We-1700 / We-2200
English Version
Weimer Skogsteknik & Hydraulik ab
www.weimer.se & www.weimerforest.com
>ĂĚĚĂŶĞƌŝŶƐƚƌƵŬƟŽŶĞƌ Žǁ ŶůŽĂĚŝŶƐƚƌƵĐƟŽŶƐ
Download-Anweisungen / Lataa ohjeet
www.weimer.biz/instr

2
2017:1
ĞĐůĂƌĂƟŽŶŽĨŽŶĨŽƌŵŝƚLJ
/ŶĂĐĐŽƌĚĂŶĐĞǁ ŝƚŚh D ĂĐŚŝŶĞƌLJ ŝƌĞĐƟǀ ĞϮϬϬϲ ϰϮ ' ;&^ϮϬϬϴ ϯ Ϳ
We, Weimer Skogsteknik & Hydraulik ab, Råskog, 575 91 Eksjö, hereby declares that
hydraulic winch :
Model: We-1400 / We-1700 / We-2200
ƚŽǁ ŚŝĐŚƚŚŝƐĚĞĐůĂƌĂƟŽŶƌĞůĂƚĞƐŝƐŝŶĐŽŶĨŽƌŵŝƚLJǁ ŝƚŚƚŚĞD ĂĐŚŝŶĞƌLJ ŝƌĞĐƟǀ ĞϮϬϬϲ ϰϮ '
Urban Johansson
Managing Director
Weimer Skogsteknik & Hydraulik ab
Delivery year 2017
Content
EU-Konformitätserklärung……………………………………………………………………………………………. 2
/ŶƚƌŽĚƵĐƟŽŶ...... 3
Warranty 2014 ................................................................................................................. 3
Winch and components .................................................................................................... 4
dĞĐŚŶŝĐĂůƐƉĞĐŝĮĐĂƟŽŶ. 4
^ĂĨĞƚLJŝŶĨŽƌŵĂƟŽŶ... 5
KƉĞƌĂƟŶŐŝŶƐƚƌƵĐƟŽŶƐ. 5
Maintenance and service ................................................................................................. 5
DŽƵŶƟŶŐ....... 6

3
2017:1
/ŶƚƌŽĚƵĐƟŽŶ
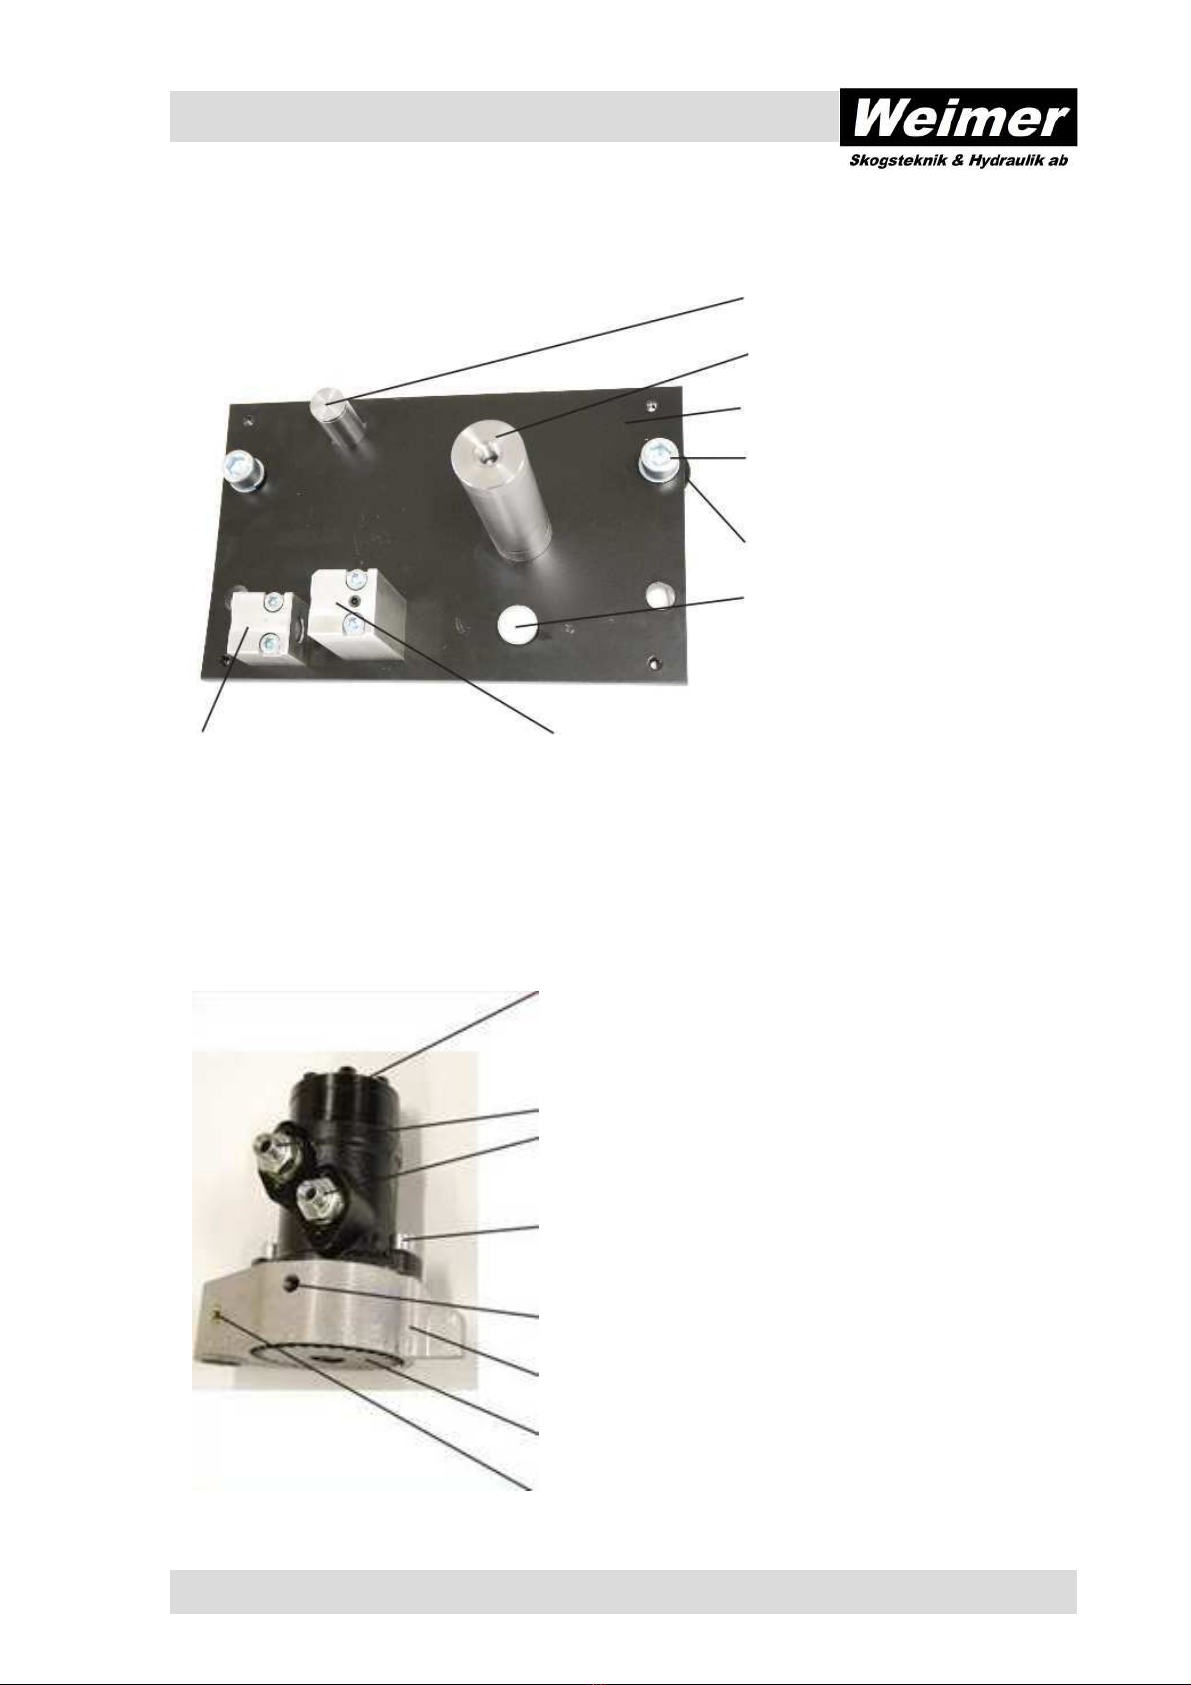
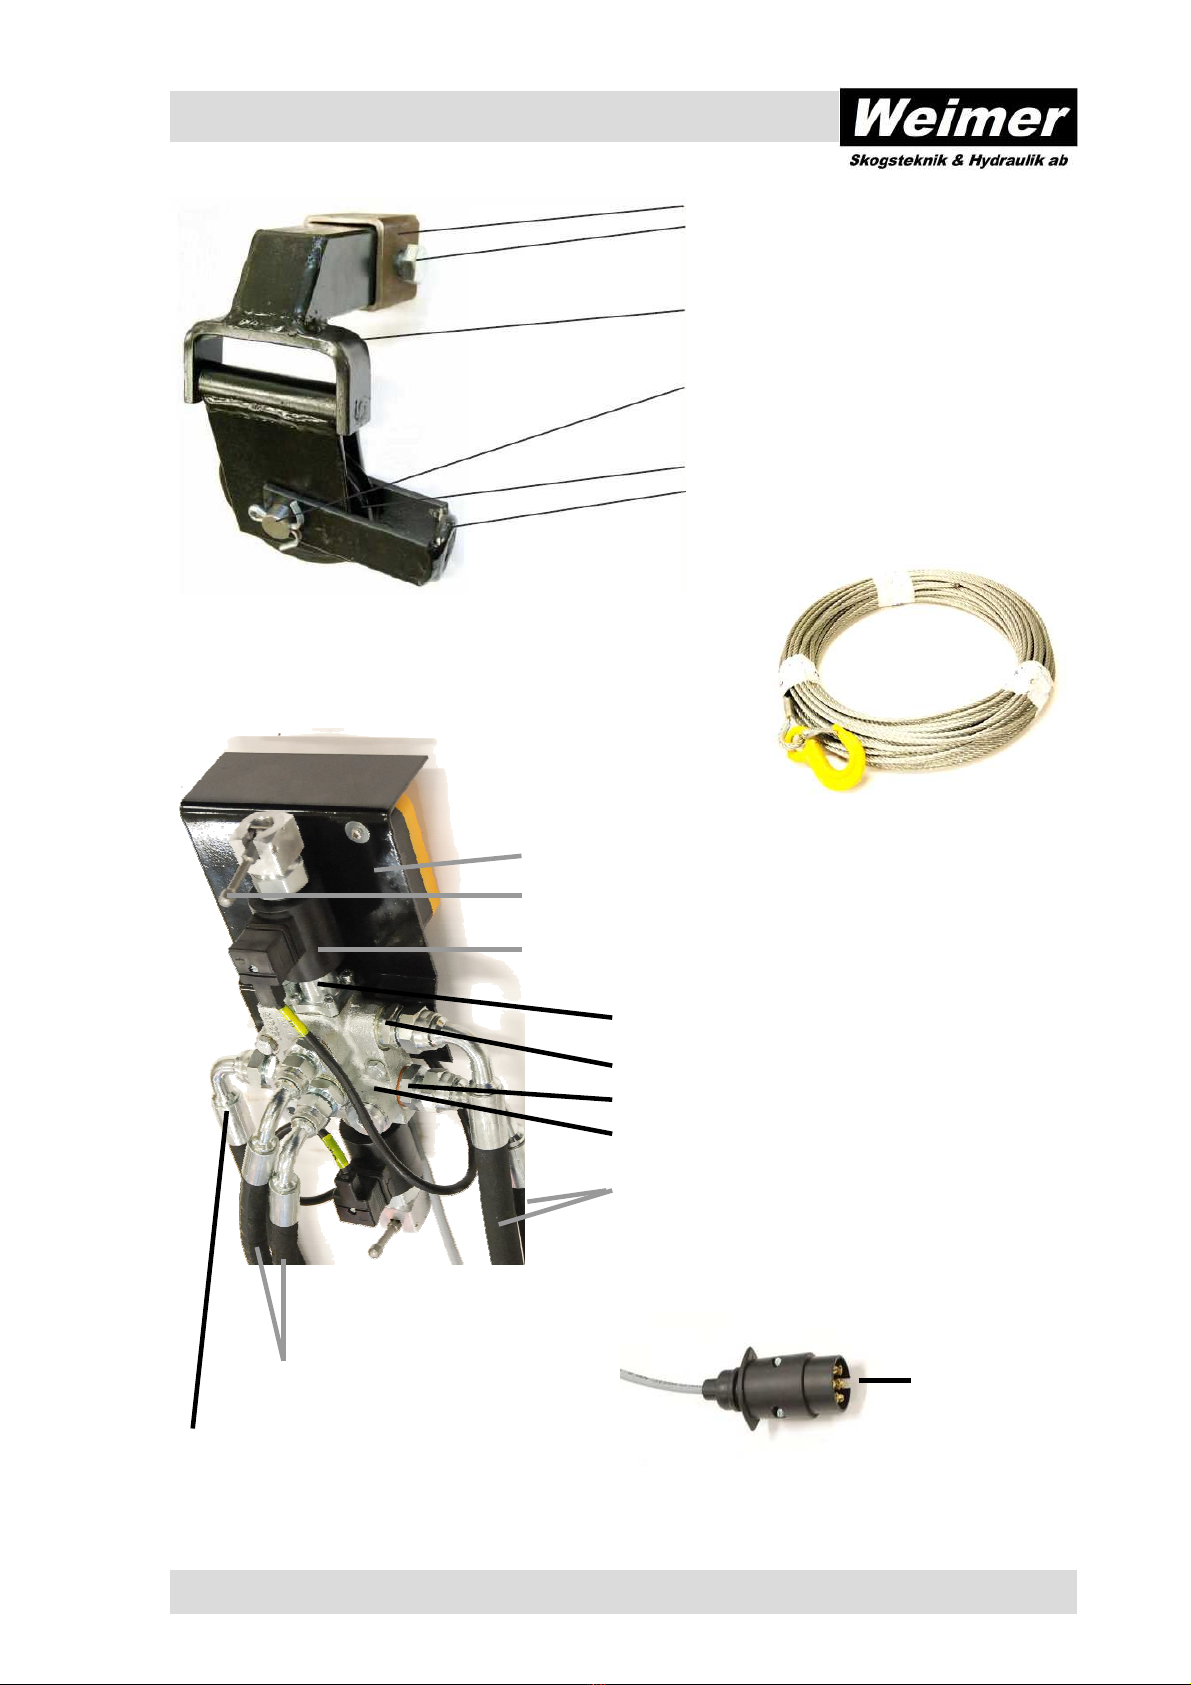
The hydraulic winch We-1400, We-1700, We-2200 M3 is assembled on a crane.The winch is
controlled with a control lever on the carriage and by radio. We thank you for the purchase
ŽĨƚŚŝƐŚLJĚƌĂƵůŝĐǁ ŝŶĐŚĂŶĚŚŽƉĞƚŚĂƚLJŽƵǁ ŝůůďĞĨƵůůLJƐĂƟƐĮ ĞĚǁ ŝƚŚƚŚĞƉƌŽĚƵĐƚ
Manufacturer: Weimer Skogsteknik & Hydraulik ab
Råskog
575 91 Eksjö
Phone: +46 381 710 10
E-mail: [email protected]
Website: www.weimer.se and www.weimerforest.com
This manual contains guidelines for your maintenance of the hydraulic winch. Read this ma-
ŶƵĞůĂŶĚĂƐƐƵƌĞƚŚĂƚLJŽƵŚĂǀ ĞƵŶĚĞƌƐƚŽŽĚƚŚĞƉƌŝŶĐŝƉůĞŽĨŽƉĞƌĂƟŽŶŽĨƚŚĞƉƌŽĚƵĐƚďĞĨŽƌĞ
ŽƉĞƌĂƟŶŐƚŚĞǁ ŝŶĐŚ dŚĞŵĂŶƵĂůĚĞƐĐƌŝďĞƐƚŚĞĂƐƐĞŵďůLJ ŵĂŝŶƚĞŶĂŶĐĞĂŶĚƐĞƌǀ ŝĐŝŶŐŽĨƚŚĞ
ĚĞǀ ŝĐĞ &ŽůůŽǁ ƚŚŝƐŵĂŶƵĂůƚŽĞŶƐƵƌĞƌĞůŝĂďůĞĂŶĚĨĂƵůƚůĞƐƐŽƉĞƌĂƟŽŶ
ƚŽŐĞƚŚĞƌǁ ŝƚŚĐŽŶƟŶƵĂŶĐĞŽĨǀ ĂůŝĚŝƚLJŽĨƚŚĞŵĂŶƵĨĂĐƚƵƌĞƌ ƐŐƵĂƌĂŶƚĞĞ &ŽƌĞdžƚĞŶƐŝǀ ĞŵĂŝŶͲ
tenance or repair works contact your retailer or Weimer Skogsteknik & Hydraulik. Weimer
ƌĞƐĞƌǀ ĞƚŚĞƌŝŐŚƚƚŽŵĂŬĞĐŚĂŶŐĞƐǁ ŝƚŚŽƵƚŶŽƟĐĞ ' ŽŽĚůƵĐŬǁ ŝƚŚLJŽƵƌŶĞǁ ŚLJĚƌĂƵůŝĐǁ ŝŶĐŚ
from Weimer.
Warranty 2014
Weimer Skogsteknik & Hydraulik´s own manufactured forest products have two years war-
ranty. Products that derive from third-party vendor has one year warranty, such as motor,
ǀ Ăůǀ ĞĂŶĚƌĂĚŝŽƵŶŝƚ dŚĞǁ ĂƌƌĂŶƚLJĐŽǀ ĞƌƐŽŶůLJƚŚĞŝŶŝƟĂůĞƌƌŽƌƐ ŝ Ğ ĞƌƌŽƌƐƚŚĂƚĞdžŝƐƚĞĚŝŶ
the product upon delivery, and is valid from delivery date. Warranty does not co-
ver handling errors, bad luck injuries or if the product is used under abnorm-
al circumstances such as usage of impure oils or high heat ĐŽŶĚŝƟŽŶƐ
If any product should break during normal use, contact Weimer Skogsteknik & Hydraulik
Į ƌƐƚĂŶĚƚŚĞƌĞĂŌĞƌƐĞŶĚďĂĐŬƚŚĞĚĞĨĞĐƟǀ ĞŐŽŽĚƐ /Ĩǁ ĞĮ ŶĚĚĞĨĞĐƚƐŝŶŵĂƚĞƌŝĂůƐŽƌǁ ŽƌŬͲ
manship, we will repair the goods or send you a new product. If necessary, the product will
be returned to third-party manufacturer for warranty processing. Warranty claims are not
ĂĐĐĞƉƚĞĚŽŶĂƐƐĞŵďůLJ ĚŝƐĂƐƐĞŵďůLJ ƌĞƉĂŝƌƐĂƚŽƚŚĞƌǁ ŽƌŬƐŚŽƉ ĐŽŶƐĞƋƵĞŶƟĂůĚĂŵĂŐĞƐ
ĐĂƵƐĞĚďLJƚŚĞĚĞĨĞĐƟǀ ĞƉƌŽĚƵĐƚ ŵĂĐŚŝŶĞĚŽǁ ŶƟŵĞĂŶĚůŽƐƚƉƌŽĚƵĐƟŽŶ dŚĞǁ ĂƌƌĂŶƚLJŝƐ
not valid if the product has been modified so that it deviates from its original version e.g. by
ŵŽĚŝĮ ĐĂƟŽŶ ƐĞƫ ŶŐƐ ĂĚĚ-ĐŽŶƐƚƌƵĐƟŽŶŽƌƌĞƉůĂĐĞŵĞŶƚŽĨƉĂƌƚƐŶŽƚƐƵƉƉůŝĞĚďLJt ĞŝŵĞƌ
&Žƌǁ ĂƌƌĂŶƚLJƌĞƚƵƌŶ ƚŚĞƉƌŽĚƵĐƚƚLJƉĞ ƉƌŽĚƵĐƟŽŶŶƵŵďĞƌĨŽƌŵĂŶƵĨĂĐƚƵƌĞĚŐŽŽĚƐ ĚĞůŝͲ
very date and the name and address of purchaser should be included in the shipment.

4
2017:1
Winch and components
Check the delivery before assembly so that all parts are available.
dĞĐŚŶŝĐĂůƐƉĞĐŝĮ ĐĂƟŽŶ
Winch excl. hose and valve Winch with
manual valve
Winch with
radio control
Winch part Winch part Winch part
D ŽƵŶƟŶŐŝƌŽŶǁ ŝƚŚďƌĂĐŬĞƚƐ D ŽƵŶƟŶŐŝƌŽŶǁ ŝƚŚďƌĂĐŬĞƚƐ D ŽƵŶƟŶŐŝƌŽŶǁ ŝƚŚďƌĂĐŬͲ
ets
Wire
6 mm & 40 meter alt.
8 mm & 35 meter
Wire
6 mm & 40 meter alt.
8 mm & 35 meter
Wire
6 mm & 40 meter alt.
8 mm & 35 meter
Snatch block Snatch block Snatch block
2 pcs 3/8” hose 2 pcs 3/8” hose
Manual valve Electric valve
Couplings and a plate Couplings and a plate
2 pcs 1/2” hose 3 pcs 1/2” hose
Radio unit
We-1400 We-1700 We-2200
Pulling force at 175 bar 1 400 kp 1 700 kp 2 200 kp
Wire speed at flow 40L/min 0,45 m/sec 0,36 m/sec 0,29 m/sec
Wire with hook / length 6 mm / 40 m 8 mm / 35 m 8 mm / 35 m
Weight winch 45 kg 45 kg 45 kg

5
2017:1
^ĂĨĞƚLJŝŶĨŽƌŵĂƟŽŶ
ZĞĂĚƚŚĞŝŶƐƚƌƵĐƟŽŶŵĂŶƵĂůďĞĨŽƌĞŽƉĞƌĂƟŶŐƚŚĞǁ ŝŶĐŚ
Risk zone of winching is 50 meters. Before and during the work, ensure that no unaut-
ŚŽƌŝnjĞĚƉĞƌƐŽŶŝƐŝŶƚŚĞƌŝƐŬnjŽŶĞĂŶĚĞŶƐƵƌĞŐŽŽĚǀ ŝƐŝďŝůŝƚLJŽǀ ĞƌƚŚĞĞŶƟƌĞŽƉĞƌĂƟŶŐ
range.
Consider the risk of overturning at all winching. For increased stability, use the sup-
ƉŽƌƚůĞŐƐĂŶĚƉŽƐŝƟŽŶƚŚĞĐƌĂŶĞĂƉƉƌŽƉƌŝĂƚĞůLJ ^ƚĂŶĚĂƚĂƐĂĨĞĚŝƐƚĂŶĐĞŝĨƚŚĞĐĂƌƌŝĂŐĞ
would topple over.
Check every workday that the wire is intact. If snatch block, wire or hook deficiencies,
it will be thrown out with great force. Be sure to keep a safe distance.
Connect the wire near the log's end for safer winching.
ŽŶŽƚƵƐĞƚŚĞǁ ŝŶĐŚĨŽƌƚƌĞĞĨĞůůŝŶŐ ƚŽǁ ŝŶŐŽƌůŝŌŝŶŐ
Make sure you know how to switch off the winch and tractor quickly in an emergency
ƐŝƚƵĂƟŽŶ
K ƉĞƌĂƟŶŐŝŶƐƚƌƵĐƟŽŶƐ
&ŽůůŽǁ ƚŚĞŝŶƐƚƌƵĐƟŽŶƐĨŽƌŝŶƐƚĂůůĂƟŽŶĂŶĚŵĂŬĞƐƵƌĞĞǀ ĞƌLJƚŚŝŶŐŝƐĐŽŶŶĞĐƚĞĚĐŽƌƌĞĐƚůLJ
^ƚĂƌƚƚŚĞŽŝůŇŽǁ ĂŶĚŵŽǀ ĞƚŚĞůĞǀ Ğƌ ůĞǀ ĞƌƐĨƌŽŵƚŚĞǀ Ăůǀ ĞƵŶƟůƚŚĞŵŽƚŽƌƐƚĂƌƚƐƐƉŝŶŶŝŶŐ
ŚĞĐŬƚŚĂƚƚŚĞŵŽƚŽƌĐŽŶŶĞĐƚƐĂŶĚĚŝƐĐŽŶŶĞĐƚƐƐĂƟƐĨĂĐƚŽƌLJ &ŽƌƌĂĚŝŽĐŽŶƚƌŽů ƐƚĂƌƚƚŚĞ
ƚƌĂŶƐŵŝƩ ĞƌďLJƉƌĞƐƐŝŶŐĂŶĚŚŽůĚŝŶŐƚŚĞK E ďƵƩ ŽŶĨŽƌĂĨĞǁ ƐĞĐŽŶĚƐ dĞƐƚĚƌŝǀ ĞďLJ
ƉƌĞƐƐŝŶŐ/E ĂŶĚK h dĂĨĞǁ ƟŵĞƐ /ĨƚŚĞǁ ŝŶĐŚŝŶŐĚŝƌĞĐƟŽŶĚŽĞƐŶŽƚŵĂƚĐŚ/E K h dďƵƩ ŽŶƐ
switch the cables on the valve and test drive again.
Maintenance and service
Check regularly that
ĂůůƐĐƌĞǁ ƐĂŶĚŶƵƚƐĂƌĞƟŐŚƚ
the wire is intact and free of rust. Replace or lubricate the wire if damaged or rusty.
ƚŚĞŚLJĚƌĂƵůŝĐƐLJƐƚĞŵŝƐƟŐŚƚĂŶĚŶŽƚůĞĂŬŝŶŐ
the hoses are intact and there is no oil leaks.
the electric cables are undamaged and connectors are OK.
>ƵďƌŝĐĂƟŽŶŝŶƐƚƌƵĐƟŽŶƐ
>ƵďƌŝĐĂƚĞŵŽƚŽƌďƌĂĐŬĞƚĂŶĚƚŚĞǁ ŝƌĞǁ ŚĞĞůĞǀ ĞƌLJϴŚŽƵƌƐ /ƚŝƐďĞƩ ĞƌƚŽůƵďƌŝĐĂƚĞĨƌĞͲ
ƋƵĞŶƚůLJƌĂƚŚĞƌƚŚĂŶƵƐĞůĂƌŐĞĂŵŽƵŶƚƐŽĨůƵďƌŝĐĂŶƚĂƚĂƐŝŶŐůĞƟŵĞ ŚĂŶŐĞĚĂŵĂŐĞĚ
ůƵďƌŝĐĂƟŽŶŶŝƉƉůĞƐ
If winching in or out is difficult, spray some lubricant behind the drum.
ŌĞƌůƵďƌŝĐĂƚĞƚŚĞǁ ŝƌĞǁ ŚĞŶŶĞĐĞƐƐĂƌLJ
Use hydraulic oil 46 or ƐLJŶƚŚĞƟĐenvironmentally approved oils. Vegetable oil is not recom-
mended since it contributes to abnormally high wear and can cause problems with
the valves.

6
2017:1
D ŽƵŶƟŶŐ
Hold the fixture on the boom side plate.
Put the winch as far forward as possible
in height or below the top of the boom,
see dimension drawing above.
Mark and grind clean of paint.
Measure and weld.
It is very important that the brackets
ĂŶĚǁ ŝƌĞǁ ŚĞĞůĂƩ ĂĐŚŵĞŶƚĂƌĞŝŶůŝŶĞ
if not build up with plates.
t ĞůĚƚŚĞǁ ŝƌĞǁ ŚĞĞůĂƩ ĂĐŚŵĞŶƚŽŶƚŚĞ
boom plates as far as possible from the
winch.
Mount the winch in place.
ŝŵĞŶƐŝŽŶĂŶĚĂƩ ĂĐŚŵ ĞŶƚƉŽŝŶƚƐ

7
2017:1
t ĞůĚƚŚĞďƌĂĐŬĞƚƚŽƚŚĞǀ Ăůǀ ĞƉůĂƚĞŝŶĂŶĂƉƉƌŽƉƌŝĂƚĞůŽĐĂƟŽŶĂŶĚĐŚĞĐŬƚŚĂƚŚŽƐĞ ǀ Ăůǀ Ğ
ĂŶĚƌĂĚŝŽĚĞǀ ŝĐĞĂƌĞƉƌŽƚĞĐƚĞĚĂŶĚĨƵŶĐƟŽŶĂů ƐƐĞŵďůĞƚŚĞŚLJĚƌĂƵůŝĐŚŽƐĞƐĂƐďĞůŽǁ
image:
Start by rolling up the wire, this is very im-
portant.
Assemble the wire in the drum. Ensure
that the wire goes into the correct side of
the drum.
Lubricate the wire during rewinding.
To the winch,
3/8” hose 90°-45°
Return from winch valve,
1/2” hose 90°-IR with adapt
Return to the tractor
Pressure to crane valve
Pressure from tractor,
1/2” hose 90°-UF with quick
coupling

2017:1
Reservdelar/Spare parts/Ersatzteile/Varaosat
1311150-Cylinder 1/Zylinder 1/Sylinteri 1
1311170-Kolv/Piston/Kolben/Mäntä
42019200300-O-ring/O-rengas 19,2x3
42SR020025-Ring/Rengas 20-25
49310055-M10x55 8,8 FZB
1311160-Cylinder 2/Zylinder 2/Sylinteri 2
1311170-Kolv/Piston/Kolben/Mäntä
42019200300-O-ring/O-rengas 19,2x3
42SR020025-Ring/Rengas 20-25
49310110-M10x110 8,8 FZB
49411008-M10x8 SK6SS FZB
1311120
1311130
1311110
49320040-M20x40 8,8 FZB
490620-M20
1311140
131010210-Nylon
131010200-Fjäder / String
Feder / Jousi
5516001-We-1400
5520001-We-1700
5525001-We-2200
75090608-3/8”UF-ϭ Ϯ h &ƌŝůůĞĚ WŽƌĂƩ Ƶϯŵŵ
7500608-3/8”UF-1/2”UF
79508-Tredo 1/2”
49312040-M12x40 8,8 FZB
490612-M12
49410816-M8x16 SK6SS
1311180
1311190
49511-M8x1,25 Nippel/Nippa

2017:1
1311200
45106010-6010 2RS
49411016-M10x16 SK6SS DIN 916
49310050-M10x50 8,8 FZB
1311300
49116030-M16x30 8,8 FZB
490616-M16
7500606-3/8”UFx3/8”UF
70906003-3/8”UF-IR 340mm
4954030-SGA 30
49310020-M10x20 8,8 FZB
490610-M10 Bricka/Aluslevy

2017:1
1311450
49116080-M16x80
490216-D ϭϲE LJůŽĐŬ E LJůŽĐ >ƵŬŝƚƵƐŵƵƩ Ğƌŝ
1311455-ϭ<ŽŵƉůĞƩ ŽŵƉůĞƚĞ dćLJĚĞůůŝŶĞŶ
1311456/57-2
1311490 Axel/Axle/ Achse/Akseli
49530640 Pin/Tappi 6x40mm 2 styck
1311458-1
1311488
1311455-ϭ<ŽŵƉůĞƩ ƚĂůũĂ WƵůůĞLJĐŽŵƉůĞƚĞ
ZŝĞŵĞŶƐĐŚĞŝďĞŶD ϯ ŬŽŵƉůĞƩ
Vajer kompl./Wire compl./Seil kompl./Vaijeri, täydellinen
We-1400 131010900 6mm x 40m
We-1700/2200 131010910 8mm x 35m
70908725-1/2” UF-90° L=2,5m
70906327-3/8” IR-90° L=2,7m
60925-5 Ankarsats/cartridge kit/ Verankerungs-Set/
Patruuna
7500808-1/2”UR-1/2”UF
60935S-Serienippel/Nippa
602519-s ĞŶƟůŬŽŵƉů s Ăůǀ ĞĐŽŵƉů s ĞŶƫ ŝůŝ ƚćLJĚĞůůŝŶĞŶ
70908325-1/2” IR-90° L=2,5m
s ĞŶƟůƉůĊƚ s ĞŶƟůďůĞĐŚ s ĞŶƫ ŝůŝůĞǀ LJ
60925-4 Styrning spak/Level/ Steuerhebel/Vipu
60925-ϳ D ĂŐŶĞƚƐƉŽůĞ ^ŽůĞŶŽŝĚ D ĂŐŶĞƚƐƉƵůĞ D ĂŐŶĞĞƫ ŬĞůĂϭϮs
60925-ϴD ĂŐŶĞƚƐƉŽůĞ ^ŽůĞŶŽŝĚ D ĂŐŶĞƚƐƉƵůĞ D ĂŐŶĞĞƫ ŬĞůĂϮϰs
813210
Contact number
+58R/5 (blue)
-31 (brown)

2017:1
82310 Radio kompl./compl./kompl./täydellinen 2k Åkerströms
82310-ϭZĂĚŝŽƐćŶĚĂƌĞ ZĂĚŝŽƚƌĂŶƐŵŝƩ Ğƌ

Operang Manual Sesam 800 from Åkerströms
Descripon of the Receiver
Sesam 800 RXM 12/24 V DC to winch with cable
installed. The models indicators, connecons and
jumper.
1. Power LED
2. Ground, 0V (-)
3. 12/24 V DC power
Fuse with 3A blad fuse near the baery
4. Internal supply to the outputs (see chap. 8.1)
5-7. Status LEDs
8. Learn/Erase knapp
9. Jumper J1
10. Output LEDs
11. Output connecons 1-6
Fig 1
Fig 2

Operang Manual Sesam 800 from Åkerströms
Sesam 800 M4 4 buon transmier
Sesam 800 M4 transmior indicaon and
buons.
1. Status LED
2. Buon 1-4
Indicators on the Receiver
Led Indicators
The receiver has LED indicators that indicates dierent parameters (see g. 1 for posions of the LEDs).
The indicaons on the LEDs are as follows:
Power LED (see ”1” in g 1)
Indicates whetever the receiver is powered.
LED 5 Squelch (see ”5” in g. 1)
Indicates a detectes signal on the operang frequency band.
LED 6 Status (see ”6” i g. 1)
Indicates that informaon from a transmier paired with the receiver has been received.
LED 7 Learn (see ”7” i g. 1)
Indicates if the transmier is in ”Learn” Mode.
Fig 3
Indicaons on the Transmier
The transmiers are equipped with a status LED indicang the status of the transmission during oper-
aon (see g. 3).
Normal operaon
Quick ashing RED LED = Output is not acvated and there is no feedback from the receiver.
Quick ashing RED then a connuous GREEN LED = Output is acvated in the receiver with feedback.
Baery Warning
Connuous RED LED aer acvang a command = Low baery
3 long RED LED ashes = Baery depleted, transmier cannot send commands.

Operang Manual Sesam 800 from Åkerströms
Operaon
Acvang the Transmier
The transmier is delivered with the baeries not installed. Insert the baeries according to chapter
”Replacing Baeries”.
Acvate the transmier by pushing the start buon ”ON” for 3 seconds. The transmier indicator will
ash GREEN quickly during startup and then ashing GREEN slowly when contact with the receiver is
enabled. The transmier is now enable to control the winch.
Deacvang the Transmier
To prevent unintended acvaon the transmier shall be turned o when not used.
Turn o the transmier by pushing buon ”OFF” for three seconds, the indicator ashes a couple of
quick RED to nish with a long RED. The transmier is now turned o. If you forget to turn o the trans-
mier it will shut itself o aer a me, idle-me (non-use).
Controlling the Device
The winch is controlled via the buons on the transmier.
The relaonship between buons and outputs are:
Buon 1 Winch 1 ”IN”
Buon 2 ”ON” funcon (3 sec.)
* Buon 3 Winch 1 ”OUT”
Learning of Transmier
If any part of the system has been replaced, the receiver and transmier will need to be paired
together.
Dismount the cover of the receiver by remove the plasc caps to reach the screws.
Press the buon ”ON” on the transmier unl the green indicator lights. The transmier is now
acve.
Press the Learn/Erase buon on the receiver unl LED 7 is ON.
The Learn Mode will be acve for 10 seconds (as long as LED 7 is ON).
Press transmier buon 1 ”IN” to pair the transmier to the receiver.
LED 7 blinks three mes if the learning has succeeded.
Install the receiver cover and ghten the six screws to 2.0 Nm
Mount the caps over the screws.

Operang Manual Sesam 800 from Åkerströms
Replacing Baeries
If the indicaon LED on the transmier indicates low baery power, replace the baeries promptly. Be-
fore changing the baeries note that changing of baeries must take place in a clean environment free
from stac electricity.
The baeries are changed as follows:
1. Open the baery cover by unscrewing the 6 outer screws on the rear side of the transmier
housing.
2. Carefulle remove the cover by liing up the top of the baery cover.
3. Remove the used baeries and insert new baeries.
4. Close the cover by rst inserng the rear of the cover into the transmier and then push the top
back down.
5. Tighten the 6 screws (torque 1,0 Nm).
Fig 4
This manual suits for next models
2
Table of contents