weinor Duofix Assembly instructions

Duofix
Instructions for assembly
Version 4
10.12.2019
We reserve the right to make technical changes
Item number
112719-0000
Page 1/35
Duofix
1-unit and multi-section units
Instructions for assembly
ENGLISH
Important notes for retailers/partners and end users
Please read thoroughly before assembly and operation!
These instructions must be kept by the end consumer!

Duofix
Instructions for assembly
Version 4
10.12.2019
We reserve the right to make technical changes
Item number
112719-0000
Page 2/35
List of contents .............................................................. Fehler! Textmarke nicht definiert.
1Important Notes / Safety Notes ...................................................................................4
1.1. Warnings........................................................................................................................... 4
1.2. Tips and recommendations .............................................................................................. 4
1.3. Safety instructions ............................................................................................................ 4
1.4. Fundamental safety instructions ....................................................................................... 4
1.5. Qualifications .................................................................................................................... 5
1.6. Transport .......................................................................................................................... 5
1.7. Lifting with ropes............................................................................................................... 5
1.8. Fixing material .................................................................................................................. 5
1.9. Ladders............................................................................................................................. 5
1.10. Partly mounted awnings ................................................................................................... 5
1.11. Intended use ..................................................................................................................... 6
1.12. Unsupervised operation.................................................................................................... 6
1.13. Reading the operating instructions ................................................................................... 6
1.14. Proper and safe use ......................................................................................................... 6
1.15. Functional description....................................................................................................... 6
1.16. Important........................................................................................................................... 6
2Duofix with screw-in base ...........................................................................................7
2.1 Bases and distances between centre lines ........................................................................... 7
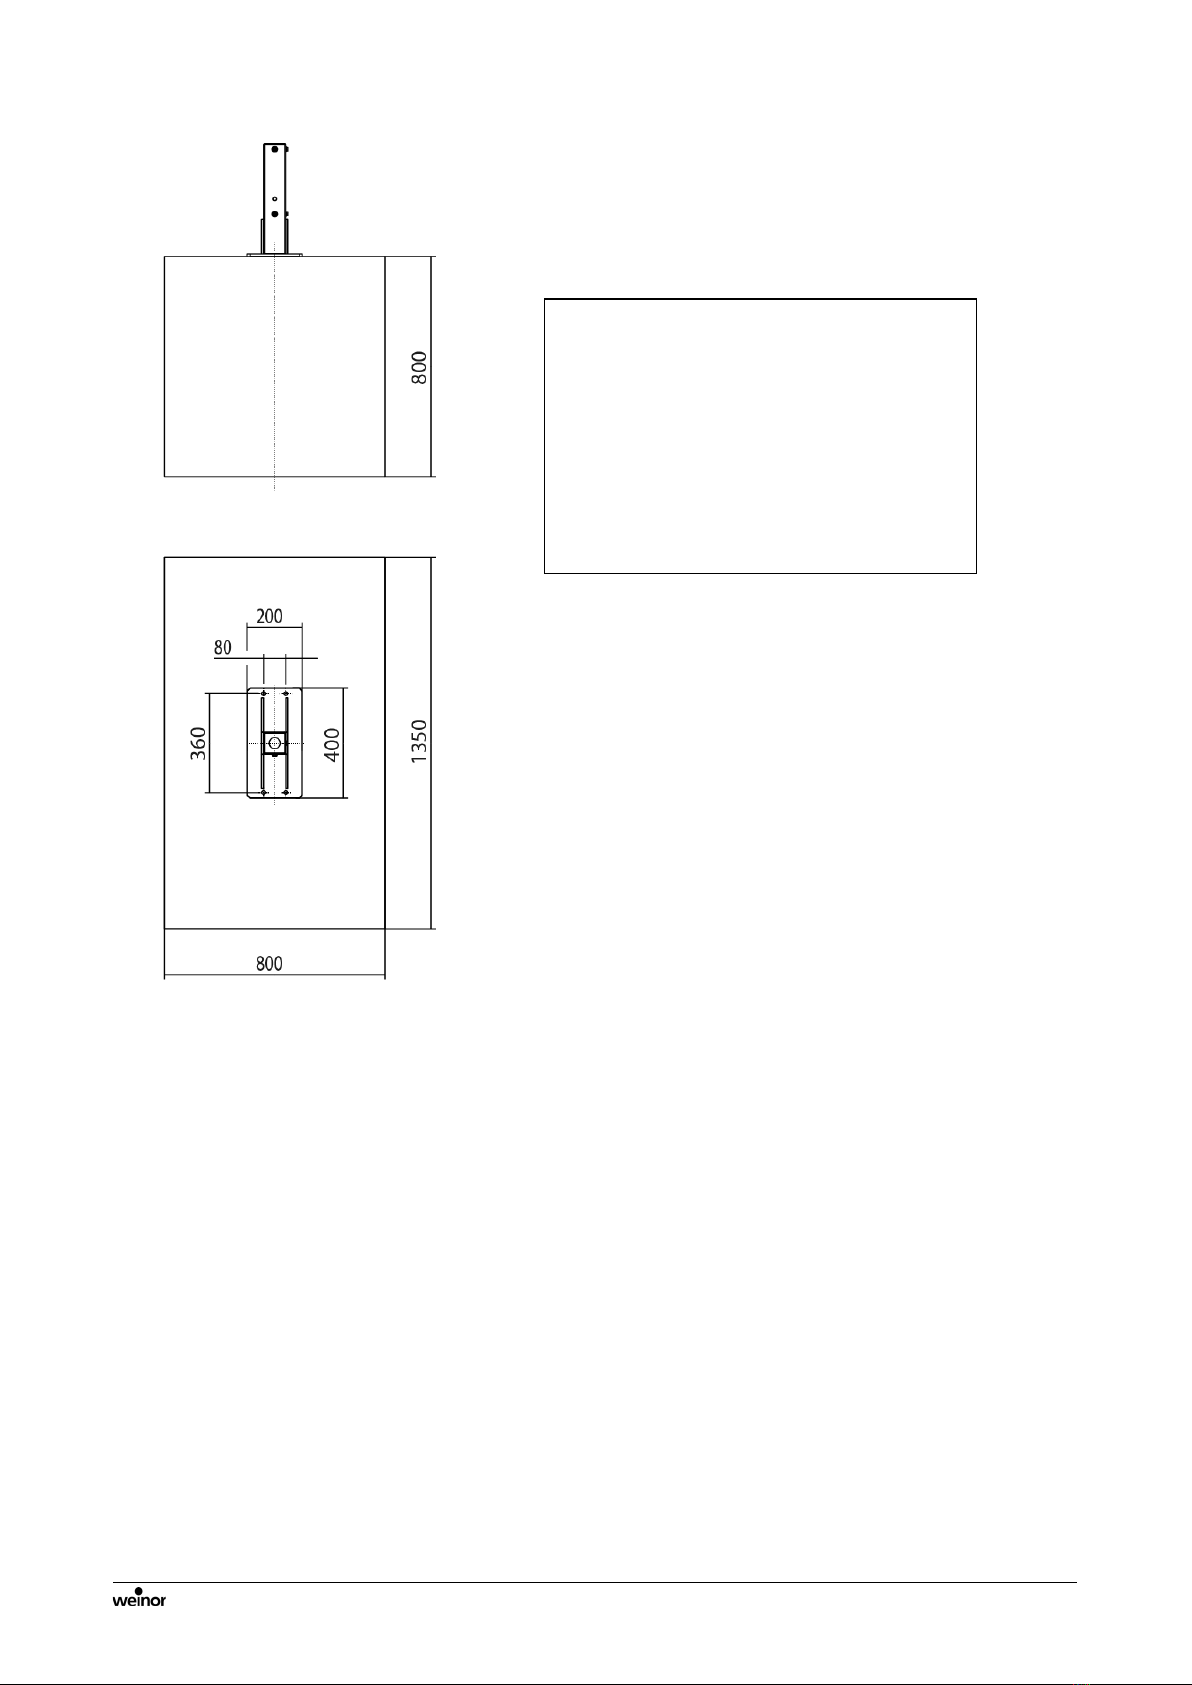
2.2 Base for 1-unit systems......................................................................................................... 8
2.3 Assembly preparation
............................................................................................................ 9
2.4 Installing Duofix on screw-in bases ..................................................................................... 10
2.5 Installing the Duofix in slab bases ....................................................................................... 13
2.6 Note the post is standing up on the ground during this process ......................................... 14
2.7 Storm protection for slab bases........................................................................................... 15
2.8 Installing storm protection ................................................................................................... 15
3Preparing the brackets for the awning installation .................................................16
3.1 Topas .................................................................................................................................. 16
3.2 Opal Design......................................................................................................................... 16
3.3 Plaza Viva ........................................................................................................................... 17
3.4 Topas bracket assembly ..................................................................................................... 18
3.5 Opal bracket assembly........................................................................................................ 19
3.6 Plaza Viva bracket assembly .............................................................................................. 20
3.7 Bolting the top bracket to the crossbeam ............................................................................ 21
3.8 Attaching and bolting the safety shield................................................................................ 22
4Electrical connections ...............................................................................................25
5Functional check ........................................................................................................26
6Operation ....................................................................................................................26
7Fitting multi-section units..........................................................................................27
7.1 Description of multi-section units......................................................................................... 27
7.2 Base for multi-section units at the coupling point ................................................................ 28
7.3 Assembly sequence ............................................................................................................ 30
7.4 Functional check ................................................................................................................. 30
7.5 To check the functions of the unit........................................................................................ 30
8Cleaning ......................................................................................................................31

Duofix
Instructions for assembly
Version 4
10.12.2019
We reserve the right to make technical changes
Item number
112719-0000
Page 3/35
9General notes on the fabric .......................................................................................31
10 Fault analysis..............................................................................................................32
11 Disposal ......................................................................................................................33
12 Handover.....................................................................................................................33
12.1 Handover certificate........................................................................................................ 34

Duofix
Instructions for assembly
Version 4
10.12.2019
We reserve the right to make technical changes
Item number
112719-0000
Page 4/35
1 Important Notes / Safety Notes
1.1. Warnings
•The warnings differentiate between personal injury and damage to property. The signal word
"Danger" is used for personal injury, and "Caution" for property damage.
Immediate danger to life and limb!
Immediate danger to the product and environment!
1.2. Tips and recommendations
Highlights useful tips and information that enable fast and correct installation.
1.3. Safety instructions
•The installation and operating manual must be read and observed.
•Observe the corresponding accident prevention regulations.
•Ensure when installing the awning that all existing electrical connections are disconnected.
•Cordon off a large space around the installation site.
•Check that all scaffolding and building facilities are duly safe and secure.
•Observe the stipulations relating to dowels and fixings.
•Only work with fully intact and appropriate tools.
•Keep plastic sheeting, packaging material and small parts away from children – risk of
suffocation!
•For personal safety, it is important that these instructions are complied with.
•Non-compliance means the manufacturer does not carry any liability.
The customer must retain all instructions, and if the product is sold, they must be given to the new
owner
1.4. Fundamental safety instructions
Personal injury
Risk of personal injury due to improper use of the Terrazza.
Please read and observe the safety instructions contained in this section.
Product and property damage
Risk of damage to the product and property due to improper use of the Terrazza.
Please read and observe the safety instructions contained in this section.
DANGER
IMPORTANT
DANGER
IMPORTANT

Duofix
Instructions for assembly
Version 4
10.12.2019
We reserve the right to make technical changes
Item number
112719-0000
Page 5/35
1.5. Qualifications
The instructions for assembly are aimed at qualified technicians who have knowledge of and are
experienced in the following areas:
•Safety at work, operating safety and accident prevention regulations
•Use of ladders and scaffolding
•Handling and transporting long, heavy components
•Handling and transporting glass panes
•Handling tools and machines
•Fitting the fixing materials
•Estimation of the building structure
•Start-up and operation of the product
If one of these qualifications is lacking, a qualified installation firm must be brought in.
1.6. Transport
The maximum permissible axle loads and gross vehicle weight of the goods vehicles must not be
exceeded. Loading a vehicle can alter its handling characteristics.
The transported goods must be mounted properly and securely. The awning packaging must be
protected against moisture. Softened packaging can come loose and cause accidents. Packaging
which has been opened for incoming goods inspections must be sealed again properly for further
transport. When unloaded, the awning must be carried to the place of installation the right way
round so it does not have to be turned round again in a confined space. The instructions on the
packaging about which way up the awning should be placed must be noted.
1.7. Lifting with ropes
If the awning needs to be raised to a higher level using ropes, the awning must be:
•removed from the packaging;
•attached to the hauling ropes so that it cannot slide out;
•lifted horizontally and evenly. The same applies when disassembling the awning.
1.8. Fixing material
Responsibility for the installation work that is being carried out on-site must always rest with the
foreman; it is not possible to issue uniformly applicable instructions due to the differing
structural conditions and building regulations that apply at every site. Above all, this implies that
all bolts and screws required to affix the weinor roof to the on-site connections (back and side
of house wall, concrete base, etc.) must be suitable for the on-site building conditions and the
statics requirements.
1.9. Ladders
Do not lean ladders against the awning or fix them to the awning. Ladders must be on a firm base
and provide adequate support. Only use ladders with adequate load-bearing capacity.
Anti-fall guards:
Workers run the risk of falling when working at elevated heights.
Suitable fall protection equipment must be used.
1.10. Partly mounted awnings
With awnings which are partly mounted in the factory, secure the spring-tensioned parts (see
labelling) against unintentional opening. Do not remove this until the awning has been fully
installed.
There is a high risk of injury due to the awning parts labelled as
spring tensioned!

Duofix
Instructions for assembly
Version 4
10.12.2019
We reserve the right to make technical changes
Item number
112719-0000
Page 6/35
1.11. Intended use
Awnings may only be used as sun protection.
Alterations such as attaching items or conversions not envisaged by weinor may only be carried
out with weinor's written consent.
Additional loads on the awning caused by hanging objects from it or by anchoring ropes may result
in damage or cause the awning to fall and are therefore not permissible.
1.12. Unsupervised operation
When working in the range of the awning’s movement, the automatic controls must be switched off.
There is a danger of trapping or the system falling down.
Measures must also be taken to ensure that the awning cannot be manually operated
unintentionally. These include cutting off the power source, e.g. by disconnecting the fuses or
removing the connector coupling from the drive. The crank handle must also be removed and
stored safely during manual operation.
If awnings are operated by several users, a priority locking device must be installed
(controlled interruption of power supply from outside), making it impossible to open or retract the
awning at all.
1.13. Reading the operating instructions
Read the operating instructions before using the product for the first time.
For personal safety, it is important that these instructions are complied with.
Non-compliance means the manufacturer does not carry any liability.
The customer must retain all instructions, and if the product is sold,
they must be passed onto the new owner.
All the installation steps described in these instructions and the details about the product must be
observed.
Once the awning has been successfully installed, these instructions must be given to the user and
kept
available.
1.14. Proper and safe use
Duofix has been designed for use as a sun protection unit and – at upwards of 14° - as an outdoor
weather protection unit.
The awning must be retracted whenever winds reach force 5 on the Beaufort scale, or whenever
there are signs of frost or
snowfall.
1.15. Functional description
Only high-quality corrosion resistant materials are used in the Duofix. The profiles are made from
galvanized
and powder coated steel profiles and aluminium. All connecting parts, such as
screws, are made of stainless steel. All outside aluminium parts are powder coated.
1.16. Important
Both awnings must always be open while using the folding arm awnings!
The awnings must only be used up to the permitted wind resistance category!
Open awnings must not be left unattended!
IMPORTANT

Duofix
Instructions for assembly
Version 4
10.12.2019
We reserve the right to make technical changes
Item number
112719-0000
Page 7/35
2 Duofix with screw-in base
2.1 Bases and distances between centre lines

Duofix
Instructions for assembly
Version 4
10.12.2019
We reserve the right to make technical changes
Item number
112719-0000
Page 8/35
2.2 Base for 1-unit systems
Bases may only be laid by professional personnel!
The bases must be mounted on supporting natural frost-free ground beyond the specified cross
sections and dimensions. The applied permissible bearing load of 250 kN/m2 must be responsibly
checked on site, and measures must be taken to stabilise the ground, if applicable.
Watch out for any supply lines at ground level during the excavation work, if applicable.
Use concrete mixes for strength class C20 / 30.
Leave the base concrete to harden for a few days depending on the weather before installing the
screw-in bases.
Carry out drilling samples, if applicable.
The foundations can be unreinforced
from a static point of view. Additional
reinforcement is purely constructive and
not essential.
AVM-BGZ-R (A4) 125 M12 concrete
anchors from Atrion are recommended.
Equivalent products from Fischer or
HILTI can also be used alternatively.

Duofix
Instructions for assembly
Version 4
10.12.2019
We reserve the right to make technical changes
Item number
112719-0000
Page 9/35
Note:
Standard ducts can be poured into the bases for electrical supply lines.
2.3 Assembly preparation
Unpack all the building units belonging to the Duofix mounting system and place them in front of
the
installation location sorted

Duofix
Instructions for assembly
Version 4
10.12.2019
We reserve the right to make technical changes
Item number
112719-0000
Page 10/35
2.4 Installing Duofix on screw-in bases
•Mark the distance between centre lines for the screw-in base installation position on bases
•Screw the corner joint to the crossbeam and post.
What you need:
Consumables pack for corner joint and crossbeam bolting
8.4 washer
M8x30 A2 hexagon head set screw
•Place the screw-in bases in the axis position and compare with the Duofix distance
between centre lines
•Mark the drill positions through the screw-in bases
•Drill boreholes in the bases
•Bolt the screw-in bases to the bases.
8.4 washer
M8x30 hexagon head set

Duofix
Instructions for assembly
Version 4
10.12.2019
We reserve the right to make technical changes
Item number
112719-0000
Page 11/35
Note:
Recommended dowel:
Note:
Make sure the screw-in bases are installed perpendicularly and at the same level, unevenness in
the base can be balanced out using a spackle.
Note:
Only use concrete anchors approved by construction supervision and check the torques specified
by the manufacturer after installation.
•With Duofix with screw-in bases, the square tube stabiliser has to be pushed into the posts
before installing the mounting system to increase the wind resistance.

Duofix
Instructions for assembly
Version 4
10.12.2019
We reserve the right to make technical changes
Item number
112719-0000
Page 12/35
•Position and erect the Duofix frames on the bolted screw-in bases.
Make sure there is sufficient self securing. There is a risk of crushing!
Securing the posts in the screw-in bases:
IMPORTANT

Duofix
Instructions for assembly
Version 4
10.12.2019
We reserve the right to make technical changes
Item number
112719-0000
Page 13/35
What you need:
Consumables pack for Duofix screw-in bases
M8x30 A2 hexagon head set screw
2.5 Installing the Duofix in slab bases
•Screw the levelling feet at the bottom of the slab base frame
•Move the slab bases into the distance between centre lines position.
Note:
The slab bases can be positioned inside or outside the frames.
•Loosely pre-mount the clamping plate with M8x20 A2 countersunk hex head screw and
M8x20 A2 countersunk hex head screw to the frame
•Insert 4 patio plates per frame
•Adjust the Duofix frame pre-mounted in frames as described in sections 3.1 and 3.2

Duofix
Instructions for assembly
Version 4
10.12.2019
We reserve the right to make technical changes
Item number
112719-0000
Page 14/35
2.6 Note the post is standing up on the ground during this process
•Screw the AM12x400-A2 threaded rod for the free-standing awning in the bottom frame
•Place the fabric support rollers on the threaded rods
•Insert more patio plates
•Position the upper frame at an angle to the posts, position them on the patio plates and
both using the clamping plate
•4 more patio plates in the upper frame per slab base
•Bolt the upper frame using M12-A2 hexagon cap nuts and 13-140HV-A2 washers
•Bolt the clamping plate to all positions on the lower and upper frame
•Screw the stiffening plate faceplate onto the clamping plate using two M8x20 A2
countersunk hex head screws
Note:
Square tube stabilisers are not inserted in the posts with slab bases.
Please see the enclosed structural standards for the possible uses of slab bases and use of storm
protection
Or refer to our website in the Duofix product folder.

Duofix
Instructions for assembly
Version 4
10.12.2019
We reserve the right to make technical changes
Item number
112719-0000
Page 15/35
2.7 Storm protection for slab bases
In the event of hurricane warnings, storm protection is inserted on Duofix with slab bases
depending on the wind zone and territory category.
Note:
If portable Duofix awnings are used in different places, the use of storm protection must be
protected every time at the respective location.
2.8 Installing storm protection
•Replace the hexagon cap nuts on the slab bases with M12-A2 ring nuts with steel rope
•Replace the hexagon cap nuts on the post with M10-A2 ring nuts with steel rope
•Connect the eyebolts using a M6 turnbuckle and set the tension evenly on both sides.

Duofix
Instructions for assembly
Version 4
10.12.2019
We reserve the right to make technical changes
Item number
112719-0000
Page 16/35
3 Preparing the brackets for the awning installation
Three kinds of awnings can be installed on Duofix:
3.1 Topas
Consumables, bag of, for affixing Topas to bracket 85
3.2 Opal Design
Consumables pack for bolting the Opal to 180 bracket

Duofix
Instructions for assembly
Version 4
10.12.2019
We reserve the right to make technical changes
Item number
112719-0000
Page 17/35
3.3 Plaza Viva
Consumables pack for bolting the Plaza Viva to 180 bracket
Fix the brackets to the Duofix crossbeam in accordance with the provided awning installation
instructions.
Attachment for Topas with roof Attachment for Opal Design II Attachment for Plaza Viva

Duofix
Instructions for assembly
Version 4
10.12.2019
We reserve the right to make technical changes
Item number
112719-0000
Page 18/35
3.4 Topas bracket assembly

Duofix
Instructions for assembly
Version 4
10.12.2019
We reserve the right to make technical changes
Item number
112719-0000
Page 19/35
3.5 Opal bracket assembly

Duofix
Instructions for assembly
Version 4
10.12.2019
We reserve the right to make technical changes
Item number
112719-0000
Page 20/35
3.6 Plaza Viva bracket assembly
Please see the relevant instructions for installing the different weinor products, Plaza Viva, Topas
and Opal Design II, to Duofix.
Table of contents
Other weinor Patio Furniture manuals
Popular Patio Furniture manuals by other brands

Shadowspec
Shadowspec SERENITY ROTATING CANTILEVER UMBRELLA owner's manual

Jysk
Jysk NAPPEDAM 3780480 manual

Alice's Garden
Alice's Garden HARDELOT BU300 quick start guide

Treasure Garden
Treasure Garden UM801 Assembly and operation guide

Costway
Costway NP10965-22 manual

JARDINICO
JARDINICO JCP.4 Series Assembly and adjustment