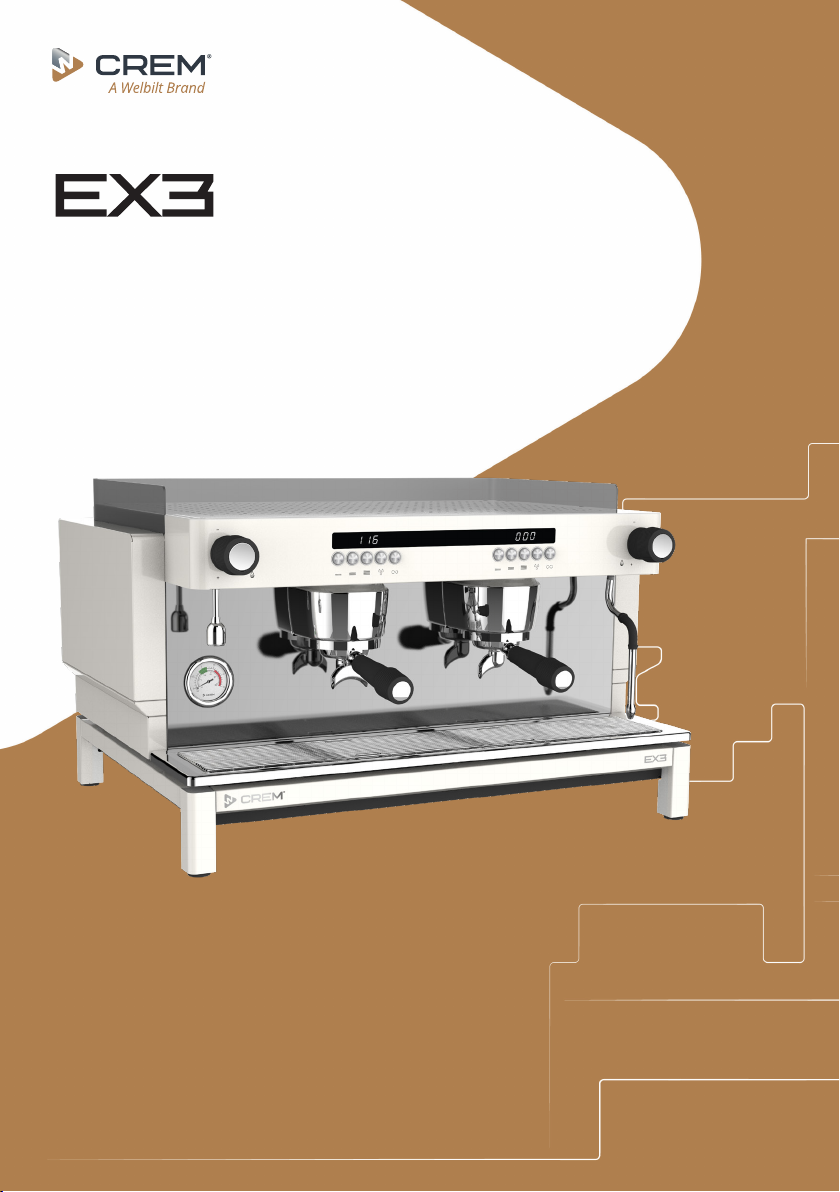
Welbilt Crem EX3 Series User manual

User Manual
UM_EN
Part No.: 1964211_06
Crafted for every taste

2Original instructions.
CONTENTS 2
MANUAL REVISIONS 5
NOTIFICATIONS 6
· Explanation of descriptions 6
GENERAL INFORMATION 7
· Introduction 7
· General instructions 7
· Intended use 8
· Warnings and Precautions 8
TRANSPORT 11
· Packaging 11
· Delivery inspection 11
STORAGE AND DISPOSAL 12
· Long-term storage requirements 12
· Machine disposal requirements 12
· Caution 12
TECHNICAL SPECIFICATIONS 13
· EX3 1GR MINI & 2GR MINI machine data 13
· EX3 1GR MINI & 2GR MINI versions accessories 13
· EX3 1GR MINI & 2GR MINI versions front view 14
· EX3 1GR MINI & 2GR MINI versions bottom view 14
· EX3 1GR MINI & 2GR MINI versions external dimensions 15
· EX3 2GR machine data 16
· EX3 2GR versions accessories 16
· EX3 2GR versions front view 17
· EX3 2GR versions bottom view 17
· EX3 2GR versions external dimensions 18
BUTTONS AND CONTROLS 19
· Machine controls 19
INSTALLATION AND START UP 20
· Machine positioning 20
· Mains water connection 21
CONTENTS

3
Original instructions.
CONTENTS
· Water lter requirements 21
· Boiler pressure and temperature information 22
· Drain connection checklist 22
· Electrical connection checklist 23
· Initial starting procedure 24
· Machine handling tips 24
OPERATION 25
· Inserting the portalter in the group 25
· Espresso brewing 25
· Steaming and frothing milk 26
· Dispensing hot water - Automatic hot water control 26
· Dispensing hot water - Manual hot water control 26
CLEANING AND CARE 27
· Cleaning reminders 27
· Daily cleaning – At the end of each working day be sure to: 27
· Daily ushing - Control version 27
· Daily ushing - Display version 28
· Weekly cleaning or Periodical cleaning and care – Once per week be sure to: 28
· Weekly cleaning with espresso machine detergent per week be sure to: 28
USER PROGRAMMING - CONTROL VERSIONS 29
· Additional button functions 29
· Programming the coee dosage 29
USER PROGRAMMING - DISPLAY PID VERSIONS 30
· Programming the coee / tea dosage 30
· User menu – Access & browsing 30
· User menu – Settings summary chart 30
· t0 – Boiler temperature 31
· cro – Enabling / Disabling Chrono setting 31
· Pi1 – Pi2 – Pi3 – Enabling / Disabling preinfusion on each group 31
· Eco – ‘Eco mode’ timing setting 31
· Std – ‘Eco mode stand-by’ timing setting 32
· SLc – Service liter counter 32
· Scc – Service coee counter 32
· tot – Total counters 33
· cLo – Clock setting 33
· AUt – Auto On/O setting 33

4Original instructions.
CONTENTS
MACHINE ALERTS 34
· Alarms and warnings 34
TROUBLESHOOTING 35
· Machine faults 35
· Brewing faults 35
· Limescale faults 35

5
Original instructions.
MANUAL REVISIONS
Rev. #: Date: TSB#: Change Description
01 Oct. 08, 2019 None First draft released for technical review and
validation testing.
02 Oct. 30, 2019 None Modify layout, add programming instructions.
03 Dec. 03, 2019 None Revise instructions based on Service Dept input.
04 Dec. 06, 2019 None Add contact information.
05 Feb. 05, 2020 None Add display PID programming instructions (rev1.04).
06 Apr. 03, 2020 None Add EX3 Mini Technical Specications.

6Original instructions.
NOTIFICATIONS
· Explanation of descriptions
There are ve dierent levels of notication intensity within this
manual, as identied by the signal terms: DANGER, WARNING,
IMPORTANT, NOTE and PRO TIP. The level of risk and importance
of the notication is determined by the following denitions.
Always observe the warnings to ensure safety and prevent
potential injury and product damage.
Important:
Alerts against unsafe practices. Observe Important
notications to ensure food safety, prevent possible
minor personal injury, or damage to the machine.
WARNING:
Indicates a potentially hazardous situation which, if the
WARNING is ignored, could result in serious injury or
even death.
DANGER:
INDICATES AN IMMINENTLY HAZARDOUS SITUATION
WHICH, IF NOT AVOIDED, WILL LIKELY RESULT IN
SERIOUS INJURY AND EVEN DEATH.
Note:
Gives additional information which may be helpful
during the operation, routine maintenance, and
cleaning of the machine.
Pro Tip:
Gives helpful hints and suggestions from the
manufacturer that take the guesswork out of choosing
settings and care intervals.
i

7
Original instructions.
GENERAL INFORMATION
· Introduction
Thank you for choosing an EX3 espresso machine. We hope
you enjoy it !
Please read this user manual carefully before using the machine.
This manual contains important instructions regarding safe
intended use of the machine.
Do not discard this manual, it will be useful for future reference.
If damaged or lost, request a new copy from the manufacturer/
distributor or download a free PDF copy via:
www.creminternational.com/downloads
· General instructions
Machine installation and certain maintenance operations should
only be performed by qualied service personnel.
All safety instructions and warnings contained in this manual should be
observed at all times to ensure safe installation, use, and maintenance.
Do not attempt to remove covers or safety shields to access the
interior of this machine or make repairs. Repairs should be made
by an authorised technician or service centre.
Owners are liable for ensuring that users have been properly trained
to operate the machine and understand the potential risks involved.
The owner or installer will be liable for all non-authorised
modication of the machine.Non-authorised alteration
or modication of the machine will immediately void the
manufacturer’s warranty.
This manual references the machine at the time of sale. The
commercial availability of subsequent versions including
modications, upgrades or adaptations does not oblige the
manufacturer to apply any changes to this machine, nor is it
obliged to update the documentation supplied.
The manufacturer reserves the right to withdraw currently
available manuals whenever deemed appropriate and reasonable.
Periodically, some updates and changes may be required for this
machine. In this event, a technician will be responsible for ensuring
the change is made in accord with manufacturer’s specications.
Note:
The manufacturer is not liable for damage to persons or property
resulting from failure to follow the instructions, warnings and precautions
listed in this manual when installing and using this machine.

8Original instructions.
· Intended use
· Warnings and Precautions
The coee machine has been designed and manufactured to make
espresso coee and other hot drinks (e.g., steaming and frothing
milk). Do not use it for any other purpose.
The machine is intended to be
used by trained personnel for
preparing foodstus.
This machine is not intended for use in industrial kitchens,
domestic kitchens, or similar locations.
The manufacturer will not be held liable for damage to persons
or property due to incorrect, improper or negligent use by
nonprofessional personnel.
The A-weighted sound pressure level is below 70 dB.
To ensure optimal performance, install the machine in a location
where these parameters will not be exceeded:
- Maximum inlet water pressure: 0.9MPa (9 Bar), or 1.0MPa (10
Bar) [only for Norway, Sweden and Denmark]
- Minimum inlet water pressure:
0.0MPa (0 Bar)
Note: For a suitable performance of machine, maximum inlet water
pressure should be kept between 0.8-0.9MPa. Install a pressure
reducer in case water pressure exceeds this range.
- Maximum inlet water temperature: 40ºC
- Ambient temperature between +10ºC (min.) and +40ºC (max.).
Install the machine in a horizontal position and away from heat
sources and ammable objects.
Appliance is only to be installed in locations where its use
and maintenance is restricted to trained personnel. Access to
the service area is restricted to persons having knowledge and
practical experience of the appliance, in particular as far as
safety and hygiene are concerned.
This machine should only be installed on a water-resistant work
surface that is capable of adequately supporting the machine’s weight.
GENERAL INFORMATION

9
Original instructions.
GENERAL INFORMATION
· Warnings and Precautions
The appliance is not suitable for installation in an area where a
water jet could be used. This appliance must not be cleaned
with a water jet or a pressure washer.
The appliance is not suitable for outdoor use, where it would be
exposed to severe weather or extreme temperatures.
The instructions for appliances connected to the water mains by
detachable hose-sets shall state that the new hose-sets supplied
with the appliance are to be used and that old hose-sets should
not be reused.
Use the inlet hose included with the machine to connect it to the
water mains in accordance with the national rules applicable in the
country where machine is installed.
Plug the machine into a properly installed, earth grounded
electrical outlet with line voltage that matches the specications
for the machine.
For appliances not tted with a supply cord and a plug, means for
disconnection must be incorporated in the xed wiring in accordance
with the wiring rules.
Ensure that the power supply voltage does not uctuate by more than 6%.
Position the power cable so that users cannot trip over it. Keep the
power cable away from sharp edges and heat sources.
Do not remove or disable any of the mechanical, electrical, or thermal
protection safety equipment.
If supply cord is damaged, it must be replaced by the manufacturer, its
service agent or similarly qualied persons in order to avoid a hazard.
In case of emergency, (e.g., the machine catches re or becomes
unusually hot or noisy), disconnect the power immediately and turn
o the water supply.
If the machine is not going to be used for an extended period of time,
disconnect the power. When disconnecting the power, pull the plug
rather than the cable.
Keep all hazardous packaging materials, such as plastic bags,
styrofoam, and staples, out of reach of children.
Before performing maintenance and/or moving the machine, disconnect
the machine from the power supply and wait for it to cool down.
To ensure fault-free machine operation, only use manufacturer-
approved replacement parts and accessories.

10 Original instructions.
GENERAL INFORMATION
· Warnings and Precautions
When packed for storage, store the machine in a dry place with an
ambient temperature above 5ºC. Boxes may be stacked up to three
units high of the same model. Do not place other heavy items on top
of the box.
If the machine is likely to be exposed to temperatures below 0ºC during
handling and transport, make sure that service personnel empty the
boiler and water system. (The machine’s boiler and water system are
empty when delivered from the factory.)
Never immerse the machine, plug or power cable in water, as there is a
risk of electric shock.
Place the machine out of reach of children.
This appliance is not intended for use by persons (including children)
with reduced physical, sensory or mental capabilities, or lack of
experience and knowledge, unless they have been given supervision
or instruction concerning use of the appliance by a person responsible
for their safety.
Note: safety regulation not valid for Europe.
Specic safety regulation for Europe:
This appliance can be used by children aged from 8 years and above
and persons with reduced physical, sensory or mental capabilities or
lack of experience and knowledge if they have been given
supervision or instruction concerning use of the appliance in a safe
way and understand the hazards involved. Children shall not play
with the appliance. Cleaning and user maintenance shall not be
made by children without supervision.
Do not use the machine if the power cable or plug is damaged,
or the machine has been dropped. Contact a service technician for
repairs or to ensure that it is safe for use.
Do not place any liquids on the machine.
Do not touch the machine’s hot surfaces or dispensing equipment.
Do not touch the machine if your hands or feet are wet.
Do not operate the machine if any part except the dispensing
equipment is wet.
Do not block the vents with rags or other objects.
Do not insert foreign objects into the vents.
Check the drain regularly to make sure that waste water is emptying
properly.

11
Original instructions.
· Packaging
TRANSPORT
The machine is shipped in a custom-designed carton which utilizes model-specic polystyrene
cushions to protect it from damage.
The machine’s carton features standardized handling symbols to explain proper shipping and
storage methods.
The machine must remain in a horizontal position during the transport. Do not store or handle
the machine except on its feet.
During transport protect the carton and machine from impact drops, crushing, shocks, moisture
and exposure to extreme temperature.
· Delivery inspection
Upon receipt and delivery ensure that the machine is in the exact condition described in the
enclosed documentation, and that all accessories are included. Missing items should be reported
to the manufacturer or dealer immediately.
Damage caused during transport should be reported to the shipping agent and the machine’s
distributor immediately.
Packaging materials are potentially dangerous and should be kept away from children.
The carton and all packing materials are recyclable and should be returned to a recycling centre
for disposal.

12 Original instructions.
STORAGE AND DISPOSAL
· Long-term storage requirements
Before storage for a month or more be sure to:
• Perform all weekly and periodic cleaning procedures described in this manual.
• Disconnect and roll up the power cord (this should be performed by a qualied person).
• Disconnect the machine’s water inlet hose from the domestic water supply and drain the boilers
(this should be performed by a qualied person).
• Clean the drip tray and exterior of the machine to remove any coee or other residue.
• Cover / re-pack the machine in its original carton and store it in a dry place where it will not
be exposed to extreme temperatures or humidity.
• When returning the machine to service after long-term storage, perform all weekly and
periodic cleaning procedures and reconnect the water and power supplies (this should be
performed by a qualied person) before use.
· Machine disposal requirements
If the machine ever needs to be scrapped and disposed of be sure to:
• Disconnect and roll up the power cord (this should be performed by a
qualied person).
• Disconnect the machine’s water inlet hose from the domestic water
supply and drain the boilers (this should be performed by a qualied
person).
• Pack up and ship/deliver the machine to a certied recycling centre.
· Caution
• Risk of re and electric shock.
• Replace only with manufacturer’s original cord set.
• Disconnect from power supply before servicing.

13
Original instructions.
TECHNICAL SPECIFICATIONS
· EX3 1GR MINI & 2GR MINI machine data
Version: EX3 1GR MINI
Control
EX3 1GR MINI
Display PID
EX3 2GR MINI
Control
EX3 2GR MINI
Display PID
Temperature control
system: Pressure switch Temperature
PID controler Pressure switch Temperature
PID controler
Dispensing control
system:
Push button
control
Push button
control with
group display
Push button
control
Push button
control with
group display
Steam wand: 1 unit 1 unit (standard), 2 units (option)
Hot water outlet: 1 unit
Boiler system: 1 steam boiler
Boiler operating
pressure: 0.8 to 1.2 bar
Steam boiler volume: 6L
Power rating: 220V-240V 1N~ 2800W 50-60Hz
Water connection: 3/8” Internal thread BSPP
Height, width, depth: 465, 550, 575mm
Machine weight: 48 Kg 50 Kg
Ambient noise: < 70 db
· EX3 1GR MINI & 2GR MINI versions accessories
2-spout
portalter 1-spout
portalter
55-cm
inlet
hose
Blind
lter
Drain
tube (150
cm)
Power
cable
Drinks grids
(TA versions
only)
Item:
Quantity: 1 unit 1 unit 1 unit 1 unit 1 unit 1 unit 1 or 2 units

14 Original instructions.
· EX3 1GR MINI & 2GR MINI versions front view
Steam Knob
Manometer
Steam wand
Drink Keypads
Hot water Knob
Brewing
Groups
Water tap
Power ON/OFF
Drip Tray
· EX3 1GR MINI & 2GR MINI versions bottom view
Waste Water Drain
LED ON/OFF
Boiler Drain
Portalters
TECHNICAL SPECIFICATIONS
Power Cable
(1Phase machines:
install from rear side & clip)
Element high
limit switch
Element pilot
light
Front face

15
Original instructions.
A
C
TECHNICAL SPECIFICATIONS
· EX3 1GR MINI & 2GR MINI versions external dimensions
B
E
D
Dimension Standard
A 550mm
B 575mm
C 465mm
D 74mm
E 125mm
Standard
Takeaway
B
Dimension Takeaway
A 550mm
B 575mm
C 465mm
D1 84mm
D2 124mm
E 125mm
E
D1 D2
A
C

16 Original instructions.
TECHNICAL SPECIFICATIONS
· EX3 2GR machine data
Version: EX3 2GR Control EX3 2GR Display PID
Temperature control system: Pressure switch Temperature PID controler
Dispensing control system: Push button control Push button control with group
display
Steam wand: 1 unit (standard), 2 units (option)
Hot water outlet: 1 unit
Boiler system: 1 steam boiler (single boiler version)
Boiler operating pressure: 0.8 to 1.2 bar
Steam boiler volume: 11.5L
Power rating: 220V-240V 1N~ 3100W 50-60Hz
Water connection: 3/8” Internal thread BSPP
Height, width, depth: 465, 770, 575mm
Machine weight: Single boiler version = 60 Kg
Ambient noise: < 70 db
· EX3 2GR versions accessories
2-spout
portalter 1-spout
portalter
55-cm
inlet
hose
Blind
lter
Drain
tube (150
cm)
Power
cable
Drinks grids
(TA versions
only)
Item:
Quantity: 1 unit 1 unit 1 unit 1 unit 1 unit 1 unit 2 units

17
Original instructions.
· EX3 2GR versions front view
Hot Water Knob
Manometer
Water Tap
Drink Keypads
Steam Knob
Brewing
Groups
Steam Wand
Power ON/OFF
Drip Tray
· EX3 2GR versions bottom view
Waste Water Drain
LED ON/OFF
Boiler Drain
Portalters
TECHNICAL SPECIFICATIONS
Power Cable
(1Phase machines:
install from rear side & clip)
Element high
limit switch
Element pilot
light
Front face

18 Original instructions.
TECHNICAL SPECIFICATIONS
· EX3 2GR versions external dimensions
AB
C
E
D
Dimension Standard
A 770mm
B 575mm
C 465mm
D 74mm
E 125mm
Standard
Takeaway
A
C
B
Dimension Takeaway
A 770mm
B 575mm
C 465mm
D1 84mm
D2 124mm
E 125mm
E
D1 D2

19
Original instructions.
BUTTONS AND CONTROLS
· Machine controls
EX3 features a push button control block for each brewing group. Control functions are explained
below.
Versions with display (PID) are equipped with an individual 3 digit display on each group for
monitoring machine status, performing user programming and machine adjustments.
Hot Water Knob
K1
(One set per group)
Steam Knob
Pro Tip:
All group buttons are fully adjustable via the user programming. See the Dose
Programming section for more details.
Control PID
Pro Tip:
Versions with display will show the shot timer during the brewing process.
Button Selection description Programming menu function
K1 Short espresso (+)
K2 Medium espresso (-)
K3 Long espresso
K4 Group ush
K5 Continuous / Hot water Enter / Accept
K2 K3 K4 K5

20 Original instructions.
INSTALLATION AND START UP
· Machine positioning
MIN. 10 cm
MIN. 30 cm
Install within 0-3º horizontal.
1. Installing the machine in the service area must be performed by a qualied person. As the
machine may be quite heavy, at least two strong, capable individuals are recommend to
work together to lift and position the machine. Consult the Technical Specications page
for the specic machine model being installed for machine weight and dimensions details.
Contact a service technician to do this task if you are not condent about performing the
steps below.
2. Position the machine on a level, sturdy, and water-resistant surface approximately 110cm
above oor level for ease of access and usage.
3. Adjust the feet to ensure that it dispenses coee evenly to all cups.
4. Ensure enough free space is available above (>30cm) and behind (>10cm) the machine to
ensure easy cleaning and maintenance and adequate ventilation.
Important:
Leave an air gap of at least 30cm above the machine and 10cm behind it to ensure adequate
ventilation. The machine must be installed within 3º of horizontally level front-to-back and
side-to-side to ensure proper hydraulic function and drainage. Conrm with a spirit level or
digital angle gauge.
Do not install the machine if the machine or installation surface it is wet. Allow it to dry
completely and ask a service technician to ensure that none of the electrical components
have been aected.
This manual suits for next models
4
Table of contents
Other Welbilt Coffee Maker manuals