Wellness Supply AP Pro User manual

1of 14 Wellness Supply Group V012
AP Pro ~ Active Passive All Body Exerciser
User Manual!
Physiotherapy Apparatus for Upper and Lower Limbs
!
!
!
!
!
!
Wellness Supply Group, LLC
1685 Woodland Avenue,
Columbus, OH 43219
Tel: 800-653-8037
Fax: 614-474-1483
E-mail: [email protected]
www.wellnessSG.com
!
!

2of 14 Wellness Supply Group V012
Table of Contents
1. Important Safety Information …………………………………………………… 3
2. Intended Use, Product Information …………………………………………………… 4
i. Intended Use
ii. Product Features
3. Name of Components & Installation …………………………………………………… 4
i. Name of Components
ii. Initial Set-Up
4. LCD Touch Screen Monitor …………………………………………………… 6
5. Spasm Control …………………………………………………… 7
6. How to Use …………………………………………………… 7
i. Upper Limbs Exercise
ii. Lower Limbs Exercise
7. Exercise Mode Set-up …………………………………………………… 8
i. P Mode: Passive Mode
ii. Program Setting Mode
iii. A Mode: Active Mode
iv. Exercise Results Displayed
8. Maintenance …………………………………………………… 12
i. General Items
ii. Preventive Maintenance
9. Storage and Moving …………………………………………………… 13
10. Product Warranty …………………………………………………… 14
11. Breakdown and Diagnosis …………………………………………………… 14
12. Product Identification …………………………………………………… 14

3of 14 Wellness Supply Group V012
1. Important Safety Information
Please read this manual carefully from beginning to end before using the equipment for the first
time.
This exercise equipment is designed and built for optimum safety. However, certain precautions
must be applied whenever you operate a piece of exercise equipment. Make sure to read the
entire manual before assembling and/or operating this machine. Also, please note the following
safety precautions:
WARNING
1. Potential shock hazard.
2. Do not modify this equipment without authorization from the manufacturer.
3. Intended for supervised use only: Patients must not use without being supervised by an
assistant.
4. Leave standing at least one hour after transporting or before first use.
5. Always place on a level and non-slip surface to ensure maximum stability.
6. Always wear snug fitting clothing when using the exerciser.
7. Designed to be used in a sitting position only.
CAUTION
1. If using a wheelchair with the exerciser, please engage the wheelchair’s brake and secure
using the tethers provided before exercising.
2. Never reach into, or attempt to take hold of, moving parts of the exerciser when it is in
motion.
3. Never use the exerciser with a damaged power cord. Use only the original power cord
supplied with the exerciser.
4. Use the correct voltage and never use in wet, damp, or very hot and humid conditions.
5. Do not disassemble during use or while plugged in.
6. If the exerciser is damaged/faulty or if it produces abnormal noises or smells, stop the
exercising session immediately, unplug the power cord, and contact your service engineer.
THIS PRODUCT IS A CERTIFIED MEDICAL DEVICE.
ALWAYS KEEP THIS USER MANUAL NEAR THE UNIT.
USER MUST READ AND FOLLOW THE INSTRUCTIONS CONTAINED IN THIS MANUAL.
The symbols used in this instruction manual and on the exerciser are intended to
point out potential dangers when using the unit.
WARNING: If you do not follow these precautions, it may cause death or serious
injury.
CAUTION: If you do not follow these precautions, it may cause serious injury.!

4of 14 Wellness Supply Group V012
2. Intended Use, Product Information
i) Intended Use
1. Motor-driven rehabilitation exerciser for the upper and lower limbs (upper and lower limbs
NOT to be exercised together, they must be used independently of each other).
2. This product is developed for exercise therapy. Rehabilitation is accomplished by providing
motorized passive assistance and active resistance when appropriate.
3. Reconstruction of the muscles and joints and facilitation of motion for enhanced user
recovery.
4. Helps increase flexibility of the joint and operating range of the joint.
5. Helps prevent contraction phenomenon of the muscle and thrombosis.
6. Users are those for which rehabilitation and remedial exercise is required such as SCI
handicapped persons caused by cerebral apoplexy (paralysis), traffic accident etc, the
elderly, patients of multiple arteriosclerosis, brain damage, nervous lesion, poliomyelitis,
cerebral palsy, whirled patient and other wheel-chair bound individuals.
ii) Product Features
1. Easy to use touch screen monitor with voice guidance and usage prompts.
2. Screen displays showing speed, resistance, time and direction of rotation.
3. Speed and resistance can be controlled to fit the users functional capacity.
4. Spasm control function.
5. Forward and reverse movement of both upper and lower limbs.
6. Users can specify the desired amount of exercise time.
7. Displays exercise amount by % at active exercise (lower pedals/limbs only).
8. Easy to use, adjustable pedal positions.
3. Name of Components & Installation
i) Name of Components
!!
AP Pro uses upper limbs, or lower limbs
1. Upper body exercising handles
2. Handlebar adjustment knob
3. Height control knob
4. Power switch
5. Foot pedal
6. Transport wheels
7. T-frame
8. Side casing
9. Calf support
10. Handlebar
11. Monitor/display

5of 14 Wellness Supply Group V012
ii) Initial Set-Up
1. Place the AP Pro on a horizontally flat floor with a minimum of 40 inches side distance
between the unit and other products or walls.
2. Assemble both the left and the right upper body exercising handles (part 1 in the above
diagram) using the wrench as per the illustration below.
3. Tighten all crank bolts and knobs ensuring pedals and handles are secure with no unusual
play.
4. Attach the wheel chair tethers (included)
to the T-frame (part 7 in the diagram on
page 4) using a 3/8” Allen Wrench (not
supplied). The C-clamps should be
positioned as near to the center as
possible in order to avoid interference
with the wheelchair foot plate (see photo).
5. Ensure the unit is connected to a properly
grounded power outlet.
6. Leave the AP Pro standing at least one hour
after transporting or before first use.
7. Your AP Pro is now ready to use.
8. We recommend you keep the carton for future transportation needs.
WARNING:
Take care to minimize impact when moving this product.
This product must be connected to a mains supply and a properly grounded socket.
!

6of 14 Wellness Supply Group V012
4. LCD Touch Screen Monitor
Please see the tables below for the monitor functions:
Passive Mode
Setting Mode
Active Mode
Pedal Position Control Button:
Pedals are positioned for the
user
Menu Button:
Used to return to initial screen

7of 14 Wellness Supply Group V012
5. Spasm Control
Spasm Control only acts in Passive Mode.
If spasm occurs during exercise, the AP Pro will pause for approximately 3 seconds and then
change direction to control and relieve the spasm. The spasm occurrence will be registered on
the screen.
If the Spasm Control is initiated three (3) times during a single exercise session, the unit will end
the exercise session and report “System Stopped”. If the session is ended by the Spasm
Control function, the main power switch must be turned off for at least 30 seconds to re-set the
unit.
See page 10 for Spasm Control set-up instructions.
6. How to Use
This product is intended for supervised use only. Therefore, patients must not use without being
supervised by an assistant.
This product is NOT designed to exercise upper and lower limbs at the same time, they must be
used independently of each other.
Begin exercise sessions slowly and then increase the level of
intensity gradually according to the user’s physical capabilities.
i) Upper Limbs Exercise
1. Twist the two handlebar adjustment knobs (counter-
clockwise) and rotate the upper body exercising handles
toward the display and the user. Twist adjustment knobs
clockwise to lock into position. The handlebar (#10 as per
the diagram on page 4) should be facing away from the
user on the far side of the unit (see drawing to the right).
2. Position the chair or wheelchair for the user ensuring it is
stable and locked in position (utilize the wheelchair
tethers where ever possible).
3. WITH CARE adjust to the correct height for the patient,
CAUTION:
Patients with predisposition to the occurrence of spasm phenomenon should be
closely monitored throughout exercise.
CAUTION:
Confirm that the power cable is properly connected prior to each use.
Users must always maintain a straight, upright position.
The unit should be used with a chair or wheelchair in the proper, comfortable
position. Improper positioning can cause discomfort in the knee, hip, elbow, or
shoulder.
!

8of 14 Wellness Supply Group V012
using the height control knob (#3 on the diagram on page 4). DO NOT let the mast drop
to the lowest position as this may cause damage to the LCD touch screen monitor.
4. Twist knob clockwise until fully tightened to maintain selected vertical height.
5. Do not use the device while standing.
6. Turn on power switch.
7. Complete relevant exercise set-up (see below instructions).
ii) Lower Limbs Exercise
1. Twist the two handlebar adjustment knobs (counter-clockwise) and rotate the upper body
exercising handles away from the display and user.
Twist adjustment knobs clockwise to lock into position.
The handlebar (#10 as per the diagram on page 4)
should be facing the user (see drawing to the right).
2. Position the chair or wheelchair for the user ensuring it is
stable and locked in position (utilize the wheelchair
tethers where ever possible).
3. WITH CARE adjust to the correct height for the patient,
using the height control knob (#3 on the diagram on page
4). DO NOT let the mast drop to the lowest position
as this may cause damage to the LCD touch screen
monitor.
4. Twist knob clockwise until fully tightened to maintain
selected vertical height.
5. Press PEDAL button and maneuver the foot pedals in to
the correct position in order to secure the users foot
comfortably into each pedal with the Velcro straps.
6. Turn on power switch.
7. Complete relevant exercise set-up (see below instructions).
7. Exercise Mode Set-up
A) P Mode: Passive Mode
Mode which uses the force of the AP Pro to provide joint movement and muscle rehabilitation
exercise for patients who do not move naturally because of arm or leg disability.
During P Mode exercise, if the user increases the speed through active assistance (pedaling
faster than the set rpm), the device will transition to Active Mode. If the user then decreases
speed to below the set rpm, the AP Pro will transition back to Passive Mode.
CAUTION:
This product is intended for supervised use only. Therefore, patients must not
use without being supervised by an assistant.
Confirm that all adjustment knobs and straps are tightened prior to starting
exercise.
!

9of 14 Wellness Supply Group V012
a) Function
Resistance:
•Set the resistance value in case the exercise is converted from Passive Mode to Active
Mode (if the user pedals faster than the set rpm).
•Available to set from 1 to 15 levels (initial setting: level 1).
•Increase/decrease 1 level at a time by pressing +/- button once. Increase to maximum
value or reduce to lowest value by pressing continuously. Touch the actual number for
direct input.
•Resistance setting can be changed during exercise.
•Set resistance is applied to all speeds.
•Resistance value is applied only if exercise is changed to Active Mode.
Speed:
•Available to set from 4 to 60 rpm (initial setting: 4 rpm).
•Increase/decrease 2 steps at a time by pressing +/- button once. Increase to maximum
value or reduce to lowest value by pressing continuously. Touch the number for direct
input.
•Speed setting can be changed during exercise.
Time:
•Available to set from 1 to 99 minutes (initial setting: 15 min).
•Increase/decrease 1 minute at a time by pressing +/- button once. Increase to maximum
value or reduce to lowest value by pressing continuously. Touch the required number for
direct input.
•Time setting can be changed during exercise.
Direction of Rotation:
•Set the direction of rotation for arm or leg exercise.
•Press icon until the desired direction arrow mark lights up.
•Available to select forward direction or backward direction.
•Direction can be changed during exercise.
Spasm Control:
•Set Spasm Control in case spasm happens while patient is exercising (see page 7 for more
information on Spasm Control).
•Spasm Control setting CANNOT be changed during exercise.
Arm and Leg Exercise:
•Select and set upper or lower limb exercise.
•Upper limb and lower limb exercise CANNOT be conducted at the same time.
•You CANNOT change from upper limb to lower limb or vice versa during exercise.
b) How to Set
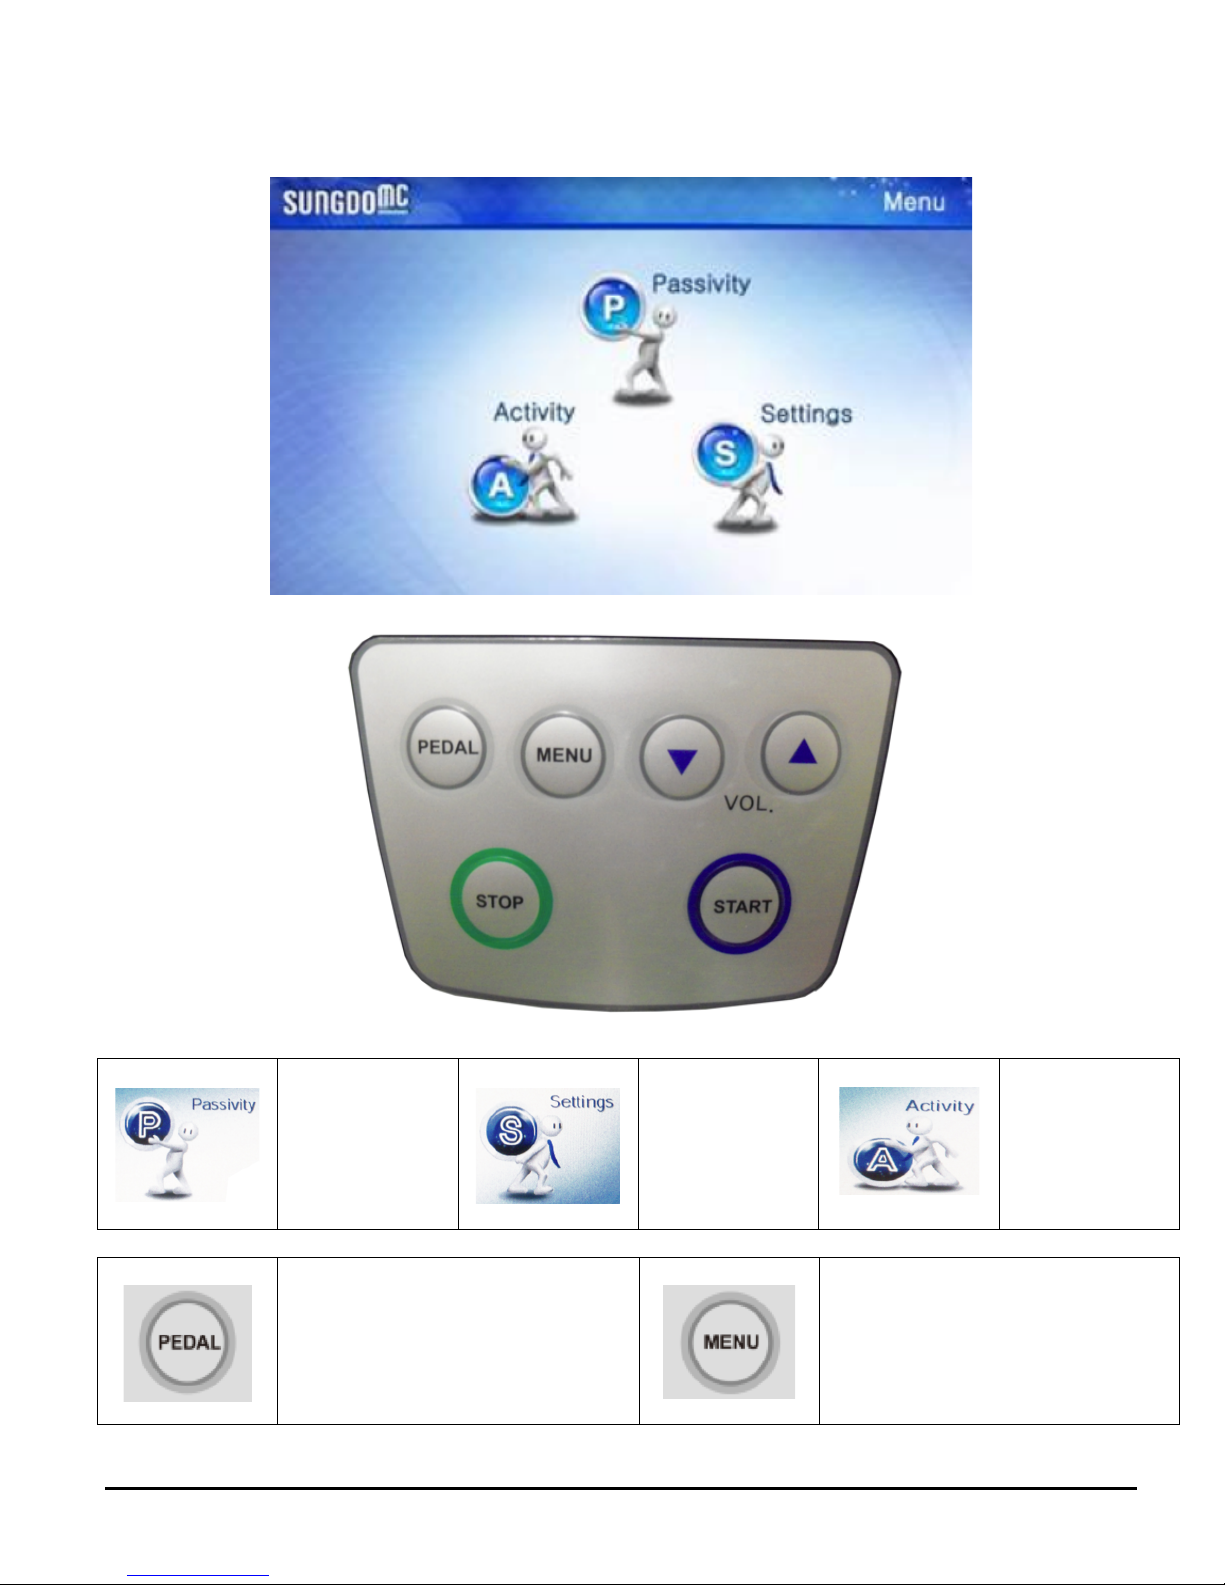
1. Select Passive exercise mode in initial screen
on the monitor.
2. Select SPEED button. Set desired speed by
pressing + or - button (4-60 rpm).
!

10 of 14 Wellness Supply Group V012
3. Select POWER button. Set desired resistance value by pressing + or - button (level 1-15).
4. Select DURATION button. Set desired time by pressing + or - button (1-99 min).
5. Select FORW/BACKW button to set direction of rotation. Pressing the button again
changes direction.
6. Select SPASTIC AUTO button to set spasm control function. The circle will light up if
selected.
7. Select ARM or LEG TRAINING. Both CANNOT be selected at the same time. The circle
next to the one selected will light up.
8. Press START button on control panel and begin exercise.
9. When the exercise session ends, exercise results will be displayed on monitor (see D
below for details).
10. Press MENU button on control panel to return to initial screen.
B) Program Setting Mode
Allows the user or therapist to define the parameters of an individual exercise program
specifically designed for an individual patient and their current abilities.
a) Function
Spasm Sensitivity:
•Consists of 3 settings: low, medium or high. Sensitivity is set according to the patient’s
spasm degree. During exercise, the spasm control function reacts according to the set
sensitivity.
Spasm Control:
•Select direction of rotation after spasm control according to the exercise direction.
↑: After spasm control, regardless of present direction, it rotates unconditionally
only in the forward direction.
↓: After spasm control, regardless of present direction, it rotates unconditionally
only in the backward direction.
↕: After spasm control, it rotates to the opposite direction of present direction.
Each time there is a spasm, the AP Pro will automatically decrease by 3 rpm’s.
Motor Power:
•Used to maintain the amount of power (torque) to correspond to the strength of the upper
or lower limbs.
•It consists of 3 settings: weak, medium or strong.
Exercise Time:
•Set exercise time.
•Controls from 1 to 99 minutes (initial setting: 15 min).

11 of 14 Wellness Supply Group V012
b) How to Set
1. Select Settings (S) exercise mode in initial screen on the monitor.
2. Select DURATION button and set the
desired exercise time by pressing + or -
buttons (max 99 min).
3. Select SPASTIC DETECTOR button. Set
the desired sensitivity by pressing low,
medium or high.
4. Select SPASTIC AUTO button. Set the
desired direction by pressing forward,
backward or reverse-direction arrow.
5. Select MOTOR POWER button. Set desired power by pressing weak, medium or strong.
6. Press MENU button on control panel to store settings. Pressing “P” will also store settings.
7. Press START button on control panel and begin exercise.
8. Press P button on monitor screen to confirm exercise settings. Setting of resistance, speed,
and time while exercising is the same with Passive Mode set-up (see Set-up, page 9).
9. When the exercise session ends, exercise results will be displayed on monitor (see D
below for details).
10. Press MENU button on control panel to return to initial screen.
C) A Mode: Active Mode
Mode for exercise using the force of the patient. This helps increase muscular power by
providing resistance against the users activity.
a) Function
Resistance:
•Turning load value applied during exercise.
Balance (Biofeedback):
•For lower limbs only, displays the percentage of force that is being exerted by both left and
right leg during exercise.
b) How to Set
1) Select A Mode in initial screen on monitor.
2) Set desired resistance by pressing + or -
button. Then select A Mode.
!
!

12 of 14 Wellness Supply Group V012
3) Press START button on control panel. Start exercise by patient’s force.
4) Monitor screen displays present speed, exercise time, resistance, and left/right balance (for
lower limbs only) during exercise.
5) Press STOP button to end exercise session. Exercise results will be displayed on the
monitor screen (see D below for details).
6) Press MENU button on control panel to return to initial screen.
D) Exercise Results Displayed
1. Total exercise time in minutes and
seconds.
2. Total exercise distance in km.
3. Number of spasm control episodes during
exercise session.
4. Total active exercise ratio (%).
5. For lower limbs only, displays the active exercise for left and right sides (%).
8. Maintenance
i) General Items
1. Inspect the AP Pro unit regularly.
2. Replace worn or damaged parts, particularly high-wear parts, discovered through routine
inspection.
3. Tighten crank bolts after the first two hours of operation and then monthly there after.
ii) Preventive Maintenance
a) Daily Inspection Items
1. Always shut off power before checking.
2. Clean monitor and outside of unit using a soft cotton cloth dampened with water. Do not
use abrasive cleaners or those that contain ammonia or acids. Do not spray water or any
cleaning fluids directly on to the unit or any part of the monitor/display.
3. Inspect and remove any foreign substances in and around turning parts (knobs, pedal
bearings, etc).
!
WARNING:
When initiating a repair process, turn off power switch and unplug from wall outlet.
Do not repair the device outside of manufacturers recommendations.
Manufacturer assumes no responsibility for any alterations or repairs.

13 of 14 Wellness Supply Group V012
4. Inspect cleanliness of foot pedals and handles.
5. Inspect power plug and all cables for visible damage.
6. Maintain a clean environment around the exercise device.
b) Weekly Inspection Items
1. Check monitor.
2. Check pedals and handles for proper tightness and eliminate any unusual play.
c) Main Component Routine Inspection Schedule
Part / Item
Daily
Weekly
Twice a Year
Power plug / cord
I
Monitor
C
I
Frame
C
I
Pedals
C
I
Turning/fixing knobs
C
I
Crank bolts
C
I
I = Inspect C = Clean
d) Prohibited Random Alteration and Reconstruction
1. Product cannot be altered outside of manufacturer’s original product specifications.
2. Product alterations or changes are not warranted so that all the losses that might occur are
not compensated.
3. The product warranty shall not apply if there is any modification to the product or
accessories or if there is a failure to provide maintenance as outlined in this manual.
4. The product warranty does not cover damage or equipment failure resulting from misuse,
incorrect cleaning, abuse, or failure to comply with electrical codes.
5. The buyer’s remedy for breach of the expressed warranties contained herein shall be
limited to the return of the product and accessories and repayment of the original purchase
price. Provided, however, at manufacturer selection, it may repair and replace the non-
conforming goods or parts.
6. Manufacturer shall not be liable for any incidental or consequential damages.
Note.
The owner of this product is responsible for its proper disposal in compliance with all
applicable federal, state and local waste disposal laws and regulations.
9. Storage and Moving
i) Storage Method
1. Keep product in clean, dry environment.
2. Keep product in sealed packing to eliminate dirt, dust, and moisture.
3. Keep separate power supply cord detached while in storage.

14 of 14 Wellness Supply Group V012
ii) Moving Method
1. Move product using transfer wheels.
2. Requires more than 2 persons to transfer product over steps or up stairs.
3. Do not transfer device with power supply cord attached.
4. Transfer after tightening all adjustment knobs.
10. Product Warranty
1. 12 months limited warranty on the AP Pro unit.
2. 18 month limited warranty on the LCD Touch Screen Monitor.
3. Warranty does not include wear and tear items such as Velcro straps, pedals, handles,
power cords etc.
4. Product warranty does not cover damage or equipment failure resulting from mis-use,
incorrect cleaning, abuse, or external impact.
5. Product warranty will not apply if there is any modification to the product outside the
manufacturers recommendations.
11. Breakdown and Diagnosis
Symptoms
Diagnostic
Solution
No power.
Be sure power cord is properly
connected.
Insert correctly in outlet and
main body connector.
Pedal not positioned properly.
Press PEDAL position control
button.
Turn power off and on again to
reset.
Spasm Control function does
not work.
Confirm exercise is in Passive
Mode. Make sure Spasm
Control is selected.
Choose ROUGH spasm
control setting in Passive
Mode.
Upper limb cranks do not
rotate.
Make sure arm exercise is
selected.
Choose arm exercise in
Passive Mode.
Lower limb cranks do not
rotate.
Make sure leg exercise is
selected.
Choose leg exercise in
Passive Mode.
If you are still experiencing problems please contact Wellness Supply Group’s Service
Department on 800-653-8037, option 2.
12. Product Identification
1. Name of item: Physiotherapy Apparatus for Upper and Lower Limbs
2. Type: AP-Pro (SP-1100)
3. Product info: 88lbs, 23-36” x 23.5” x 43” (L x W x H)
4. Protection against electrical shock: Class I
5. Protection against harmful ingress of water: Ordinary (IP20)
6. Serial number: Marked on unit
7. Manufacturer: Sungdo MC Co. Ltd.
Table of contents
Popular Elliptical Trainer manuals by other brands

Precor
Precor EFX EFX 821 Assembling and maintaining

Vision Fitness
Vision Fitness X6850HRT Assembly guide

Weslo
Weslo MOMENTUM CT 5.0 user manual

Energetics
Energetics XT 420p Assembly manual

Keys Fitness
Keys Fitness Magnetic Elliptical Exercise Trainer ET4000 owner's manual

Precor
Precor Discovery Series Getting started guide