Weslo Renew 510 Spa User manual

®
Model No. 831.105100
Serial No.
Write the serial number in the space
above for reference. The serial num-
ber decal is found on the frame
behind the access cover.
CAUTION
Read all precautions and instruc-
tions in t is manual before
using t is equipment. Save t is
manual for future reference.
QUESTIONS?
As a manufacturer, we are com-
mitted to providing complete
customer satisfaction. If you
ave questions, or if t ere are
missing parts, we will guarantee
complete satisfaction t roug
direct assistance from our factory.
PLEASE CALL DIRECT TO OUR
TOLL-FREE CUSTOMER HOT
LINE. T e trained tec nicians on
our customer ot line will pro-
vide immediate assistance, free
of c arge to you.
CUSTOMER HOT LINE:
1-877-897-7493
Mon.–Fri., 6 a.m.–6 p.m. MST
USER'S MANUAL
Visit our website at
www.workoutware ouse.com
new products, prizes,
fitness tips, and much more!

TABLE OF CONTENTS
IMPORTANT AFETY IN TRUCTION . . . . . . . . . . . . . . . . . . . . . . . . . . . . . . . . . . . . . . . . . . . . . . . . . . . . . .3
BEFORE YOU BEGIN . . . . . . . . . . . . . . . . . . . . . . . . . . . . . . . . . . . . . . . . . . . . . . . . . . . . . . . . . . . . . . . . . . .6
CHOO ING A LOCATION FOR THE HYDROTHERAPY PA . . . . . . . . . . . . . . . . . . . . . . . . . . . . . . . . . . . . . .7
ET-UP AND A EMBLY . . . . . . . . . . . . . . . . . . . . . . . . . . . . . . . . . . . . . . . . . . . . . . . . . . . . . . . . . . . . . . . .8
U ING THE HYDROTHERAPY PA . . . . . . . . . . . . . . . . . . . . . . . . . . . . . . . . . . . . . . . . . . . . . . . . . . . . . . .10
MAINTENANCE . . . . . . . . . . . . . . . . . . . . . . . . . . . . . . . . . . . . . . . . . . . . . . . . . . . . . . . . . . . . . . . . . . . . . . .14
TROUBLE- HOOTING . . . . . . . . . . . . . . . . . . . . . . . . . . . . . . . . . . . . . . . . . . . . . . . . . . . . . . . . . . . . . . . . .18
PART LI T . . . . . . . . . . . . . . . . . . . . . . . . . . . . . . . . . . . . . . . . . . . . . . . . . . . . . . . . . . . . . . . . . . . . . . . . . . .20
EXPLODED DRAWING . . . . . . . . . . . . . . . . . . . . . . . . . . . . . . . . . . . . . . . . . . . . . . . . . . . . . . . . . . . . . . . . .21
ORDERING REPLACEMENT PART . . . . . . . . . . . . . . . . . . . . . . . . . . . . . . . . . . . . . . . . . . . . . . . .Back Cover
LIMITED WARRANTY . . . . . . . . . . . . . . . . . . . . . . . . . . . . . . . . . . . . . . . . . . . . . . . . . . . . . . . . . . .Back Cover
2
IMAGE®is a registered trademark of ICON Health & Fitness, Inc.

3
IMPORTANT SAFETY INSTRUCTIONS
WARNING: TO REDUCE THE RISK OF DROWNING, ELECTRIC SHOCK, OR SERIOUS INJURY, READ
THE FOLLOWING IMPORTANT PRECAUTIONS BEFORE USING THE HYDROTHERAPY SPA.
READ AND FOLLOW ALL INSTRUCTIONS
1. It is t e responsibility of t e owner to ensure
t at all users of t e ydrot erapy spa are
adequately informed of all precautions.
2. Use t e ydrot erapy spa only as described
in t is manual.
3. T e ydrot erapy spa is intended for ome
use only. Do not use t e spa in any commer-
cial, rental, or institutional setting.
4. Use t e ydrot erapy spa only on a level
surface. Do not use t e spa on carpet or
ot er materials t at could be damaged by
moisture. Do not use t e spa on roug or
s arp surfaces suc as gravel or wood
c ips.
5. T e ydrot erapy spa will weig approxi-
mately 2,000 pounds (908 kgs) w en it is
filled wit water. Be sure t at t e location
you select for t e spa will support t is
weig t plus t e weig t of t e occupants.
6. Inspect and tig ten all parts regularly; replace
any worn or missing parts immediately.
7. DANGER—Risk of injury: Do not remove or
alter t e covers on t e suction fittings. Never
operate t e ydrot erapy spa if t e suction
guard is missing or broken. If you need to
replace a suction fitting, be sure to use only
manufacturer-recommended parts. Keep air
and body away from t e suction guard. Do
not allow long air to float freely in t e
water; long air s ould be restrained wit a
bat ing cap.
8. IMPORTANT: Do not allow t e ydrot erapy
spa to be exposed to direct sunlig t w en it
is empty. T e surface of t e spa s ell can
reac temperatures as ig as 150°F (65°C)
in a matter of minutes if exposed to t e sun
w ile it is empty. T ese ig temperatures
can cause significant damage, suc as blis-
tering of t e s ell surface and warping of t e
spa s ell. Any damage caused by sun expo-
sure is not covered under warranty.
9. Do not bring any object into t e ydrot era-
py spa t at could damage t e spa s ell.
10. Never insert any object into any opening.
11. Do not use breakable containers near or in
t e ydrot erapy spa.
12. Do not sit on t e spa cover or place objects
on it. It is not designed to support weig t.
13. Remove any water or debris t at may collect
on t e spa cover.
14. Keep c ildren under 12 and pets away from
t e ydrot erapy spa w en it is not in use.
15. Keep all c emicals away from c ildren and
pets.
16. T e pH and c emical balance of t e water
must be maintained as explained in t is man-
ual (see pages 10 and 14). Failure to do so
may cause injury to users or damage to t e
spa, and will void t e warranty.
17. Individuals wit infections and open sores or
wounds s ould not use t e ydrot erapy
spa. Bacteria t rive in warm and ot water.
Always keep your spa disinfected and main-
tain t e proper c emical balance.
18. S ower before and after using t e ydrot er-
apy spa. T is will remove any deodorant,
perspiration, or body oils t at could contami-
nate t e water. S owering after will remove
any residual c emicals and any bacteria t at
may ave been in t e spa.
19. WARNING—T e Ground Fault Circuit
Interrupter (GFCI), must be tested before
eac use. To test t e GFCI, press t e “test”
button w ile t e spa is running. T e spa
s ould s ut off. Press t e “reset” button.
T e spa s ould resume normal operation. If
t e spa continues to run after t e “test” but-
ton is pressed, t en t e GFCI is damaged.

4
Do not use t e spa until t e GFCI as been
repaired or replaced by a qualified electri-
cian.
20 Keep all electrical appliances suc as radios,
telep ones, televisions, and lig ts at least
five feet (1.5 m) away from t e water.
21. DANGER—Risk of electric s ock: Do not set
up t e ydrot erapy spa wit in five feet (1.5
m) of any metal objects or surfaces. As an
alternative, you may use t e spa wit in five
feet (1.5 m) of metal objects if eac metal
object is permanently connected to t e bond-
ing LVG on t e controller of t is unit by a
minimum No. 6 AWG (1.3 mm2) solid copper
conductor. At least two lugs marked “BOND-
ING LUGS” are provided on t e external sur-
face or on t e inside of t e supply terminal
box or compartment. To reduce t e risk of
electric s ock, connect t e local common
bonding grid in t e area of t e ot tub or spa
to t ese terminals wit an insulated or bare
copper conductor not smaller t an 6 AWG.
All field-installed metal components suc as
rails, ladders, drains, or ot er similar ard-
ware wit in 3 m of t e spa or ot tub s all be
bonded to t e equipment grounding bus wit
copper conductors not smaller t an 6 AWG.
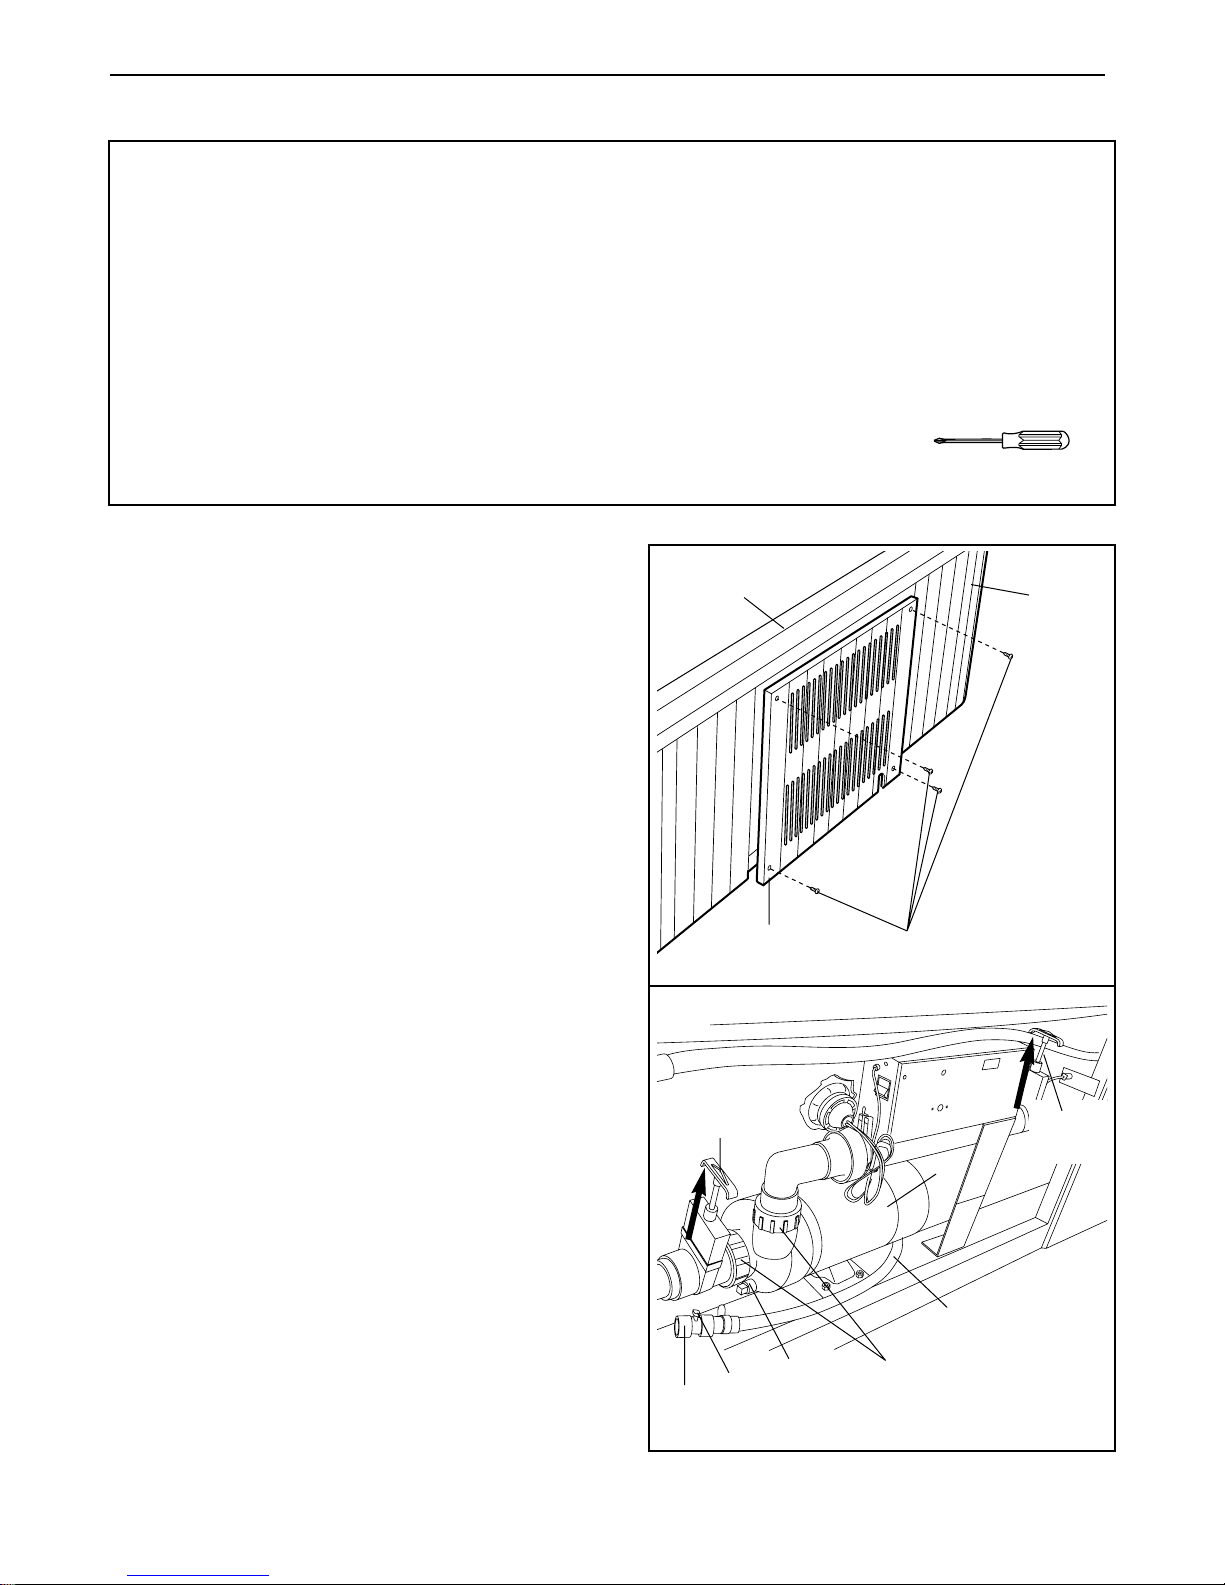
22. Do not operate t e pump motor w en t e
ydrot erapy spa is empty. T e pump motor
may be seriously damaged if it is operated
wit out water circulating. T e cut-off valves
must always be open w en using t e spa
(see step 2 on page 8).
23. DANGER—Risk of drowning: Exercise
extreme caution to prevent unaut orized and
unsupervised use of t e ydrot erapy spa by
c ildren. C ildren must always be supervised.
24. DANGER—To reduce t e risk of drowning:
• Never use t e ydrot erapy spa alone;
• C ildren s ould not use t e spa unless
t ey are supervised by an adult;
• Keep pets away from t e spa at all times;
• Always replace and lock t e spa cover
w en t e ydrot erapy spa is not in use.
25. WARNING—To reduce t e risk of injury: T e
water temperature s ould never exceed
104°F (40°C). Water temperature in excess of
100°F (38°C) may be injurious to your ealt .
If you plan to remain in t e ydrot erapy spa
for more t an 10 to 15 minutes, lower t e
temperature to 100°F (38°C) or below. Lower
temperatures are also recommended for c il-
dren. C ildren s ould not be allowed to swim
under t e surface of t e water in t e spa.
26. WARNING—To reduce t e risk of injury:
Always use an accurate t ermometer to
determine t e water temperature before
using t e ydrot erapy spa.
27. WARNING—To reduce t e risk of injury:
Pregnant women s ould consult wit t eir
p ysician before using t e ydrot erapy spa.
Pregnant women s ould not use t e spa if
t e water temperature is above 100°F (38°C);
t e unborn c ild could be seriously armed.
T is is especially important during t e first
90 days of t e pregnancy.
28. DANGER—To reduce t e risk of drowning:
Prolonged immersion in t e ydrot erapy
spa may cause ypert ermia, a dangerous
condition w ic occurs w en t e internal
body temperature rises several degrees
above t e normal body temperature of 98.6°F
(37°C). T e symptoms of ypert ermia are
nausea, dizziness, drowsiness, and fainting.
Effects include: a lack of awareness, inability
to perceive eat or danger, and a greater risk
of drowning due to a loss of consciousness.
Special note: Individuals suffering from
hyperthermia may be unable to realize that
they must exit the spa, and they also may be
physically unable to do so.
29. WARNING—To reduce t e risk of drowning:
Do not use t e ydrot erapy spa if you are
under t e influence of alco ol or drugs. Heat
from t e water, in conjunction wit alco ol or
drugs, can cause unconsciousness.
30. WARNING—To reduce t e risk of injury or
drowning: Consult your p ysician about pos-
sible side-effects of any medications you
may be taking before using t e ydrot erapy
spa. Heat from t e water, in conjunction wit
some medications may cause drowsiness
and increase t e risk of drowning. Ot ers
can effect blood pressure, eart rate, and cir-
culation.
31. Do not use t e ydrot erapy spa immediate-
ly after strenuous exercise.
32. WARNING—To avoid injury, exercise care
w en entering or exiting t e spa.

5
33. WARNING—To reduce t e risk of injury: It is
especially important for persons over t e age
of 35 or persons wit pre-existing ealt
problems, suc as obesity, eart disease,
ig or low blood pressure, circulatory prob-
lems, or diabetes to consult t eir p ysician
before using t is product.
34. WARNING—T e included warning sign must
be posted w ere all users of t e spa can see
and read it (see POSTING THE WARNING
SIGN on page 13).
35. CAUTION—T e ydrot erapy spa is not
designed for in-ground installation. Do not
install t e ydrot erapy spa in-ground.
36. WARNING—Disconnect t e electric power
supply before servicing t e spa.
37. If you feel pain or dizziness at any time w ile
using t e ydrot erapy spa, discontinue use
and contact a p ysician.
38. Minimum Electrical Ratings:
• 120 Volt Minimum Supply Conductor
Ampacity: 15 Amps
• 120 Volt Minimum Breaker/Fuse: 15 Amps
39. A green terminal or a terminalmarked G, GR,
Ground, Grounding, or wit t e symbol
is located inside t e supply terminal box or
compartment. To reduce t e risk of electric
s ock, t is terminal must be connected to
t e grounding means provided in t e electric
supply service panel wit a continuous cop-
per wire equivalent in size to t e circuit con-
ductors supplying t is equipment.
40. WARNING DECAL PLACEMENT: Locate t e
decals at rig t and familiarize yourself wit
t is information.
WARNING: Read all instructions before using t e ydrot erapy spa. ICON assumes no responsibility
for personal injury or property damage sustained by or t roug t e use of t is product.
SAVE THESE INSTRUCTIONS
Continuous exposure of the spa surface to direct
sunlight or ultra-violet rays may cause damage to
the spa’s surface, will void the warranty, and will
result in potentially hazardous surface
temperatures.To avoid sun damage, the cover
should be in place when the spa is not in use.

6
BEFORE YOU BEGIN
Thank you for selecting the innovative IMAGE®
RENEW 510 hydrotherapy spa. The RENEW 510
offers the features and quality of a traditional hot tub at
an affordable price. Best of all, the RENEW 510 pro-
vides the benefits of hydrotherapy in the comfort and
privacy of your own home.
Hydrotherapy is a proven method for soothing tired
muscles after exercise or for relieving the stress of a
busy life. The warm environment stimulates blood flow,
which is essential in the healing process, and the pow-
erful massage action further eases tension and stress
throughout the body. The RENEW 510 gives you the
specialized treatment you need to feel your best.
For your safety and benefit, read t is manual care-
fully before using t e RENEW 510. If you have addi-
tional questions, please call our Customer ervice
Department toll-free at 1-877-897-7493, Monday
through Friday, 6 a.m. until 6 p.m. Mountain Time
(excluding holidays). To help us assist you, please
note the product model number and serial number
before calling. The model number is 831.105100. The
serial number can be found on a decal attached to
frame inside the spa (see the front cover of this user’s
manual).
Before reading further, please familiarize yourself with
the parts that are labeled in the drawing below.
pa hell
Wood Panels
Cover Latch
Locking
Buckle
Console
Light
Filter
pa Cover
Access
Cover

7
CHOOSING A LOCATION FOR THE HYDROTHERAPY SPA
There are many factors to consider when choosing a location to set up the hydrotherapy spa. These factors vary
depending on whether you use the hydrotherapy spa inside or outside. We have listed several factors you may
wish to consider as you decide where you want to use the hydrotherapy spa.
If you set up t e ydrot erapy spa inside:
1. The hydrotherapy spa will increase the level of
humidity in your home. The location you choose
should be well ventilated. You may need to install
a ventilation fan or use a dehumidifier.
2. The hydrotherapy spa should be close to a source
of water.
3. Do not use the hydrotherapy spa on carpet or
other material that may be damaged by moisture.
We recommend that you place the spa on a
water- and stain-resistant, non-slip surface with a
floor drain for any water that may splash from the
spa.
4. Be sure that the location you choose is stable. It
must be able to support the weight of the
hydrotherapy spa when it is filled with water plus
the weight of the occupants. The hydrotherapy
spa weighs approximately 2,000 pounds (908 kgs)
when filled with water.
5. Do not use the hydrotherapy spa above a finished
living area due to the risk of water damage.
6. Be sure that there is room around the hydrothera-
py spa to permit servicing of the unit. The dimen-
sions of the spa are: 5’ 10” W x 6’ 4” L x 2’ 6” H
(153 cm x 183 cm x 61 cm). Make sure to allow
for this size when choosing the location.
7. The hydrotherapy spa is not designed for in-floor
installation. However, it is compatible with a deck
system that is built flush with the top of the spa,
provided you leave access to the motor for ser-
vice.
8. Make sure to consider such factors as aesthetics
or privacy that may affect the safety or enjoyment
of using the hydrotherapy spa.
If you set up t e ydrot erapy spa outside:
1. You should check your local building codes con-
cerning the use of outdoor spas.
2. The hydrotherapy spa should be close to a source
of water.
3. We recommend that you place the hydrotherapy
spa on a water- and stain-resistant, non-slip sur-
face. Do not use the spa on rough or sharp sur-
faces such as gravel or wood chips.
4. Be sure that the location you choose is stable. It
must be able to support the weight of the
hydrotherapy spa when it is filled with water plus
the weight of the occupants. The hydrotherapy
spa weighs approximately 2,000 pounds (908 kgs)
when filled with water.
5. Think about environmental factors, such as rain,
wind, shade, sunlight, and so forth.
6. You should be able to monitor the use of the
hydrotherapy spa from your home, to prevent
unauthorized use by children. You may want to
enclose the spa with a fence and self-latching
gate to prevent unauthorized use.
7. Be sure that there is room around the hydrothera-
py spa to permit servicing of the unit. The dimen-
sions of the spa are: 5’ 10” W x 6’ 4” L x 2’ 6” H
(153 cm x 183 cm x 61 cm). Make sure to allow
for this size when choosing the location.
8. The hydrotherapy spa is not designed for in-ground
installation. However, it is compatible with a deck
system that is built flush with the top of the spa,
provided you leave access to the motor for service.
9. Make sure to consider such factors as aesthetics
or privacy that may affect the safety or enjoyment
of using the hydrotherapy spa.

8
SET-UP AND ASSEMBLY
Before beginning assembly, carefully read t e
following information and instructions:
• Place all parts in a cleared area and remove the
packing materials from the spa shell; do not dis-
pose of the packing materials until assembly is
completed and the spa is in operation.
• Assembly requires two people.
•Note: ome small parts may have been pre-
attached for shipping. If a part is not in the parts
bag, check to see if it has been pre-attached.
• During assembly, make sure that all parts are ori-
ented as shown in the drawings.
• Read each assembly step before you begin.
•Tighten all parts as you assemble them, unless
instructed to do otherwise.
ASSEMBLY REQUIRES THE FOLLOWING
TOOLS (not included):
• One (1) p illips screwdriver
1. Before beginning assembly, make sure t at you
ave read and understand t e information on
t e previous two pages.
Remove the four cover screws from the access
cover. Remove the access cover from the spa by
sliding the access cover down and pulling the bot-
tom of it away from the spa. Be careful not to
damage t e Spa S ell (15).
2. Locate and check the positions of the two cut-off
valves. The cut-off valves may have been closed at
the factory during manufacturing. However, the cut-
off valves must be open for spa operation. To open
the valves, hold the handles and turn them until you
can pull them out to the open position. IMPORTANT:
THE MOTOR WILL BE DAMAGED IF IT IS OPER-
ATED WITH THE CUT-OFF VALVES CLOSED.
Close the valve knob on the drain hose. Thread the
cap onto the drain hose. Thread the drain plug into
the Pump Motor (13). Tighten the two pump fittings.
1
Access
Cover Cover
crews
pa
15
2
Cut-off
Valve
Pump
Fittings
Cut-off
Valve
Drain
Plug
Drain Hose
Valve
Knob
Cap
13

9
Fill to Here
4
5
5. Place the pa Cover (18) over the spa. Make sure
t at t e Spa Cover is centered.
nap a Buckle (2) onto each of the four latches on
the pa Cover (18).
Pull down one of the straps on the pa Cover (18)
and hold the Buckle (2) against the wood panels on
the side of the spa. (Note: To position the Buckle
correctly, have a second person hold the strap on
the opposite side of the pa Cover tight.) T e Spa
Cover must be tig t. Do not place t e Buckle
over t e grooves between t e wood panels.
Refer to the inset drawing. Remove the latch from
the Buckle (2). Attach the Buckle to the wood panel
with two Buckle crews (1). Note: It may be elpful
to use a drill wit a 1/16” bit to make starter
oles in t e wood panel. It may also be elpful to
apply a little soap or wax to t e screw t reads.
Attach the other three Buckles (2) to the wood panels
in the same way.
18
pa
pa
trap
2
2
1
trap Latch
6. Before using the spa, follow the instructions on page 13 to post the included warning sign. Do not allow t e
spa to be used before t e warning sign is posted.
4. Remove the two warning decals (not shown) from
the spa shell. Wipe out the spa shell using a damp
cloth. Before you fill the spa, make sure that it is in
the desired position and that it can easily be ser-
viced. Once the spa is filled with water, it must be
drained before it can be moved.
Using a garden hose or other clean water source,
begin filling the spa. Do not use soft water. You
may fill the spa with cool water; however, if you use
warm or hot water, the spa will be ready to use
sooner. Fill the spa until the water is about four
inches (10 cm) below the console. Do not overfill
t e spa.
3. The hydrotherapy spa is designed to operate with a 120 volt power source and must be wired directly to a
120 volt ground fault circuit interrupter (GFCI) installed in your home. T is procedure must be performed
by a licensed, qualified electrician and conform wit all local, state, and national electrical codes.
Before you have the spa wired, be sure that it is in the position you want, and that it can easily be serviced,
if needed.

10
USING THE HYDROTHERAPY SPA
The hydrotherapy spa is designed to seat two adults.
The ten thera-jets can be regulated to provide a relax-
ing massage to sooth away stress, and the strength
of the water massage can be adjusted by the air con-
trol. The hydrotherapy spa holds 200 gallons (167
imperial gallons) of water and offers an automatic,
programmable heating (70°F to 104°F [21°C to 40°C])
and filtration system.
The guidelines below explain how to properly use the
hydrotherapy spa. Follow these guidelines to maintain
the hydrotherapy spa for your long-term enjoyment.
TESTING THE GROUND FAULT CIRCUIT
INTERRUPTER (GFCI)
Turn on the hydrotherapy spa by pressing the pump
button on the console. Once the unit is running, press
the GFCI “test” button. The hydrotherapy spa should
shut off. Press the “reset” button. The hydrotherapy
spa should resume normal operation. If the hydrother-
apy spa continues to run after the “test” button is
pressed, then the GFCI is damaged. Do not use the
hydrotherapy spa until the GFCI has been repaired or
replaced by a qualified electrician.
TESTING AND TREATING THE WATER
The hydrotherapy spa comes with a starter chemical
pack for maintaining the water in the spa. Disregard
the directions on the individual packages of “QUICK
pHix It DOWN” and “QUICK pHix It UP.” However, the
directions on the bottle of “Non-chlorine hox” and
“Bromine Base” are correct. Always keep t e c emi-
cals away from c ildren and pets.
The first time you use the spa, you should test and
treat the water. You must also treat t e water eac
time you refill t e spa. Once you have verified that
the spa is functioning properly, and the water has cir-
culated for a while, remove the spa cover and add 1/3
of the “Bromine Base” bottle, and 1/3 of the “Non-
chlorine hox” bottle to the water. Allow the water to
circulate for five minutes. You should now test the pH
of the water using the included pH test kit. The pH
reading should be between 7.2 and 7.8.
If the level is too low, add one teaspoon from one of
the “QUICK pHix It UP” packets to the water. Let the
water circulate through the spa for five minutes. Test
the pH level again. Repeat until the pH level is cor-
rect.
If the level is too high, add one teaspoon from one of
the “QUICK pHix It DOWN” packets to the water. Let
the water circulate through the spa for five minutes.
Test the pH level again. Repeat until the pH level is
correct.
ee WATER CHEMI TRY on page 14 for information
concerning proper water maintenance.
STARTING THE HYDROTHERAPY SPA
Once you have tested the GFCI, you should verify the
water flow from the pumping unit. et the air control
on the console to the lowest setting (see U ING THE
CON OLE on page 12). The pumping unit will heat
the water as it pumps. Cover the hydrotherapy spa
with the spa cover. T e spa cover must be tig t.
( ee ECURING THE PA COVER on page 13.) The
water will heat at about 2.0°F (1°C) an hour with the
cover on. If you are using the spa indoors, and the
room temperature is maintained at 70°F (21°C), it will
take approximately 24 to 26 hours for the water to
reach the set temperature.
The temperature and water flow can be set or
changed by the controls on the console (see U ING
THE CON OLE on page 12).

11
A
A
B
B
D
C
E
B
A
A
SPA SHELL DIAGRAM
SPA OPERATION
Refer to the diagram above. The function of each
component is explained below:
The six uni-directional t era-jets (A) are located on
the sides of the spa. Five jets focus a water massage
on your upper or lower back. The remaining jet pro-
vides a foot hydro-massage when you are in the
reclining seat.
The t ree multi-directional t era-jets (B) can be
adjusted for a custom hydro-massage. One of the jets
is located on the reclining seat and focuses the water
massage on your lower back. Another jet is located
on one of the bench seats, below a uni-directional
thera-jet, and focuses a water massage on your lower
or middle back. The remaining jet, located on the
other bench seat, focuses a water massage on your
upper or lower back.
Note: Each thera-jet can be shut off by being pressed
in and turned back on by being pulled out.
The filter (C) can be removed for cleaning and
replacement (see page 17).
The suction vent (D), located near the floor of the
spa, brings the water into the pump, in order to oper-
ate the system. The suction cover should always be in
place over the suction vent. Never operate t e spa
wit out t e suction cover in place.
This spa is ozone ready. An optional ozone generator
can be installed to utilize the ozone jet (E). Ozone
provides a way to help sanitize your spa with minimal
chemical treatment.
The temperature probe (F) reads the current water
temperature, which is displayed on the console.
The spa also has a light (G) for evening use.
The spa features automatic freeze protection. If the
water temperature falls below 40°F (4°C), the pump
will begin circulating and heating the water to prevent
the water from freezing.
F
G

12
USING THE CONSOLE
Refer to the console diagram above. The function of
each console control is explained below:
Temperature Display: During normal use, this dis-
play shows the actual water temperature. When the
et Temp indicator is lit, the display will show the set
temperature.
Note: W en problems occur, t e temperature dis-
play may s ow an error code. T e error codes are
explained below:
HL High temperature protection mode. If the water
temperature rises above 115°F (46°C), the
heater will shut off. If the temperature rises
above 122°F (50°C), the high temperature cir-
cuit will shut off the entire system. In either
case, once the water has cooled to normal, you
can press any button to reset the system.
FrE Freeze protection mode. If the water tempera-
ture falls below 40°F (4°C), the pump will begin
cycling the water through the heater to raise the
temperature. This cycle will run for one minute
and may be repeated as needed.
FLC Flow related problems. You will need to call our
customer service department.
FLO Flow related problems. You will need to call our
customer service department.
PrH High temperature probe problem. You will need
to call our customer service department.
Prr Temperature probe problem. You will need to
call our customer service department.
Pump Button: This button turns the pump on and off.
When the pump is running, the LED indicator above
the button will light. To turn the pump on high, press
the button once. The thera-jets will operate at full
speed. To turn the pump on low, press the button
again. The thera-jets will operate at low speed. After
you press the button a third time, the thera-jets will
shut off, unless it is time for the heat or filter cycles. If
you turn the pump off and it continues to operate,
check to see if the Heat On or Filter On indicator is lit
to see if either cycle is running.
Lig t Button: This button turns the light on and off.
When the light is on, the indicator above the light but-
ton will light. Note: The light will automatically turn off
after two hours.
Set Temp Indicator: This indicator will light when the
temperature is adjusted using the up and down buttons.
The thermostat can be set to heat the water from
70°F to 104°F (21°C to 40°C). While you are setting
the temperature, the temperature display will show the
temperature setting. The temperature setting will
remain in the display for five seconds after you
release the buttons. The et Temp light will then turn
off and the display will show the actual water temper-
ature. The water heats at 2°F (1°C) per hour with the
cover on.
Filter On Indicator: This indicator lights when the
spa is running the filter cycle.
Note: To keep t e eat and filter cycles from run-
ning, s ut off t e circuit breaker or t e GFCI.
Heat On Indicator: This indicator lights when the spa
is running the heating cycle.
Air Control: The air control determines the amount of
air flowing through the spa jet system during operation.
If the control is turned to the left, the amount of air will
increase; if the control is turned to the right, the
amount of air will decrease.
CONSOLE DIAGRAM

13
SECURING THE SPA COVER
To secure the spa cover, snap the latches on the spa
cover into the buckles on the side panels.
To lock the buckles,
insert the key and
turn it clockwise 1/4
turn. To unlock the
buckles, insert the key
and turn it counter-
clockwise 1/4 turn.
Always keep t e
buckles locked
w en t e spa is not
in use. Keep t e
keys in a safe place, out of t e reac of c ildren.
ATTACHING THE RED AND BLUE LIGHT COVERS
The spa comes with
red and blue light
covers for the spa
light. To attach one of
the light covers, cen-
ter it over the spa
light and press it into
place.
Key
Latch
Buckle
Light
Cover
Light
PREVENT DROWNING
• pa heat speeds up the effect of alcohol, drugs,
or medicine and can cause unconsciousness.
• Immediately leave spa if uncomfortable or
sleepy.
DURING PREGNANCY, OAKING IN HOT WATER MAY CAU E
DAMAGE TO THE FETU . LIMIT U E TO 10 MINUTE AT A TIME.
PREVENT CHILD DROWNING
• Water attracts children.
• Always attach spa cover after each use.
POSTING THE WARNING SIGN
The included warning sign, shown below, must be posted on a wall or fence where it will be visible to all users
of the spa. Whenever the spa is moved, the sign must also be moved and reposted near the spa. If the sign
becomes lost or illegible, call our toll-free Customer Hot Line at 1-877-897-7493 to obtain a free replacement
sign. Post the sign as described above.

14
The hydrotherapy spa is designed to provide you with
years of enjoyment. Please follow the guidelines
below to properly maintain the spa.
MAINTENANCE SCHEDULE
DAILY
• Check the water level and refill the spa to the level
shown in step 4 on page 9.
• Check the pH balance and sanitizer level. Adjust if
necessary (see WATER CHEMI TRY below).
• Clean the surface of the water with a skimming net.
WEEKLY
• Clean the spa shell at the waterline.
• Check and thoroughly clean the filter (see CHECK-
ING AND CLEANING THE FILTER on page 17).
• Replace the filter if needed (see ORDERING
REPLACEMENT PART on the back cover).
MONTHLY
• Clean the spa cover (see MAINTAINING THE PA
COVER on the right).
• oak the filter for two hours in a trisodium phos-
phate (T P) solution. Rinse the filter in clean water.
• Replace the filter if needed (see ORDERING
REPLACEMENT PART on the back cover).
EVERY THREE MONTH
• Drain the spa and refill with clean water. anitize
and test the pH of the water.
• Check for any leaks around the pump or joints in
the pipes. The seals will wear out over time; detect-
ing leaks early can reduce repair costs.
• Clean the interior of the spa. Do not use solvents or
waxes.
EVERY IX MONTH
• Treat the exterior with a wood sealant (see MAIN-
TAINING THE PA EXTERIOR below).
MAINTAINING THE SPA EXTERIOR
The wood panel exterior has been treated with a
sealant at the factory to protect the wood from water
damage. We suggest that you treat the wood finish
twice a year with an additional coat of weather
sealant. Contact your local spa and pool supplier for
advice on which sealants work best in your climate.
CLEANING THE SPA SHELL
The spa shell should be cleaned with a mild soap
solution. Do not use solvents. The spa should always
be clean and dry before being moved or stored.
MAINTAINING THE SPA COVER
The spa cover should be cleaned monthly. To clean
the spa cover, use water and a non-abrasive cleaner
on the entire cover. Rinse the cover with a garden
hose to remove any cleaner residue. Dry the cover
entirely. You should also use a non-silicone based
vinyl conditioner on the cover after you clean it. This
will help protect the cover from sun damage.
REPLACING THE LIGHT BULB
If the light bulb in the spa burns out, first remove the
access cover to replace it (see ATTACHING AND
REMOVING THE ACCE COVER on page 15).
Locate the light housing. Turn the housing counter-
clockwise and remove it from the spa shell.
To replace the light bulb, pull the old bulb out of the
housing and insert a new bulb. Re-attach the light
housing to the spa shell. Re-attach the access cover
to the spa unit.
SANITIZING THE SPA
Please refer to your local pool and spa supplier for
information concerning which chemicals you should
use in your area to sanitize the spa.
The most common sanitizing agent is a solid bromine
concentrate. The amount required varies according to
several factors, such as user load, temperature, water
conditions, and so forth.
Proper water maintenance is a complex process.
Contact your local pool and spa supplier for informa-
tion on how you should accomplish this.
WATER CHEMISTRY
The hydrotherapy spa comes with a starter chemical
pack for maintaining the water in the spa. ( ee TE T-
ING AND TREATING THE WATER on page 10.)
MAINTENANCE
Light Housing
Light
Housing
Light
Bulb

15
Additional chemicals can be purchased at a pool and
spa supply store.
CAUTION: T e c emicals used to maintain t e pH
balance of t e water and to sanitize t e water can
be dangerous. Always follow t ese basic guide-
lines w en andling t e c emicals:
1. Always read and follow t e directions on t e
label, unless directed ot erwise.
2. Never mix different c emicals.
3. Do not exceed t e recommended amounts of
c emicals—follow t e directions on t e label
closely.
4. Keep all c emicals out of t e reac of c ildren
and pets.
5. Keep all containers closed tig tly w en not in
use.
6. Never add water to t e c emicals—always add
t e c emicals to t e water as directed.
7. Always store c emicals in a cool, dry place.
MAINTAINING THE PROPER PH BALANCE
The pH factor is a measure of relative acidity or alka-
linity in the water. It is measured on a scale of 1 to 14.
Pure water has a value of 7, which is neutral. Any
value above 7 is alkaline, and any value below 7 is
acidic. You should maintain a slightly alkaline pH
level, between 7.2 and 7.8, in the hydrotherapy spa.
evere problems can occur when the pH balance is
not maintained within this range. If the pH level
exceeds 7.8, dissolved minerals can build-up and clog
the plumbing in the spa jet unit. If the pH level falls
below 7.2, the acid level in the water will begin to cor-
rode the metal parts in the spa jet unit. Also, the sani-
tation agents in the water will not be effective if the pH
level is not properly maintained. Damage caused by
improper pH levels is not covered under the warranty.
To maintain the proper pH level, you should test the
pH of the water regularly, using the included pH test
kit. The pH reading should be between 7.2 and 7.8. If
the level is too low, add a pH increaser (usually soda
ash). If the level is too high, add a pH reducer (usually
sodium bisulfate). Test the water again after five min-
utes. ee the instructions with your pH test kit for addi-
tional information about testing and adjusting the pH.
ADJUSTING THE FILTER CYCLE
The spa filter cycle runs automatically to clean the
water in the spa. However, the number of times that
the filter cycle needs to run depends on how often the
spa is used.
If many different people use the spa regularly, the
water will need to be filtered more often than if it is
only used occasionally by a few. The number of daily
cycles, as well as the length of the cycle, can be
adjusted.
The pump can run one to three filter cycles daily. To
change the number of cycles, press the pump and up
buttons at the same time. The number of cycles will
appear in the temperature display. Use the up and
down buttons to select the desired number of cycles.
Each cycle can run for 60, 120, or 180 minutes. To
change the length of the cycle, press the light and up
buttons at the same time. The length of the cycle will
appear in the temperature display. Use the up and
down buttons to select the desired cycle length.
The pump or the light may turn on while you are
adjusting the filter cycle. If this happens, you can turn
the pump or light off once you have finished the
adjustment procedure.
ATTACHING AND REMOVING
THE ACCESS COVER
To remove the access cover, remove the four cover
screws from the access cover. lide the access cover
down and pull the bottom of the access cover away
Temperature
Display Pump and
Light Buttons Up and Down
Buttons
Cover crews
Cover
crew
Access
Cover
pa Unit
pa
hell

16
from the spa unit. Be careful not to damage t e spa
s ell as you remove t e cover.
To replace the access cover, insert the top of the
cover under the edge of the spa shell. lide the cover
up until the bottom of the cover will clear the trim
along the bottom of the spa unit. lide the cover into
place and re-attach the four cover screws.
If you will be storing the spa for any period of time,
you should place the power cord inside the spa unit
before re-attaching the access cover.
DRAINING THE HYDROTHERAPY SPA
The hydrotherapy spa should be drained at least four
times a year and refilled with clean water. You may
need to drain the spa more often, depending on the
user load. This must be done, because after repeated
chemical treatment, the water becomes chemically
saturated. Once this happens, additional chemical
treatment of the water is no longer effective. The spa
should also be drained if you will not be using it for
long periods of time. The spa must always be drained
before major repairs are made.
T e ydrot erapy spa s ould always be covered
w en it is empty. Direct sunlig t can cause exten-
sive damage. T e surface of t e spa s ell can
reac temperatures as ig as 150°F (65.5°C). in
a matter of minutes if exposed to t e sun w ile it
is empty. T ese ig temperatures can cause sig-
nificant damage, suc as blistering of t e s ell
surface and warping of t e spa s ell. Any damage
caused by sun exposure is not covered under
warranty.
To drain the hydrotherapy spa, follow these steps:
1. et the temperature control on the console to the
lowest setting.
2. Unplug the power cord.
3. Remove the access cover from the back of the
spa unit.
4. Remove the drainage hose from the clip and
attach a garden hose to the valve on the
drainage hose.
5. Open the valve by turning the knob counterclock-
wise. The water will begin to drain.
6. When the spa is empty, close the valve and
remove the garden hose. Return the drainage
hose to the clip and replace the access cover.
7. Refill the spa and treat the water with chemicals
(see pages 9, 10, 14 and 15).
DRAINING THE PUMP
After the hydrotherapy spa is drained (see DRAINING
THE HYDROTHERAPY PA above), the pump in the
spa jet unit should also be drained if the hydrotherapy
spa will be stored for more than thirty days, or if it
may be exposed to freezing temperatures.
To drain the pump,
remove the access
cover from the spa
unit (see ATTACHING
AND REMOVING
THE ACCE
COVER on page 15).
Locate the pump
inside the spa unit.
Remove the drain plug from the pump. Tip the spa jet
unit slightly, until all the water has drained from the
pump. Replace the drain plug.
OPENING AND CLOSING THE CUT-OFF VALVES
For minor repairs to the pump/motor, the cut-off
valves can be closed. To close the valves, remove
the access cover from the back of the spa unit.
Locate both cut-off valves. Push the handles into the
closed position and turn the handles until they lock
into place.
If you are planning to work on the pump/motor, you
will also need to drain the pump (see this page).
To open the valves, turn the handles until they are
unlocked, and pull the handles out to the open posi-
tion.
Drain Plug
Pump
Drain Hose
Valve
Knob
Cap
Cut-off
Valve Cut-off
Valve

17
WINTER USE AND CARE
The hydrotherapy spa is designed for year-round use.
If you decide to store the hydrotherapy spa for the
winter, store it in a warm, dry location. Follow the
steps below to winterize the hydrotherapy spa.
1. Drain the spa (see DRAINING THE
HYDROTHERAPY PA on page 16).
2. Remove all remaining water from the spa shell.
Dry the spa shell with towels.
3. et the air control on the console to the lowest
setting. Use a wet/dry vacuum to pull any remain-
ing water from the system. To do this, place the
vacuum nozzle over each thera-jet, starting with
the highest jet and finishing with the lowest one.
4. et the air control on the console to the highest
setting and repeat step 3.
5. Drain the pump (see DRAINING THE PUMP on
page 16). Once the water has drained from the
pump, place the vacuum nozzle over the
drainage hole in the pump and vacuum any addi-
tional water from the pump. Note: For additional
protection you can remove t e pump/motor
from t e spa to store it in a climate controlled
room.
6. Clean the spa shell (see page 14).
7. Clean the filter (see this page).
8. Re-attach the access cover.
9. Re-attach the spa cover.
CHECKING AND CLEANING THE FILTER
The filter should be checked periodically for build-up
of dirt and oil. To check or clean the filter, it is neces-
sary to remove the basket and the two filter car-
tridges from the filter housing.
Removing and Cleaning t e Basket:
1. Turn off the power.
2. Locate the filter housing in one corner of the spa.
Grip the tab on the filter door and pull it open.
3. Reach into the basket with four fingers and pull
the basket towards you until it snaps free.
4. Lift the basket out of the filter housing by pulling
on the handle on the far side and turning the bas-
ket towards you.
5. Clean the basket by spraying it with a garden
hose or holding it under a faucet. Note: Avoid
itting t e basket against objects to clean it,
since t is may break t e basket.
6. Put the basket back into the housing and press it
down until it snaps into place.
7. Close the filter door.
Removing and Cleaning t e Filter Cartridges:
1. Follow steps 1 through 4 at the left to remove the
basket.
2. Reach into the housing and locate the plastic
diverter on top of the filter cartridges. Rotate the
valve on the diverter until it is fully open.
3. tick two fingers into the holes in the diverter and
lift the diverter and the upper filter cartridge
directly upwards until the edge of the diverter
clears the housing. Then, tip the diverter towards
yourself and pull it out. Note: If the diverter
comes off the filter cartridge, reach into the hous-
ing and lift out the upper filter cartridge.
4. Lift the lower filter cartridge out of the housing.
5. Clean the filter cartridges with a garden hose or
under a faucet. pray each pleat from top to bot-
tom. Note: To avoid damaging t e filter car-
tridges, do not use a brus to clean t em.
6. To remove body oils or sun tan lotions, soak the
filter cartridges in a cleaning solution purchased
from a pool and spa supply store.
7. Inspect the filter cartridges for damage. Replace
the filter cartridges if there is any sign of damage.
8. Put one filter cartridge back into the housing.
9. Push the tube on the diverter into the other filter
cartridge as far as it will go. Put the other filter
cartridge into the housing.
10. Put the basket back into the housing and press it
down until it snaps into place. Close the filter door.
ADJUSTING THE FILTER DIVERTER
The diverter regulates the flow of water to the filter in
order to make the pump run smoothly. Open the
diverter fully to begin with. If the pump runs smoothly,
no further adjustment is necessary.
If the pump begins to cavitate (if you hear a “cracking”
sound or if the speed of the pump surges up then
slows down repeatedly), turn the valve slightly to
reduce the water flow. Keep adjusting the valve in
small increments until the pump runs smoothly.

18
1. SYMPTOM: THE SPA WILL NOT OPERATE
a. Check to see if the GFCI breaker is tripped, or
was not turned on. Reset the GFCI breaker.
b. Remove the access cover and locate the
heater switch on the side of the heat controller.
Make sure that the heater switch is in the “on”
position. Important: T e spa will not operate
if t e eater switc is in t e “off” position.
2. SYMPTOM: THE CIRCUIT BREAKER OR THE
GFCI TRIPS WHILE THE SPA IS OPERATING
a. Reset the circuit breaker or the GFCI. If the cir-
cuit breaker or the GFCI trips again, contact a
qualified electrician for service.
3. SYMPTOM: THE PUMP HUMS
a. The filter may be dirty or damaged. Remove
the filter housing from the spa jet unit and clean
or replace the filter.
b. The pump may have a foreign object stuck in
the impeller. Contact our customer service
department or, if your spa is no longer under
warranty, you may also contact a local spa and
pool service provider.
c. The pump may have a loose wire connection.
Contact our customer service department or, if
your spa is no longer under warranty, you may
also contact a local spa and pool service
provider.
4. SYMPTOM: THE PUMP HUMS BUT DOES NOT
ROTATE
a. The pump may be jammed. Contact our cus-
tomer service department or, if your spa is no
longer under warranty, you may also contact a
local spa and pool service provider.
5. SYMPTOM: THE PUMP IS NOISY WHILE
OPERATING
a. There may be debris in the pump. Contact our
customer service department or, if your spa is
no longer under warranty, you may also contact
a local spa and pool service provider.
b. The pump may have a bad bearing. Contact
our customer service department or, if your spa
is no longer under warranty, you may also con-
tact a local spa and pool service provider.
6. SYMPTOM: THE WATER DOES NOT HEAT
a. Make sure that the hydrotherapy spa is fully
covered with the spa cover. T e spa cover
must be tig t for t e water to eat. et the
air control to low. et the temperature to the
desired setting. The water will heat at a rate of
2.0°F (1°C) an hour. If you are using the spa
indoors, and the room temperature is main-
tained at 70°F (21°C), it will take approximately
24 to 36 hours for the water to reach the set
temperature.
b. If you are using the hydrotherapy spa outdoors,
it may take longer for the water to heat. ee
the chart below for the approximate heating
time.
Air Temperature Heating Time
70°F+ (21°C+) 24 to 36 hours
50°F to 70°F (10°C to 21°C) 2 to 3 days
30°F to 50°F (1°C to 10°C) 3 to 4 days
b. If the water still has not heated after four days,
contact our customer service department or, if
your spa is no longer under warranty, you may
also contact a local spa and pool service
provider.
c. If actual water temperature is lower that the set
temperature, and the Heat On LED indicator on
the console is not lit, contact our customer ser-
vice department. If your spa is no longer under
warranty, contact a local spa and pool service
provider.
TROUBLE-SHOOTING
Most problems can be solved by following t e simple steps below. Find t e symptom t at applies, and
follow t e steps listed. If furt er assistance is needed, call our Customer Service Department toll-free at
1-877-897-7493, Monday t roug Friday, 6 a.m. until 6 p.m. Mountain Time.

19
7. SYMPTOM: THE WATER IS NOT BEING
CLEANED BY THE FILTER
a. Check to see if the filter is in place. Clean the
filter if it is dirty.
b. Check the chemical balance of the water. If the
pH is incorrect, the sanitizing agents will not
function properly.
8. SYMPTOM: THE WATER PULSATES OR
THERE IS MINIMUM WATER FLOW
a. Adjust the water level. This usually occurs only
when the water level is low. Add water until the
thera-jets are covered (see step 4 on page 9).
9. SYMPTOM: THE WATER LEVEL DROPS
a. ome water loss due to evaporation is normal.
If rapid water loss occurs, or if you notice wet-
ness on the floor around the hydrotherapy spa,
then the spa shell may have a leak. Contact
your local spa and pool service provider for
repairs.
b. A clamp or seal inside the pump compartment
may be loose. Check inside the pump compart-
ment for excess water, and watch the pump
unit while it is operating to see if water drips
from any of the plumbing. If you can identify the
location of the leak inside the spa jet unit, tight-
en the clamp or replace the damaged seal.
10. SYMPTOM: THE SPA CONTINUES TO RUN
AFTER IT HAS BEEN SHUT OFF
a. To turn the spa jets on, press the Pump button
once. To turn the spa jets off, press the control
twice. After you press it once, the spa jets will
shut off for about 30 seconds, and restart.
Press the control again. The spa jets will
remain off for three hours, at which time they
will begin running the filter cycle. At any time
after the spa jets has been shut off, the pump
will begin cycling the water if the temperature
falls below the minimum setting.
11. SYMPTOM: NO AIR FLOWS THROUGH THE
MULTI-DIRECTIONAL HYDRO-JETS WHEN
THE AIR CONTROL IS TURNED COUNTER-
CLOCKWISE
a. The three multi-directional hydro-jets can be
closed and opened by pushing and pulling the
nozzles. If no air flows through the jets when
the air control is turned counterclockwise, sim-
ply pull the nozzles slightly.

20
PART LIST—Model No. 831.105100 R0400A
Note: “#” indicates a non-illustrated part. pecifications are subject to change without notice.
1 8 Buckle crew
2 4 Buckle
3 6 Motor crew
4 4 Motor Washer
5 4 Rubber Insulator
6 1 Blue Lens
7 1 Zip Tie
8 1 Nylon Cord
9 1 Heat ensor
10 2 Filter Cartridge
11 1 Hose Cap
12 1 Rubber Damper
13 1 Pump Motor
14 1 Heat Controller
15 1 pa hell
16 1 Console
17 1 Control Knob
18 1 pa Cover
19 1 Red Lens
20 2 Large tar Washer
21 1 Wire Harness
22 2 1/4” x 1/2” crew
23 2 Wing Nut
24 1 Console Bracket
25 1 Cover crew
26 1 uction Cover
27 3 Rubber Washer
28 1 1/2” O-ring
29 1 Drain Plug
30 1 Hose Washer
31 1 ensor Fitting Assembly
32 2 #6 Lock Washer
33 1 Rubber Gasket
34 2 1/4” Nut
35 1 1/2” Plumbing Elbow
36 1 2” O-ring
37 1 Filter Door
38 1 Foam, Weir
39 1 Trim Plate
40 1 Diverter Valve
41 1 Diverter
42 1 Basket
43 10 #8 x 1 1/2” crew
44 1 Heater witch
45 4 mall tar Washer
46 4 Heater Control crew
47 2 mall Index Nut
48 2 Adjustment Bracket
49 2 mall Bracket crew
50 1 uction Fitting
51 3 Multidirectional Jet
# 4 Panel crew
#2Key
# 1 tarter Chemical Pack
# 1 User’s Manual
# 1 Light Bulb
Key No. Qty. Description Key No. Qty. Description
EXPLODED DRAWING—Model No. 831.105100 R0400A
37 38
3940
41
42
10
43
619
11
36
35
33
30
Other manuals for Renew 510 Spa
1
This manual suits for next models
2
Table of contents
Other Weslo Hot Tub manuals

Weslo
Weslo Daybreak 408cream Pe User manual

Weslo
Weslo Wl Daybreak 3person Spa User manual

Weslo
Weslo Daybreak 510blue User manual

Weslo
Weslo Daybreak 615blue User manual

Weslo
Weslo WLSB63940 User manual

Weslo
Weslo Daybreak 300 User manual

Weslo
Weslo Daybreak 408 Spa User manual

Weslo
Weslo WLSB62810 User manual

Weslo
Weslo Daybreak 515 Spa User manual

Weslo
Weslo Daybreak 860 User manual