manuals.online logo
Brands
  1. Home
  2. •
  3. Brands
  4. •
  5. WESTBRASS
  6. •
  7. Bathroom Fixture
  8. •
  9. WESTBRASS D206PS User manual

WESTBRASS D206PS User manual

Remove excess sealant from nished side.
Retire el exceso de sellador del lado acabado.
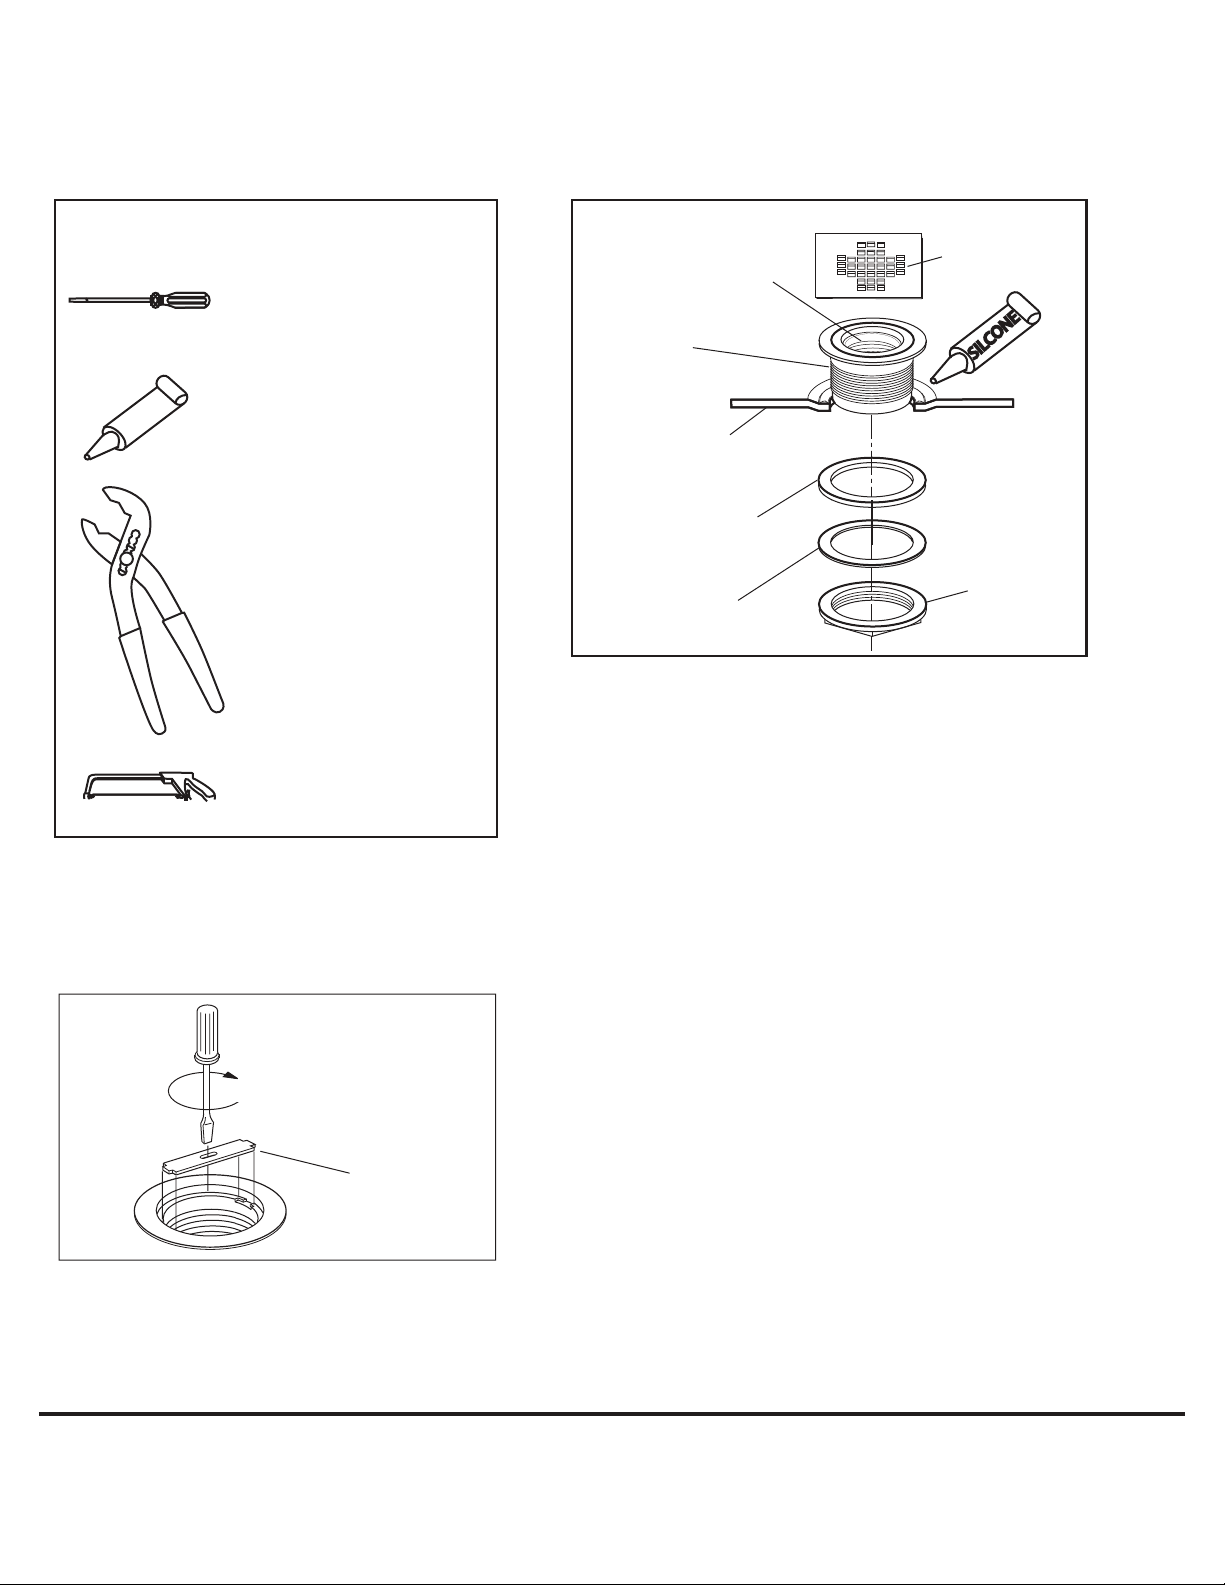
TIGHTEN SEALING NUT
TOOL
(INCLUDED)
Remove the tool, locking
mechanism and rubber seal
from the inside of the shower
drain. Lubricate the seal with
common household liquid
soap and slide it over the 2”
drain pipe. With a large
screwdriver and the tool
provided, tighten the
compression nut to seal the
drain pipe connection. After
the drain is fully installed
check for proper drainage
and inspect for leaks.
Fine Decorative Plumbing Since 1935
WESTBRASS
ASME A112.18.1 / CSA B125.1
YOU MAY NEED:
USTED PUEDE NECESITAR:
Screwdriver
El destornillador
Silicone Sealant: Use silicone
sealant under base of fauc
Sellador de silicón: Siel
lavamanosestádesniveladous
sellador de silicón debajodela
base delborde.
Pliers: For removal and instal
lation.
Alicates: Para quitar y insta
lación.
Hacksaw
Sierra parra mentales
SILCONE
STRAINER
DRAIN
ASSEMBLY
SHOWER BASE
RUBBER WASHER
FIBER WASHER NUT
APPLY LUBRICANT
D206PS or
D206BS
Instalación:
Retire el ltro de la drenar el
montaje. Desmontar la tuerca
de seguridad y dos empaqu-
etaduras de la parte posterior
de la fuga asamblea. Aplicar
un cordón de cuarto calafa-
teo (silicona ) para el desagüe
agujero e inserte el desagüe
Asamblea. Vuelva a colocar la
goma lavadora , arandela de
bra, bloquear la tuerca en
ese orden. Apriete la tuerca
de seguridad. No apriete
demasiado.
Retire la herramienta , mecanismo
y junta de goma de bloqueo
desde el interior del desagüe de la
ducha. Lubrique el sello con jabón
líquido común de la casa y
deslícela sobre la tubería de
drenaje de 2". Con un destornilla-
dor grande y la herramienta de
dotación, apriete la tuerca de
compresión para sellar la conexión
de la tubería de drenaje. Después
de que el drenaje se instala
totalmente cheque por un drenaje
adecuado y verique que no haya
fugas.
Installation:
Remove the strainer from
the drain assembly. Disas-
semble the locknut and two
gaskets from the back of the
drain assembly. Apply a 1/4"
bead of caulking(silicone)to
the drain hole and insert the
drain assembly. Replace the
rubber washer, ber washer,
and lock nut in that order.
Tighten the locknut. Do not
overtighten.
Snap on drain cover.
Broche de presión en la cubierta de drenaje.
WESTBRASS
s%/LYMPIC"LVD,OS!NGELES#!
ssORDERS WESTBRASSCOMsWWWWESTBRASSCOM

This manual suits for next models

1

Other WESTBRASS Bathroom Fixture manuals

WESTBRASS L685LF-SS User manual

WESTBRASS

WESTBRASS L685LF-SS User manual

WESTBRASS WAS00X-07 User manual

WESTBRASS

WESTBRASS WAS00X-07 User manual

Popular Bathroom Fixture manuals by other brands

RAVAK ELEGANCE ESD2 110 manual

RAVAK

RAVAK ELEGANCE ESD2 110 manual

Tres Tres-Clasic 24214601 manual

Tres

Tres Tres-Clasic 24214601 manual

Hans Grohe Croma 100 Multi 28538000 Assembly instructions

Hans Grohe

Hans Grohe Croma 100 Multi 28538000 Assembly instructions

Guglielmi SAVE XS manual

Guglielmi

Guglielmi SAVE XS manual

Kohler K-706139 Installation and care guide

Kohler

Kohler K-706139 Installation and care guide

Brizo MULTICHOICE R75000 manual

Brizo

Brizo MULTICHOICE R75000 manual

Produits Neptune TARON Installation

Produits Neptune

Produits Neptune TARON Installation

LF Style Selections 2619KKMV manual

LF

LF Style Selections 2619KKMV manual

Hans Grohe Rainfinity 250 3jet 26232 Series Assembly instructions

Hans Grohe

Hans Grohe Rainfinity 250 3jet 26232 Series Assembly instructions

Swann Swanstone Series manual

Swann

Swann Swanstone Series manual

Crosswater Limit LI120WNC manual

Crosswater

Crosswater Limit LI120WNC manual

Relax Light AB 63 Assembly instructions

Relax

Relax Light AB 63 Assembly instructions

agape BUCATINI ABUC0160 Assembly instructions

agape

agape BUCATINI ABUC0160 Assembly instructions

Glacier bay 874X-0001 Installation and care guide

Glacier bay

Glacier bay 874X-0001 Installation and care guide

BEMMA TERRA 36 Assembly instructions

BEMMA

BEMMA TERRA 36 Assembly instructions

Artweger WALK IN 9WR D9 Series Assembly instructions

Artweger

Artweger WALK IN 9WR D9 Series Assembly instructions

baliv WA-5892 Series manual

baliv

baliv WA-5892 Series manual

URIDAN CREW GR1200-10 installation instructions

URIDAN

URIDAN CREW GR1200-10 installation instructions

manuals.online logo
manuals.online logoBrands
  • About & Mission
  • Contact us
  • Privacy Policy
  • Terms and Conditions

Copyright 2025 Manuals.Online. All Rights Reserved.