manuals.online logo
Brands
  1. Home
  2. •
  3. Brands
  4. •
  5. WESTBRASS
  6. •
  7. Bathroom Fixture
  8. •
  9. WESTBRASS WAS00X-07 User manual

WESTBRASS WAS00X-07 User manual

Fine Decorative Plumbing Since 1935
WESTBRASS
Bathroom Faucet
Models: WAS00X-07, WAS00X-12A, WAS00X-26
Llave Para Lavamanos
Modelos: WAS00X-07, WAS00X-12A, WAS00X-26
ASME A112.18.1 / CSA B125.1
YOU MAY NEED:
USTED PUEDE NECESITAR:
Water Supply Connectors not
provided. Choose connectors
with 1/2” iron pipe outlet
connections.
El Tubo De Abasto No Es
Proveido. Selectione su tubo de
abasto con connector de 12,7mm
para tubo de hierro.
Important: Use Teon Tape on
all threaded connections.
Importante: Use cinta para
plomero todas las conexiones
roscadas.
Silicone Sealant: Use silicone
sealant under base of faucet.
Sellador de silicón: Si el lavama-
nos está desnivelado use sellador de
silicón debajo de la base del borde.
Wrenches: For faucet removal
and installation.
Llaves: Para quitar y instalación
de lavamanos.
SILCONE
Aerator
(WaterSense)
Aireador
Bonnet Nuts
Botones
Lever Handle
w/ Screws
Palancas con
Tornillos
Ceramic Cartridge
Cartucho de Ceramica
Spacer
Separador
Locknuts
Contratuercas
Complete Pop-up Assembly
Ensamble Completo del
Desague Automatico
1. Shut o Water Supply:
Remove old faucet. Place gasket on bottom of faucet.
Use silicone seal between gasket and sink surface.
2. Secure faucet to sink:
Using locknuts provided. Do not over tighten. Clean-
up excess silicone.
3. Install water supplies (Not included):
To bottom of faucet. Use connectors to t on 1/2”
iron pipe.
4. Install pop-up body using silicone sealant:
Under the ange, between ange and sink. Replace
black gasket (at side down) on nut and hand tight-
en nut. Place drain with pivot entry facing towards
faucet. Clean-up excess silicone.
5. Install pop-up drain assembly:
Using removable or non-removable pop-up
installation.
1. Cierre el Suministro de Agua:
Quite la llave vieja. Coloque el empaque en la
parte inferior de la llave. Asegúrese de aplicar un
sellador con base de silicón entre el empaque de
la llave y el lavamanos.
2. Fife la llave al fregadero:
Con las contratuercas proporcionadas. Apriete
Solo Con La mano.
3. Conecte al tubo de abasto.
Nota: El Tubo De Abasto No es proveido. Sele-
cione su tubo de abasto con conector de 12,7mm
para tubo de hierro.
4. Instale el cuerpo del desagüe con sellador
con base de silicón:
Debajo de la brida. Reemplace el empaque negro
(el lado plano hacia abajo) y la tuerca. Apriete a
mano la tuerca. El hoyo del pivote debe de estar
viendo la parte trazera del fregadero.
5. Instale el ensamble del desagüe automático.
Instalacion Separable o Instalacion No Separable.
Care Instructions
Care should be given to the cleaning of this product.
To Clean
Wipe gently with a damp cloth.
Blot dry with a soft towel.
Maintenance
Shut O Water Supply before replacing Cartridge.
If faucet leaks from spout:
Replace Ceramic Cartridge. URP33447 and URP33448
If Faucet exhibits low ow:
Remove and Clean Aerator
Install cartridges correctly for proper handle rotation:
For Lever handles, the stops must point to the right when
installed.
Instrucciones Sobre el Cuidado
Se debe tener cuidado con la limpieza de este producto.
Para limpiaria:
Frote con un Paño húmedo.
Séquela con una toalla sueve.
Mantenimiento
Cierre Los Suministros De Agua.
Si la llave tiene fugas en la salida:
Reemplace Cartucho de Cerámica, Equipo para Reparación
URP33447 y URP33448
Si la llave muestra un ujo muy bajo:
Quite y limpie el aireador
Instale los cartuchos correctamente para una giración
correcta de la manija:
Para manijas de palanca, los topes deben se señalar a la
derecha cuando son instalados.
2429 East Olympic Blvd. • Los Angeles, CA 90021 v
Drain and Strainer Finishes:
(01) PVD Polished Brass (26) Polished Chrome (07) Satin Nickel
(12) Oil Rubbed Bronze (50) Powder Coated W (62) Powder Coated Flat Black
CARE & MAINTENANCE
TO CLEAN:
Do not allow your product to come into contact with any cleansers forti-
Soft Scrub, Dawn Liquid Soap, Palmolive or any other combined cleaners
contain certain chemical components that will dissolve and remove the
warm water and mild soap on a soft cloth or sponge. Avoid using any
sponge with a scouring pad to clean your product. It is not necessary to
rub hard to remove spots.
and living, require some care in use.
WARRANTY
arofdetnarrawsistcudorpllafoytilanoitcnufehT
retawynanosevlavcsidcimareC.raeyonefodoirep
delivery merchandise are warranted for one year. Warran-
ties are guaranteed to the original purchaser only. Product
problems attributable to abuse, misuse, improper instal-
lation, hard water, neglected maintenance or accidental
damage are not covered by this warranty. Modifying the
product in any way voids the warranty. The use of plumb-
er’s putty on our products also voids the warranty. Silicone
sealing compounds should be used instead. No repairs
or replacements will be made under such circumstances
except at customer’s expense. Liability under warranties
expressed or implied is limited to repair or replacement of
defective goods only. In no event will Westbrass be liable for
incidental or consequential damages (such as labor charges).
This warranty does not cover labor charges, whether based on
breach of express or implied warranty, breach of contract,
negligence or any other legal theory.
TO PROTECT:
An occasional application of Carnauba wax
(without cleaners), like that found in Flitz Fau-
cet Wax, Turtle Wax for Clear Coat Car Finishes
or McGuire’s Premium Wax, will enhance the
Functional Warranty:
Other Westbrass nishes, including living nishes and other electroplated nishes carry no warranty.
WESTBRASS • 2429 E. Olympic Blvd., Los Angeles, CA 90021
(213)-627-8441 • (213) 627-2844 • [email protected] • www.westbrass.com
WARRANTY
CARE INSTRUCTIONS
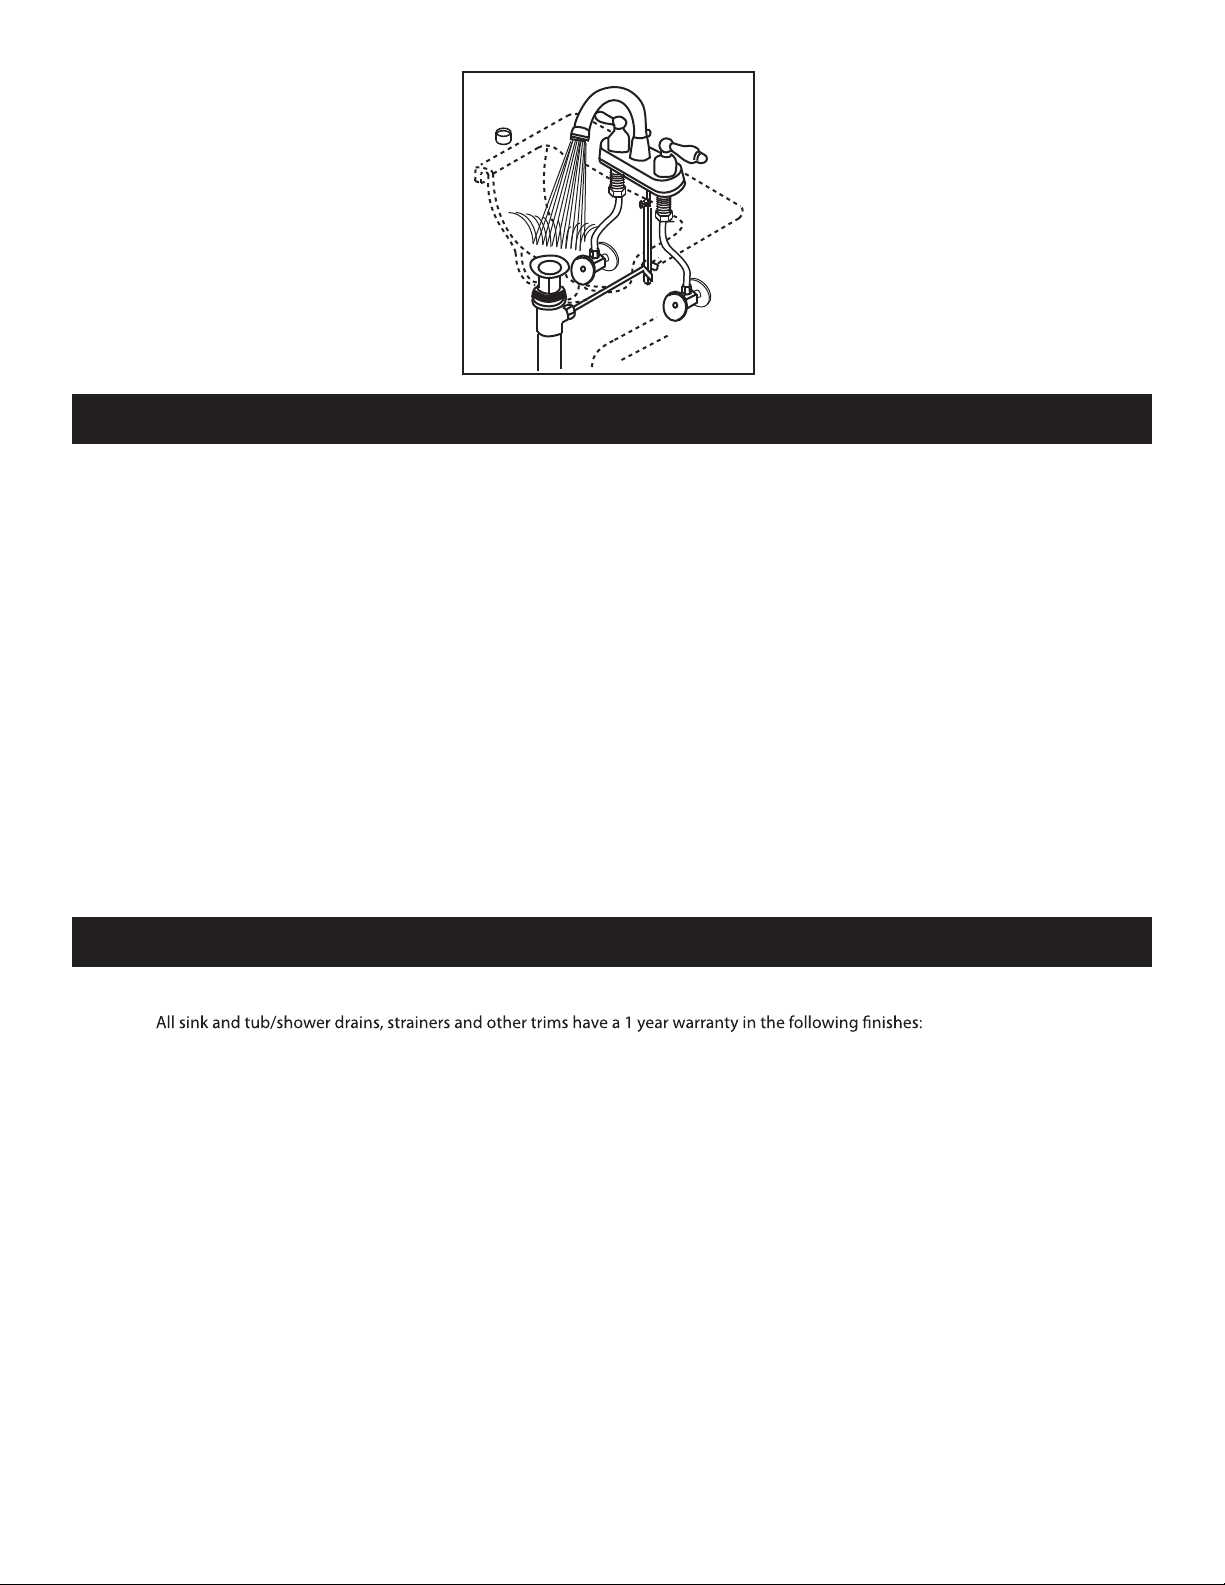
6. Important: After installation is com-
plete, remove aerator by turning counter-
clockwise, turn handles on to full on mixed
position. Turn on water supplies and check
for leaks. Let lines ush for one minute to
eliminate debris and ush valves, without
moving handles. After ushiing, shut o
water at faucet and replace aerator.
Importante: Después que la instalación
está completa, quite el aireador, gire la
mannijas a la posición de temperatura
mixta y ábraio al máximo. Abras las líneas
de suministro e inspeccione en caso
de fugas, dejando que uya el agua un
minuto entero sin mover la manijas de la
llave. Esto hará salir toda partícula o basura
de la linea, la cual podría causar daños a
componentes internos de la llave o causar
fugas. Después de hacer esto, cierre la llave
y reemplace el aíreador.

This manual suits for next models

2

Other WESTBRASS Bathroom Fixture manuals

WESTBRASS D206PS User manual

WESTBRASS

WESTBRASS D206PS User manual

WESTBRASS L685LF-SS User manual

WESTBRASS

WESTBRASS L685LF-SS User manual

Popular Bathroom Fixture manuals by other brands

Spectrum Brands Pfister Arkitek 016-LPMK Quick installation guide

Spectrum Brands

Spectrum Brands Pfister Arkitek 016-LPMK Quick installation guide

Monogram Brass MB522BN instructions

Monogram

Monogram Brass MB522BN instructions

Hans Grohe Unica'A 27820 Series manual

Hans Grohe

Hans Grohe Unica'A 27820 Series manual

PolyJohn HandStand 2 PSW2-1000 user manual

PolyJohn

PolyJohn HandStand 2 PSW2-1000 user manual

FORENO PUR040 quick guide

FORENO

FORENO PUR040 quick guide

Kohler K-705790 Homeowner's guide

Kohler

Kohler K-705790 Homeowner's guide

Signature Hardware LENTZ 951354 quick start guide

Signature Hardware

Signature Hardware LENTZ 951354 quick start guide

Luca Varess Nona 5414599490688 installation guide

Luca Varess

Luca Varess Nona 5414599490688 installation guide

Zenna Home 2128BM Assembly instructions

Zenna Home

Zenna Home 2128BM Assembly instructions

Majestic Como vJUN19 installation guide

Majestic

Majestic Como vJUN19 installation guide

Kohler Englefield K-5627X Installation and care guide

Kohler

Kohler Englefield K-5627X Installation and care guide

Kohler K-705767 Installation and care guide

Kohler

Kohler K-705767 Installation and care guide

JADO Hatteras 842 027 Series installation instructions

JADO

JADO Hatteras 842 027 Series installation instructions

MCBATH SCALA instructions

MCBATH

MCBATH SCALA instructions

STEIN EASYCLEAN WASTE instruction manual

STEIN

STEIN EASYCLEAN WASTE instruction manual

Pulse Shower Spas Hana 1012 instructions

Pulse Shower Spas

Pulse Shower Spas Hana 1012 instructions

Hans Grohe Raindance Select E 150 26550000 Assembly instructions

Hans Grohe

Hans Grohe Raindance Select E 150 26550000 Assembly instructions

Naterial 3276007426380 instruction manual

Naterial

Naterial 3276007426380 instruction manual

manuals.online logo
manuals.online logoBrands
  • About & Mission
  • Contact us
  • Privacy Policy
  • Terms and Conditions

Copyright 2025 Manuals.Online. All Rights Reserved.