Westend Audio Systems Monaco User manual

Dear customer
Thank you for purchasing this Westend Audio Systems product. You now own a versatile,
excellent sounding hifi component. Before en oying music, please read this manual
carefully. After that you will know how to use your new Monaco in the optimal way.
Sincerely yours,
Stefan Trog (CEO)
Declaration of conformity (for EC only)
We hereby confirm, that the unit to which this manual belongs fulfills the EC rules
necessary to obtain the sign
the necessary measurements were taken with positive results.
Westend Audio Systems GmbH
Siegenburgerstraße 10
D-81373 Munich
Germany
www.westendaudiosystems.de

Table of contents
1 Getting started Page 3
1.1 What's in the box Page 3
1.2 Packaging instructions Page 3
1.3 Control and operating elements Page 3
1.3.1 Front panel Page 3
1.3.2 Rear panel Page 4
1.4 First operation Page 4
1.4.1 Switching on for the first time Page 4
1.4.2 Installation and cooling Page 4
1.5 Connection to mains Page 4
1.6 Connecting signal sources Page 5
1.7 Connecting loudspeakers Page 5
2 Basic operation Page 5
2.1 Turning on and off Page 5
2.2 Selecting the signal source Page 6
2.3 Volume setting Page 6
3 Remote control Page 6
3.1 Layout Page 6
3.2 Advanced settings Page 8
3.2.1 Tube bias Page 8
3.2.2 Dimming main LEDs Page 9
3.2.3 Dimming front LEDs Page 9
3.2.4 Setup Main Menu Page 10
3.2.4.1 Level setup Page 11
3.2.4.2 Fix level setting Page 11
3.2.4.3 Shutdown/Auto-turn off Page 13
3.2.4.4 Tube lifetime Page 14
3.2.4.5 Leaving the setup menu Page 15
3.2.4.6 Setup Reset / Factory default Page 15
4 Appendix Page 16
4.1 Cleaning Page 16
4.2 Troubleshooting Page 16
4.3 Conditions of warranty (EC only) Page 16
5 Technical Data Page 17

1 Getting started
1.1 What's in the box
• Monaco integrated amplifier
• Power cord (in some countries)
• Remote control
1.2 Packaging instructions
The Monaco comes in a rugged and sturdy flight case. Please note that the flightcase is
not symmetrical. If you want to put the unit into the flight case again, please ensure that it
is correctly positioned.
1.3 Control and operating elements
The drawings below show the control elements. The operation of the unit is as follows.
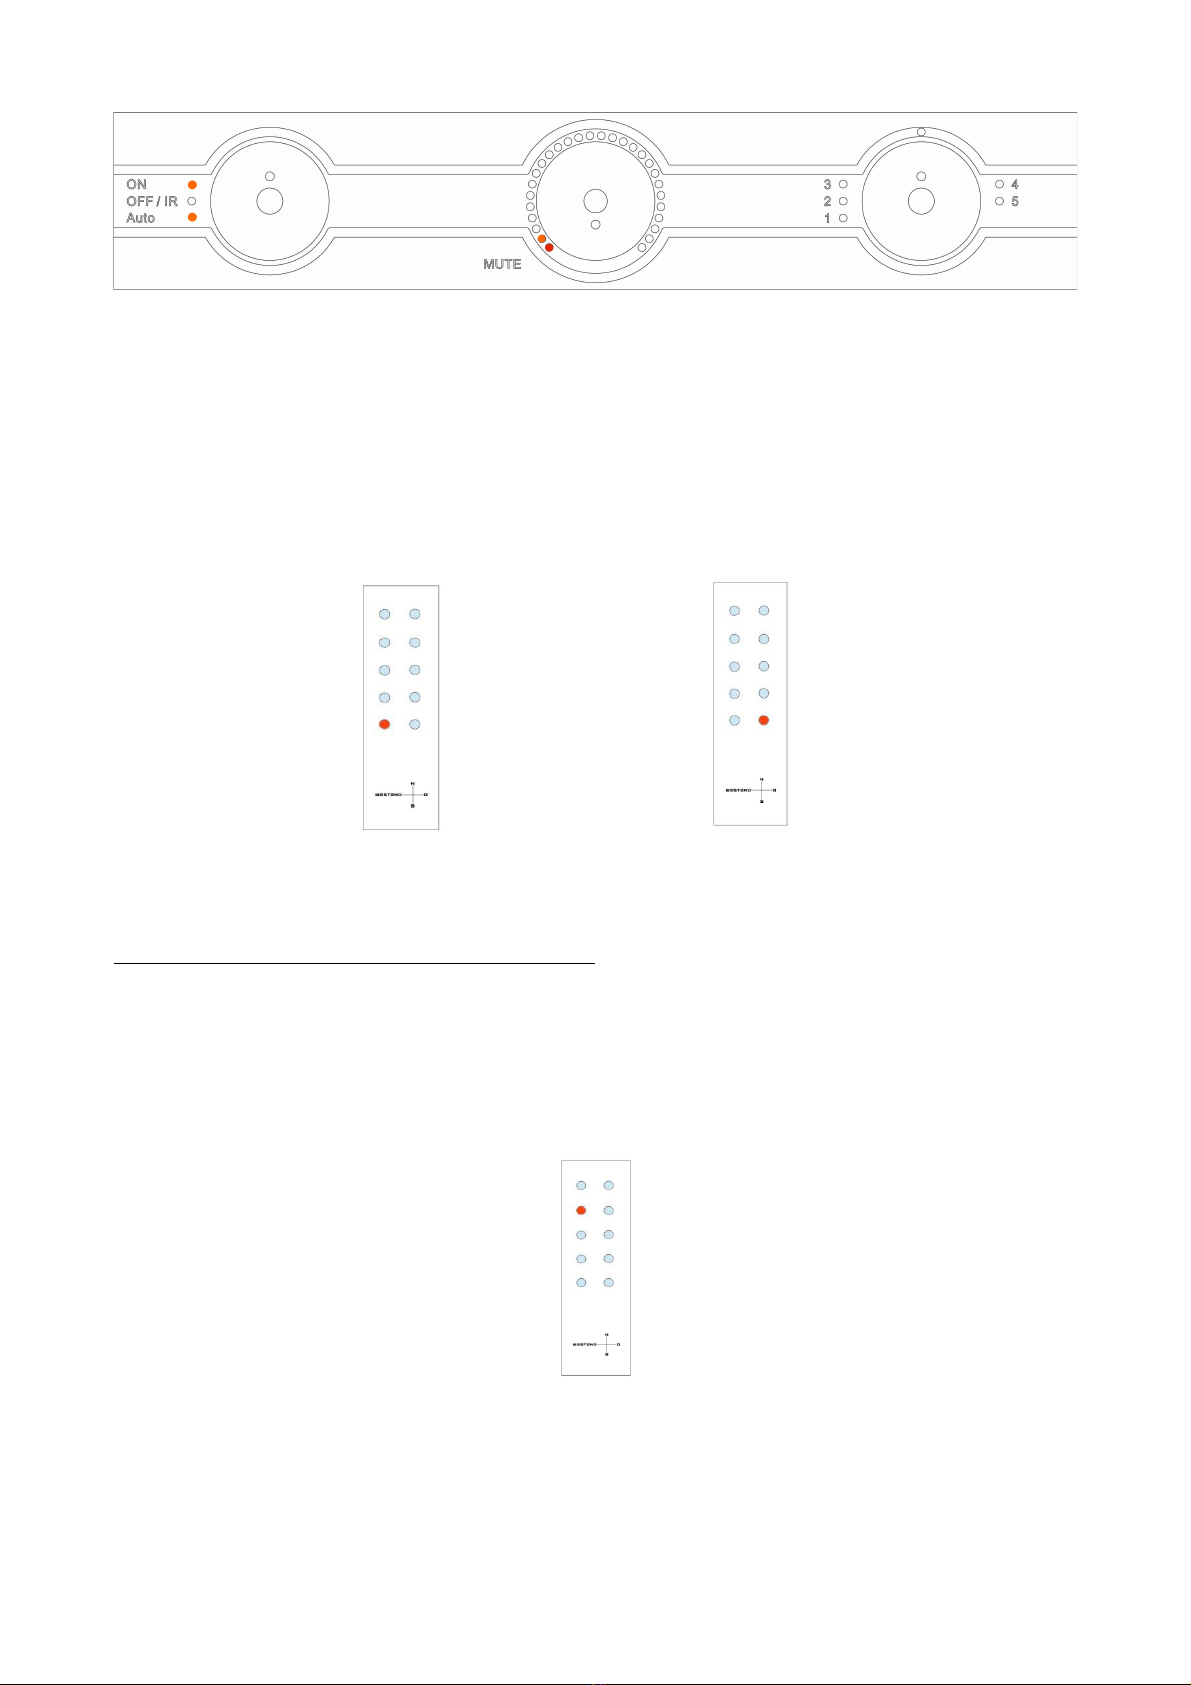
1.3.1 Front
On the left hand side is the mode selector. I t offers three operational modes –
(permanently) ON, OFF/IR and Auto.
●By turning the selector to Auto, the Monaco will power on as soon as the source
starts playing. After some time without signal, the Monaco powers off.
In this mode one of the SOURCE-LEDs is also lit. Using the SOURCE knob you can
choose the input from which the unit is triggered, when the corresponding source
supplies a music signal.
●By turning the selector to OFF/IR, the Monaco will power on and OFF upon remote
control command
●By turning the selector to ON the Monaco is permanently on and cannot be turned
off with remote control (other functions of remote control will of cours work). To shut
down the Monaco, the selector must be turned to OFF/IR. Then the MONACO will
switch to standby within 2 seconds.
REMARK: While powered on the Monaco can be controlled completely by remote control,
only the power on and power off functions are affected by the mode chosen.
In the middle of the front panel is the volume control knob – it shows the volume chosen by

LED the actual volume setting is indicated by the LED ring around the volume knob. When
the volume knob is turned slowly the Monaco changes the volume in 0,5dB steps and the
LED switches to the next one after seven clicks on the remote control seven times. When
the knob is turned faster, volume will change more coarse.
If you press Mute on the remote control, the most left LED of the LED ring is lit red.
Pressing MUTE again or changing volume by remote control or volume knob will unmute
the MONACO
The knob on the right side selects the input. The corresponding LED is ON.
1.3.2 Rear panel
The elements on of the rear panel are from left to right:
●Right channel loudspeaker output
●Pre-out XLR/balanced
●Fix-out RCA/Cinch for e.g. Headphone amplifiers
●Inputs 4-5 RCA/Cinch
●Inputs 1-3 XLR/balanced
●Left channel loudspeaker output
●Connector for SW updates, phase-control* LED, connector for external IR receiver
●AC power connector
* Correct mains phase means the LED is dark. So if the phase indicator is lit, unplug the
powercord from walls outlet and reinsert it turned by 180°.
1.4 First operation
1.4.1 Switching on for the first time
IMPORTANT NOTE: Before the Monaco is operated for the first time, it is mandatory
to start the auto bias! See chapter 3.2.1 of this manual
1.4.2 Installation and cooling
CAUTION: The tubes will become very hot and should never be touched while the
Monaco is turned on!
Also - under no circumstances – never try to unplug the anode connecors caps) of
the EL130 tubes !

●Position the unit such that unhindered air flow to the bottom plate is guaranteed.
●Do NOT put the unit on a carpet. This might prevent the air flow into the air vents in
bottom plate and thus overheat the unit.
●Direct exposure to sunlight is not recommended – this may affect the surface.
1.5 Connection to mains
Set the switch on rear panel to OFF. Then connect the unit to the mains outlet by using the
power cord which is (in some countries) supplied together with the unit or another suitable
power cord. Make sure that mains voltage is according to the specification printed on the
rear panel of the amp (near mains connector).
CAUTION: Keep the unit switched off until all audio connections are made.
1.6 Connecting signal sources
You can connect up to five analog line sources to your Monaco. Connect the outputs of
your signal sources to the inputs of the Monaco on the rear side of the unit. The upper row
of the RCA/Cinch or XLR connectors is for left channels (white), the lower row is for right
channels (red).
1.7 Connecting loudspeakers
The Monaco has one speaker outlet per channel. Use only good speaker cables with
sufficient diameter. Make sure that the red terminals are connected to the red or "+"
terminals of the speakers and the black terminals to the black or "–" terminals of the
speakers.
2 Basic operation
2.1 Turning on and off
When the Monaco powers on, it starts by heating up the tubes gradually.
This power up procedure takes about 40 seconds and is indicated by the LED ring around
the volume control and the input LEDs. With each cycle all volume LEDs are gradually lit
and the input LEDs are lit one by one.
If the unit is set to standby all LEDs except the corresponding MODE LED (and in case of
AUTO-mode additionally one of the SOURCE-LEDs) are off.
CAUTION: Even while switched to stand-by the unit is still connected to the mains. In
case of a thunderstorm or if you leave the house for longer time we recommend that you
switch the amplifier off by using the mains switch on rear panel or pull the mains plug.

2.2 Selecting the signal source
Use the input selector to select a signal source. The selected source is indicated by LED.
2.3 Volume setting
Use the volume knob to set the desired volume. The volume increases / decreases in 0.5
dB steps while knob is turned slowly and more coarse while knob is turned faster.
The same principle is valid for remote control: Short presses onto the volume keys will
change volume by 0.5 dB steps, If you press for a longer time, volume will change faster.
3 Remote control
3.1 Layout
The remote control has ten buttons in total – the assignment is as follows:
Top row:
Left: Off/Standby/Tube ad ust Right: On/Operation
Second row:
Left: Setup Menu Right: Mute

Third row:
Left: Balance left Right: Balance right
Fourth row:
Left: source down Right: source up
Bottom row:
Left: Volume down Right: Volume up

3.2 Advanced settings
3.2.1 Tube bias
NOTE: We recommend to perform the automatic bias every 1-2 months.
This is how to proceed: First set mode selector to OFF/IR. To start the auto bias press and
hold the buttons Setup and X (Off/Tube ad ust) simultaneously for five seconds until the
four LEDs around the input selector start flashing.
Now the amplifier sets the tube bias automatically. This procedure will last about 15
minutes. – if one of the tubes fails, the LED indicating the position of the tube is the only
LED not lit!
The order of the LED/tubes are from left to right:
Input 1: Tube on the far left
Input 2: Tube second from left
Input 3: Tube second from right
Input 4: Tube on the far right
Do not turn off the device during the bias progress and wait until the amplifier switches into
standby!

NOTE: If mains voltage fails or you switch the MONACO off by mistake during the auto
bias procedure, it will for safety reasons continue after mains is switched on again until the
procedure is fully completed. During this time, you the amp cannot be operated.
When the bias setting is completed you may turn on the amplifier and listen to music.
3.2.2 Main illumination brightness (upper LEDs )
Press and hold the button Setup and press either DIM Main (left) or DIM Main (right) to
increase or decrease the upper main lighting
Button combination for decreasing main LED lighting:
Button combination for increasing main LED lighting:
3.2.3 Dimming front LEDs
Press and hold the button Setup and press either DIM Front (left) or DIM Front (right) to
increase or decrease the LED brightness on the front panel

Button combination for decreasing front LED:
Button combination for increasing front LED:
3.2.4 Setup Menu
The MONACO offers several settings for configuring it to your own requirements. These
(not often used) settings can be accessed by the MENU
To enter the setup menu the unit must be in ON state. Press and hold the Setup button
until the lower two LEDs on the operation selector are lit. This indicates that you have
entered the MENU.

3.2.4.1 Level setup: (lower two LEDs lit/default Setup main menu)
Now you are in the setup menu „level setting“ (refer to the backside of the remote control
for pictograms and explanations)
While in this menu, the level of the actual selected station may be ad usted to personal
preferences with the volume buttons of the remote control or the volume knob. While
doing that you may select the sources using the SOURCE knob and this way equalize the
levels of the different sources.
3.2.4.2 Fix level setting (the upper two LEDs are lit)
In a surround system the channel balance, tone setting and bass management are done
by the decoder. This setting must not be altered by another component because the
channel balance then would be incorrect. For this application the MONACO offers the fixed
gain function.
Set the input where the main channels of the surround system are connected to fixed gain.

When this input is selected, balance is set to neutral position and the gain is on a fixed
level independently f the volume setting on the other inputs.
To enter the fixlevel menu, press the Setup button again so that the upper two LEDs on
the operation selector are lit.
Now you can activate or deactivate the fix level function for the desired input (input can be
chosen using the SOURCE selector on front panel or by remote control). The actual
setting is signalized by LED combinations around the volume knob. See drawings below.
This LED combination shows the variable status of input 1
Press the volume down button, station 1 changes to fixed status.

This LED combination shows the fixed status of input 1
Press the volume up button, input changes to variable status again
This setting is recommended if the Monaco should be integrated into a home cinema
system or to use it as power amplifier.
3.2.4.3 Shutdown/Auto-turn off setting (upper and lower LED lit)
To ad ust the automatic shutdown time, press Setup again so that the upper and lower
LEDs of the operation selector are lit.
While in this menu, the shutdown time of the amplifier can be ad usted with the volume
buttons of the remote control. Per LED lit the time is 10 minutes. Factory setting is 10
minutes (one LED lit)
3.2.4.4 Tube lifetime (all three LEDs are lit)
To see the tube lifetime, please press Setup again so that all three LEDs of the operation
selector are lit.

This menu point is of informative character only, there is no possibility of any ad ustment
here.
3.2.4.5 Leaving the setup menu
To leave the setup menu, please press Setup once again!
After leaving the setup menu, only one LED of the MODE selector will be lit!
3.2.4.6 Setup Reset / Factory default
To reset the Monaco to factory default settings, please push and hold the buttons Setup
and On simultaneously for about five seconds while unit is ON.

4 Appendix
4.1 Cleaning
Use a soft cloth and normal glass cleansing fluid.
CAUTION: Make sure that no fluid comes into the unit. Do not use scouring cleaners.
They may damage the surface.
4.2 Troubleshooting
Some putative defects are often caused by small mistakes in operation. Sometimes, other
units connected to the amplifier may cause problems, too. We therefore kindly ask you to
read the following tips first, before consulting your dealer or us.
1. No playback
Mute function is active, press button MUTE on your remote control or increase the
volume using the volume knob or the volume keys on remote control.
2. Inadvertent switching to stand by.
Turn the operation selector to On. If the LED indicator does not light up, a fuse might be
blown due to overvoltage (e.g. in case of a thunderstorm etc.). Please contact your dealer.
4.3 Conditions of warranty (EC only)
If despite expectations a defect occurs that cannot be repaired by yourself or your dealer,
we undertake the repair of your unit free of charge for up to two years from date of
purchase, six months for the tubes.
Provisions for this warranty are:
• The unit must have been purchased from an authorized dealer. Equipment from other
sources will not be repaired, not even at charge.
• The defect must not have been caused by improper handling or misuse.
• Return the unit to us only in its original packing. If this is not possible we are entitled to
refuse acceptance. We will not assume responsibility for transport damage under any
circumstances.
• A short description of the defect is to be included with the returned unit.
• We also reserve the right to levy a handling charge for items returned without good or
valid reason, or if the unit proves to be not defective.

5 Technical Data
Output power 2 x 100W (4 Ω)
Tube equipment 4x E130L, 4x ECC82
Inputs RCA 2x stereo
Inputs XLR 3x stereo
Pre-out XLR 1x stereo
Fix-out RCA 1x stereo
Loudspeaker outputs 1 pair
Dimensions (W x H x D) 47 x 23 x 38 cm
Weight 46,0 Kg
Issued 1st June 2018, changes reserved without notice.
Table of contents


