Limited Warranty
What This Warranty Covers
This is a “Limited” warranty. This warranty covers any defects in materials and workmanship and
warranty only applies to the original purchaser and is not transferable. This warranty is also only
valid if the original purchase was made from an authorized Wet Sounds™ dealer.
How Long Coverage Last s
This warranty runs for 2 years from the date of the purchase. It is recommended to REGISTER
your warranty online within 45 days of your purchase at www.wetsounds.com - click on “war-
ranty registration”.
What Is Not Covered
This warranty does not cover fading or discoloration caused by exposure to sunlight or chem-
icals such as ammonia, household bleach, or any cleaning material that contains abrasive
substances. (For information on how to prevent fading or discoloration, consult for recom-
mendations on cleaning products) Wet Sounds, Inc. does not cover the cost for removal and
reinstallation of any kind. Additionally, shipping TO Wet Sounds, Inc. is covered by the purchaser
This warranty is void and inapplicable if Wet Sounds™ deems that the product was abused
or misused; including but not limited to Speaker product that has been improperly-powered
(under or over powered), causing thermal (burnt voice coil) and/or mechanical failure (torn
surrounds or spiders), damage caused by accident, mishandling, improper installation, neg-
ligence, normal wear and tear, excessive water or heat damage, freight damage or prod-
ucts that have been altered in any way. Product owned by anyone other than the original
purchaser from an authorized Wet Sounds dealer. (The warranty is not transferable and will not
apply to products purchased from unauthorized dealers.) Wet Sounds is not responsible for any
damages to a consumer’s boat or person from a product failure. The warranty is void if Wet
Sounds deems the product was installed or used improperly. Wet Sounds shall not be responsi-
ble for any incidental or consequential damages, except to the extent provided (or prohibited)
by applicable law. This warranty gives you specic legal rights, and you may also have other
rights which vary from state.
What Wet Sounds™, Inc. Will Do
Wet Sounds, Inc will repair any part of your product that proves to be defective in materials
or workmanship. In the event repair is not possible, Wet Sounds, Inc will replace the product in
question. If it is deemed necessary Wet Sounds, Inc. will either replace the entire product with a
refurbished unit or it will be replaced with a model that is similar in price if that model is no lon-
ger available. Labor cost and materials needed to complete this service will be at no charge
to the purchaser. Additionally, the cost of shipping TO the consumer is also covered under this
warranty.
How to Obtain Warranty Service
Contact Wet Sounds, Inc. either by phone at 877-938-7757 or by email at
[email protected].
A
service
representative
will
assist
you
in
the
necessary
actions
to
verify that the problem that you are experiencing is covered under warranty. If it is in fact a
warranty issue, Wet Sounds will issue an RA number for tracking purposes and give instructions
on sending the product in for evaluation. Wet Sounds™, Inc. How State Law Applies This war-
ranty gives you specic legal rights, and you may also have other rights which vary from state
to state.
Internet Warning
Wet Sounds, Inc. products sold on any non authorized web site or internet auction site are void
of any and all manufacturer’s warranty. Please contact Wet Sounds™ at 877-938-7757 or visit
our web site at www.wetsounds.com to search for an authorized site and/or an authorized
retailer near you.
Caution & Respect
Wet Sounds™ speakers can achieve very high sound pressure levels. Please use this product
responsibly. Be aware that sound travels great distances across water so please respect other
boaters especially while loading/unloading at the ramp or dock. Wet Sounds, Inc. is not respon-
sible for any violations of the law that may be a direct result of excessive volume. Please abide
by the rules but have fun doing it.
Wet Sounds REV 10 HD & REV 12 HD Owner’s Manual Wet Sounds REV 10 HD & REV 12 HD Owner’s Manual
13 14
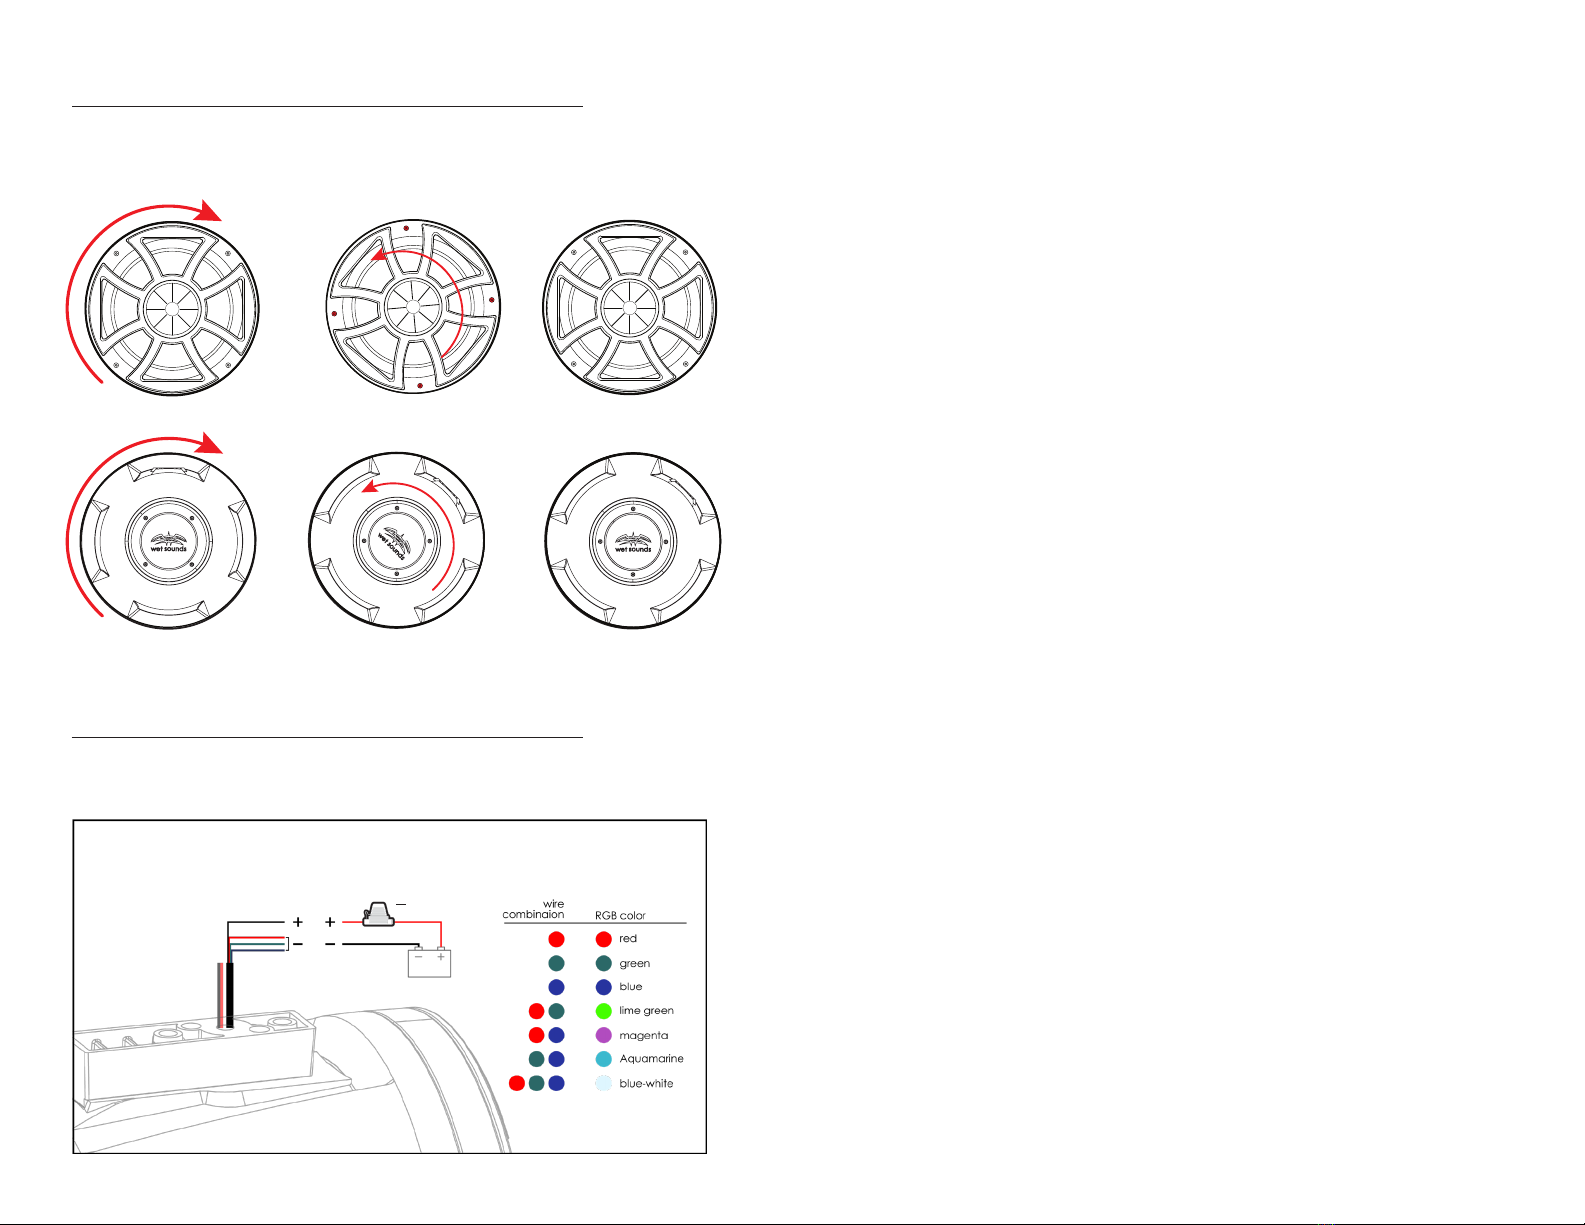
RGB Wiring
For sound response and multi color control an optional RGB
controller will be needed. For single color wiring with an external
switch see diagram below.
Splice and combine the ground wires to yield different colors. Insure to add a fuse to your
power for protection.
Grille/Badge Alignment
Each LED ring on each pod has an arrangement of screw holes
around the ring to be able to “Clock” the Grille’s position once
POD orientation is determined. The same goes with the rear LED
badge.
fuse
1. Adjust pod orientation 2. Unscrew grille and
“clock” to desired position 3. Fasten the grille in its
new position
1. Adjust pod orientation 2. Unscrew badge and
“clock” to desired position 3. Fasten the badge
in its new position


