manuals.online logo
Brands
  1. Home
  2. •
  3. Brands
  4. •
  5. Wet Sounds
  6. •
  7. Speakers
  8. •
  9. Wet Sounds ICON8 Guide

Wet Sounds ICON8 Guide

This manual suits for next models

1

Other Wet Sounds Speakers manuals

Wet Sounds REVO V3 User manual

Wet Sounds

Wet Sounds REVO V3 User manual

Wet Sounds STEALTH 6 User manual

Wet Sounds

Wet Sounds STEALTH 6 User manual

Wet Sounds VENUE Series User manual

Wet Sounds

Wet Sounds VENUE Series User manual

Wet Sounds PRO696RS User manual

Wet Sounds

Wet Sounds PRO696RS User manual

Wet Sounds SW·650 User manual

Wet Sounds

Wet Sounds SW·650 User manual

Wet Sounds RECON 6 POD User manual

Wet Sounds

Wet Sounds RECON 6 POD User manual

Wet Sounds PRO 80 User manual

Wet Sounds

Wet Sounds PRO 80 User manual

Wet Sounds XS-650 User manual

Wet Sounds

Wet Sounds XS-650 User manual

Wet Sounds RECON Series User manual

Wet Sounds

Wet Sounds RECON Series User manual

Wet Sounds VENUE Series User manual

Wet Sounds

Wet Sounds VENUE Series User manual

Wet Sounds XS-650 User manual

Wet Sounds

Wet Sounds XS-650 User manual

Wet Sounds Stealth 6 Ultra User manual

Wet Sounds

Wet Sounds Stealth 6 Ultra User manual

Wet Sounds STEALTH User manual

Wet Sounds

Wet Sounds STEALTH User manual

Wet Sounds PRO 60 User manual

Wet Sounds

Wet Sounds PRO 60 User manual

Wet Sounds REV 10 HD User manual

Wet Sounds

Wet Sounds REV 10 HD User manual

Wet Sounds STEALTH 6 CORE User manual

Wet Sounds

Wet Sounds STEALTH 6 CORE User manual

Wet Sounds AR-5 Ranger Crew User manual

Wet Sounds

Wet Sounds AR-5 Ranger Crew User manual

Popular Speakers manuals by other brands

Electro-Voice LR4S engineering data

Electro-Voice

Electro-Voice LR4S engineering data

Definitive Technology Sound Cylinder user guide

Definitive Technology

Definitive Technology Sound Cylinder user guide

AudioSource LS545 user manual

AudioSource

AudioSource LS545 user manual

Paso C402-T Instructions for use

Paso

Paso C402-T Instructions for use

Altec Lansing 416-8C LF SPEAKER manual

Altec Lansing

Altec Lansing 416-8C LF SPEAKER manual

Kenwood KFC-1072 Servise manual

Kenwood

Kenwood KFC-1072 Servise manual

Peavey ProSys 112 user guide

Peavey

Peavey ProSys 112 user guide

JBL Control Contractor 60 Series installation instructions

JBL

JBL Control Contractor 60 Series installation instructions

Aura STORM-8 owner's manual

Aura

Aura STORM-8 owner's manual

Oontz ANGLE 3 PLUS quick start guide

Oontz

Oontz ANGLE 3 PLUS quick start guide

Electro-Voice LR4A engineering data

Electro-Voice

Electro-Voice LR4A engineering data

Rave RK-650-ICA-B owner's manual

Rave

Rave RK-650-ICA-B owner's manual

Flux Reference Series installation manual

Flux

Flux Reference Series installation manual

Lanzar AQAWBS64BK installation manual

Lanzar

Lanzar AQAWBS64BK installation manual

DAPAudio DCS-6230 manual

DAPAudio

DAPAudio DCS-6230 manual

Aluratek ABS03F quick start guide

Aluratek

Aluratek ABS03F quick start guide

Kenwood KES-5A instruction manual

Kenwood

Kenwood KES-5A instruction manual

Sonance ORIGINAL SERIES instruction manual

Sonance

Sonance ORIGINAL SERIES instruction manual

manuals.online logo
manuals.online logoBrands
  • About & Mission
  • Contact us
  • Privacy Policy
  • Terms and Conditions

Copyright 2025 Manuals.Online. All Rights Reserved.

wet
sounds
TM
ICON8
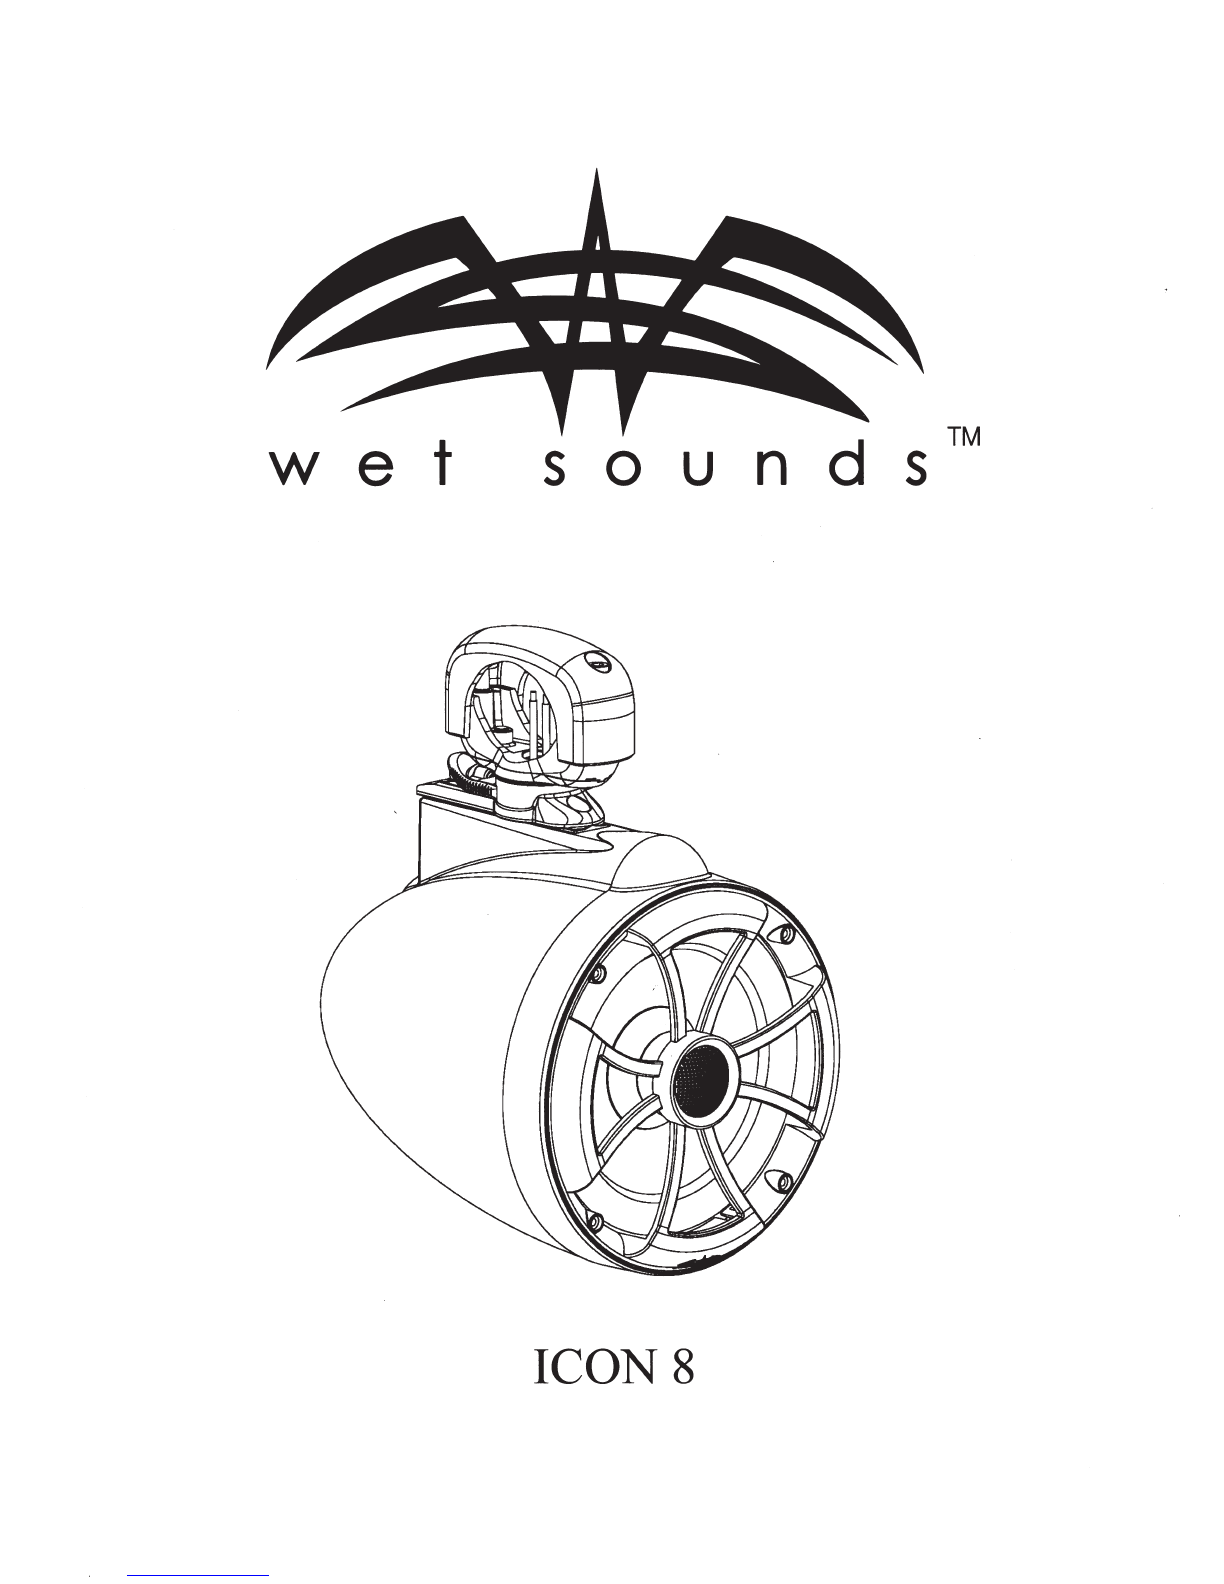
Owner's Manual & "Limited" Warranty
Technology Specifications:
Thank You for purchasing this Wet Sounds product. Wet Sounds marine audio products
represent the ultimate in high performance standards. The Icon series is specifically
engineered to withstand the rigorous marine environment. Utilizing state
of
the art acoustic
engineering and three dimensional computer aided design, the ICON series represents the
most advanced technologies available for wakeboard tower speaker systems. The Icon series
also provides multiple fitment options from direct cast mount to fixed clamp mount to our
revolutionary (Patent Pending) stainless steel TC3 Quick Disconnect Swivel clamp.
Please take a moment to read the instruction manual before starting your installation. This
manual will explain the benefits
of
the technologies developed by Wet Sounds and will help
you understand the correct installation methods and use
of
this product.
If
you have any
questions or concerns please contact a certified Wet Sounds dealer. You may also contact
Wet Sounds technical support by dialing 1-877-WET-SPKR (1-877-938-7757)
SPEAKER SPECIFICATIONS ICON 8
RMS: 150 watts
Peak: 300 watts
Mid Bass: 8 inch composite cone with polyurethane surround
High Frequency: 1 inch HLT Titanium Tweeter
Impedance: 4 ohm
Frequency Response: 20Hz to 20 kHz
Sensitivity: 92DB at 1W/
lM
The ICON series represents the highest level
of
performance in tower speaker technology for
today's extreme audiophile customers. The ICON series is a high output true sound quality
tower speaker able to provide maximum output while still providing world class sound
quality without the listener fatigue usually associated with high volumes. The unique
qualities
of
the ICON series components provide remarkable volume and mid bass and
dynamic full range sound quality. A full passive crossover network delivers tuned
frequencies to the driver resulting in rich smooth sound. The driver compliment in each
ICON 8 combines one sealed 8 inch midbass woofer made from composite cone materials
and a grille mounted Wet Sounds
"HLT
" 1 inch titanium tweeter. Utilizing the Wet Sounds
"HL
T"
Tweeter design every type
of
riding sport from wakesurfer to wakeboarder can enjoy
true quality sound.
***Caution: Do not spray any
of
the speakers directly with any liquid base substance.
Warranty will be voided
if
improper care is discovered during extensive examination
ofthe
product.
1
Installation:
ICON
8
FC
Fixed
Clamp
TC3-F Fixed
Clamp
Pipe Version Installation (pipe tower)
WireJacket
Allen Bolts(long)
ClampTop
Allen Bolts (short)
SpeakerWire Plug
ClampBase
Male
Connector
Female
Connector
Grommet
2
Step
1:
Attach Male Connector (7) from clamp base to Female Connector (8)
Step 2: Push connector into center hole
of
speaker as you place clamp base
onto the speaker housing. Please make sure the grommet (9) is seated properly.
Step 3: Attach two short Allen Bolts (4) through the clamp base and tighten
into the housing. Please make sure these are tight.
It
is also recommend to use
a Blue Loctite on these bolts.
Step 4: Find the mounting location for the speaker and clamp and then mark the
location
on
the bottom side
of
the pipe for the speaker wire. The speaker wire
will
be
inserted back into the pipe for a clean installation.
Step 5: Drill a small hole in the pipe and de burr the hole so there is no sharp
edges.
It
is also recommend to install a rubber grommet in this hole to protect
the wire.
Step 6: Slide the wire jacket (1) down the wire and Butt Connect the speaker
wire coming from the tower to the speaker wire plug (5). Red
is
positive and
black is negative
Step 7: Attach Clamp Top (3) to clamp base (6) using the two long Allen Bolts
(2)
Step 8: Make sure the clamp is tightened all the way so there is no movement
3
Installation:
ICON 8 SC Swivel Clamp
"Patent Pending" TC3-S Swivel Clamp Version Installation
Allen Bolts (long)
~~I
ClampTop
----
~~
Detachment
Plate
(casttowers)
Clamp
Bottom
Female Speaker Plug
Wire Jacket
Wire Sleeve
Allen Bolts
for
Plate Speaker Plug Screws
Male Speaker Plug Allen Bolts (short)
Bushing
Detachment
Fo
rk
Clamp
Base
Bushing
Male Connector
Female
Connector
Allen Loc
king
Bolt
Grommet
4
Pipe Tower Mount Version using the TC3-S
Step
1:
Attach Male Connector (10) from clamp base to Female Connector (11)
Step
2:
Push connector into center hole
of
speaker as you place clamp base
onto the speaker housing. Insert 4 bare wires down into this hole as well. These
wires are only used
if
you are adding the LED speaker rings. (please see LED
speaker install instructions for LED install) Please make sure the grommet (12)
is seated properly.
Step
3:
Attach two short Allen Bolts (16) through the clamp base and tighten
into the housing. Please make sure these are tight.
It
is also recommend to use
a Blue Loctite on these bolts.
Step 4: Clamp Bottom (3) and Detachment Plate (5) are already connected
together. Insert the detachment plate into the clamp base (9). Please make sure
the male speaker plug (7) and female speaker plug (4) are lined up properly.
The male speaker plug (7) inside the clamp base can rotate. Please rotate this
so that it
is
facing the proper direction. There is a U shaped groove on the
female that lines up with a boss on the male.
Step
5:
Slide the detachment fork (17) into the grooves on the clamp base.
Attach the allen locking bolt (19) and tighten down.
Step
6:
Find the mounting location for the speaker and clamp and then mark the
location on the bottom side
of
the pipe for the speaker wire. The speaker wire
will be inserted back into the pipe for a clean installation.
Step
5:
Drill a small hole in the pipe and de burr the hole so there is no sharp
edges.
It
is also recommend to install a rubber grommet in this hole to protect
the wire.
5
Step
6:
Slide the wire jacket (13) down the wire and Butt Connect the speaker
wire coming from the tower to the speaker wire plug (4). Red is positive and
black is negative.
If
you have added the LED accessory, this speaker wire plug
(4) will have 6 conductors. Please refer to the LED install instructions.
Step
7:
Attach Clamp Top (2) to clamp bottom (3) using the two long Allen
Bolts (1)
Step
8:
Make sure the clamp
is
tightened all the way so there is no movement
Step
9:
The swivel clamp allows you to rotate the speaker any direction you
may want. Loosen the allen locking bolt (19) and rotate the speaker to the
direction you like. Then tighten the bolt to lock it in place.
Step
10:
The swivel clamp also allows you to remove the speaker from the
tower in seconds. Loosen the allen locking bolt (19) and remove the
detachment fork (17). Once removed, the speaker will disconnect from the
clamp. The clamp remains on the tower. To reinstall, line up the male speaker
plug (7) so that it is centered and insert the speaker by plugging the connector
together and reinstalling the detachment fork.
Cast Mount Tower Version using the TC3-S clamp for quick disconnect
and swivel function.
Step
1:
Attach Male Connector (10) from clamp base to Female Connector (11)
Step
2:
Push connector into center hole
of
speaker as you place clamp base
onto the speaker housing. Insert 4 bare wires down into this hole as well. These
wires are only used
if
you are adding the LED speaker rings. (please see LED
speaker install instructions for LED install) Please make sure the grommet (12)
is seated properly.
Step
3:
Attach two short Allen Bolts (16) through the clamp base and tighten
into the housing. Please make sure these are tight.
It
is also recommend to use
a Blue Loctite on these bolts.
6
Step 4: Clamp Bottom (3) and Detachment Plate (5) are already connected
together. Remove allen bolts (6) that hold the detachment plate (5) to the clamp
bottom (3). Clamp Top (2) and Clamp Bottom (3) will not be used for a cast
tower mount.
Step
5:
The detachment plate (5) will be hard mounted to a cast tower. Butt
connect speaker wires from detachment plate connector (4) to the speaker wires
from the cast tower. Red is positive and Black is negative.
Step
6:
Push wires into center hole back into the tower and attach the
detachment plate to the tower.
Step
7:
Please make sure the male speaker plug (7) and female speaker plug (4)
are lined up properly. The male speaker plug (7) inside the clamp base can
rotate. Please rotate this
so
that it is facing the proper direction. There is a U
shaped groove on the female that lines up with a boss on the male.
Step
8:
Insert speaker with base onto detachment plate. Slide
on
detachment
fork (17) and allen bolt (19) and tighten allen bolt
so
the speaker does not move.
Step
9:
The swivel clamp also allows you to remove the speaker from the tower
in seconds. Loosen the allen locking bolt (19) and remove the detachment fork
(17). Once removed, the speaker will disconnect from the clamp. The
detachment plate remains on the tower. To reinstall, line up the male speaker
plug (7) so that it
is
centered and insert the speaker by plugging the connector
together and reinstalling the detachment fork.
7
Male
Connector
<D
-------------
---
~
Fe
male
Connector
Grommet
X Mount Version. Cast tower fixed mount version.
Step
1:
Remove 4 screws holding the grille and driver onto the housing. And
remove the grille and speaker from the housing. Disconnect speaker wires from
mid bass and tweeter. Remove acoustic dampening material.
Step 2: Remove two small Phillips screws from the top
of
the housing next to
the grommet (2) This will loosen the internal threaded plate.
8
Step
3:
From inside the housing. Slide out the internal threaded plate and
replace with non threaded plate from X kit. Make sure to install it in the same
direction so the screw holes line up.
Step 4: Remove the center grommet (3) so that the two top plates sit flush on
top
of
the speaker. Take the two powder coated top plates and attach on top
of
the speaker. Use two longer Phillips screws provided in the X kit to attach top
plates into internal non threaded plate.
Step
5:
Butt connect Male Connector (1) to the factory wires. Red for positive
and black for negative.
Step
6:
Take housing and hold up to the tower and plug the connectors together
(1) and (2) and push as much back into the tower and feed the remaining and
connectors into the centerhole
of
the housing.
Step
7:
Take the 2 bolts using the washers and lock washers and bolt the
housing up to the tower. Please make sure that these bolts are tight. Some
towers and adapters will only need a single lock washer and single regular
washer. Other towers and adapters may need extra washers that have been
provided in the kit.
If
you find that the bolt bottoms out and the housing is not
tight, please add washers to properly seat and tighten the housing to the tower.
(The holes on theplates shouldline up directly with thefactory threadedinsets.
However we have seen some towers that are not threaded in theproper
locations.
If
this is the case, please contact Wet Sounds
at
877-938-7757
for
advice)
Step
8:
Insert the acoustic dampening material.
Step 9: Hold the driver up to the housing to connect the speaker wires. Connect
the mid bass speaker wires and tweeter wires. The spade connectors for the mid
bass driver will be a larger size for the (
+) and smaller size for the (-
).
These
will only install one way on the mid bass driver. The tweeter wire will have a
solid wire and a wire with dash lines. Please make sure to plug the tweeter
wires back together properly matching the non marked with non marked and
dash marked wire with the dash marked wire.
Step 10: Insert the driver into the housing. Insert the grille into the housing
making sure to line up all 4 mounting locations and attach the 4 stainless screws
around to the housing. Please make sure these are tight but DO NOT over
tighten
9