Wharfedale Pro LPDV832HDMI User manual

Digital Terrestrial
Receiver
LPDV832HDMI
USER MANUAL
If you require any further assistance with setup or experience any technical difficulties
please call the Helpline Number: 0845 6040105

1
CONTENTS
1. INTRODUCTION.................................................................................................................3
POWER CORD (MAINSLEAD)..............................................................................................4
2. SAFETYPRECAUTIONS...................................................................................................5
YOUR DIGITAL RECEIVER....................................................................................................6
3. PREPARING.......................................................................................................................6
3.1. REMOTE CONTROL.......................................................................................................6
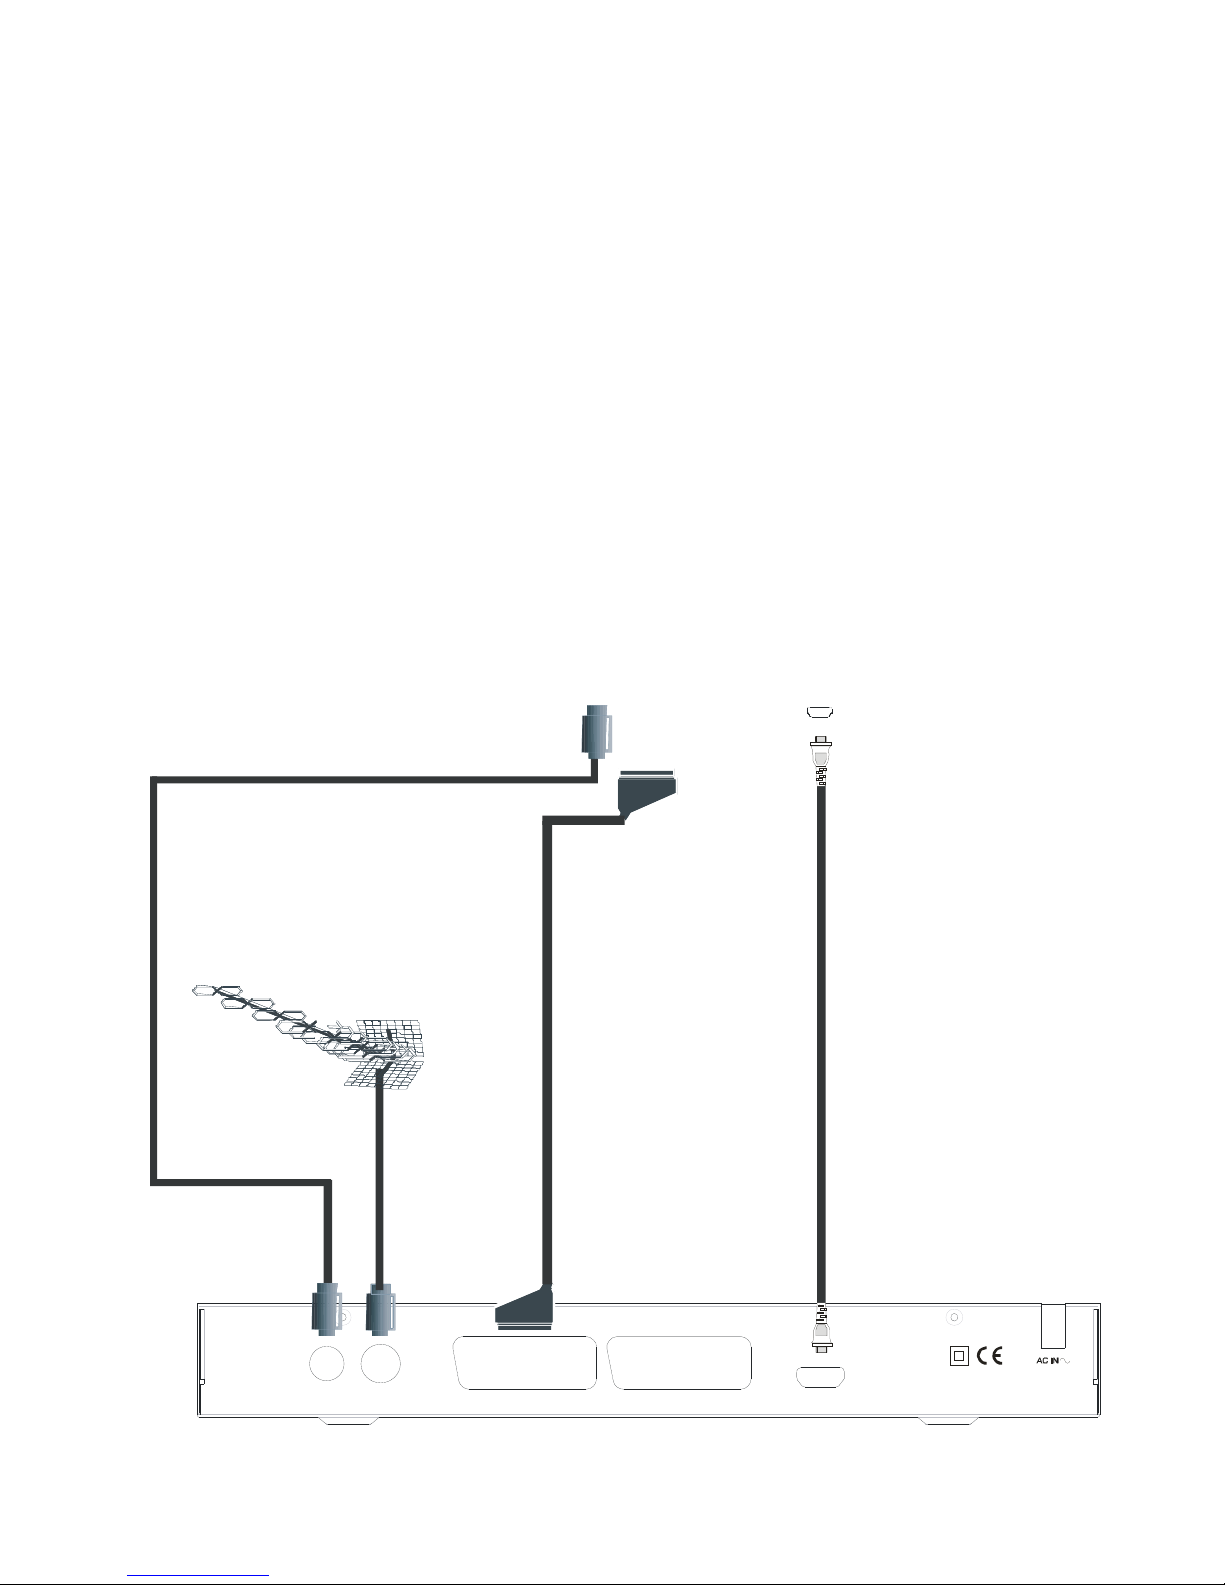
3.2. CONNECTIONS...............................................................................................................6
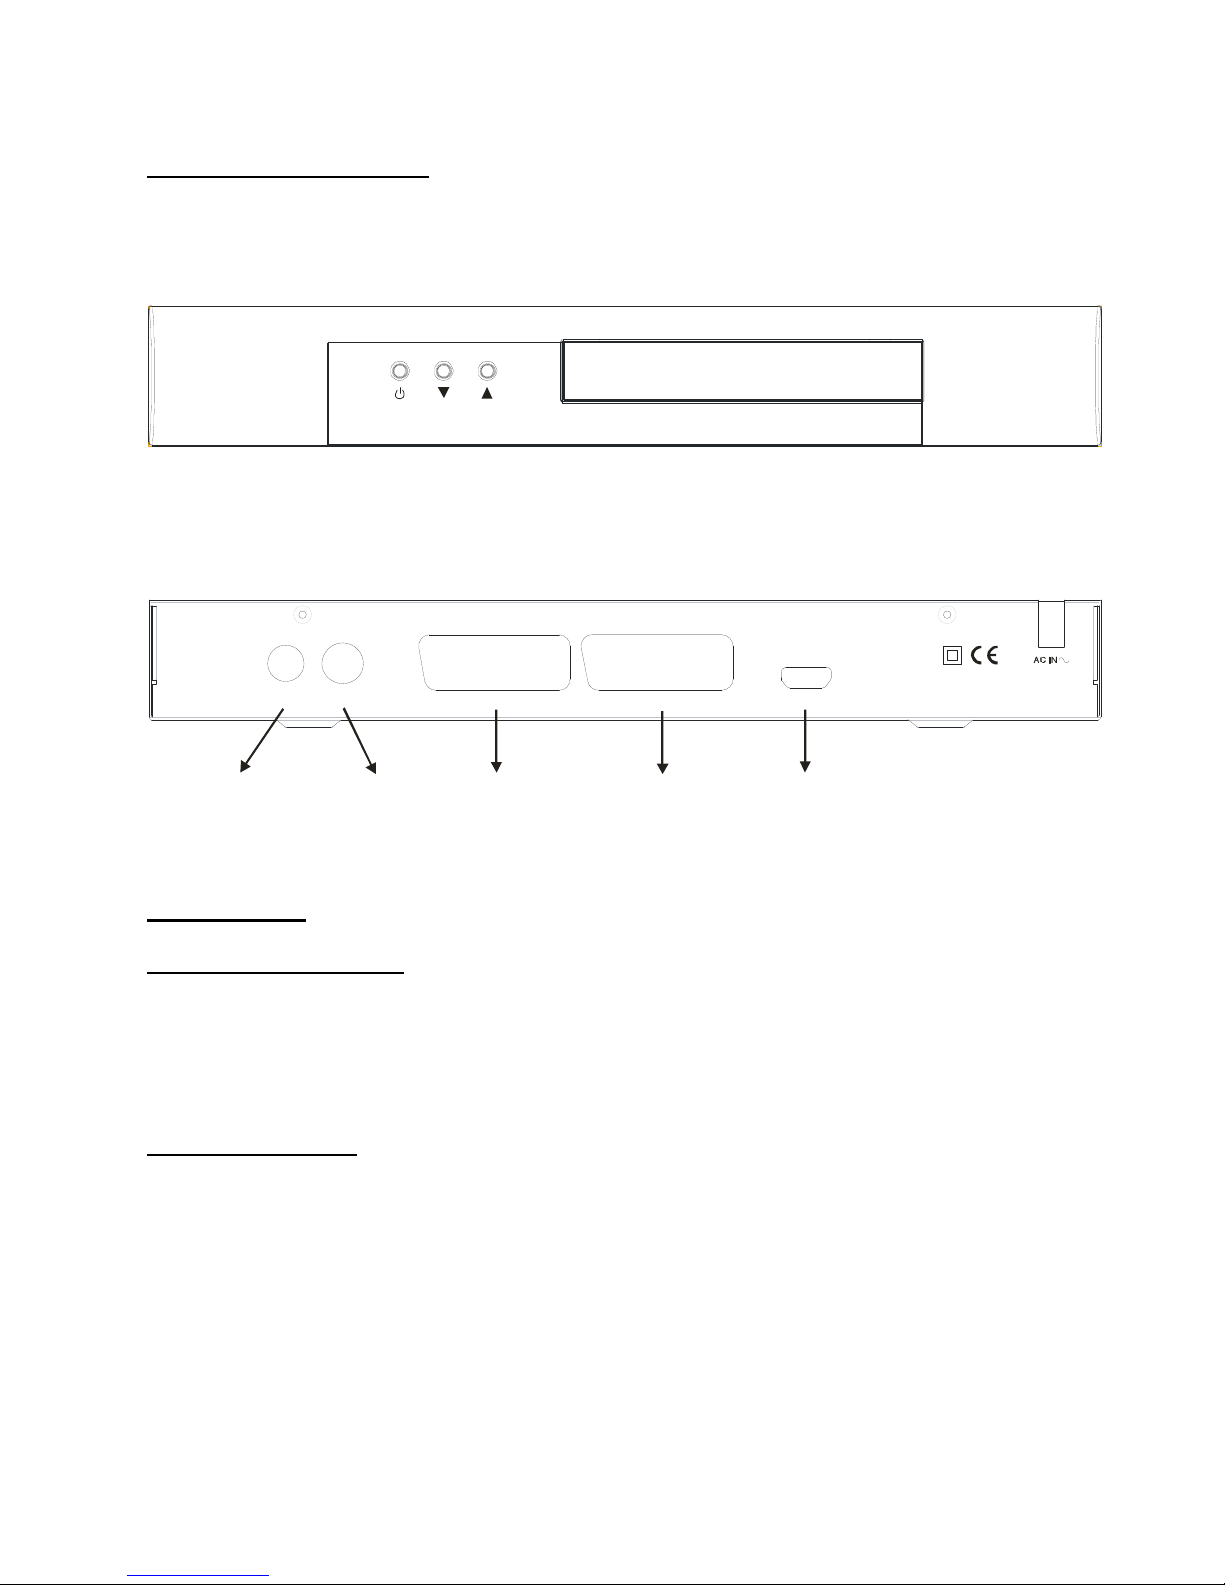
3.3. SOCKETS........................................................................................................................8
4. REMOTE CONTROL FUNCTIONS....................................................................................8
4.1. REMOTE CONTROL LAYOUT........................................................................................8
5. MENU INTERFACE..........................................................................................................10
FIRST TIME INSTALLATION................................................................................................10
MAIN MENU..........................................................................................................................10
5.1. CHANNEL LIST..............................................................................................................11
5.1.1.NAVIGATINGTHE WHOLE LIST OF CHANNELS....................................................11
5.1.2.DELETINGUNWANTED CHANNEL..........................................................................11
5.1.3.RENAMINGCHANNELS............................................................................................11
5.1.4.ADDINGLOCKS TOCHANNELS...............................................................................11
5.1.5.SETTINGFAVOURITES.............................................................................................12
5.2. INSTALLATION..............................................................................................................12
5.2.1.ADDNEWCHANNELS...............................................................................................12
5.2.1.1. AUTOMATIC SEARCH............................................................................................13
5.2.1.2. MANUAL SEARCH..................................................................................................13
5.2.2.FIRST TIME INSTALLATION......................................................................................13
5.3. CONFIGURATION.........................................................................................................13
5.3.1.AUDIOLANGUAGE....................................................................................................13
5.3.2.SUBTITLE...................................................................................................................14
5.3.3.TV TYPE.....................................................................................................................14
5.3.4.TV OUT.......................................................................................................................14
5.3.5.HDMI RESOLUTION...................................................................................................14
5.3.6.FAVOURITE MODE....................................................................................................14
5.3.7.EPG PREFERENCE...................................................................................................14
5.3.8.SCAN ENCRYPTED CHANNELS...............................................................................14
5.3.9.LOWPOWER..............................................................................................................14
5.3.10. RECEIVER UPGRADE.............................................................................................15
5.3.11. PARENTAL SETTINGS............................................................................................15
5.3.11.i.Menu Lock...............................................................................................................15
5.3.11.ii.Set LockKey...........................................................................................................15
5.4. TIMERS MENU..............................................................................................................16
5.5. LANGUAGE...................................................................................................................16
6. ADVANCED OPERATION................................................................................................17
6.1. ELECTRONIC PROGRAM GUIDE (7-DAY-EPG)......................................................17
6.2. MESSAGES...................................................................................................................18
6.3. CHANNEL NAVIGATION...............................................................................................18
6.4. VOLUME CONTROL......................................................................................................19
6.5. DIGITAL TELETEXT......................................................................................................20
6.6. WIDESCREEN...............................................................................................................20
6.7. SUBTITLE......................................................................................................................20
6.8. TV / DTV KEY................................................................................................................20
7. TROUBLESHOOTINGGUIDE..........................................................................................21
8. SPECIFICATIONS............................................................................................................22
9. IMPORTANT NOTICE.......................................................................................................23
DIGITAL SWITCHOVER AND YOUR TV EQUIPMENT.......................................................23

2
Product Guarantee
Thisproductisguaranteed against manufacturingdefectsfor a period of
1Year
Thisdoesnotcover the productwherethefaultisdueto misuse,abuse, use in contravention of the instructions,or
wheretheproducthas been the subject of unauthorised modificationsoralterations, or hasbeen the subject of
commercial use
In the event of a problemwith the productwithintheguarantee period please return it to your nearest Argosstore
If theitemis showntohave had an inherent defect present atthetimeofsale,the store will provide you with a
replacement
Yourstatutoryrightsremainunaffected
Guarantor;Home Retail Group
489 – 499AveburyBoulevard
Central Milton Keynes
MK92NW

3
1. INTRODUCTION
Introduction.
Thank you for purchasingthisproduct. It will giveyou good serviceif youtake note ofallsafetynotices and
recommendations.
Contents of appliance.
1xSet topBox
1xRemoteControl.
2x“AAA” cells
1xThisinstruction booklet
1xQuickSetupGuide
1xRF cable

4
POWER CORD (MAINS LEAD)
Donotplace theproductwhereapiece offurniture orother heavyobjectcould trap thepowercord (mains lead).
Handle the powercordbytheplug.Donotpullouttheplugbytugging the cordand nevertouchthe powercord
whenyourhands are wetas this could cause ashort circuit or electric shock.Never makea knot inthe cord or tie it
withothercords.The powercordsshould berouted insuchawaythattheyarenotlikelytobesteppedon. A
damaged power cordcan causefire or giveyou anelectrical shock.Check thepowercord periodicallytosee if it is
damaged. Ifit isdamaged, please ask anapproved service agenttoreplace it.
For yourownsafetyreadfollowing instructionscarefullybefore attemptingto connectthis device tothemains.
Thisunit isdesigned to operate ona220V-240V AC -50Hzsupplyonly.Connectingitto other powersources may
damage it. Ensure that thesupplycorrespondsto the informationontherating label onthebottomof theunit. This
component systemmaybe fittedwithanon-rewireable plug. Ifit isnecessaryto change thefusein anon-
rewireableplug,the fusecover mustbe refitted. Ifthefusecoverbecomeslostordamaged,theplug mostnot be
used until areplacement,availablefromthemanufacturer, isobtained. Itisimportant that thecolourof the
replacementfuse covercorrespondswith the colourmarking on the base of the plug. Iftheplugneeds to be
changedbecauseit isnot suitableforyoursocket or it becomes damaged, it shouldbe cutoff and the fuse
removedimmediately.Please disposeof the plugsafelyandoutofreachfromchildren. Under no circumstance
should the cut-offplug be insertedinto amainssocket outlet due to highriskof electricshock.Thenfit an
appropriateplug carefullyfollowing thewiringinstructions shownbelow.
IMPORTANT
The wiresin themainsplugshouldbe connected
asshown in the diagram.
The coloursof thewiresin the mains leadof the unit
maynotcorrespond with thecolouredmarkings
identifyingtheterminalsin yourplug. Connectthem
asfollows:
The wirewhich iscolouredblue must be connected
to theterminalwhich ismarked with theletter‘N’ or
colouredblack.
The wire which iscolouredbrownmust be connected
to the terminalwhichismarked withthe letter‘L’ or
colouredred.
Thereshould benoconnection toearthterminal of
yourplug.If youuse a13 Amp (BS1363)plug,you will
need a 5 Amp fuse.
The mainsplug or the appliancecoupler isthe disconnectdevice and therefore must remain readilyoperable.
Howto replacethefuse
Openthe fusecompartmentwith abladescrewdriverand replacethefuse. When replacing thefusein theplug,
useASTAorBSIapproved 5AMPfuseand be sure to re-fitthefusecover. If the plugsupplied withthisequipment
has adetachable fusecover, besureattachthe fusecoverafter you changethe fuse. Never usethe plugwithout
thefuse cover.
If you should lose thefuse cover, please contact an electricalgoodsretailer.
If indoubt,consult acompetent electrician howtoreplace the fuse
Thissymbol means that thisunit isdoubleinsulated. An earthconnection isnot required.
CAUTION
Toprevent electricshock,disconnectfromthemains before removing cover. No user servicable parts inside.Refer
servicing toqualified service personnel. Disconnect fromthemainssupplybefore cleaning.
BLUE
(NEUTRAL)
BROWN
(LIVE)
FUSE
CORDGRIP
OUTER
SLEEVE

5
2. SAFETY PRECAUTIONS
Power Source.
Thisunit shouldonlybe connected toa220-240VAC50-60 Hzpowersupply.Do not connecttoanyothersupply.
Power Lead.
Donot place theleadwhere itmaybe stepped onor tripped over. Do not placeheavyobjectsonthe lead. Ifthe
lead becomescut or damaged, please disconnect the unitfromthe mainssupply.
Location.
Place onasolid basesuchas ashelf or inaTVcabinet or similar. Do notplacenearheat sourcessuchas
radiators, fires or similar.
Donot blockventilation holesor place in alocationthatdoes notallowa freeairflow.
Donot place theunit near wateror inhighhumidityareas.Avoid splashing.Apparatus shallnotbe exposed to
dripping orsplashing and no objectsfilled withliquids,suchasvases,shall be placedontheapparatus.Iftheunit
doesget wet please call anapprovedservice agent.
Donot place anyobjectsintothe ventilation slots.
Shouldanyofthe abovetakeplace, do NOTopentheunityourself. You causeapossiblesafetyhazard, as there
are high voltagesinside.
Lightening
During thunderstormsor going onholiday,itisrecommended that theaerial (ifoutdoor) is disconnected, to prevent
damage to the aerialinput circuits.
WARNING
RISKOFELECTRICSHOCK
Theexclamationpoint withinanequilateral triangleisintendedto
alerttheuser topresence ofimportantoperatingandmaintenance
(servicing)instructionsintheliterature accompanyingtheappliance.
The lightningflash witharrowheadsymbol,withinanequilateral
triangle,isintendedtoalerttheusertothepresenceofuninsulated
“dangerous voltage”withinthe product’senclosure thatmay be of
sufficient magnitudetoconstitutearisk ofelectricshockofpersons.
Battery Disposal.
When the batteriesintheremotecontrol arewornout, do NOTbreakopenorthrowonafire.Donotplacein
household waste.Contactyour local wasteauthorityfor advice. Batteries shall not beexposedtoexcessive heat
suchassunshine,fire or the like.
Cleaning.
Donot use chemical cleaners.Use adryduster.If thereare stubbornstains, use adamp cloth with mild soap.

6
YOUR DIGITAL RECEIVER
FRONT PANEL:
REAR PANEL:
35023531
SCART(VCR/AUX)SCART(TV)
ANT.INTVOUT HDMI OUT
TV
OUT AERIAL
IN
TV SCART
SOCKET VCRSCART
SOCKET
HDMI
OUTPUT
3. PREPARING
3.1. REMOTE CONTROL
Firstopenthe batterycover on theunderside of the remote control.Putin both batteries1.5Volt (RO3/AAA)
referringtothe imprintedsymbols(+/-) in the batterycaseandput on the batterycoveragain. While usingthe
remote control,directit towardsthe front side of thereceiver.Iftheremote controldoes not workor the chosen
functiondoesnot work,thebatteriesaremostprobablyexhaustedandtheyshould be replacedassoon as
possible. Please useonlytheleakproof batteries.Itisbestto remove thebatteriesfromthe remote unit ifyou will
not beusing the remotecontrolunitfor long time.
3.2. CONNECTIONS
Place yourreceiver onafirm,level surfacewithatleasta10cmgap aroundallsidesof the caseandinaposition
convenientfor connection toyour television,amains poweroutlet andaTVaerialwall outlet(or the 'flyinglead'
fromyour TV aerial, asappropriate).
Turn off your televisionatthe mainsanddisconnecttheleadgoingtotheaerial walloutlet (or theflyingaeriallead)
andconnectthisto the AERIALIN socket onthe rear of thereceiver. Connectthe aerialcable supplied fromthe TV
OUT socket on thereceiver to the TV set'saerialsocket.
If youhave aTV setwithHDMIsupported, you can choosetheHDMIoutputof yourreceiver. Toconnectyour TV
with thereceiver, you have touse aspecial HDMI lead,obtained frommost high streetaudio/ video specialist.

7
ConnecttheTVSCARTsocket onthe rearofthereceivertoasuitableSCARTsocket on yourtelevision.There
maybemorethanoneSCART socket on your televisionand,ifunsure whichto use,you should referto itsmanual
for guidance. Connect AudioLEFT /RIGHT.
If youhaveaVCR or otherrecordingequipmentconnected toyourtelevision, pleaseconnectthe receiver as
described here.
Finally,plug the receiver into themainsoutlet.
35023531
SCART(VCR/AUX)SCART(TV)
ANT.INTV OUT HDMIOUT
HDMI
TV
TVAerial

8
3.3. SOCKETS
•TVSCART
•VCR SCART
•2 xCoaxconnectors.ANTIN (aerial input).TVOUT. RF loop throughtoTV or VCR, notethisisNOTan STB
output.
•HDMI output
4. REMOTE CONTROL FUNCTIONS
4.1. REMOTE CONTROL LAYOUT

9
BUTTON FUNCTION
1 Standby Turnsthe receiver on and into Standby.
2 Mute Silences received audio.
3 TV/DTV Togglesbetween TV and DTV.
4 Menu Displays the MainMenu.Exitsmenus.
5 Up, Down,Left, Right Movesbetween menuitems.
6 Select Makesselection in a menu./ ChangesHDMI
resolution(720p,1080i), whennomenuison
display.
7 Number keys Changes channels.
Entersnumbersand lettersintomenus.
8 Guide Displays and exit electronicprogrammeguide.
9 V+, V- Adjuststhe receivedaudiovolume.
10 P+, P- Changes channels.
11 PageUp/Red Movesup a page through channel list.
Selectsred optionin digitalteletext.
Movesto top inEPG programme details.
12 PageDown/Green Movesdown apage through channel list.
Selectsgreenoptionin digital teletext.
Movestobottom in EPG programmedetails.
13 Yellow Selectsyellowoptionindigitalteletext.
Scrollsup through EPG programmedetails.
14 Blue Selectsblue option in digital teletext.
ScrollsdownthroughEPG programmedetails.
15 Wide Selectsscreen format.
16 i Displays menu help.
Enables /DisablesInfo bar.
17 Text Startsandstopsdigitalteletext.
18 Back Exits themain menu.
19 SubtitleTurnsSubtitlesON and OFF.

10
5. MENU INTERFACE
FIRST TIME INSTALLATION
Turn on the mains supplyto thereceiver. Theindicator light willglowgreenandthereceiver's menu willbeseen on
the TVscreen. Whenyoupress the[STANDBY]keyon thereceiver remotecontrol handset,the indicator onthe
front of thereceiver will glowred.
When the boxisstarted fromstandbyfor thefirst timethere willbeno channelsstored in memory.A “Firsttime
Installation”menu will bedisplayed. Select the TVtype (screen format).
The nextmenu willaskyoutochoose the HDMIresolution.Ifyou intend justusingthe Scart outputthen justpress
SELECT andcontinue thescanningprocess.
Using the [LEFT]or [RIGHT]keyson theremote control,you can selectbetween 720p and 1080i. Please check the
HDMIresolutionssupportedbyyourTVset and selectthemostappropriateone fromthismenu. The nextmenu
willask you, ifyou wanttotune inthedigitalterrestrial television channels.
Using the [LEFT] or [RIGHT]keysonthe remote control, make sure thattheYESbutton ishighlightedinyellow,
and pressthe[SELECT] keyto start theautomaticsearch.
The receiverwillautomaticallytunetothe UHF transmissionchannels21to 68looking fordigital terrestrial TV
broadcastsand displaying the namesof channelsfound. Thisprocesswill take about five minutes..
MAIN MENU
The MainMenuisaccessed bypressing the Menubutton. The itemsaccessed in the
Main Menuare:
1.) ChannelList
2.) Installation
3.) Configuration
4.) Timers
5.) Language

11
5.1. CHANNELLIST
The following operationscan beperformedinthismenu:
1. Navigatingthe whole list ofchannels
2. Deletingunwanted channels
3. Renaming channels
4. Addinglocksto channels
5. Settingthe favouritelist
ChannelTableis where the channelsare managed.
5.1.1. NAVIGATINGTHE WHOLELIST OFCHANNELS
In thechannel table movesthecursorto selectthe previousor nextchannel. RED andGREEN buttons
select pageupanddown.
Towatch aspecificchannel,highlightit using the buttonsorthe Red/Green buttons,thenpress SELECT,
if theSELECTboxishighlighted. The nameandnumber ofthe selectedchannelwillbe displayedinthetop-right
corner of the screen.
If the selectedchannelispasswordprotected, apopupmenu will bedisplayed. If the correctcodeisenteredthe
selected channelcan bewatched. After thePassword boxhas disappearedyou can use the buttonsto
navigate toother channels.Thescroll barin the middle ofthe screen showstherelativeposition of the current
channel with respect to thewholelist.
5.1.2. DELETINGUNWANTEDCHANNEL
To delete a channelhighlight it using “5/6” RED/GREEN, thenhighlightthe “Delete”button using“3/4”and press
SELECT. A message is displayed toconfirmyourdecision, ifyou still want todelete press SELECT once moreand
thechannelwill bedeleted, the operation willbe cancelledifyou select“NO”.
5.1.3. RENAMINGCHANNELS
Torename a specificchannel, the channel mustbe highlighted.Select“EditName"buttonandpress SELECT.The
nameappearsontheright sideofthemenu with the firstcharacter highlighted.Bymeansof “3/4/5/6” keysthe
characterscan be changed.Pressing MENU cancelsthe editing and SELECT savesthenewname.
5.1.4. ADDINGLOCKSTOCHANNELS
Channel Locking provides apassword-protected access to channelsselected byparents.In orderto lock achannel
you should knowtheparentalLock password(set to 0000 inthefactoryandcan onlybe changedfromthe
Configuration Menu),highlightthechannel tobe locked andselectthe “Lock”button,whenSELECTispressed a
passworddialogisdisplayed.Entertheparental Lock code andtheLock iconwill bedisplayedin frontof the
selected channel. Repeatthe sameoperation to cancel theLock.

12
5.1.5. SETTINGFAVOURITES
Therewillbe somechannelsthatyou tendto watch more
often andsomeonlyoccasionally.The favouritemode
allowsthemost-watchedchannelsto be accessedmore
easily,leavingtheless-watchedchannelsaccessiblebut
outof the way.Anychannelcan be a favourite channeland
the Channel Listmenu isused tolabelthosechannelsyou
wantasfavourites.DisplaytheChannel Listmenuscreen
byhighlightingChannelListontheMain Menuand
pressing [SELECT].
Usethe “3” or “4“ keystohighlighttheFAVOURITE
button at the baseof the screenand then, inturn, highlight
eachchannel thatisrequiredtobe afavourite channel,
using the“5”and “6” keysandpress [SELECT]. A
channel selected asafavourite appearsin the main
channel listwithafavourites iconagainstthechannel
name.
Achannel can haveitsfavouritesstatusremoved byrepeatingthisprocedure, toremovethe icon. Leavethe
ChannelListmenu bypressing [MENU].Oncetherequiredchannelshave been markedasfavourite channels,the
favourite modecan be activated to alloweasyaccessto them.Press the [MENU] keyto displaythe Main Menu, the
“6”keytwiceto highlightConfiguration, andpress[SELECT] to displaythe Configurationscreen.Pressthe “6”
keyfive timesto highlightthe FavouriteMode lineand using the“3” or “4“ keyschange the settingfromOff toOn.
When you leavetheConfigurationmenu bypressing[MENU]the favouritemode isactivated.Now,changing
channel using the[P+] or [P-] keys willswitch to onlythose channelsmarked asfavouritesinthechannellist.
You can still access allthechannelsin the channellistbykeyingintheirchannel listnumber. Alternativelyyoucan
switch off thefavourite mode fromtheFavouriteModelineof the Configuration menu.
NOTE: The favouritemodecanonlybeactivatedifone or morechannelsin thechannellistare markedas
favourites.Similarly,ifthe favourite statusisremoved fromall thechannelsin theChannelList,the favourite mode
isturnedoff automatically.
5.2. INSTALLATION
The options located in Installation Menu are:
1. Add NewChannels
•AutomaticSearch
•ManualSearch
2. First Time Installation
5.2.1. ADD NEWCHANNELS
The receivercan search for channelsautomatically
(searching all the broadcastfrequenciesforfree-
to-air channels)ormanually(searching one
specifiedbroadcastfrequencyonlyforany
channelstobefound there).Pressthe [MENU] key
to displaytheMainMenuandusingthe “5”or
“6” keys,highlightthe Installationlineandpress
[SELECT]todisplaythe InstallationMenu.Highlight theAddNewChannelslineandpress “4“ to displaythe
options.SelectAutomaticSearchwith the “5” or “6” keysandpress [SELECT]. Awarning message is
displayed.Thisstartstheautomatictuningprocessand searchesthrough alltheavailable broadcastfrequencies
for free-to-air channels. Previouschannels willbe replacedon automaticsearch.

13
5.2.1.1. AUTOMATIC SEARCH
Automaticsearch isstartedbyselectingYESintheauto-
search pop upmenu. All themultiplexes are searchedand a
channel table iscreated automatically.All channelsfound
arestored inasortedformwith respecttotheir channel
numbers.
5.2.1.2. MANUAL SEARCH
In manualsearch thenumber ofthe multiplexisentered
manuallyandonlythatmultiplexissearched forthe
channels.Inmanualandauto search, anyexisting channel
in thedatabaseis notre-stored toavoid redundant
duplicatesof that channel.
5.2.2. FIRST TIME INSTALLATION
The user can usethisitemto loaddefault settings,which
hadbeenloadedto the receiver atthefactory.Toinstall
factorysettings,highlight ‘FirstTimeInstallation’ menuand
pressSELECTkey,thenyou will beaskedtoconfirmfor
deletingallchannelsandsettings.SelectingYES and
pressing SELECT will delete theentirechannel table.
5.3. CONFIGURATION
You canconfigure the settings of yourbox.Select
Configuration fromSettingsMenu andPress SELECT to
enterthismenu.Press MENU button toexit.
Configuration Menuincludesthefollowingmain items:
ØAudioLanguage
ØSubtitle
ØTV Type
ØTV Out
ØHDMI Resolution
ØFavouriteMode
ØEPG Preference
ØScan EncryptedChans
ØLowPower
ØReceiver Upgrade
ØParentalSettings
5.3.1. AUDIOLANGUAGE
Digitalterrestrial televisionchannelscanbroadcastsimultaneous soundtracksin more than onelanguage.This
functionselectswhichlanguagesoundtrackyouwill hear when switchingtoachannel broadcasting withmultiple
soundtracks.Highlightthe AudioLanguage line in the Configurationmenuand usethe“3”or“4“ keystocycle
throughthelanguageoptions. ReturnNo Menuto normal TVviewing bypressingthe [MENU]key.

14
5.3.2. SUBTITLE
Digitalterrestrial televisionchannelscanbroadcastwithsubtitlesdisplayedon-screen for the hard-of-hearing. This
functionselectsthe desired subtitlelanguage andenablestheautomaticdisplayofsubtitleswhenever subtitle
informationisbroadcast.Highlightthe Subtitleline in theConfigurationmenuandusethe“3” or“4“ keystocycle
throughthedisableand languageoptions.ReturnNOMENU to normalTVviewing bypressing the [MENU] key.
5.3.3. TVTYPE
Digitalterrestrial television channelscan broadcastprogrammesin awidescreen format. Thisformat mustbe set
correctlyto normal or widescreenTVs. Thisfunction tells the TV the screen format so that broadcasts aredisplayed
correctly.InConfigurationmenu,usethe “ / ▼”buttons to goto TV Type option.Use“◄/ ►”buttons to toggle
TVtype.It can be4:3or 16:9(widescreen) according tothe TVthat set-top-boxisconnectedto.The aspectratio
conversionmodeis letter-boxasdefault. Videois displayed according totheselectedTVtype.WhenAutomodeis
selected, video isdisplayed atitsoriginalaspectratio definedbybroadcast. When4:3 or 16:9 is selected, pictureis
forced to match either4:3or 16:9ratiosrespectively.Toreturntoprogrammespress the MENU key.
5.3.4. TVOUT
The receiver can output either anRGB orCVBSsignalfromtheTV SCART on the rear panel.Although theRGB
format resultsinabetter qualitypicture, not all equipment - particularlysomeVCRs- cancope with an RGB signal.
5.3.5. HDMI RESOLUTION
Thisreceiver can giveHDMIoutputin 3differentresolutions:576p, 720p,1080ifromtheHDMIconnectoronthe
rear panel.In order to get bestpicture quality,please checktheHDMIresolutions supportedbyyourTV set and
selectthemostappropriateonefromthismenu.Note thatonlystored channelscan be watchedoverHDMI,not
VCR input.Thisfunction duplicatestheselection madeatthetimeof firstinstallation.Ifyou experienceanyissues
withtheHDMIconnection, pleaseturn the poweroff at themainsswitch,leavefor aminute,thenturn back on. If
the problemstill continues,pleasetrythe sameprocess with your TV set.Under certain conditionsthepicture
qualityviaHDMIcanbe limited,ifthecurrent programis broadcasted with lowbandwidth. This isnotamalfunction
of the unit.
5.3.6. FAVOURITE MODE
Thisfunctionenables ordisablesthe favourite channel listmodeby
pressing“3/4”buttonsand pressOK .If there isnofavourite channel,
awarning message isdisplayed.
5.3.7. EPGPREFERENCE
Digitalterrestrial televisionchannelscanbroadcastsimultaneous
Now&Nextand7-Dayelectronicprogram.HighlighttheEPGPreference
lineintheConfigurationmenuand usethe“3” or “4“keystoselect
Now&Next or 7-Day.
5.3.8. SCAN ENCRYPTEDCHANNELS
If selected when searching, the“Encrypted” channels will also be stored and displayed. If NO ischosen only“Free
to Air” channels will be stored.
5.3.9. LOW POWER
Highlight theLowPower line in theConfigurationmenu andusethe“3” or“4“keystocyclethroughthe ONand
OFF options.If youselectON and the deviceisinStandbymode,the displaywill shownotimeinformation.VCR
outputwillbe disabled. If you selectOFF, all functionswillbeoperable.Toreturnto normal TV viewing,pressthe
[MENU]key.

15
5.3.10. RECEIVER UPGRADE
Toensurethatyourdigitalreceiver alwayshas
the mostup-to-date software, pleaseensure
thatafteruseitissettoitsstandbymode. The
Receiverautomaticallypowersupat 3AMeach
dayandsearchesfor anynewinformation
which maybe broadcastand willdownloadthis
to your boxautomatically.Thisoperationwill
normallytakeapproximately30minutes.If you
haveanimportant recording tomake at 3AM
which mustnothave a30 minutesinterrupt
thenyoucan disable theautoOAD search by
performingthefollowing:
1. Press Menubuttonand using the“5/6”
buttonshighlight CONFIGURATION and press
theSELECTbutton.
2. Use the“5/6”buttons tohighlight "RECEIVER UPGRADE" and press SELECT button.
3. Using the “3/4” button change “AutomaticDownload” fromEnabledtoDisabled.
4. Utilize the “5/6” button tohighlight“Search for NewVersion”and pressSELECT.
5. Ifthere is a newsoftwareversionthereceiver will start to search.
Donot forget toreenable theautomaticOAD function after you have made yourrecording byrepeating theabove
instructions.
NOTE: If there isnonewsoftware todownload,thisprocedure will take onlyabout20-30 seconds.
5.3.11. PARENTAL SETTINGS
Use“5/6”buttons to go to ParentalSettingsoption. Press
SELECT button to enterParental Settings Menu.Aboxasking
for the lockkeyis displayed. There is onlyone keywhich is set to
“0000” initially. Enterlockkey.Ifitisincorrect,it isreturned back.
If itiscorrect, the ParentalSettingsMenuincludingfollowing
itemsisdisplayed:Thereyoucanset/reset lockingfor the MainMenu,orthe InstallationMenu to restrictaccess.If
themenu lockisdisabled, therewill befree access tothe menusystem.You can change thelockkey.
5.3.11.i. Menu Lock
Use “5/6” buttons to go to Menu Lock option. Use “3/4”buttonsto toggleMenu Lock Mode.
DISABLED : All menusare unlocked.
MAINMENU: Main Menu isaccessible onlywith thecorrectlock key.Sotheusercan’t add, delete, rename,
channels,can’t settimers.
INSTALLATION: Installation menu islocked. Sotheuser can’t add channels.
Changeswill beupdatedafter exiting‘Configuration Menu’.
5.3.11.ii. Set LockKey
Use“5/6”buttons togo to SetLock Keyoption.
UseSELECTbutton to enter newpassword. New
PasswordMenuisdisplayed.UseNUMERIC
buttonsto enternewpassword.NewPasswordis
asked twicefor confirmation.Ifboth passwordsare
fourdigitslong andthe same,the passwordischanged.Itisupdated afterexitingtheParental Menu.

16
5.4. TIMERS MENU
Timer MenuisenteredfromtheMainMenu. There isa
fivecolumnsummaryinformation, suchas timer no,
channel name, start time,end time, start date andmode,
for each ofthe five timers.
Thereare twowaystoset a timer.Ifthe start/endtimeand
datearevalidnumbers,thetimer can beset directlyby
changingthe modefrom“Inactive”to “Active” using
“3/4”cursors.If the start/endtimesand dateare invalid
orif the setvaluesareto bechangedtotally,OK mustbe
pressedwhile the desired timerishighlighted inthe
summarylist. Anewwindowwhere the timer detailsare to
beenteredwill bedisplayedonthe lowerpart of the
screen.The timer detailsare asfollows:
Name: According to thetype that ischosenabove, “3”/“4”keyswill
navigate theuser throughtheTVor Radio listand nameof the program
isselected.
Start: Byusing “0,1,2…,9” keysstart timeof thetimer is entered.
End: Byusing“0,1,2…,9” keys endtimeof the timer isentered.
Date: Byusing“0,1,2…,9”keysdateof the timerisentered.
Mode: Byusing“3”/“4”keys,timer modeisselected as“Once”,
“Daily”or “Weekly”.
Start,Endand Datefield dataareenteredusingnumber keys.Currenttimeand dateare shownonthe lower-right
part of thescreento help you.
Afterthe desireddetail fieldsare filled,one canturnbacktothe timerinfo summarylistbypressing“OK” tosave
the settings,orbypressing “Menu”to cancelthesenewsettings.Aset timeriscancelled(disabled)bychanging
the mode to“Inactive”in timersummarylist. Iftheboxis instandbymodeand when atimer start timecomes,the
Set-Top-Boxswitchesto the set channel, thenwhentheendtimeisreached,the boxgoesto stand-bymode. This
utilityhelpsthe boxtobe used asa sleep-timer.
If youare watching digitalterrestrial TVatthe timethetimer event starts,amessageisflashed onto thescreen
announcing thatthe receiver is“Switching to timer channel”. Soyou understand whatishappening.
5.5. LANGUAGE
In thismenu the user canadjustthepreferred language.
Languageis changed bypressing “5/6” and SELECTkey.

17
6. ADVANCED OPERATION
6.1. ELECTRONIC PROGRAM GUIDE (7-DAY - EPG)
In nomenu mode, EPGMenu isreached bypressing
GUIDE key,quit bypressingGUIDEkeyagain.In EPG
Menuall channelsare displayed.Current programis
highlighted. Use “5/6” buttonsto change channels.
Some,butnot all, channelssend informationaboutthe
current andnextevents.Please note that event information
isupdatedautomatically.If there isno event information
dataavailable in channels,onlychannelnameswith“No
Information” banner isdisplayed.
In EPG Menu,you can easilyseethe extendedhelp
informationbypressing INFO keyand bypressingthis key
again youcanclosethiswindow.Ifyou highlight anevent,
short event description, extendedevent description,start
and finish times of event are displayed onthescreen.
When thecurrent programis highlighted, theboxis
switchedtothe highlighted channelbypressingSELECT
key.
If youpressSELECT when anexteventis highlighted, a
reminder issetforthe highlighted programandaclock
appearsonthescreen.Programreminderscanbeset to
signal that aprogramisabout to startwhen youare
watchinganotherchannel. If yousetreminder to aprogram,
thenyou will beasked forswitching tothatchannelwhen
theremindertimeisreached.
Press MENU to viewthe 7dayEPG.Press“5/6”to
navigate in Channelsor Programs.“3/4”keyto navigate
through thechannel andprogramlist. WithRED/GREEN
keysyou canchangeschedule time. Bypressing
YELLOW/BLUEyoucan advancetheschedule backward/
forwardofaday.Ifyoupressinfo keyyoucan seeeasily
the detailedhelp information and bypressinginfo keyagain
you can exit Help menu.

18
The startingtimefor EPG isthe current time. Youcansee
the event informationfor thenexttwohours.Bypressing
“5/6”key,youcango tothenext/previousprograms.If
you press SELECT whenanextevent ishighlighted, a
reminder isset forthe highlightedprogramandaclock
appearsonthescreen.Programreminderscan be set to
signal that aprogramisabouttostart whenyouare
watchinganother channel.If yousetreminderto a
program,then youwill be asked for switchingtothat
channel when thereminder timeis reached.
6.2. MESSAGES
When the boxreceivesno signal (e.g.theantennacable isdisconnected),“NO
SIGNAL” message isseen on the screen.
When thereisnochannel stored in thebox,TimerMenu,ChannelTableMenus are not accessible. Channel
navigation is not allowed.Therefore, tryingto enter thesemenus ordochannel navigation will display“FirstAdd
newChannels!” message on the screen.
6.3. CHANNELNAVIGATION
Thereare twowaystonavigatethroughthechannels:
1. Pressing P+/P- keys will helpyou togotothe nextor thepreviouschannel in the list.
2. Pressing a numberkeywill activate asmall digit entrywindowon the left upper cornerof thescreen.After a digit
isentered,theboxwillwait for2secondstill you enteranotherdigit. Ifnodigitisenteredduring these 2seconds,
thenthe boxwill switch to theentered number channel.

19
If anumberthatisgreater than themaximumnumberof channelsisentered, thebox willswitchautomaticallyto
the lastchannel. Eachtimetheboxswitchesto thedesired channel,aninformationwindowisdisplayedonthe
lowerpartof the screen.Thesmallbarontopright of the bannerindicatesthecurrent signalquality.Onthis
channel infowindowthereare:
ØCurrent event namenexteventname, and their startand end times.
ØTime
ØChannelnumber
ØNameofthe channel
ØAn iconindicatingthatthe channelisset asfavourite (if thechannel isnot set asfavouritethe field isleft
empty)
ØTV/ Radio icon
When switchingtoalockedchannel (channel), lockcode isrequested via awindowas
showninthepicture.Onlyafterthecorrectcode isentered, itisallowed toaccessto
thischannel.To skipthischannel, P+/P- cursor keys mustbe used.
6.4. VOLUMECONTROL
The volumelevel ofthesound fromthe receiver can bealteredwith
the [V+]and[V-]keysonthe remote control handset. Pressingeither
keydisplaysabargraphof the soundvolumeonthe TVscreen.The
volumelevelselectedwillremainset,even whenthereceiver isturned
stbyoff /on again, untilit isaltered with the [V+] and[V-] keys.
The audiovolumeadjustmentforthe receiver isindependentofthe volumecontrolon yourTVset.Be carefulthat
bothvolumecontrolsarekeptwithinreasonablelevelsso thatwhen switchingfromanaloguetodigitaltelevision
viewing, orwhen first turningonyourTV set, the sound levelisnotsuddenlyveryhigh.
You can silencethesoundfromthereceiverbypressingthe[MUTE] key.The sound remainsmuted
untilthe [MUTE] keyis pressedagain,the [V+] keyispressed, or until the receiver isturnedoffand on
again.Whilethe sound ismutedin thisway,the mute symbol is displayedin the topleftof theTV
screen.The symbolisremovedafter 3seconds,but thesound willremainmuteduntilthe [MUTE]key
ispressed forthesecond time,and themutesymbolwilldisplayfor3 seconds.
Table of contents