Wherify Wherifone G550 User manual

WHERIFONE G550®
User Guide

My Wherifone Information
To access the Wherify Location Service Center on the Web:
http://www.wherify.com
To access the Location Service Center by phone:
1-877-WHERIFY (943-7439)
Wherifone ID:
Primary Contact:
IMEI Number:
S/N Number:
User ID:
Password:
(Chosen by you at time of activation)
Key Phrase:
(Chosen by you at time of activation)
Secondary Contact:
G550®
WHERIFONE
User Guide

ii iii
Table of Contents
My Wherifone Information . . . . . . . . . . . . . . . . . inside front cover
Part One—The Wherifone G550® GPS Locator Phone
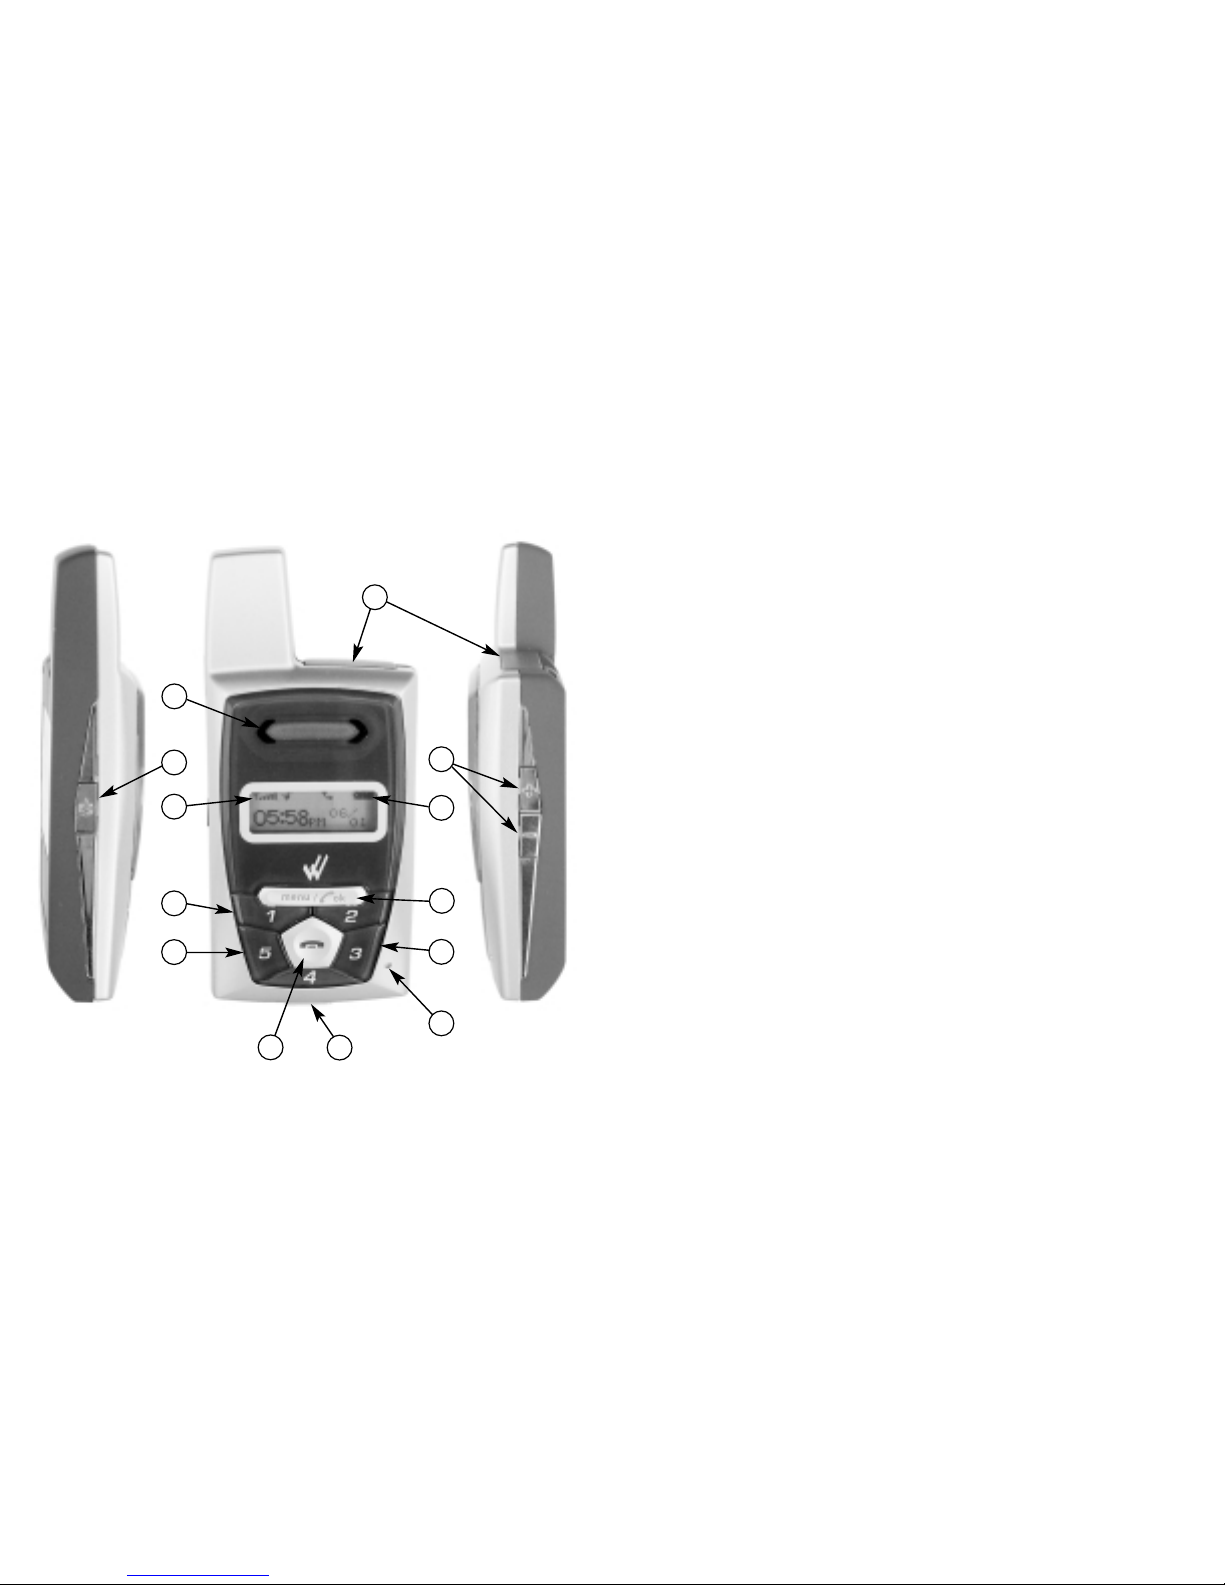
Your Wherifone G550®. . . . . . . . . . . . . . . . . . . . . . . . . . . . . . . . . 2
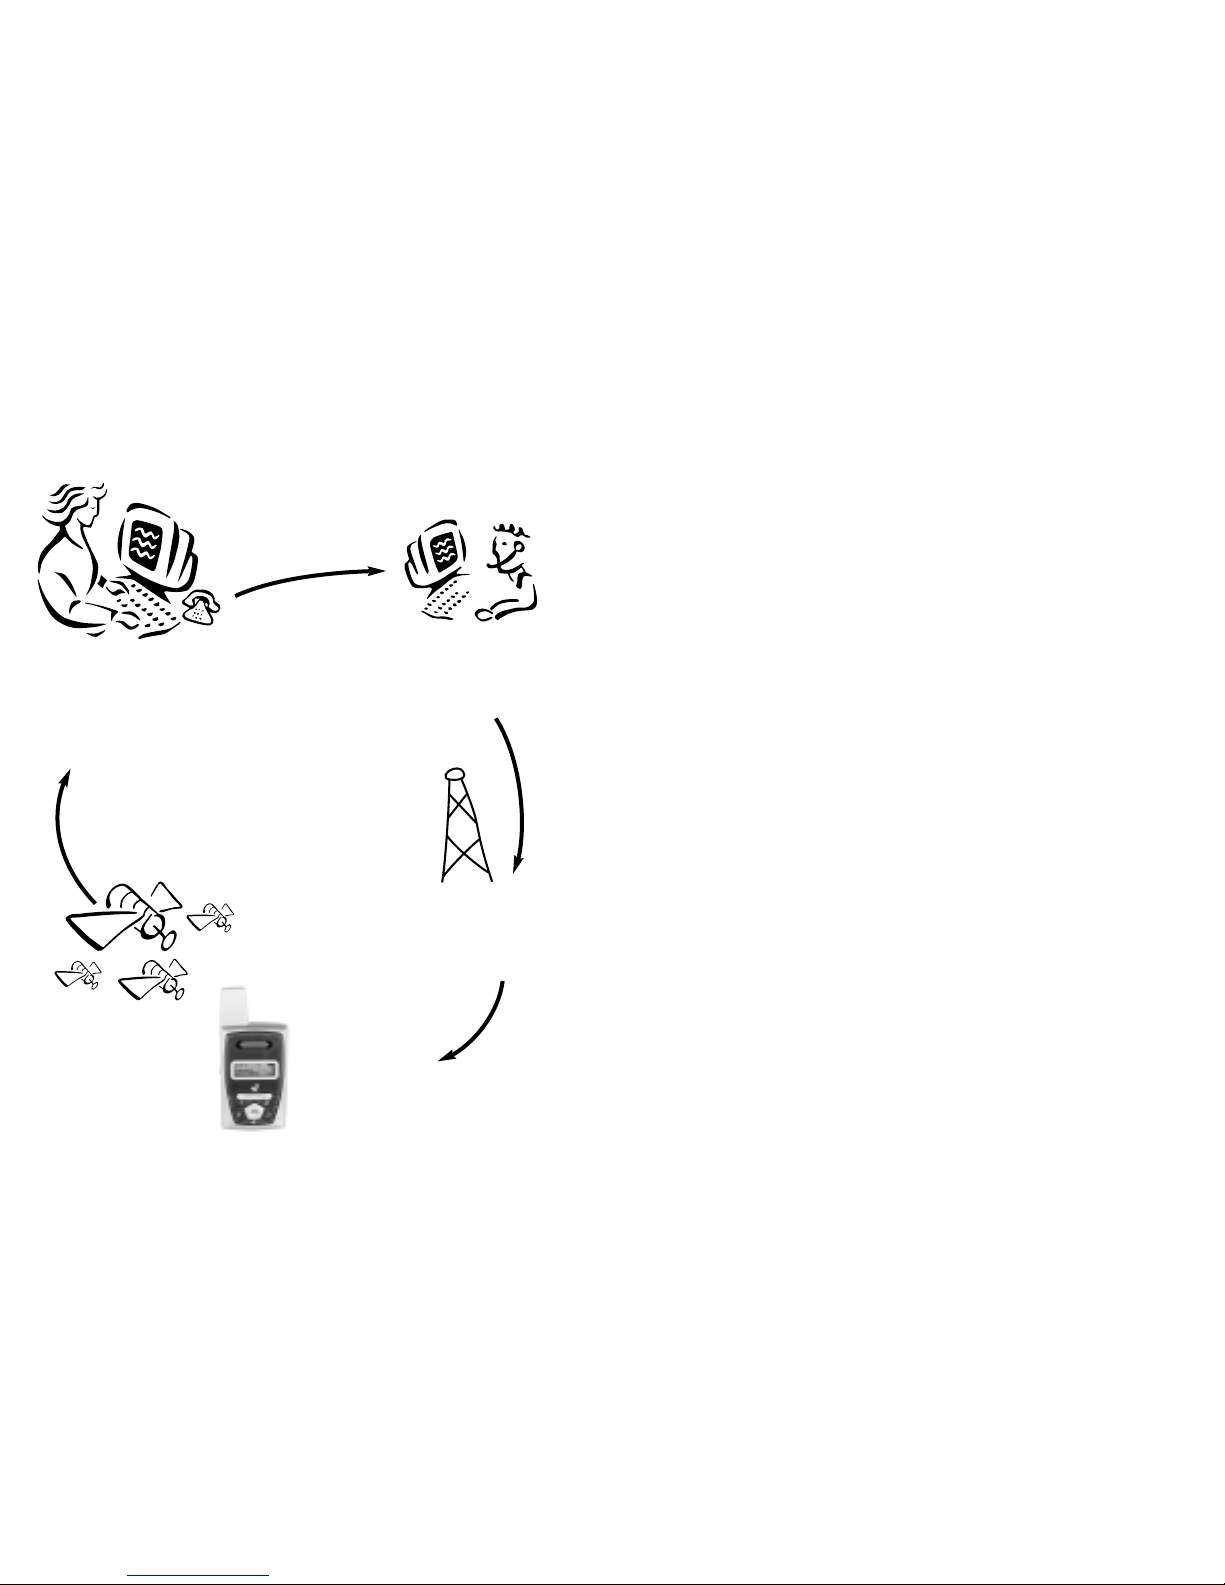
How It Works . . . . . . . . . . . . . . . . . . . . . . . . . . . . . . . . . . . . . . . . . 7
The System Behind the Wherifone . . . . . . . . . . . . . . . . . . . . . . . . 7
Setup . . . . . . . . . . . . . . . . . . . . . . . . . . . . . . . . . . . . . . . . . . . . . . . 9
Step 1: Charge the Battery . . . . . . . . . . . . . . . . . . . . . . . . . . 9
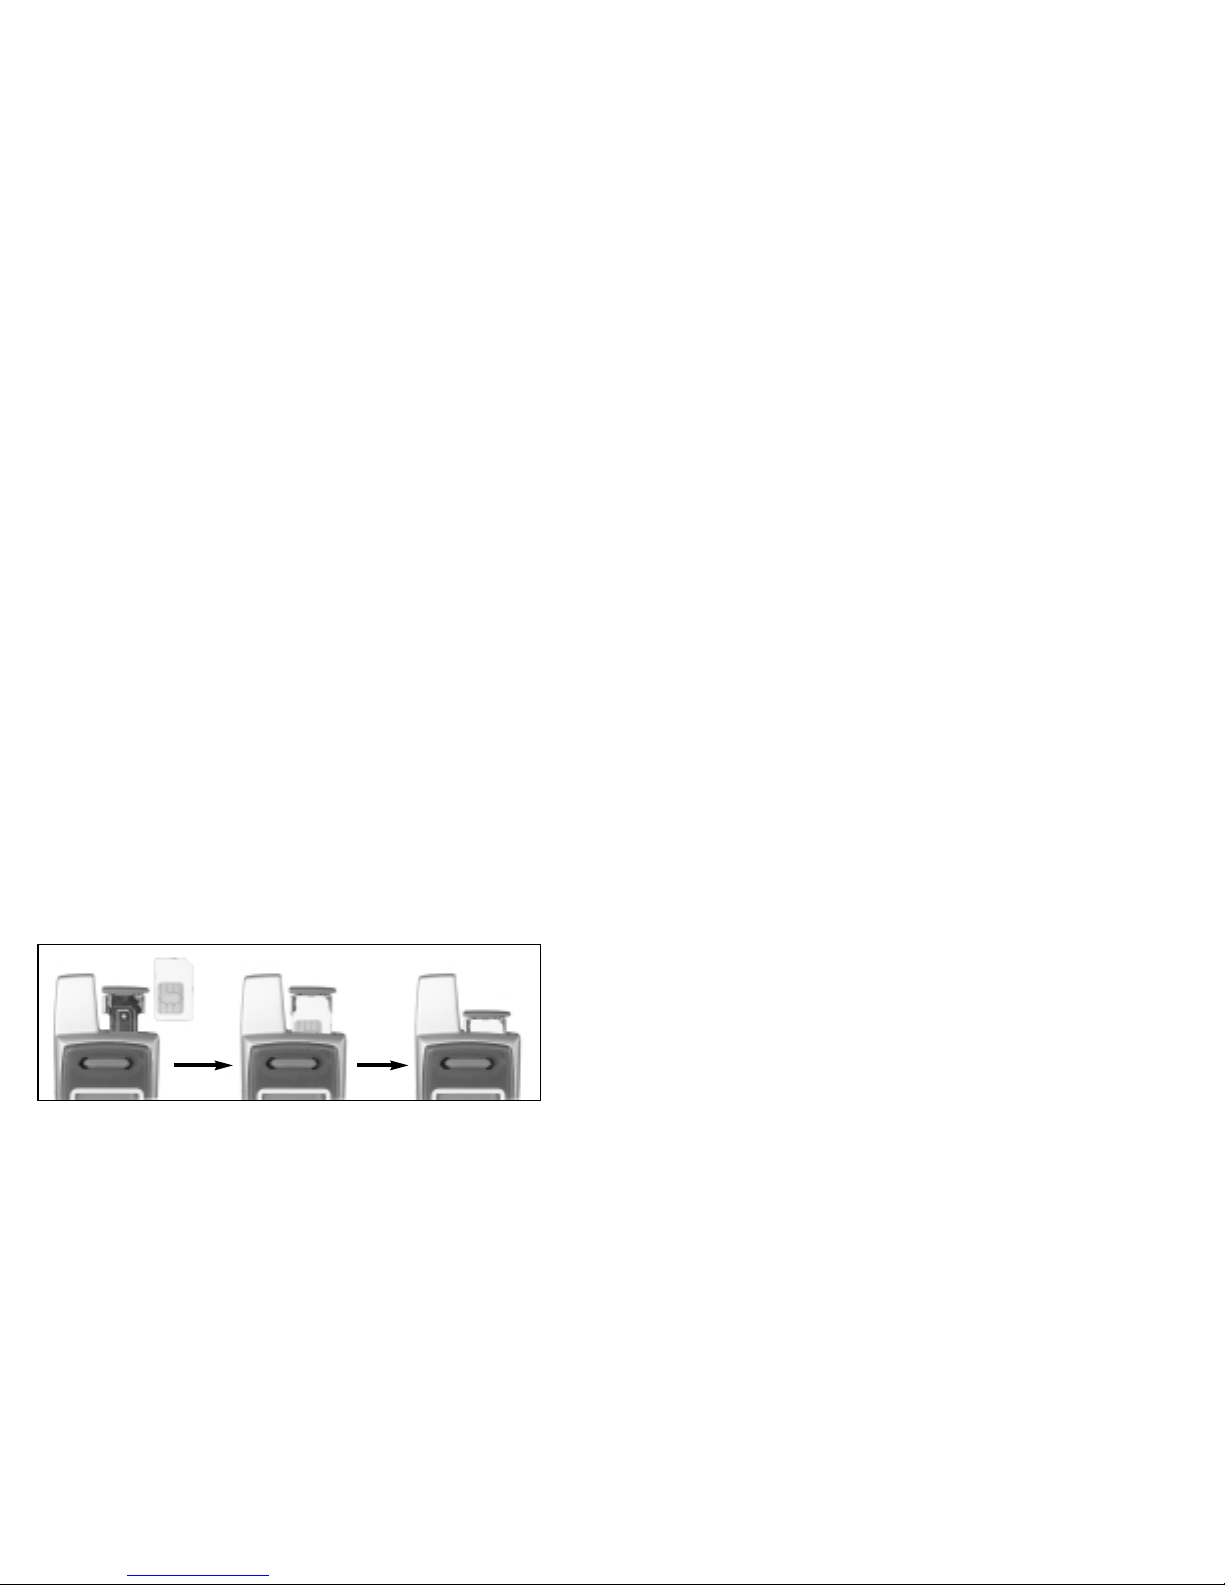
Step 2: Insert your SIM Card . . . . . . . . . . . . . . . . . . . . . . . . 10
Step 3: Activate Your Account . . . . . . . . . . . . . . . . . . . . . . . 11
Main Display . . . . . . . . . . . . . . . . . . . . . . . . . . . . . . . . . . . . . . . . 13
Signal Strength . . . . . . . . . . . . . . . . . . . . . . . . . . . . . . . . . . 13
Ring Mode . . . . . . . . . . . . . . . . . . . . . . . . . . . . . . . . . . . . . . 14
Lock . . . . . . . . . . . . . . . . . . . . . . . . . . . . . . . . . . . . . . . . . . . 14
Battery Level . . . . . . . . . . . . . . . . . . . . . . . . . . . . . . . . . . . . 14
Using the Wherifone: . . . . . . . . . . . . . . . . . . . . . . . . . . . . . . . . . 16
Turning On the Wherifone . . . . . . . . . . . . . . . . . . . . . . . . . 16
Turning Off the Wherifone . . . . . . . . . . . . . . . . . . . . . . . . . 16
Emergency Requests . . . . . . . . . . . . . . . . . . . . . . . . . . . . . . 17
Changing Phone Settings . . . . . . . . . . . . . . . . . . . . . . . . . . . . . . 18
Menu Operations and Selections . . . . . . . . . . . . . . . . . . . . . 18
Setting Ring Tones . . . . . . . . . . . . . . . . . . . . . . . . . . . . 20
Setting Phone Volume and
Activating the Speakerphone . . . . . . . . . . . . . . . . . . . 21
Setting Ringer Volume . . . . . . . . . . . . . . . . . . . . . . . . . 22
Keypad Lock . . . . . . . . . . . . . . . . . . . . . . . . . . . . . . . . . 23
Ring/Vibrate Mode . . . . . . . . . . . . . . . . . . . . . . . . . . . . 24
Adjust Screen Contrast . . . . . . . . . . . . . . . . . . . . . . . . . 25
Set Backlight Timer . . . . . . . . . . . . . . . . . . . . . . . . . . . 26
Device Setup Menu . . . . . . . . . . . . . . . . . . . . . . . . . . . . . . . 27
Set Time . . . . . . . . . . . . . . . . . . . . . . . . . . . . . . . . . . . . 28
Set Date . . . . . . . . . . . . . . . . . . . . . . . . . . . . . . . . . . . . 28
Message Center . . . . . . . . . . . . . . . . . . . . . . . . . . . . . . 29
IMEI Number . . . . . . . . . . . . . . . . . . . . . . . . . . . . . . . . 29
Software Version . . . . . . . . . . . . . . . . . . . . . . . . . . . . . 29
Reset to Factory Defaults . . . . . . . . . . . . . . . . . . . . . . 29
Making Voice Calls . . . . . . . . . . . . . . . . . . . . . . . . . . . . . . . . . . . . 32
Program the Dial Buttons . . . . . . . . . . . . . . . . . . . . . . . . . . 32
Receive, Make, and End Calls . . . . . . . . . . . . . . . . . . . . . . . . 32
Water Resistance . . . . . . . . . . . . . . . . . . . . . . . . . . . . . . . . . . . . . 34
Part Two—The Wherify Global Location Service Center
Connecting to the Wherify Global
Location Service Center via Phone . . . . . . . . . . . . . . . . . . . . . . . 36
Connecting to the Wherify Global
Location Service Center via the Web . . . . . . . . . . . . . . . . . . . . . . 36
Logging On . . . . . . . . . . . . . . . . . . . . . . . . . . . . . . . . . . . . . 37
Main Menu Page . . . . . . . . . . . . . . . . . . . . . . . . . . . . . . . . . 38
Locator Functions . . . . . . . . . . . . . . . . . . . . . . . . . . . . . . . . . . . . 40
Locator Functions Menu . . . . . . . . . . . . . . . . . . . . . . . . . . . 40
Create Breadcrumb . . . . . . . . . . . . . . . . . . . . . . . . . . . . . . . 41
Perform Emergency Locate . . . . . . . . . . . . . . . . . . . . . . . . . 44
Program Buttons . . . . . . . . . . . . . . . . . . . . . . . . . . . . . . . . . 44
Display History . . . . . . . . . . . . . . . . . . . . . . . . . . . . . . . . . . . 46
Viewing and Managing Location Information . . . . . . . . . . 48
Account Management . . . . . . . . . . . . . . . . . . . . . . . . . . . . . . . . . 51
Manage Account Menu . . . . . . . . . . . . . . . . . . . . . . . . . . . . 51
Subscriber Information . . . . . . . . . . . . . . . . . . . . . . . . . . . . 52
Edit Security Code . . . . . . . . . . . . . . . . . . . . . . . . . . . . . . . . 53
Edit Device Information . . . . . . . . . . . . . . . . . . . . . . . . . . . . 54
FCC Compliance Information . . . . . . . . . . . . . . . . . . . . . . . . . . . 55
Caution . . . . . . . . . . . . . . . . . . . . . . . . . . . . . . . . . . . . . . . . . . . . 55
Warning . . . . . . . . . . . . . . . . . . . . . . . . . . . . . . . . . . . . . . . . . . . . 56
Returns/Refunds . . . . . . . . . . . . . . . . . . . . . . . . . . . . . . . . . . . . . . 56
Wherify Terms and Conditions . . . . . . . . . . . . . . . . . . . . . . . . . . 56
Wherify Limited Warranty . . . . . . . . . . . . . . . . . . . . . . . . . . . . . . 62
Index . . . . . . . . . . . . . . . . . . . . . . . . . . . . . . . . . . . . . . . . . . . . . . 66

1
Part One
The Wherifone G550®
GPS Locator Phone

32
1. SIM Card Holder: Pull out SIM card drawer and slide in your
SIM card until it snaps into place.
2. Dual Function—Volume Control and Navigation: Press these
buttons to control speakerphone volume. Press (+) to increase
volume or (-) to decrease volume. While in the Menu use
buttons to move to select desired feature.
3. Battery Level Icon: Indicates the percentage of charge left in
the battery.
4. Menu/OK Button: Use this button to scroll through menu
options AND to select features.
5. Dual Function—Scroll and Programmable Buttons: While in
the Menu, buttons 5and 3can be used to move the cursor
left or right to select the desired feature OR during normal
operation numbered buttons can be preprogrammed and
used for making a phone call.
6. Reset Button: Safety switch, DO NOT USE unless directed to
by a Wherify Customer Service Representative.
7. Charging Port: Plug in the AC power adaptor here to charge
battery.
8. End/Off Button: Press and release to hang up or disconnect
a call. Press and hold for 5 seconds to turn off your
Wherifone.
9. Programmable Buttons 1 through 5: Press any numbered
button once to display a pre-programmed phone number;
then press the Menu/OK button to dial that number. Or you
can press and hold a numbered key for 4 seconds to dial the
selected number.
10. GSM Cellular Network Signal Strength Icon: Indicates the
signal strength of the GSM network.
11
6
1
8
10 3
7
5
2
12
4
9
5
Your Wherifone G550®
Figure 1.1

4 5
The Wherifone G550®GPS Locator Phone
Through the convergence of Global Positioning System (GPS), digi-
tal wireless technologies and Wherify’s patented technology, the
Wherifone G550 offers a tested and proven solution that provides
you and your family with added safety and peace of mind by
knowing you can locate a loved-one 24 hours a day, seven days a
week. Whether you are at work, at home, or traveling, you can
use the Internet or any telephone to quickly and precisely identify
the location of the Wherifone. In the event of an emergency, you
can request 911 assistance and your local emergency responders
will be dispatched to your location.
Please read the entire User Guide to become familiar with
the Wherifone G550 and how it works.
For Best Results
•Although the Wherifone is equipped with “Enhanced GPS,”
which enables it to obtain a location inside many buildings and
in areas where conventional (autonomous) GPS devices cannot,
the Wherifone works best under an open sky. GPS signal recep-
tion can be affected or even blocked by the local environment.
GPS signal reception can be obscured by structural steel and
concrete in office buildings and parking garages, heavy “urban
canyons”and similar situations. The Wherifone works in wood
frame buildings, such as your home, and in most vehicles.
•Your Wherifone operates on a nationwide GSM cellular net-
work. The Wherifone must be within the GSM network cover-
age “footprint”for GPS Locates and voice calls to occur. Check
coverage maps at www.wherify.com for details.
•To help ensure optimal performance of the Wherifone, we
recommend you charge the Wherifone every night. This can
help ensure a longer battery life.
11. Power On/Off Button: Hold this button down for 2 seconds to
power the unit ON or 4 seconds to turn the unit OFF.
12. Speaker: Plays Ring Tones when phone rings. Also used to
listen to inbound caller during a conversation.
Other required equipment:
1. A Personal Computer with Internet account, or phone
(not included): Once you have activated your account, your
Wherifone is part of an accurate location and emergency
network. Use a computer with an Internet account, or a
phone, to access the network.
2. Location Service Center: The behind-the-scenes backbone
of the accurate location and emergency network (included
after account activation with Wherify).

76
Note
The Wherifone utilizes both GPS and GSM (digital wireless) tech-
nologies, and both are required to provide a complete location
report. If the Wherifone receives a GSM signal, but no GPS signal
is available, a tower-based location report is available to authori-
ties in the event of an emergency. If a GPS signal is available, but
the Wherifone is outside the GSM network coverage area or does
not receive a GSM signal, no location report can be provided until
the unit returns to an area with GSM cellular service. Refer to the
Troubleshooting Guide on Wherify’s website www.wherify.com
for the most up to date information.
How It Works
You can locate the Wherifone in two easy ways:
1. Log onto the Internet at www.wherify.com (see page 40) to
view location information on street and aerial maps.
2. Call us at 1-877-WHERIFY (see page 36) to obtain a verbal
location report from a Wherify Customer Care representative.
We’ll map your loved-one’s location and give you a nearby/
approximate street address, typically in less than a minute.
An e-mail of the same information is also available.
The System Behind the Wherifone
The Wherifone G550 works by combining Wherify’s patented loca-
tion technology with the United States Department of Defense’s
Global Positioning System (GPS) of satellites—plus the digital,
nationwide cellular networks.
We integrate all this into our state-of-the-art automated Global
Location Service Center—utilizing the same type of mainframe
computers used by banks, telephone companies and airlines, and
2. The Location
Service Center
processes your
request and…
1. Request a
Locate on our
Web site or
over the phone.
5. Receive your
Location Report
on the Web site or
over the phone.
4. The Locator
uses GPS
satellites to
determine
its location.
3. …sends a
wireless
call to the
Locator.
System Overview
Figure 1.2

98
backed by Wherify’s Customer Care representatives standing by to
provide assistance when needed.
When you request a Locate either through our Web site at
www.wherify.com or over the phone at 1-877-WHERIFY, our
Global Location Service Center contacts the Wherifone via a
nationwide GSM cellular network. The Wherifone then zeros in
on the closest GPS satellites orbiting the Earth and determines
its location through latitude and longitude coordinates.
Our Global Location Service Center processes those coordinates,
pinpoints them with advanced mapping software, and gives you
an approximate street address (if one is available) with your
Wherifone location plotted onto two types of maps: 1) Standard
online street maps and 2) a detailed high resolution photo map
(using either aerial or satellite imagery).
Note
If the GPS satellites are obscured and a GPS fix is not available,
the location of the nearest cell phone tower will be available to
authorities in emergencies. Cell phone tower location information
is only available to Wherify Customer Care representatives and
911 emergency operators during emergencies.
Setup
We make it easy for you to set up your Wherifone and your
accompanying account. YOU MUST FULLY COMPLETE THE
ACTIVATION PROCESS FOR YOUR WHERIFONE TO WORK.
Step 1: Charge the Battery
For the initial battery charge, we recommend charging the
battery for at least twelve hours. The battery must be fully
charged before you can continue to “Step 3: Activate Your
Account”on page 11. After the initial battery charge, it will
take less than three hours to fully charge the Wherifone during
normal use. For a completely dead battery, it may take up to 1.5
hours for the battery icon to activate.
Battery Strength: The battery icon on the LCD indicates the
charge state of the battery. If it indicates very low power or less,
your Wherifone may not be able to receive a location request,
take incoming phone calls, or make outgoing phone calls.
BATTERY LEVEL ICON
CHARGING IS REQUIRED
VERY LOW POWER (<20% OF BATTERY LIFE).
UNIT SHOULD BE CHARGED
LOW POWER (<40% OF BATTERY LIFE)
MEDIUM POWER (60% OF BATTERY LIFE)
MEDIUM HIGH (80% OF BATTERY LIFE)
FULLY CHARGED BATTERY

1110
The Wherifone uses a miniaturized, built-in rechargeable Lithium
Ion Polymer battery. To maximize the life of the battery, Wherify
recommends charging the battery every night, just as you would
do with your mobile phone. To maximize battery life, plug the
Wherifone into the charger whenever you’re not using it.
Depending on GSM network coverage and GPS satellite positions,
a fully charged battery can last up to 4 days in standby mode or
about 50 location requests. Keep in mind that every time you
perform a GPS location request or make a voice call battery
power is consumed.
Charge your Wherifone every night to keep it ready for an emer-
gency. It is NOT necessary to drain the battery before charging.
Moreover, you will not harm the battery by leaving the Locator in
the charger for long periods of time.
WARNING: Only use the Wherify battery charger that came with
the Wherifone to charge it. Do not use any other battery charger.
Other battery chargers may damage the battery and the
Wherifone, and may also be dangerous to anyone near the unit.
Step 2: Insert your SIM Card
Remove the SIM drawer and snap in your SIM card with the
notched corner in the top right and the gold pads facing forward.
Please refer to the photos below.
Note
The Wherefone requires a valid SIM card to function. The SIM
card must be in the phone prior to activation. If you do not have
a SIM card the unit will not make or receive phone calls. The
phone must be off when you insert or extract the SIM card.
Step 3: Activate Your Account
IMPORTANT: YOU MUST SIGN UP FOR WHERIFY SERVICE AND
ACTIVATE YOUR ACCOUNT TO USE YOUR WHERIFONE. Activation
gives you access to Wherify’s Global Location Service Center and
“links”your Wherifone to you.
Before Activating...
To activate your account, you’ll need to select a Service Plan.
Choose the plan that’s right for you and matches how you intend
to use your Wherifone. You can get Wherify Service Plan informa-
tion where you purchased your Wherifone, on our Web site at
www.wherify.com or by calling 1-877-WHERIFY.
You will also need to provide the information requested below.
To help speed up the activation process, we suggest you write
this information down before starting. You can use the “My
Wherifone Info”page, which is inside the front cover.
•Your fully charged Wherifone (Note: To make sure the battery
is fully charged, the Battery Icon MUST BE FULLY ILLUMINATED.
•The Service Plan you selected.
•The two serials numbers from the back of your Wherifone.
These numbers can also be found on your package, they are
called the IMEI and S/N.
•The IMEI is 15 characters in length
•The S/N is 11 characters in length.
Figure 1.3

1312
•A SIM card (the SIM card contains the phone number for the
Wherifone G550)
•A security Password you create for your account. The Password
needs to be at least 6 characters (up to 12 characters is permit-
ted). Characters can be any combination of numbers, symbols,
or letters you choose.
•A Key Phrase you create to help you remember your Password,
in case you forget it.
•Your credit card information: number and expiration date.
Once you have collected these components…
You’re ready to activate!
Simply go online to www.wherify.com and click the Activate but-
ton, then follow the activation instructions and prompts. If you do
not have access to the Internet, call 1-877-WHERIFY and a Wherify
Customer Care representative will help you activate your account.
At the end of the activation process, you will be provided with
two important numbers that allow you to access your account:
•User ID—a 10-digit number (like a phone number) you will use
with the Password you created to access secure services from
our Web site.
•Phone number—a 10-digit number (for the USA) used for
receiving incoming phone calls (including area code).
Please write these numbers in the “My Wherifone Info”page,
located inside the front cover of this guide. Please keep them in a
safe and confidential place.
Your Wherifone is now ready to use!
Main Display
Important information about
the status and features of the
Wherifone appear in the main
display. There are three types
of displays on the Wherifone:
Icon Display: The top icons show the vital Wherifone functions.
Scrolling Display: The middle line is scrolling text that indicates
carrier, locate, and other status information.
Message Display: The bottom line shows the date and time
during regular use.
Signal Strength
The number of bars in the Signal Strength icon indicates the
strength of the GSM network signal the Wherifone is receiving.
More bars mean a stronger GSM signal. The Wherifone uses the
GSM network for all communication activities: making calls,
receiving calls, receiving pages, receiving location requests, and
sending location reports to the Global Location Service Center.
If the signal strength is low or non-existent, your Wherifone may
not be able to receive a location request, send its location infor-
mation, or make incoming or outgoing phone calls.
GSM NETWORK SIGNAL STRENGTH ICON
NO BARS NO SIGNAL ON GSM NETWORK
ONE BAR VERY LOW OR WEAK SIGNAL ON THE GSM
NETWORK
TWO BARS LOW SIGNAL ON THE GSM NETWORK
THREE BARS MEDIUM SIGNAL ON THE GSM NETWORK
FOUR BARS MEDIUM HIGH SIGNAL ON THE GSM NETWORK

1514
Ring Mode
The Ring Mode icon indicates that the Wherifone is set either to
“Ring Mode”or “Vibration Mode.”Set this mode using the Menu
function. In Ring Mode the Wherifone will alert the user to an
incoming call via the ringtone selected by the user. When the
phone is in Vibration Mode the phone will vibrate to alert the
user to an incoming call.
Lock
The Lock icon indicates that the Wherifone keypad is locked. The
Lock icon will only appear when the keypad has been locked
using the Menu function. If the keypad is locked you may tem-
porarily unlock it by holding down on the Menu/OK button for
3 seconds. The keypad will automatically re-lock one minute after
you’ve completed your call or locate.
Battery Level
The Battery Level icon shows the battery charge. The more filled
in the icon, the more battery power is left in the Wherifone. If
the Battery Level icon is empty, you may not be able to perform
locates, receive or send phone calls, or receive pages.
Depending on the cellular network coverage and GPS satellite
positions, a fully charged battery can last up to 4 days in standby
mode or perform about 50 location requests. Keep in mind that
battery power is consumed every time you perform a GPS location
request or make a voice call.
Charge your Wherifone every night to keep it ready for an emer-
gency. It is not necessary to drain the battery before charging.
Charging your Wherifone everyday can actually help prolong the
battery life and will not harm the battery.
WARNING: Only use the Wherify battery charger that came with
the Wherifone. Do not use any other battery charger. Other bat-
tery chargers may damage the battery and your Wherifone, and
may also be dangerous to anyone near the unit.
BATTERY LEVEL ICON
CHARGING IS REQUIRED
VERY LOW POWER (<20% OF BATTERY LIFE).
UNIT SHOULD BE CHARGED
LOW POWER (<40% OF BATTERY LIFE)
MEDIUM POWER (60% OF BATTERY LIFE)
MEDIUM HIGH (80% OF BATTERY LIFE)
FULLY CHARGED BATTERY

1716
Using the Wherifone:
Your Wherifone has the ability to communicate your location
whenever it is powered on, within the range of the GSM and GPS
signals, and a Location Report is requested either online at
www.wherify.com or 1-877-WHERIFY, or by requesting directly
from the locator.
Turning On the Wherifone
The Wherifone must be on to operate and to communicate infor-
mation about your location, to receive incoming phone calls, or
make outgoing phone calls. To turn on the Wherifone, press and
hold the Power button for 2 seconds.
Turning Off the Wherifone
You should turn off your Wherifone if you will not be using it for
an extended period of time. Just like a cellular phone, you MUST
turn the Wherifone off when you are traveling on any commercial
airplane.
When you turn off the Wherifone, all
locating and phone call functions are
suspended.
To turn off the Wherifone:
1. Press and hold the Power button
for 4 seconds OR;
2. Press and hold the End/Off button
for 5 seconds.
Emergency Requests
In the event of an emergency, you can request a 911 emergency
response directly from your Wherifone.* Button 1has been set at
the factory as the default Emergency button for making 911 calls.
The phone will always have an emergency 911 calling ability
through this button, with or without a valid SIM card.
To send an emergency request from your Wherifone:
Press button 1 and hold for 4 seconds to access the
emergency number (911).
After validating the emergency request with you or your designat-
ed contact, the Emergency Operator can dispatch the request to
the nearest Public Safety Answering Point (PSAP) 911 operator. The
proper emergency authority can then be sent to your location.
*Emergency Operators must be able to validate the emergency
before the Emergency Providers (Police, Fire Department,
Ambulance, etc.) are dispatched to your location.
Note
If your Wherifone is not within a GSM
coverage area, we will not immediately
receive the Emergency request. The
Wherifone holds the request until the unit
returns to a coverage area and then the
request is transmitted.
Emergency/911 Request: Press button 1
and hold for 4 seconds to initiate a 911
Emergency Request.*
Power button
End/Off button
Figure 1.4
Figure 1.5

1918
Changing Phone Settings
You may change your Wherifone default settings through the
main Menu, including Ring Tones, Volume Level, Ring Tone
Volume, Display Contrast/Level, Keyboard Lock, Ring/Vibrate
Function, and Backlight Timer.
To access the Menu, press the Menu/OK button, and hold it down
for 2 seconds. Once in the Menu, you may scroll to the feature
you wish to set by using the 3button to scroll to the right, and
the 5button to scroll to the left. You may also use the volume
buttons to scroll between menu items. The “+”button will scroll
your selection to the right, and the “-”button will scroll your
selection to the left.
Once you have scrolled to the Menu icon you wish to select, press
the Menu/OK button. Your selection will be set, and you will be
returned to the main display. To cancel your selection and quit
the Menu function, press the End/Off button and you will be
returned to the main display.
Menu Operations and Selections
•Enter menu: push Menu/OK and hold for 2 seconds
•Scroll menu: use 5and 3, or “+”and “-”
•Select icon: press Menu/OK
•Cancel selection: press End/Off
•Return to main display: press End/Off
•Accept incoming calls while in the Menu: press Menu/OK
button to connect to the call
Scroll Menu
with 5 and 3,
or “+”and “-”
Enter Menu with
Menu/OK held for
2 seconds
Select icon with
Menu/OK button
Figure 1.6

Setting Ring Tones
Your Wherifone comes with a choice of 7 different Ring Tones.
To set your Ring Tone, enter the Menu by pressing the Menu/OK
button. Then scroll to and select the Ring Tones icon. Once you
are in the Ring Tone menu you may select one of 7 Ring Tones by
scrolling through them using the number 3and 5buttons, or the
“+”and “-”volume buttons. Pressing the Menu/OK button will
set your Ring Tone.
2120
Setting Phone Volume and Activating the Speakerphone
To set the volume or activate the speakerphone, enter the Menu
by pressing the Menu/OK button. Scroll to and select the Phone
Volume icon. The volume level is represented by the number of
bars in the icon. The speakerphone will start functioning at level
6. Adjust the volume level by scrolling through them using the
number 3and 5buttons, or the “+”and “-”volume buttons.
Pressing the Menu/OK button will set your Phone Volume.
Icon Description
Main Menu Ring Tone Selection
Submenu Ring Tone 1
Ring Tone 2
Ring Tone 3 (default)
Ring Tone 4
Ring Tone 5
Ring Tone 6
Ring Tone 7
Icon Description
Main Menu Speaker Volume
Submenu Level 1
Level 2
Level 3 (default)
Level 4
Level 5
Level 6 (speakerphone starts)
Level 7
Level 8
Level 9
Level 10

2322
Setting Ringer Volume
To set your Ringer Volume, enter the Menu by pressing the
Menu/OK button. Then scroll to and select the Ringer Volume
icon. The volume level of the Ringer is shown by the number of
bars in the icon. More bars means a higher volume. Adjust the
volume level by scrolling through them using the number 3and 5
buttons, or the “+”and “-”volume buttons. Pressing the
Menu/OK button will set your Ringer Volume.
Keypad Lock
You may lock the Keypad of the Wherifone to prevent accidental
calls, or to limit access to the Wherifone. To lock, enter the Menu
by pressing the Menu/OK button. Then scroll to and select the
Keypad Lock icon. You may then set “Active”or “Inactive”using
the scroll and select commands. The Lock icon indicates that the
Wherifone keypad is locked. The Lock icon will only appear when
the it has been locked using the Menu function. If the keypad is
locked you may temporarily unlock it by holding down on the
Menu/OK button for 3 seconds. The keypad will then automatical-
ly re-lock one minute after you’ve completed your call or locate.
Icon Description
Main Menu Ringer Volume
Submenu Volume 1
Volume 2
Volume 3 (default)
Volume 4
Volume 5
Icon Description
Main Menu Auto Keypad Lock
Submenu Active
Inactive (default)

2524
Ring/Vibrate Mode
The Wherifone may be set to either Ring or Vibrate when it
receives an incoming call or page. To set the Ring/Vibrate mode,
enter the Menu by pressing the Menu/OK button. Then scroll to
and select the Ring/Vibrate icon. You may then set the phone to
either “Ring”or “Vibrate”using the scroll and select commands.
If the Wherifone is set to “Ring”it will alert the user with the
selected Ring Tone. If the Wherifone is set to “Vibrate”it will
alert the user by vibrating.
Adjust Screen Contrast
The screen may be adjusted to set the desired level of Black/White
contrast. To set Screen Contrast, enter the Menu by pressing the
Menu/OK button. Then scroll to and select the Screen Contrast
icon. You may then set the contrast level by using the scroll and
select commands.
Icon Description
Main Menu Ring/Vibration Mode Selection
Submenu Ring Mode (default)
Vibration Mode
Icon Description
Main Menu Adjust Screen Contrast
Submenu Level -2
Level -1
Level 0 (default)
Level 1
Level 2

2726
Set Backlight Timer
The Wherifone display screen has a backlight feature that makes
it easier to operate the phone. The backlight consumes battery
power, so to conserve power the Wherifone has a Backlight Timer
that adjusts how long the backlight stays “on”during operation.
To set the Backlight Timer simply enter the Menu by pressing the
Menu/OK button. Then scroll to and select the Backlight Timer
icon. Set the duration of the backlight, ranging from “Always
Off”to five-, ten-, and 20-second intervals, to “Always On,”by
using the scroll and select commands. Once the Backlight Timer
has reached its time limit the backlight will automatically turn off.
Device Setup Menu
The Device Setup Menu allows you to set the date and time on
your Wherifone, check messages and check the support software
version and IMEI number. To access these features, simply scroll to
the Device Set-up icon in the main menu and press the Menu/OK
button. You can then scroll through the Device Set-up Menu.
Icon Description
Main Menu Set Backlight Timer
Submenu Always OFF
5 Seconds (default)
10 Seconds
20 Seconds
Always ON
Icon Description
Main Menu Device Set-up
Submenu Set Time
Set Date
Message Center
IMEI Number
Software Version
Reset to Factory Defaults

2928
Set Time
When setting time, you must individually set each digit of the
hour, minute and second. To Set Time, select this menu icon from
the Device Setup Menu. Then select either a 12-hour, or a 24-hour
clock by highlighting your preference, and press the Menu/OK
button.
Use the scroll buttons, 5and 3, or “+”and “-”to choose the cor-
rect number of 0 to 9. Press the Menu/OK key to set each desired
time digit entry. Once you have set a part of the time entry, you
will be prompted to the next digit of the time-set entry. If you
make a mistake, you can press the End/Off button to go back to
the previous digit. If the time is set for the 12-hour mode, you
will be prompted to set either AM or PM, when you entered the
last digit.
Use the same procedure to set the time for a 24-hour time clock.
You will not have to select AM or PM.
There is no error checking as single digits are entered, but your
Wherifone will not accept an invalid time setting, such as
88:95:00.
Set Date
To Set the Date, select this menu icon from the Device Setup
Menu. You will then be able to set the date displayed on your
Wherifone.
The screen will display the initial date setting with the number
“0”under the first Y in the YY column (Year), with no numbers
under the MM (Month) and DD (Day) columns.
You must individually set each digit of the year, month and day.
Use the scroll buttons, 5and 3, or “+”and “-”to choose the cor-
rect number of 0 to 9. Press the Menu/OK key to set each desired
date digit entry. Once you have set a part of the date entry, you
will be prompted to the next digit until it is complete.
There is no error checking as single digits are entered, but your
Wherifone will not accept an invalid date setting, such as
05:49:00.
Message Center
Your Wherifone does not support numeric paging in the current
release, but future releases will allow you to receive and store
numeric pages that you access through the Check Messages icon.
IMEI Number
Check the IMEI of your Wherifone by selecting this icon from the
Device Setup Menu. You may be asked for this information from a
customer service representative during a troubleshooting call.
Software Version
To see what software version your Wherifone is using, select the
Software Version icon from the Device Setup Menu. You may be
asked for this information from a customer service representative
during a troubleshooting call.
Reset to Factory Defaults
Select this icon to reset your Wherifone to default settings for
Ring Tones, Speaker Volume, Ring Tone Volume, Display Contrast,
Keyboard Lock, Ring/Vibrate Function, and Backlight Timer.

3130
Performing a Locate
Once your Wherifone account has been activated and is part of
Wherify’s Global GPS location system, you may perform Locates.
You may do both “remote”Locates through the Wherify website,
and “local”Locates that are initiated directly from the phone.
How to Perform a “Remote”Locate Via the Internet
1. First, make sure the Wherifone is powered on. Depress the
power button and check the Battery Strength Icon and GSM
Network Signal Strength Icon on the Liquid Crystal Display
(LCD). Both Icons on the LCD should illuminate. If the Battery
Icon shows low power or less, your Wherifone needs charging.
If the GSM Signal Strength Icon has NO BARS displayed, you
are outside of the GSM network coverage (go to www.wheri-
fy.com to view national GSM coverage maps for your area)
and will not be able to locate the Wherifone or make voice
calls.
2. Log onto our Web site: www.wherify.com
3. Enter your User ID and Password and select the Perform
Locate menu. We have instructions that take you through the
process in “Connecting to the Location Service Center via the
Web”on page 36 (and with HELP links on the Web site).
4. Click the Perform Locate button. You have now initiated a
location request to your Wherifone. In about a minute you
will be able to view the location of your Wherifone on street
map and on an aerial map (see page 40 for more details).
How to Perform a “Local”Locate Directly from the Phone
You may initiate Locate requests directly from your Wherifone to
request a Managed Location Service such as Roadside Assistance
or Concierge Service, or to summon help via 911 or a managed
emergency calling service. While dial button 1is pre-set to emer-
gency 911, the other dial buttons may be programmed to request
other Managed Location Services.
1. First, make sure the Wherifone is powered on. Depress the
Power button and check the Battery Level icon and GSM
Network Signal Strength icon on the Liquid Crystal Display
(LCD). Both icons on the LCD should illuminate. If the Battery
Level icon shows low power or less, your Wherifone needs
charging. If the GSM Signal Strength icon has NO BARS dis-
played, you are outside of the GSM network coverage (go to
www.wherify.com to view national GSM coverage maps for
your area) and will not be able to locate the Wherifone or
make voice calls.
2. To make a Managed Location Service request from the
Wherifone, press your programmed dial button (numbers 2–4
on the button pad) once to pull up the service number and
then press and HOLD for 4 seconds. You will then be connect-
ed to a Managed Location Service operator who can assist you.
3. In the event of an emergency, you can request a 911 emer-
gency response directly from your Wherifone. Button number
1has been set at the factory as the default Emergency button
for making 911 calls. The phone will always have an emer-
gency 911 calling ability through this button, with or without
a valid SIM card inserted into the phone. To send an emer-
gency request from the Wherifone, press your prepro-
grammed Emergency button (911) once to pull up the
Emergency number and then press and HOLD for 4
seconds (Figure 1.5).
After validating the emergency request with you or your desig-
nated contact, the Emergency Operator can dispatch the request
to the nearest Public Safety Answering Point (PSAP) 911 operator.
The proper emergency authority can then be sent to your location.

3332
Emergency Operators must be able to validate the emergency
before the Emergency Providers (Police, Fire Department,
Ambulance, etc.) are dispatched to your location.
NOTE: If your Wherifone is not within a GSM coverage area, we
will not immediately receive a Emergency or Service request. The
Wherifone holds the request until the unit returns to a coverage
area and then the request is transmitted.
Making Voice Calls
Your Wherifone is capable of taking incoming calls from any
number or making outgoing calls to a total of 5 preprogrammed
numbers (4 preprogrammed numbers in addition to 911 for
emergencies).
Program the Dial Buttons
To program your programmable dial buttons, log-on to the
Wherify Location Service Center at www.wherify.com, enter your
User ID and Password; then click on Manage Devices; then click
on Program Button for Call. Just enter in the phone number,
including area code, in the box corresponding to each program-
mable button (See Account Services on Wherify’s web page).
You can use either the speakerphone for talking or turn the vol-
ume down and use your Wherifone like a standard hand phone.
To control speaker volume, press (+) button to increase volume or
(-) to decrease volume.
Receive, Make, and End Calls
To receive a phone call, you will hear the Wherifone’s distinctive
ring, then press the Menu/OK button to pick-up and begin talk-
ing. The phone number of the incoming call will be displayed on
the screen unless the number is blocked, in which case the word
“CALL”will be displayed.
To make a phone call, press any numbered button 1through 5
once to display a pre-programmed phone number, then press the
Menu/OK button to dial that number. Or you can press and hold a
numbered button for 4 seconds to dial the selected number.
To end a phone call, press the End/Off button in the middle of
the dial pad. Please note that if you press and hold the End/Off
button down for more than 5 seconds the phone will turn off.
To use a headset with your Wherifone, simply plug the headset
connector into the Charger/Headset port located on the bottom
of the Wherifone. Then insert the headset bud into your ear.
Please note that you should only use a headset intended for use
with the Wherifone as you may damage your Wherifone if you
try to use a non-Wherifone headset.
Menu/OK Button:
Press this button
to answer an
incoming call.
Adapter Port: Plug your charger
or hands-free headset in here.
Volume Control for
Speakerphone and
Headset: Press
either of these
buttons to control
volume. Press (+)
to increase volume
or (-) to decrease
volume.
Programmable
Buttons: Press any
of the numbered
buttons to dial a
pre-programmed
phone number.
Figure 1.7
Other manuals for Wherifone G550
3
Table of contents
Other Wherify Cell Phone manuals