i
Table of Contents
My Wherifone Information . . . . . . . . . . . . . . . . . inside front cover
Part One—The Wherifone™ G500 Series
GPS Locator Phone
Your Wherifone G500 Series . . . . . . . . . . . . . . . . . . . . . . . . . . . . . 2
How It Works . . . . . . . . . . . . . . . . . . . . . . . . . . . . . . . . . . . . . . . . . 8
The System Behind the Wherifone . . . . . . . . . . . . . . . . . . . . . . . . 8
Setup . . . . . . . . . . . . . . . . . . . . . . . . . . . . . . . . . . . . . . . . . . . . . . . 9
Step 1: Charge the Battery . . . . . . . . . . . . . . . . . . . . . . . . . . 9
Step 2: Insert your SIM Card . . . . . . . . . . . . . . . . . . . . . . . . 11
Step 4: Activating Your Account . . . . . . . . . . . . . . . . . . . . . 12
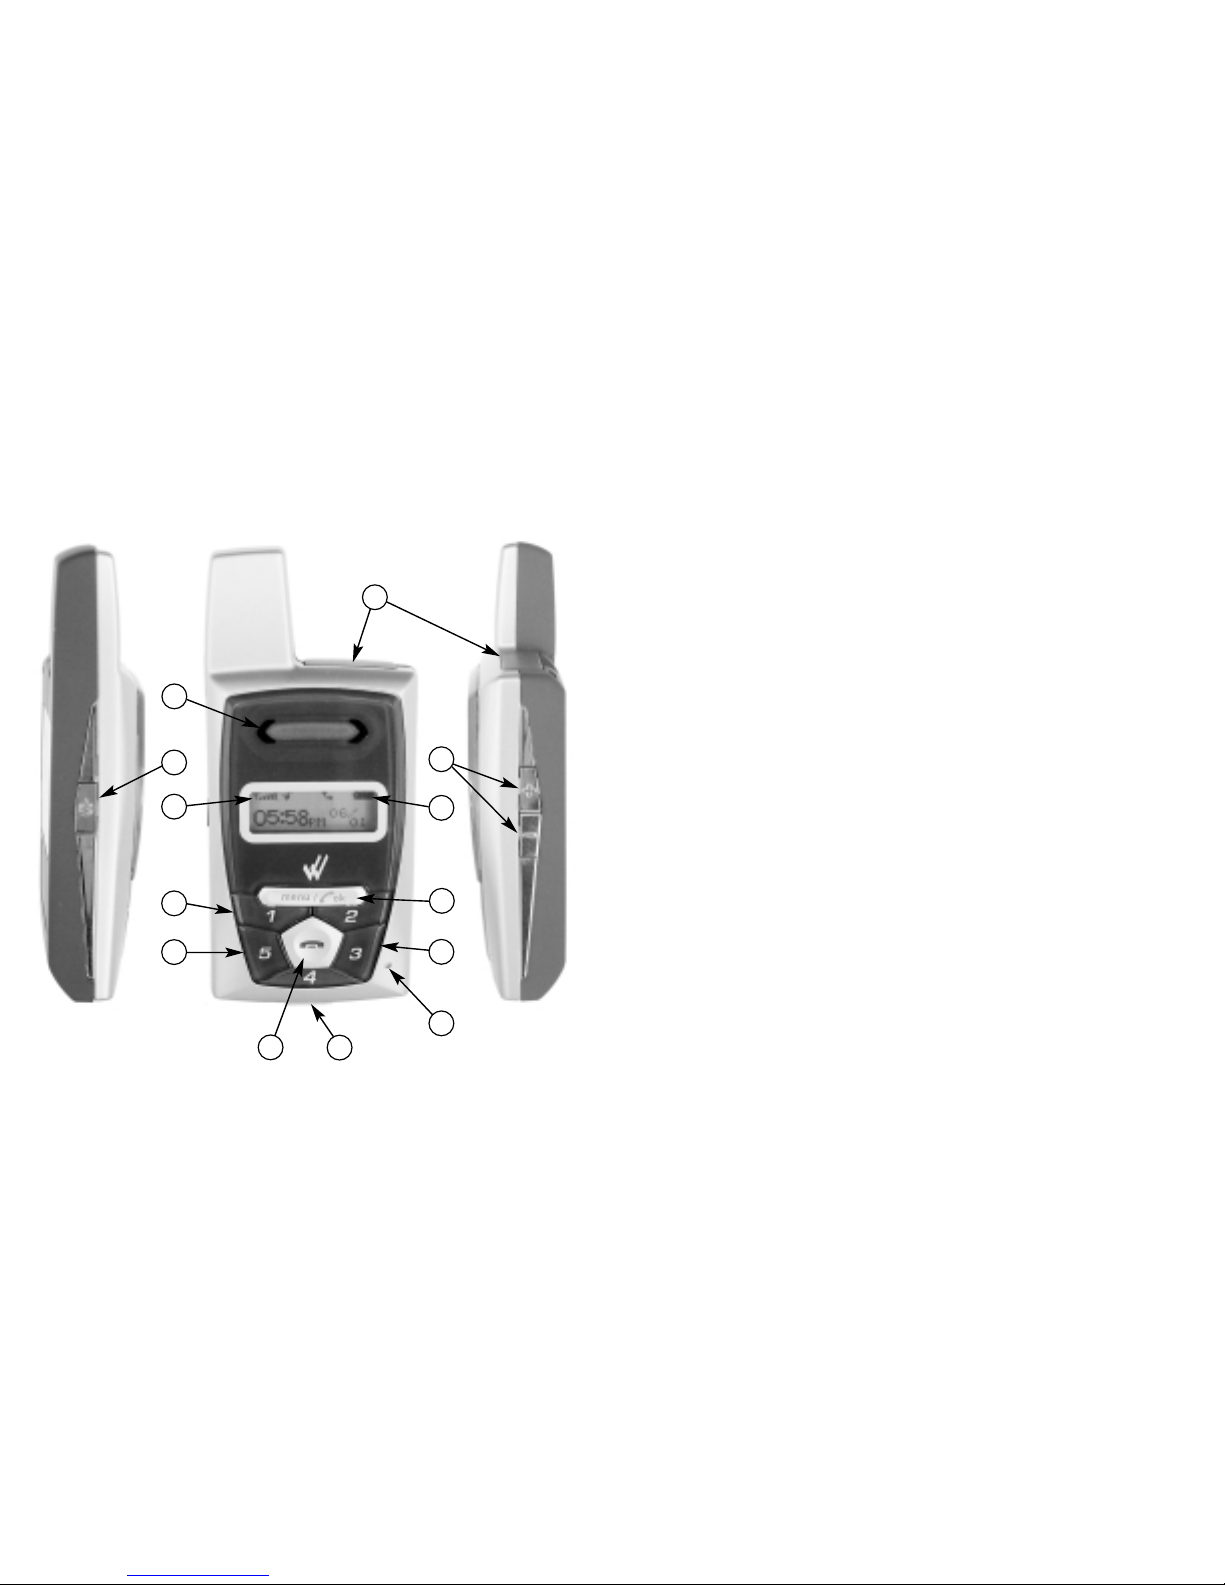
Getting to Know Your Wherifone G500 Series
GPS Locator Phone . . . . . . . . . . . . . . . . . . . . . . . . . . . . . . . . . . . 15
Main Display . . . . . . . . . . . . . . . . . . . . . . . . . . . . . . . . . . . . . . . . 15
Signal Strength . . . . . . . . . . . . . . . . . . . . . . . . . . . . . . . . . 15
Ring Mode . . . . . . . . . . . . . . . . . . . . . . . . . . . . . . . . . . . . . 16
Lock . . . . . . . . . . . . . . . . . . . . . . . . . . . . . . . . . . . . . . . . . . . 16
Battery Level . . . . . . . . . . . . . . . . . . . . . . . . . . . . . . . . . . . . 17
Using the Wherifone: . . . . . . . . . . . . . . . . . . . . . . . . . . . . . . . . . 18
Turning On the Wherifone . . . . . . . . . . . . . . . . . . . . . . . . . 18
Turning Off the Wherifone . . . . . . . . . . . . . . . . . . . . . . . . . 18
Emergency Requests . . . . . . . . . . . . . . . . . . . . . . . . . . . . . . 19
Changing Phone Settings . . . . . . . . . . . . . . . . . . . . . . . . . . . . . . 21
Menu Operations and Selections . . . . . . . . . . . . . . . . . . . . . 21
Setting Ring Tones . . . . . . . . . . . . . . . . . . . . . . . . . . . . 23
Setting Phone Volume and Activating
the Speakerphone . . . . . . . . . . . . . . . . . . . . . . . . . . . . 24
Setting Ringer Volume . . . . . . . . . . . . . . . . . . . . . . . . . 25
Keypad Lock . . . . . . . . . . . . . . . . . . . . . . . . . . . . . . . . . 26
Ring/Vibrate Mode . . . . . . . . . . . . . . . . . . . . . . . . . . . . 27
Adjust Screen Contrast . . . . . . . . . . . . . . . . . . . . . . . . . 28
Set Backlight Timer . . . . . . . . . . . . . . . . . . . . . . . . . . . 29
Please read this user guide, including its Safety Information and Warnings
section, prior to using your Wherifone G500 Series GPS locator phone and
the Wherify location services. Please keep a copy of this user guide for your
future reference.
© Wherify Wireless, Inc. 2005. All rights reserved.
Software, Web Content and User Guide Restrictions. Laws in the United
States of America and other countries provide Wherify Wireless, Inc. with
certain exclusive rights with respect to this user guide, the web pages made
available by Wherify Wireless, Inc., the contents of this user guide and such
web pages, and the software and firmware provided on your Wherifone
device. Such rights include copyright, trade secret, and other applicable
intellectual property and proprietary rights. Accordingly, no portion of this
user guide or such web pages, or any derivative of this guide or such web
pages, may be reproduced, distributed, or transmitted, and no derivative
(including translations) may be created, without the prior written agree-
ment of Wherify Wireless, Inc. Similarly, no portion of the software or
firmware provided with your Wherifone device, or any derivative of such
software or firmware, may be reproduced, distributed, or transmitted, and
no derivative may be created, without the prior written agreement of
Wherify Wireless, Inc. The software and firmware provided on your
Wherifone device, and the trade secrets therein, shall not be used except
on the Wherifone device on which such software was installed at the time
of distribution, and such software, firmware, and trade secrets shall not be
altered, disassembled, de-compiled, interrogated, translated, transmitted,
decoded, or otherwise reverse engineered in any manner.
No Licenses. No purchase, transmission or distribution of products, docu-
mentation or services of Wherify Wireless, Inc. shall be considered to grant
any license, whether express, implied, or otherwise, under any patent,
copyright, trademark, trade secret or other intellectual property or propri-
etary right of Wherify Wireless, Inc. or its suppliers and licensors. ALL SUCH
RIGHTS ARE RESERVED EXCLUSIVELY TO WHERIFY WIRELESS, INC. AND ITS
SUPPLIERS AND LICENSORS.
WHERIFY, WHERIFONE and the W logo are among the registered and
unregistered trademarks of Wherify Wireless, Inc. in the United States and
other jurisdictions.