manuals.online logo
Brands
  1. Home
  2. •
  3. Brands
  4. •
  5. Whirlpool
  6. •
  7. Washer
  8. •
  9. Whirlpool AWZ 8596 User manual

Whirlpool AWZ 8596 User manual

Other Whirlpool Washer manuals

Whirlpool 8LSC6244BG0 User manual

Whirlpool

Whirlpool 8LSC6244BG0 User manual

Whirlpool 8576493 Assembly instructions

Whirlpool

Whirlpool 8576493 Assembly instructions

Whirlpool LBR4132JQ0 User manual

Whirlpool

Whirlpool LBR4132JQ0 User manual

Whirlpool LA5570XP User manual

Whirlpool

Whirlpool LA5570XP User manual

Whirlpool GVW9959KT0 User manual

Whirlpool

Whirlpool GVW9959KT0 User manual

Whirlpool  WET3300XQ Assembly instructions

Whirlpool

Whirlpool  WET3300XQ Assembly instructions

Whirlpool WVIID1158BKG User manual

Whirlpool

Whirlpool WVIID1158BKG User manual

Whirlpool WFW8620HC User manual

Whirlpool

Whirlpool WFW8620HC User manual

Whirlpool AWM 1111 User manual

Whirlpool

Whirlpool AWM 1111 User manual

Whirlpool FL 5064 User manual

Whirlpool

Whirlpool FL 5064 User manual

Whirlpool WTW4950X Series User manual

Whirlpool

Whirlpool WTW4950X Series User manual

Whirlpool 3366859 Installation instructions

Whirlpool

Whirlpool 3366859 Installation instructions

Whirlpool CFCR80211W User manual

Whirlpool

Whirlpool CFCR80211W User manual

Whirlpool FL 5085 User manual

Whirlpool

Whirlpool FL 5085 User manual

Whirlpool AWM05801 User manual

Whirlpool

Whirlpool AWM05801 User manual

Whirlpool 6AWTW5550XW0 User manual

Whirlpool

Whirlpool 6AWTW5550XW0 User manual

Whirlpool W11201742A User manual

Whirlpool

Whirlpool W11201742A User manual

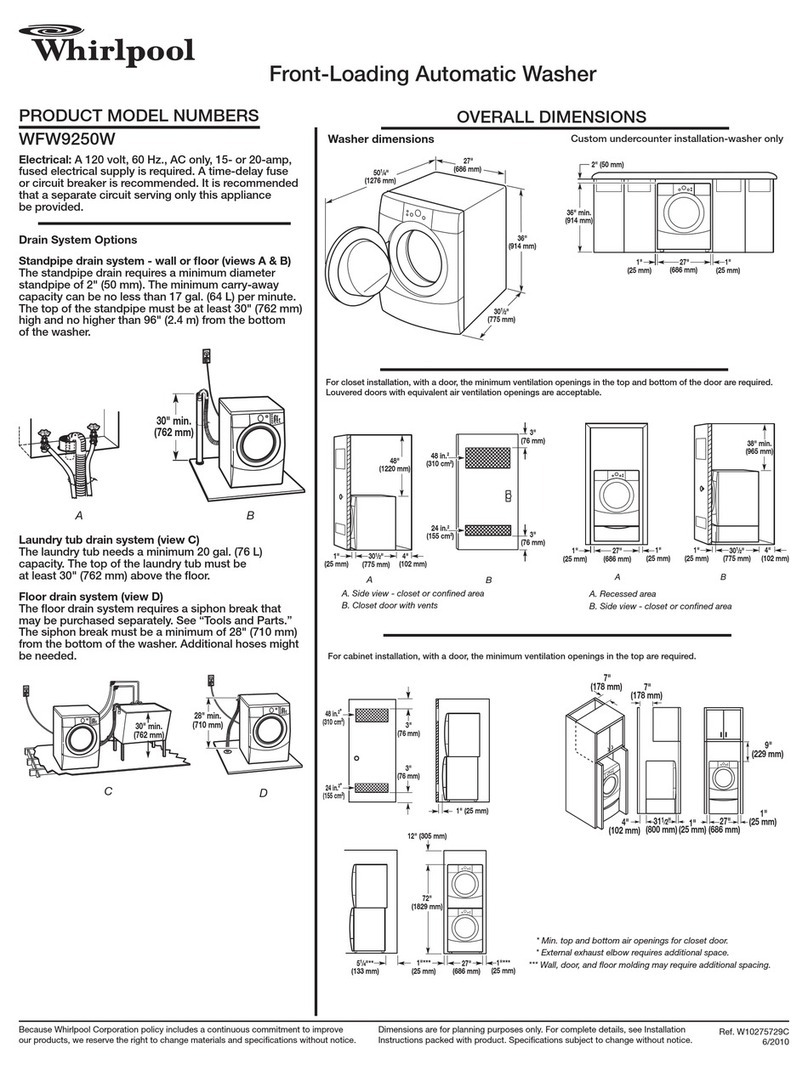
Whirlpool WFW9250W Series Parts list manual

Whirlpool

Whirlpool WFW9250W Series Parts list manual

Whirlpool WTW8000DW0 User manual

Whirlpool

Whirlpool WTW8000DW0 User manual

Whirlpool WFW9400SW - Duet HT Series User manual

Whirlpool

Whirlpool WFW9400SW - Duet HT Series User manual

Whirlpool Vantage WTW7990XG Assembly instructions

Whirlpool

Whirlpool Vantage WTW7990XG Assembly instructions

Whirlpool LA9320XY User manual

Whirlpool

Whirlpool LA9320XY User manual

Whirlpool Washer 3366855 User manual

Whirlpool

Whirlpool Washer 3366855 User manual

Whirlpool WTW5505SQ1 User manual

Whirlpool

Whirlpool WTW5505SQ1 User manual

Popular Washer manuals by other brands

Zanussi ZWF 14080 W user manual

Zanussi

Zanussi ZWF 14080 W user manual

Zanussi FV 825 N Instruction booklet

Zanussi

Zanussi FV 825 N Instruction booklet

LG WM8000HVA Specifications

LG

LG WM8000HVA Specifications

Zanussi TJ 1284 H instruction manual

Zanussi

Zanussi TJ 1284 H instruction manual

AEG KO-LAVAMAT 74740 User information

AEG

AEG KO-LAVAMAT 74740 User information

Beko WSRE7512PRA user manual

Beko

Beko WSRE7512PRA user manual

Miele PW 6207 operating instructions

Miele

Miele PW 6207 operating instructions

GE GE Profile WWSE3160AAA Specifications

GE

GE GE Profile WWSE3160AAA Specifications

Bush WMNB712EB instruction manual

Bush

Bush WMNB712EB instruction manual

ALLIANCE UW60AV Information manual

ALLIANCE

ALLIANCE UW60AV Information manual

Bosch WAN280H3 User manual and installation instructions

Bosch

Bosch WAN280H3 User manual and installation instructions

Maytag MAT15MNAW installation instructions

Maytag

Maytag MAT15MNAW installation instructions

LG T2109VSAL owner's manual

LG

LG T2109VSAL owner's manual

Indesit IWC 61481 Instructions for use

Indesit

Indesit IWC 61481 Instructions for use

Electrolux EWF12843 user manual

Electrolux

Electrolux EWF12843 user manual

Indesit WIN 70 Instructions for use

Indesit

Indesit WIN 70 Instructions for use

Bosch WGB25400BY User manual and installation instructions

Bosch

Bosch WGB25400BY User manual and installation instructions

Coltene SciCan HYDRIM C61W G4 Operator's manual

Coltene

Coltene SciCan HYDRIM C61W G4 Operator's manual

manuals.online logo
manuals.online logoBrands
  • About & Mission
  • Contact us
  • Privacy Policy
  • Terms and Conditions

Copyright 2025 Manuals.Online. All Rights Reserved.

5019 307 00636
• Recommended drying times are based on spinning speeds of 800, 1000 and 1200 rpm.
• For reduced spinning speed a longer drying time should be selected.
• Drying times may be longer for towelling and heavier items.
Drying Times
Options Recommended
Time Selection
Max
Load
Gentle
Reduces drying
intensity
(recommendedfor
delicate items)
Buzzer
Signals/Sounds
end of drying
cycle at intervals
Start Delay
Delays the drying
cycle start
Spin speed
Washing Machine
rpm
800 rpm
1000 rpm
1200 Kg
Cotton
Max. 6 kg
Cupboard dry plus 105’
140’ -80’
115’ 3.5
6.0
Cupboard dry 85’
140’ -70’
100’ 3.5
6.0
Iron dry 70’
120’ -60’
85’ 3.5
6.0
Easy care
Max. 2.5 kg
Cupboard dry plus 70’ 40’ -2.5
Cupboard dry 60’ 30’ -2.5
Iron dry 50’ 20’ -2.5
Airing Laundry is aired for 9 minutes without
heating. -----
AWZ 8596
GB
Start
Starts the drying cycle.
On The indicator lamp lights up
when the dryer is on.
Start delay Delays the drying cycle start
from 1 to 8 hours.
To select the start delay:
turn the time selector knob
clockwise to the desired drying
time (select the option, when
necessary) and turn the start
delay knob to the desired delay
time. Press the Start button.
To cancel or change the
previously set time delay: turn
the time selector knob to “0”.
Filter The indicator lamp lights up
when the filter needs cleaning.
Clean the filter at the end of
every cycle.
Water Container
The indicator lamp lights up
when the water container
needs to be emptied. The
drying cycle is automatically
interrupted. Empty the water
container. Open the door and
check how damp the laundry
is. Close the door. Re-set the
drying time if necessary and
press the Start button.
(The water container light
will remain on for about 2
min. even after having
emptied the water
container.)
DRYING CYCLE SEQUENCE INDICATORS
Drying
Airing
Anti-
crease
End
The selector knob shows the
progress of the cycle after
drying start.
QUICK REFERENCE GUIDE
Please also carefully read the
Instructions for Use and Installation
Manual.
5019 307 00636
1. Check that all fastenings are closed and that
pockets are empty.
2. Turn the articles inside out.
3. Place laundry loosely in the drum to make
sure it doesn’t become tangled.
Sort laundry as follows:
A) By care symbols
(on the collar or inside seam):
Suitable for tumble drying
Tumble drying with reduced drying
intensity only
Do not tumble dry
B) By amount and thickness/weight
Whenever the load to be dried exceeds dryer
capacity, separate laundry according to
weight (e.g. towels from thin underwear).
C) By type of fabrics
Cotton/linen: Towels, cotton jersey, bed
and table linen made of cotton or linen.
Synthetics/Easy Care: Blouses, shirts,
overalls, etc. made of polyester or polyamide,
as well as cotton/synthetic mixes.
D) By drying level
• Sort into: iron dry, cupboard dry, etc.
Do not tumble dry: Woollens, silk, nylon
stockings, delicate embroidery, fabrics with
metallic decorations, bulky items such as
sleeping bags, etc.
Important: only use specific indicated dryer-
safe additives and rinse items that have been
treated with stain remover thoroughly in plenty
of water before drying. Only use specific
indicated dryer-safe plastic items and never
dry rubber or articles contaminated with
vegetable oil in the dryer
How to use the child safety lock:
1. Open the door.
2. Usinga coinor ascrewdriver, turnthe plastic
screw clockwise by 90°.
Slot vertical: the door cannot be locked.
Slot horizontal: the door can be locked.
Drying Time or Programme and Options:
• To select a drying time or Programme, turn
the time selector knob clockwise.
• To select an option (if available), press the
corresponding button.
• Press the button again to cancel the option.
1. Having selected the desired drying time or a
programme and options, press the Start
button.
If the laundry is not removed at the end of
the drying cycle, an automatic anti-crease
cycle will operate for maximum 12
min.
2. On completion of the drying cycle, set the
time selector knob to position “0”.
The dryer indicator lamp “On” switches off.
To interrupt the dryer during operation
1. Set the time selector knob to “Airing” .
2. Wait at least 5 minutes before opening the
door to allow the dryer to cool down.
For your safety the drying time stops
automatically if you open the door.
3. To restart, after door opening, close the door
and press the start button again.
Clean the lint filter at the end of every drying
cycle:
1. Open the door.
2. Pull the filter upwards.
3. Open the filter.
4. Remove lint using a soft brush or your
fingertips.
5. Close the filter.
6. Push the filter firmly back into place.
Empty the water container at the end of every
drying cycle.
1. Pull the handle to remove the water
container.
2. Empty the water container.
3. Replace the water container when empty by
pushing it completely back in place.
When installing your dryer, always carefully
level the dryer by means of the adjustable
feet and check the correct levelling with a
spirit level.
Clean the heat exchanger at least every 3
months. Wipe away any lint/fluff from the
door seal and interior using a damp cloth.
(Please refer to instructions for use)
To built in the dryer (when absolutely
necessary)
1. It is recommended to not remove the
worktop.
2. A minimum space of at least 5 cm between
the dryer and the furniture is necessary to
guarantee the correct airflow.
If a fault occurs, before contacting our After-
Sales Service, make the following checks to
try and remedy the problem:
Drying takes too long / laundry is not dry
enough:
• Was the correct drying time selected?
• Was the inserted laundry too wet (Washing
machinespin speedless than800 rpm?When
the spinning speed is less than 800 rpm the
water container fault may occur during
drying cycle).
• Is the lint filter dirty (filter indicator lamp
on)?
• Is the heat exchanger dirty? (refer to the
Instructions for use)
• Is the ambient temperature too high?
The dryer does not operate:
• Is the power plug properly inserted into the
mains electricity socket?
• Is there a power failure?
• Has the fuse blown?
• Is the door properly closed?
• Has the drying time been selected?
• Has the start delay option been selected?
• Has the Start button been pressed?
Lint filter or water container indicator lamp
on:
• Is the lint filter clean?
• Is the water container empty?
• Is the water container correctly positioned?
• Is the heat exchanger clean?
Water droplets underneath the dryer:
• Is the heat exchanger correctly positioned?
• Has any fluff on the heat exchanger seal
been wiped away?
• Has any fluff on the door seal been wiped
away?
• Has the water container been positioned
correctly?
If, after carrying out the above checks the
malfunction persists or appears again, turn
the dryer off and call our After-Sales Service
(refer to guarantee).
Please specify:
• The nature of the fault.
• The dryer type and model.
• The service code (the number after the word
Service on the adhesive rating plate) on the
right-hand side when the door is open.
• Your full address and phone number.
PREPARING THE LAUNDRY
CHILD SAFETY LOCK
SELECTING A DRYING TIME OR A PROGRAMME
AND OPTIONS
STARTING AND COMPLETING A DRYING CYCLE
INTERRUPTING A DRYING CYCLE
MAINTENANCE AND CLEANING
WATER CONTAINER TOP OR BOTTOM
INSTALLATION STABILITY
HEAT EXCHANGER
BUILT-IN INSTALLATION
TROUBLESHOOTING GUIDE
AFTER-SALES SERVICE