whisker litter robot 3 User manual

whiskersupport.com
2

whiskersupport.com
3
Thank you for purchasing a Whisker product!
This manual will help you get the most out of your Litter-Robot. We will guide you
through the setup process, as well as provide you with useful tips and advice for
acclimating your cat to their new automatic, self-cleaning litter box.
Whisker exists to make life for pets and pet parents endlessly better. As the leading
innovators in pet tech and refined pet accessories, we work tirelessly to solve problems
and deliver smarter insights for pet parents while enriching the lives of pets. We pride
ourselves on our customer experience and, should you be dissatisfied for any reason,
promise to make your return easy.
Enjoy your Litter-Robot, and enjoy your freedom!
Jacob
President & CEO
Brad
Founder & Chief Inventor

whiskersupport.com
4
Important Safety Instructions
●Always be sure any cat in your household that might use the Litter-Robot
weighs at least 2.5 kg. Cats must weigh 2.5 kg or more to safely use the
Litter-Robot in Automatic Mode.
●Always place the Litter-Robot on a firm, level surface. Avoid soft, uneven, or
unstable flooring, which may affect the ability of the unit to detect your cat. If
using litter mats or rugs, place in front of, or completely under, the unit. Do not
place mats partially under the unit. Use only low pile (6mm) rugs and mats.
●Always unplug the unit before servicing.
●Never force your cat into the Litter-Robot.
●Never put anything in the unit other than clumping litter or litter beads and
crystals that are small enough to pass through the screen.
●Never sit on or place anything on top of the Litter-Robot.
●Never push the Litter-Robot against a wall or into a corner (must not be touch-
ing any walls).
●Never remove the Globe or Bonnet while the unit is rotating or turn the unit on if
the Globe or Bonnet are removed.
●Never wet or submerge the Bonnet or Base.
●Never allow children and persons with reduced physical, sensory, or mental
capabilities or lack of experience and knowledge use, clean, or maintain the Lit-
ter-Robot without supervision, instruction concerning its use in a safe way, and
understanding of the hazards involved. Children below 8 years of age should not
be allowed contact with the Litter-Robot.
●Never allow children or others to play with the Litter-Robot.
●Never use an external power supply other than the one provided with the unit.
●If the external power supply is damaged, please contact us for a replacement.
●Never modify the Litter-Robot hardware. Doing so could impact important
safety features and will void your warranty.

whiskersupport.com
5
Table of Contents
Important Safety Instructions.....................................................................................................4
Components and Dimensions ....................................................................................................6
Setting Up Your Litter-Robot .....................................................................................................8
Introducing Your Cat to the Litter-Robot..............................................................................10
Ongoing Maintenance................................................................................................................. 11
Cycles ............................................................................................................................................. 12
Control Panel - Button Functions............................................................................................ 14
Power Button.......................................................................................................................... 14
Cycle Button ........................................................................................................................... 15
Empty Button.......................................................................................................................... 16
Reset Button ........................................................................................................................... 17
Control Panel - Indicator Lights ............................................................................................... 18
Cat Sensor....................................................................................................................................20
Drawer Full Indicator .................................................................................................................. 21
Automatic Night Light................................................................................................................ 21
Bonnet........................................................................................................................................... 22
Key ................................................................................................................................................ 22
Step Mat........................................................................................................................................ 23
8-Hour Sleep Mode.................................................................................................................... 23
Wait Time Setting....................................................................................................................... 24
Control Panel Lockout............................................................................................................... 24
Optional Backup Battery.......................................................................................................... 24
Use & Care.................................................................................................................................... 25
Safety Features...........................................................................................................................30
Frequently Asked Questions................................................................................................... 32
In-Home Trial ............................................................................................................................... 35
Contacting Customer Experience .......................................................................................... 35
whiskersupport.com
6
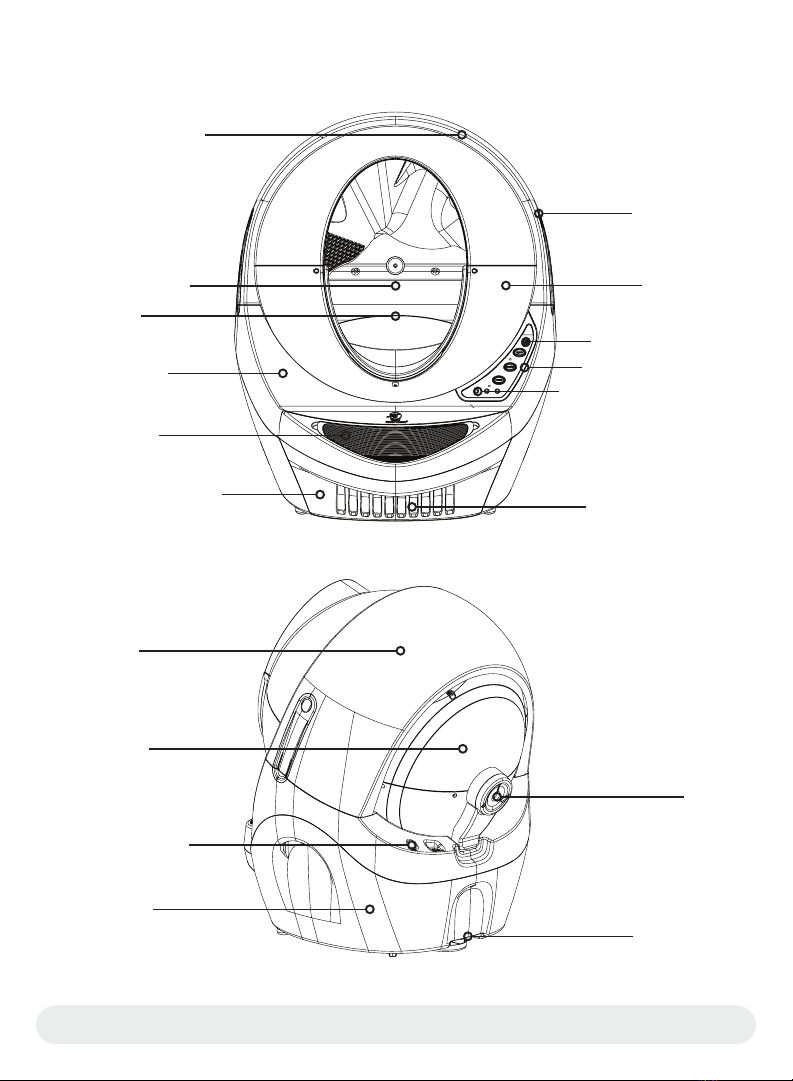
Components
Front View
Globe
Key
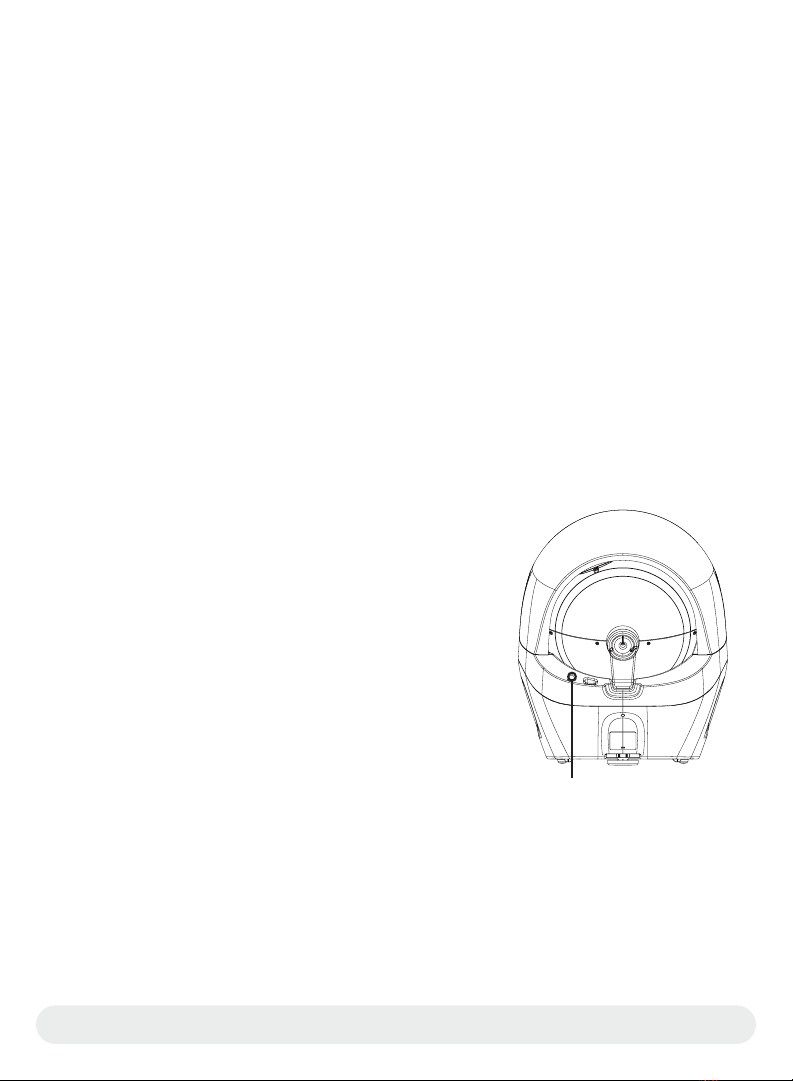
Rear View
Power Input
Base
Carbon Filter
Indicator Lights
Control Panel
Power Button
Globe
Bonnet
Night Light
Cat Entry/Exit
Base
Step Mat
Waste Drawer
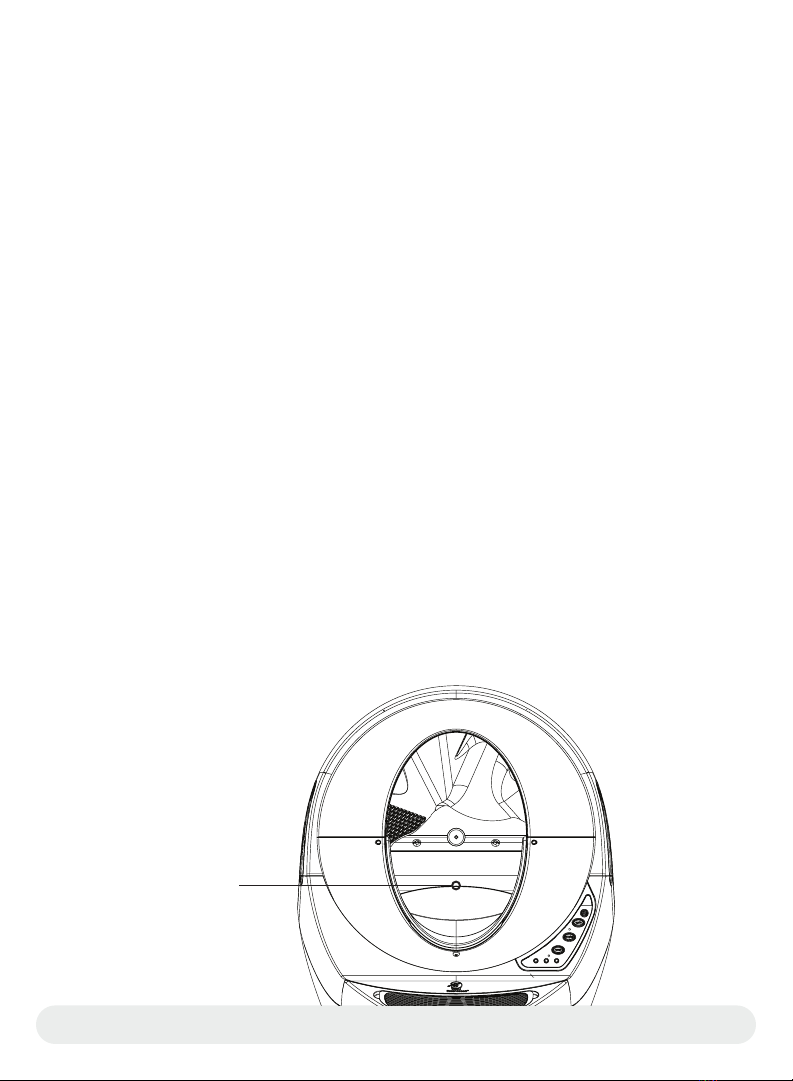
Fill Line
Cat Sensor
Bonnet
whiskersupport.com
7
Height Width xDepth Weight
Fully Assembled 75 cm x61.6 cm x68.6 cm 10.9 kg
Waste Drawer 12.7 cm x31.8 cm x40.6 cm
Entryway 39.4 cm x26 cm
Inside Globe
38.1-42.2 cm
Depending on
litter level
x50.8 cm x50.8 cm
Litter Bed 35.6 cm x35.6 cm
Floor to Step 18 cm
Step to Entryway 16 cm
Floor to Entryway 34 cm
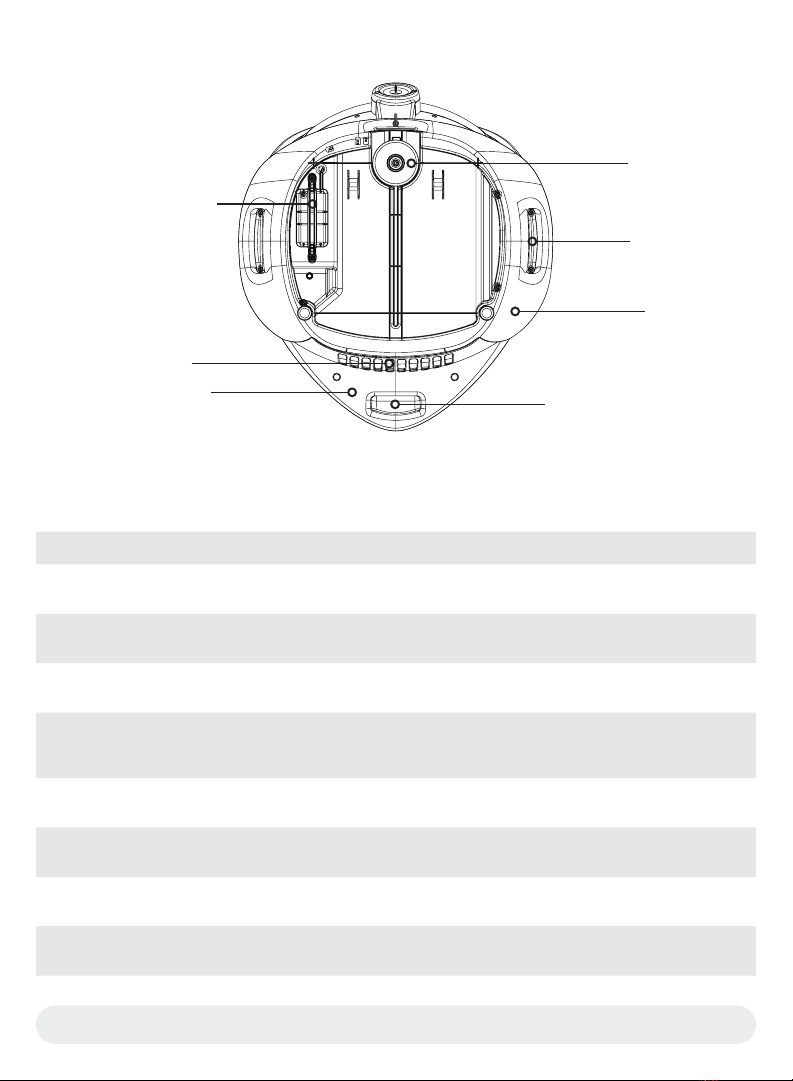
Dimensions
Waste Drawer
Handles
Base
Cat Sensor
Battery Pocket
Carbon Filter
Waste Drawer Handle
(Optional Backup
Battery)
Bottom View
whiskersupport.com
8
Setting Up Your Litter-Robot
Your Litter-Robot comes fully assembled and ready to use. Get started by following the
steps below.
Placement
If possible, place the Litter-Robot in the same location as the old litter box (at
least during transition).
Make sure the unit is on a firm, level surface. Avoid soft, uneven, or unstable
flooring.
Keep the unit indoors in a cool, dry location. Reduce exposure to high
temperature and humidity.
Locate the unit near a power outlet. Ensure the unit isn’t pushed against a wall
or into a corner (must not be touching any walls).
Place litter mats or rugs in front of, or completely under, the unit. Do not place
mats partially under the unit. Use only low pile (6mm) rugs and mats.
Litter
Fill the Globe through the opening with clumping litter until it meets the raised Fill Line
when spread flat (about 3.6-4.5 kg by weight or 6.6 liters by volume). Be careful not to
overfill the Globe.
Fill litter to raised Fill Line
on black rubber liner.
whiskersupport.com
9
The Litter-Robot litter sifting system requires clumping litter to work properly. We
recommend a high-quality, clay-clumping litter. Use of lightweight litters, such as corn
or wheat, may require more weight to activate the Cat Sensor. Litter beads and crystals
that are small enough to pass through the screen will also work (periodic changing of
this type of litter is required).
DO NOT use litters that are the strictly absorbent, non-clumping, loose-clumping, news-
paper-based, or wood-based pellets.
If you are using a litter alternative not listed here, please contact Customer Experience
to make sure you are using a compatible litter.
Tip: When filling the Litter-Robot for the first time, it is best to continue using the brand
of litter you were using previously—as long as it is a clumping type of litter. Your cat will
need to adjust to the new litter box, and introducing a new litter at the same time may
increase his anxiety. However, if you are currently using a non-clumping litter, you will
need to switch to a clumping type.
Power and Initial Clean Cycle
Plug the small end of the Power Supply into the
power input at the back of the Base. Then plug
the AC/DC adapter into a wall outlet.
Locate and press the Power button. The Litter-Robot
will perform an initial Clean cycle that will last about 2
minutes. Learn more about the Clean cycle on page 12.
Power Input
Congratulations!
Your Litter-Robot is now ready to use; however, we recommend powering the unit off
until your cat/s become familiar with and begin using the Litter-Robot.

whiskersupport.com
10
Introducing Your Cat to the Litter-Robot
Most likely, your cat will quickly adapt to the Litter-Robot. Here are some ways to facil-
itate the transition:
1. Place the Litter-Robot in the same location as the current litter box, set it up (make
sure you add litter to the Globe), and make sure it is turned off. Give your cats a
day or two to explore the Litter-Robot. If your cats show no interest, entice them to
approach the Litter-Robot by using some catnip or a favorite treat.
2. Add a scoop of litter from the old litter box to provide a familiar scent for your cat.
3. Place treats on the step or around the Litter-Robot so your cat associates rewards
with the unit.
4. Since cats are curious and love to go into boxes, try putting the original packaging
over the Litter-Robot with a hole cut out for the entryway and drawer.
5. Once you notice that your cats have used the Litter-Robot, power the unit on to
cycle the unit. Encourage your cats to be present, so they can observe the mo-
tion and become familiar with the sound of the Litter-Robot while you are there to
reassure them. Turn the unit off again once the cycle is complete (the Litter-Robot
should be in the Home position). We recommend that you no longer clean the old
litter box once your cats have used the Litter-Robot.
6. If your cats are not using the Litter-Robot within a few days, continue using the old
brand of litter in the old litter box, and let it go as long as possible without cleaning
it. Cats prefer a clean litter box and a dirty litter box might persuade them to use
the clean Litter-Robot. Also consider replacing the litter in the Litter-Robot with a
litter specifically formulated for litter box training.
Once your cats are consistently using the Litter-Robot, you can turn the unit on and
leave it on to operate in Automatic Mode—and remove the old litter box.
Congratulations, you have successfully introduced your cats to the Litter-Robot. Enjoy
your freedom from scooping!

whiskersupport.com
11
Ongoing Maintenance
Empty the Waste Drawer when indicated by the flashing blue light on the Control
Panel.
How often you will need to empty the Waste Drawer depends on the number and size
of your cats. For two average-sized cats, twice per week is typical. For a single cat,
once per week is usually sufficient.
Pull out the Waste Drawer using the handle below the step, then gather the edges of
the liner bag and dispose.
You can use Litter-Robot custom-fit, biodegradable Waste Drawer Liners or any
38-49-liter trash bags.
To install a new drawer liner, open the bag and roll down the edge about four times.
Starting at the back of the drawer, push the rolled edge of the bag into each of the four
tabs, keeping the bag taut as you work forward. Slide the drawer back in, being careful
not to push the unit against the wall or into a corner (must not be touching any walls).
Then, press the Reset button to reset the Cat Sensor.
Add litter as needed.
Check the litter level once per week or each time you empty the Waste Drawer. Add
just enough litter to meet the raised Fill Line inside the Globe, and be careful not to
overfill it. After adding or removing litter, press the Reset button to reset the Cat Sensor.
Press the Reset button.
Any time you affect the weight or placement of the unit (including emptying the Waste
Drawer, adding or removing litter, or cleaning or moving the unit), press the Reset but-
ton to ensure the Cat Sensor will detect your cat and cycle properly.
See Use and Care on page 25 to learn about the Carbon Filter, Base Seal Strips, Waste
Drawer Liners, and how to clean the Litter-Robot.

whiskersupport.com
12
Clean Cycle
After your cat leaves the Globe, the Litter-Robot automatically performs a Clean cycle.
The patented sifting system separates the clumps from the clean litter and deposits
them into the Waste Drawer below. It takes about 2 minutes. You can also press the
Cycle button to start a Clean cycle.
During a Clean cycle, press any button to pause the cycle. Press the Cycle button to
resume the cycle. Press the Reset or Empty button to abort the cycle and return the
Globe to the Home position.
How it works:
The Litter-Robot is ready for use when the Globe is at the Home position and the blue
light on the Control Panel is on.
1. When a cat enters the Globe, the Cat Sensor is activated; the blue light turns off
and the red light turns on.
2. Once the cat exits the Globe, the countdown to a Clean cycle begins. When the
Wait Time (see page 24) has elapsed, the red light turns off and the yellow light
turns on as a Clean cycle begins.
3. The Globe rotates counterclockwise. The yellow light will be on while cycling.
4. During rotation, a weight behind the black rubber Globe liner causes the liner to
fall away from the Globe to ensure any stuck-on clumps are removed.
5. The screen passes through the litter, separating the clumps from the clean litter.
The clean litter is collected in a chamber behind the screen.
6. As the Globe rotates to Dump position, the waste clumps fall through the Waste
Port in the Waste Drawer.
7. The Globe then rotates clockwise, toward the Home position. The Globe liner will
fall back into place and the clean litter will spill back into the litter bed.
8. The Globe will rotate past the Home position to level the litter before finally re-
turning to the Home position. The yellow light turns off and the blue standby light
turns on.

whiskersupport.com
13
If your cat re-enters the Globe during the Wait Time countdown (red light is on), the Cat
Sensor detects that weight and will not cycle with your cat inside (see page 30). Once
your cat exits, a new countdown will begin.
Empty Cycle
The Empty cycle allows you to empty all of the litter from
the Globe into the Waste Drawer for easy disposal. Use
this cycle to change out the whole bed of litter or before
cleaning the Globe (see page 27).
Press the Empty button to start an Empty cycle.
During an Empty cycle, press any button to pause the
cycle. Press the Cycle button to resume the cycle. Press
the Reset or Empty button to abort the cycle and return
the Globe to the Home position.
How it works:
1. The Globe rotates clockwise. The yellow light on the Control Panel will be on
while cycling.
2. As the Globe rotates, the litter will fall through the Waste Port into the Waste
Drawer.
3. After the litter is emptied, the Globe will stop with the yellow light on and await
your action. (You may need to sweep any remaining litter toward the Waste
Port.)
4. Press any button to return the Globe to the Home position.
IMPORTANT: Supervise and prevent your cat from entering during the Empty Cycle, as
the unit may not detect your cat without litter in it.
Empty Button

whiskersupport.com
14
Control Panel - Button Functions
Power Button + (Automatic Night Light)
Press and Release: Turns the system power on and off.
Press and Hold: Toggles the Automatic Night Light function on and off (see page 21).
The Litter-Robot arrives with the Automatic Night Light function activated. When the
light sensor detects low light conditions, the Night Light turns on automatically.
Check the status of the Night Light function by covering the light sensor (located above
the Cycle button on the Control Panel) to see if the Night Light comes on or not.
To turn the Night Light function off, press and hold the Power button for about 5 sec-
onds. The Night Light will flash on, then off.
To turn the Night Light function on, press and hold the Power button for about 5 sec-
onds. The Night Light will flash on and, depending on the ambient light, the Night Light
will either stay on (if low light) or turn off (if bright light).
Night Light Sensor
Power Button

whiskersupport.com
15
Cycle Button + [8-Hour Sleep Mode]
Press and Release: Starts a Clean cycle (see page 12).
To pause a cycle, press any button on the Control Panel. Press Cycle to resume the
cycle.
To abort the Clean cycle, press any button to pause the cycle, then press Empty or
Reset to return the Globe to the Home position.
Press and Hold: Activates 8-Hour Sleep Mode (see page 23).
In Sleep Mode, the yellow light will be on in addition to the blue standby light. The Cat
Sensor will be deactivated for the next 8 hours and the unit will only cycle if you press
the Cycle button.
Immediately after the 8-hour period, the unit will perform a Clean cycle, then return to
the Home position with the blue light on. The Cat Sensor will be active again.
Once set, the 8-hour period repeats every 24 hours. The start of the period is deter-
mined by when the mode is set initially.
To exit this mode, press and hold the Cycle button until the yellow light turns off, or, if
only the blue light is on (you are not within the 8-hour sleep period), the yellow light will
flash to indicate you have exited this mode.
Cycle Button

whiskersupport.com
16
Empty Button + [Wait Time Setting]
Press and Release: Starts an Empty cycle (see page 13), which empties all litter from
the Globe into the Waste Drawer for easy disposal. During the Empty cycle, the Globe
will rotate clockwise, then stop with the yellow light on and await your action. Press any
button to return the Globe to the Home position.
To pause the Empty cycle, press any button. Press Cycle to resume the Empty cycle or
Empty or Reset to abort the cycle and return the Globe to the Home position.
IMPORTANT: Supervise and prevent your cat from entering during the Empty Cycle, as
the unit may not detect your cat without litter in it.
Press and Hold: Enters Wait Time Setting mode (see page 24). One of the lights will
start flashing, indicating the current Wait Time Setting. Use the Reset button to toggle
to the next setting: blue for 3 minutes, yellow for 7 minutes, and red for 15 minutes.
Press and hold the Empty button to save the setting. The blue light will blink to confirm,
then return to standby.
The Wait Time is the time that elapses starting from when a cat exits the Globe until the
unit performs a Clean cycle.
It may be useful to reduce the Wait Time to minimize odor and/or the time that the
waste is available to other pets—such as dogs. However, reducing the Wait Time may
reduce the cleaning effectiveness if clumps do not have enough time to set up. Extend
the Wait Time when using a lower-quality clumping litter that needs more time to set up.
Empty Button

whiskersupport.com
17
Reset Button + [Control Panel Lockout]
Press and Release:
When pressed while the Globe is at the Home position with the blue light on, it resets
the Cat Sensor.
When pressed during a cycle, it pauses the cycle. If pressed again while paused, it will
abort the cycle.
If pressed when the red light is on, it cancels the Wait Time and the unit returns to
standby (blue light on).
IMPORTANT: Any time you do anything that affects the weight or placement of the unit,
including adding or removing litter, emptying the Waste Drawer, or moving or cleaning
the unit, press the Reset button once you are done. The Reset button adjusts the Cat
Sensor automatically, ensuring the Litter-Robot will detect your cat and cycle properly.
Press and Hold: Activates Control Panel Lockout (see page 24), indicated by the blue
light blinking momentarily.
While in Control Panel Lockout mode, press and hold the Reset button to exit the mode,
indicated by the blue light blinking momentarily.
This setting will disable all button functions on the Control Panel while allowing the unit
to function normally in Automatic Mode. During Control Panel Lockout you can still turn
the unit off by pressing and holding the Power button for 3 seconds.
Reset Button

whiskersupport.com
18
Control Panel - Indicator Lights
Blue Light On: OK/Standby
The unit is OK and ready for your cat’s next use.
Blue Light Flashing: Waste Drawer is Full
The Waste Drawer is approaching full (see page 21). Remove the waste, install a new
liner, then press Reset to cancel the flashing light and adjust the Cat Sensor.
Blue and Yellow Lights On: Sleep Mode
The Litter-Robot is in 8-Hour Sleep Mode (see page 23).
Yellow Light On: Cycling/In Use
The Litter-Robot is cycling (Clean or Empty cycle).
Yellow Light Flashing: Cycle Interrupted
A yellow light flashing slowly (about once per second) indicates a cycle has been
interrupted by one of the following:
●While cycling, if the Cat Sensor is activated by a cat entering the Globe, the unit
will stop and the yellow light will flash. The unit will start to cycle again 15 seconds
after your cat has left the Globe.
●If the Bonnet is removed while cycling or while the Globe is at the Home position,
the unit will stop (if previously cycling) and the yellow light will flash. The unit will
resume its previous function 5 seconds after the Bonnet is replaced (see page
28-29).
A yellow light flashing quickly (about four times per second) indicates a cycle has been
interrupted by the Anti-Pinch Safety Feature (see page 30). While cycling, if a potential
pinch condition is detected, the Globe will stop and reverse direction for 2 seconds.
The yellow light will begin flashing quickly, awaiting your action. Once the blockage is
cleared, press any button to return the Globe to the Home position.

whiskersupport.com
19
Red Light: Cat Sensor Activated and Wait Time Countdown
The Cat Sensor has been activated by a cat entering the Globe. Once the cat exits, the
Wait Time countdown to a Clean cycle will begin (see page 24). You can cancel the
timer (red light) by pressing Reset.
Red Light Flashing: Cat Sensor Fault
The Cat Sensor has been continuously activated for 30 minutes or more, either by a cat
that won’t leave the Globe or by too much weight in the unit.
Check for excess weight, such as too much litter or waste. When you are done, press
the Reset button or turn the unit off then back on to reset the Cat Sensor.
Yellow Red Lights Flashing Sequentially:
Motor detects obstruction or jam during clockwise rotation. Turn the unit off and re-
move the Bonnet and Globe. Check for gear/motor obstruction. Reassemble the unit
and verify the proper litter level. Power the unit on and let it cycle. If the problem per-
sists, contact Customer Experience.
Blue Yellow Red Flashing Sequentially:
Cannot find Dump position. The unit will continue to function in Automatic Mode.
Contact Customer Experience.
Red Yellow Blue Flashing Sequentially:
Cannot find Home position. The unit will continue to function in Automatic Mode.
Contact Customer Experience.
Blue-Yellow-Red Flashing Simultaneously:
Cannot find Home or Dump positions. The unit will not cycle.
Contact Customer Experience.
Blue Red Flashing Sequentially:
Motor detects obstruction or jam during counter-clockwise rotation. Turn the unit off
and remove the Bonnet and Globe. Check for gear/motor obstruction. Reassemble the
unit and verify the proper litter level. Power the unit on and let it cycle. If the problem
persists, contact Customer Experience.

whiskersupport.com
20
Cat Sensor
The Cat Sensor is a weight-sensitive switch that detects when a cat enters and exits the
Globe.
Your cat must weigh at least 2.5 kg to trip the Cat Sensor. Do not use the Litter-Ro-
bot in the unattended Automatic Mode with kittens that weigh less than 2.5 kg. Use
of lightweight litters, such as corn or wheat, may require more weight to activate the
Cat Sensor. See FAQ: Can kittens use the Litter-Robot? on page 32.
For the Cat Sensor to accurately detect your cat, the Litter-Robot must be placed on
firm, level flooring. Avoid soft, uneven, or unstable surfaces.
The Litter-Robot relies on the Cat Sensor to know when your cat is inside the Globe and
when it’s time to run a Clean cycle. Here’s how it works:
●Each time the unit is powered on and at the end of each cycle, the Cat Sensor
measures the weight of the unit to use as a baseline.
●When your cat enters the Globe, the Cat Sensor detects increased weight and
prevents the Globe from rotating. When your cat exits, the Cat Sensor detects a
decrease in weight and allows the countdown to a Clean cycle to begin.
●If the Cat Sensor is tripped during that countdown, a new countdown will begin
once your cat leaves the Globe, ensuring it does not rotate with a cat inside.
●Eventually (3, 7, or 15 minutes later—depending on the setting), a Clean cycle will
start, and upon finishing, the Cat Sensor will take another measurement of the
weight to use as its new baseline.
Note: Weight applied on the step and/or step mat will not trip the Cat Sensor and stop
the Globe’s rotation. This is intentional, as we do not want to invite a cat to enter by stop-
ping the Globe’s rotation. If, however, the cat steps inside, the Globe will stop when rotating
counter-clockwise or stop and reverse direction for 3 seconds when rotating clockwise.
To ensure the accuracy and reliability of the Cat Sensor, power the unit off before
making any changes that will affect the weight of the unit, including emptying the Waste
Drawer, adding or removing litter from the Globe, or cleaning or moving the unit. When
you are done, turn the unit back on. The Litter-Robot will perform an initial Clean cycle
and the Cat Sensor will take a new measurement of the unit’s weight.
Table of contents
Languages:
Other whisker Pet Care Product manuals

whisker
whisker Litter Robot User manual

whisker
whisker Litter Robot User manual

whisker
whisker SAUDER BARRISTER 429421 User manual

whisker
whisker Litter-Robot 4 User manual

whisker
whisker Litter-Robot 3 User manual

whisker
whisker Litter-Robot 4 User manual

whisker
whisker Litter Robot User manual

whisker
whisker Litter-Robot 4 User manual

whisker
whisker Litter-Robot 3 User manual


