whisker SAUDER BARRISTER 429421 User manual

If you have assembly questions or need a replacement part, please contact Sauder directly at
www.sauder.com or 800-445-1527.
Customer Service is available Monday-Friday - 9 a.m. to 5:30 p.m. EST (except holidays)
WHISKER BARRISTER DOG CRATE
support@whisker.com | 1.877.250.7729 | Mon-Fri, 9am-5pm EST
Part Identication
Hardware Identication
Hardware Usage Guide
Assembly Steps
Français
Español
Safety
Warranty
Hammer
Not actual size
No. 2 Phillips Screwdriver
Tip Shown Actual Size
ASSEMBLY TOOLS REQUIREDTABLE OF CONTENTS
THANK YOU FOR PURCHASING THE BARRISTER DOG CRATE!
I am thrilled that Whisker and Sauder furniture have partnered
together to bring you the highest-quality pet furniture. At
Whisker, we design and deliver rened pet accessories that
delight both pets and people. Whisker and Sauder products
are made with environmentally responsible materials and
world-class manufacturing processes. Together, our companies
are bringing pet parents a premium line of stylish yet functional
pet furniture that is built to last. Enjoy!
Jacob Zuppke, President of Whisker
3
4-5
6
7-30
31-35
36-40
41-42
43
429421 whiskersupport.com
Page 2
REGISTER YOUR NEW
PRODUCT ONLINE
For immediate service,
our website is available 24
hours per day, 7 days per
week, to order replacement
parts, access assembly tips,
register your product and
view Sauder products.
www.sauder.com/service

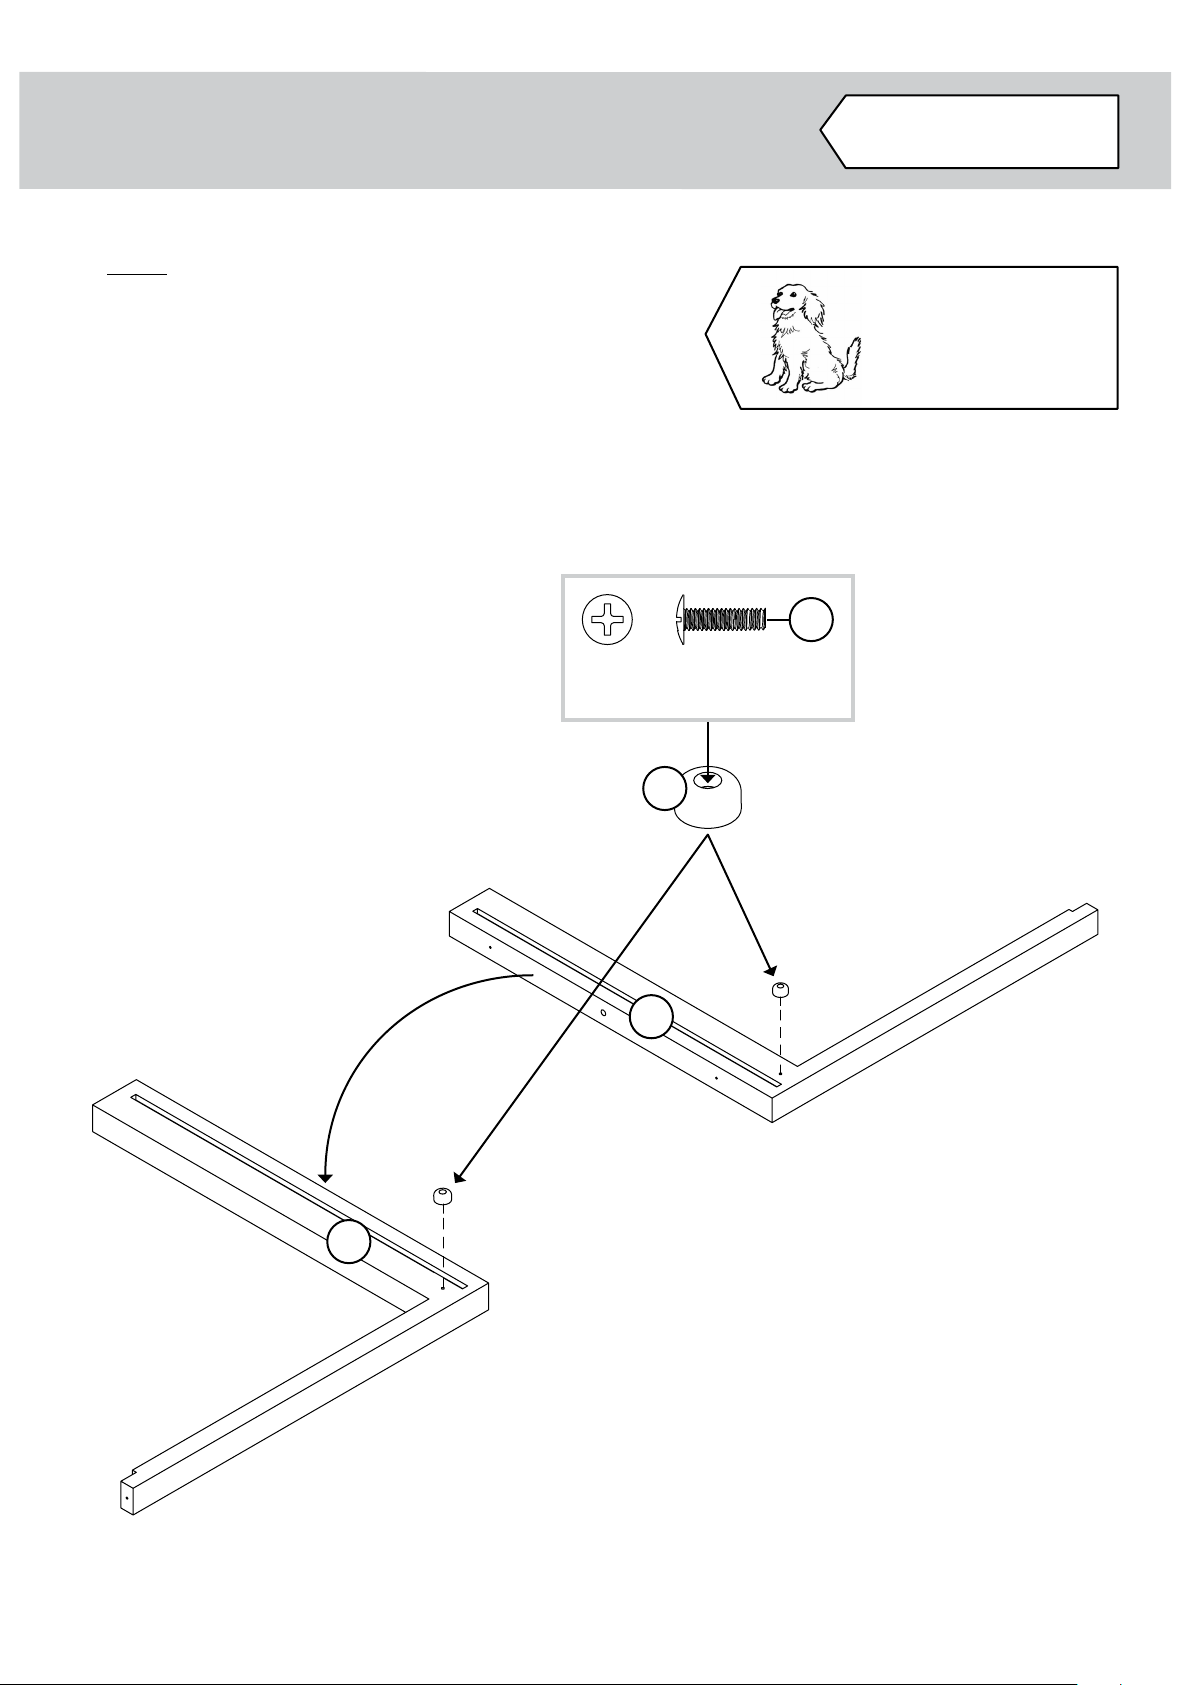
åWhile not all parts are labeled, some of the parts will have a label or an inked letter on the edge to
help distinguish similar parts from each other. Use this part identication to help identify similar parts.
Now you know
our ABCs.
PART IDENTIFICATION
A TOP (1)
B SHELF (1)
C BOTTOM (1)
D UPPER BACK (1)
E LOWER BACK (1)
F LEFT END (1)
G RIGHT END (1)
H BOTTOM MOLDING (1)
J DOOR (2)
K FOOT (1)
L CUSHION (1)
M DRAWER FRONT (1)
N DRAWER BACK (1)
O LEFT DRAWER SIDE (1)
P RIGHT DRAWER SIDE (1)
Q DRAWER BRACE (1)
R DRAWER BOTTOM (1)
S UPRIGHT (1)
A
B
C
D
E
F
G
H
J
L
M
N
O
P
Q
R
S
K
J
429421whiskersupport.com Page 3
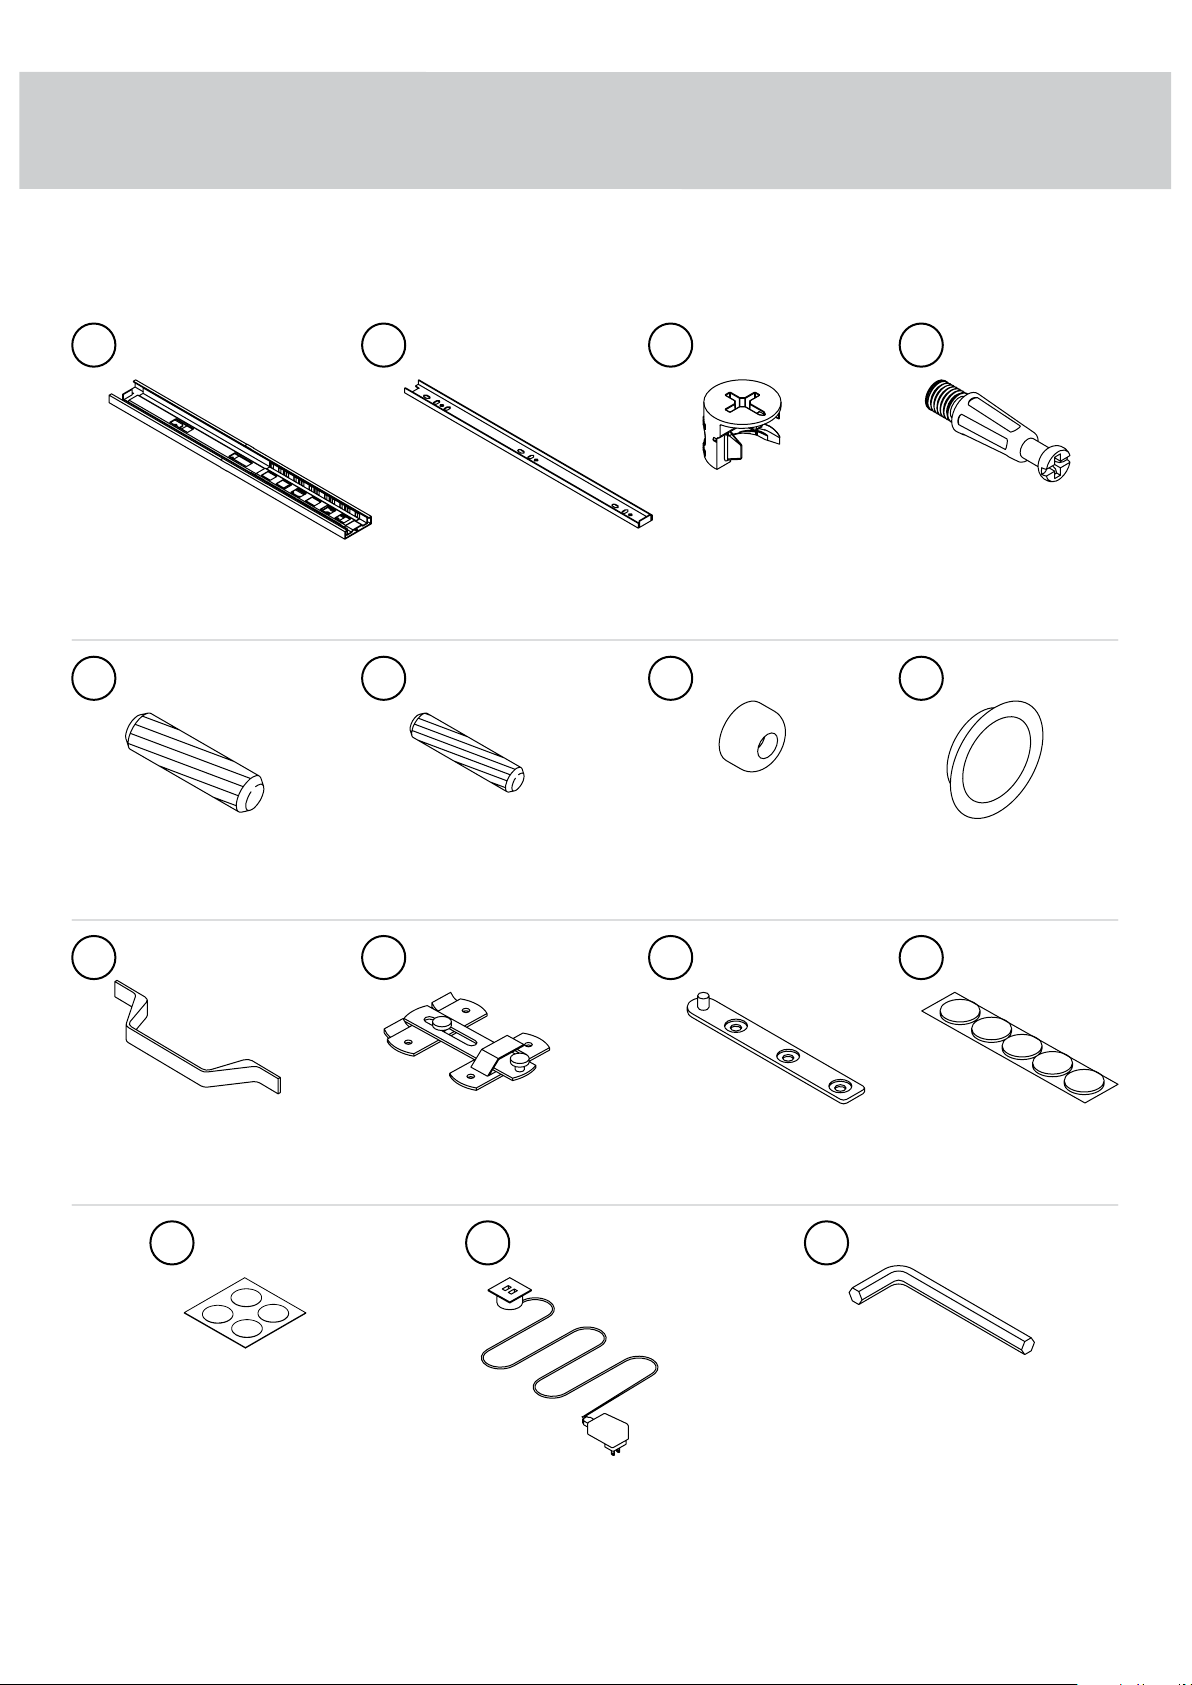
åScrews are shown actual size. You may receive extra hardware with your unit.
HARDWARE IDENTIFICATION
HIDDEN
CAM - 21
31 EXTENSION
RAIL - 2 2EXTENSION
SLIDE - 2
(EXTENSION SET SHOWN SEPARATED)
CAM
SCREW - 21
4
LARGE WOOD
DOWEL - 28
5SMALL WOOD
DOWEL - 2
6 7 BUSHING - 4 8GROMMET - 1
9PULL - 1 10 LATCH
SET - 2 11 PIVOT
HINGE - 4
FELT DISC
CARD - 1
12
L-WRENCH - 1
15
USB POWER
HUB - 1
14
APPLIQUE
CARD - 1
13
429421 whiskersupport.com
Page 4
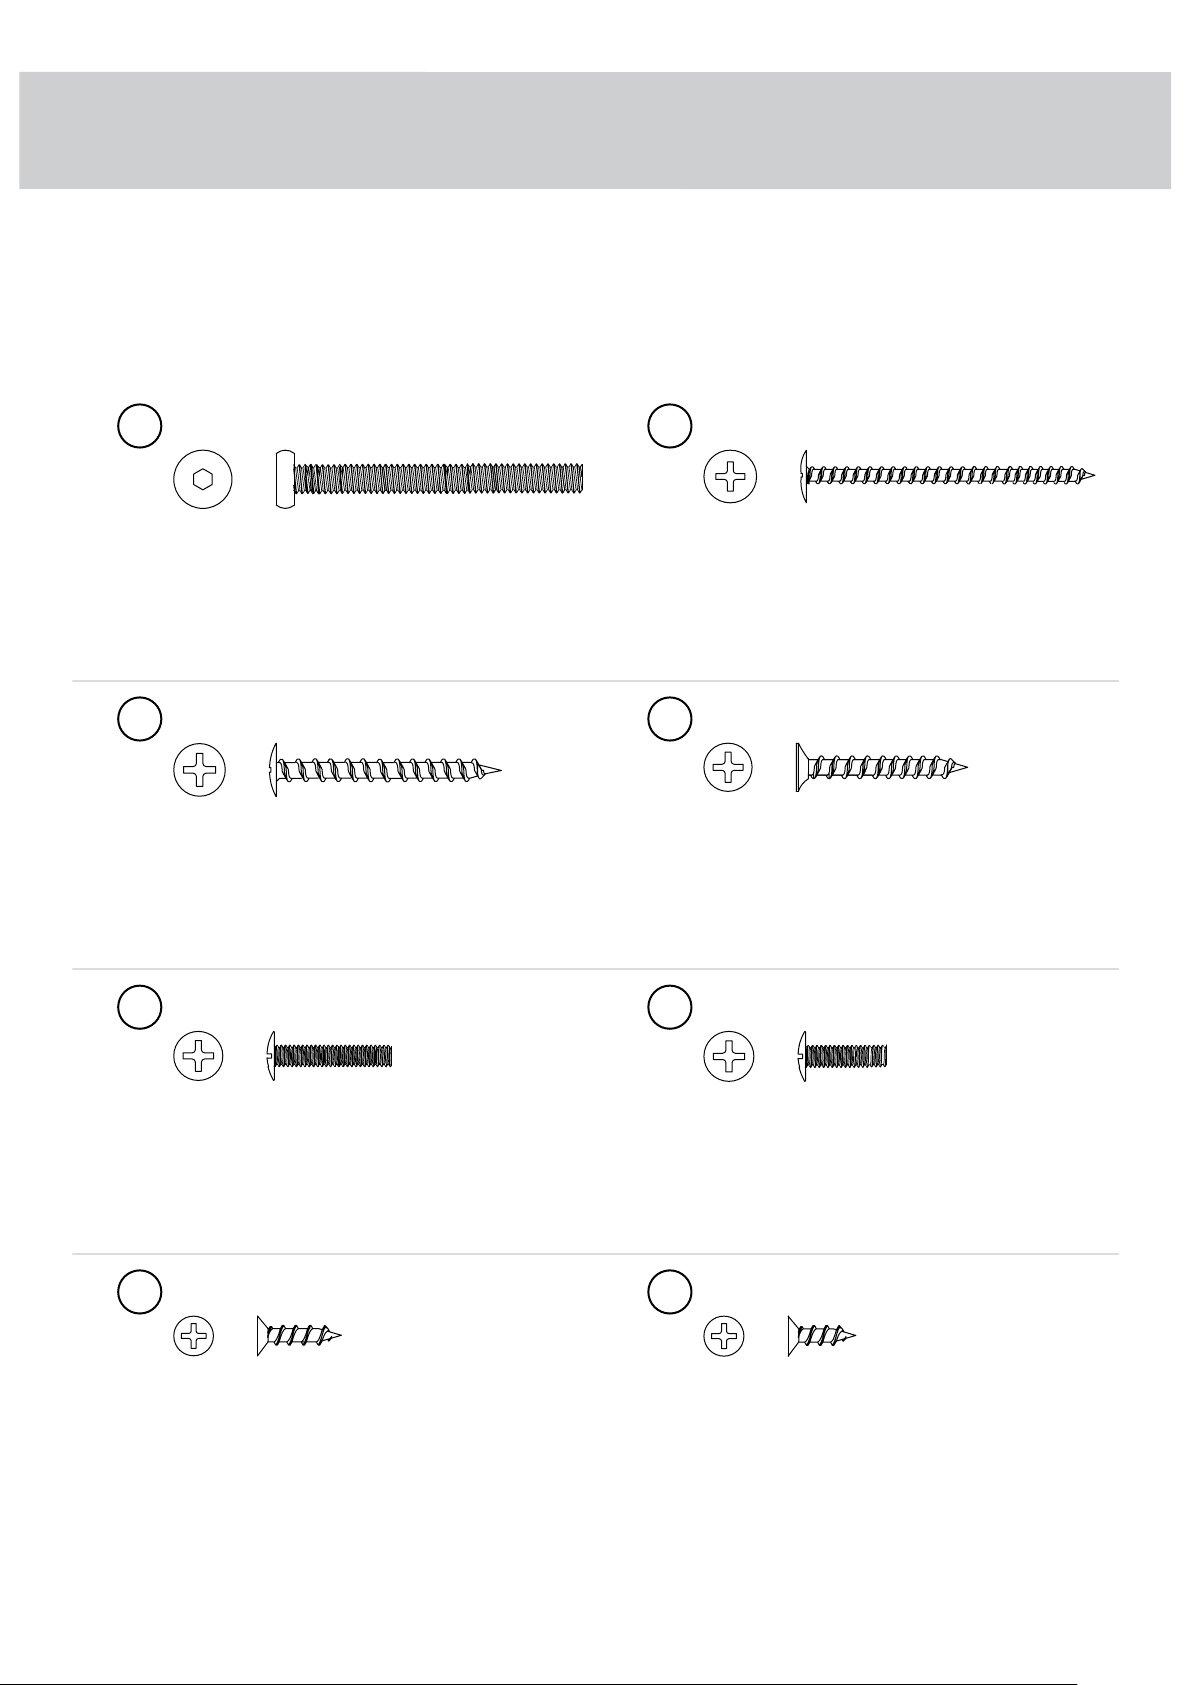
åScrews are shown actual size. You may receive extra hardware with your unit.
16 2" HEX HEAD SCREW - 1 17 2" PAN HEAD SCREW - 2
18 1-9/16" PAN HEAD SCREW - 5 19 1-3/16" FLAT HEAD SCREW - 4
22 9/16" FLAT HEAD SCREW - 8 23 1/2" FLAT HEAD SCREW - 24
20 13/16" MACHINE SCREW - 2 21 9/16" MACHINE SCREW - 4
429421whiskersupport.com Page 5
HARDWARE IDENTIFICATION
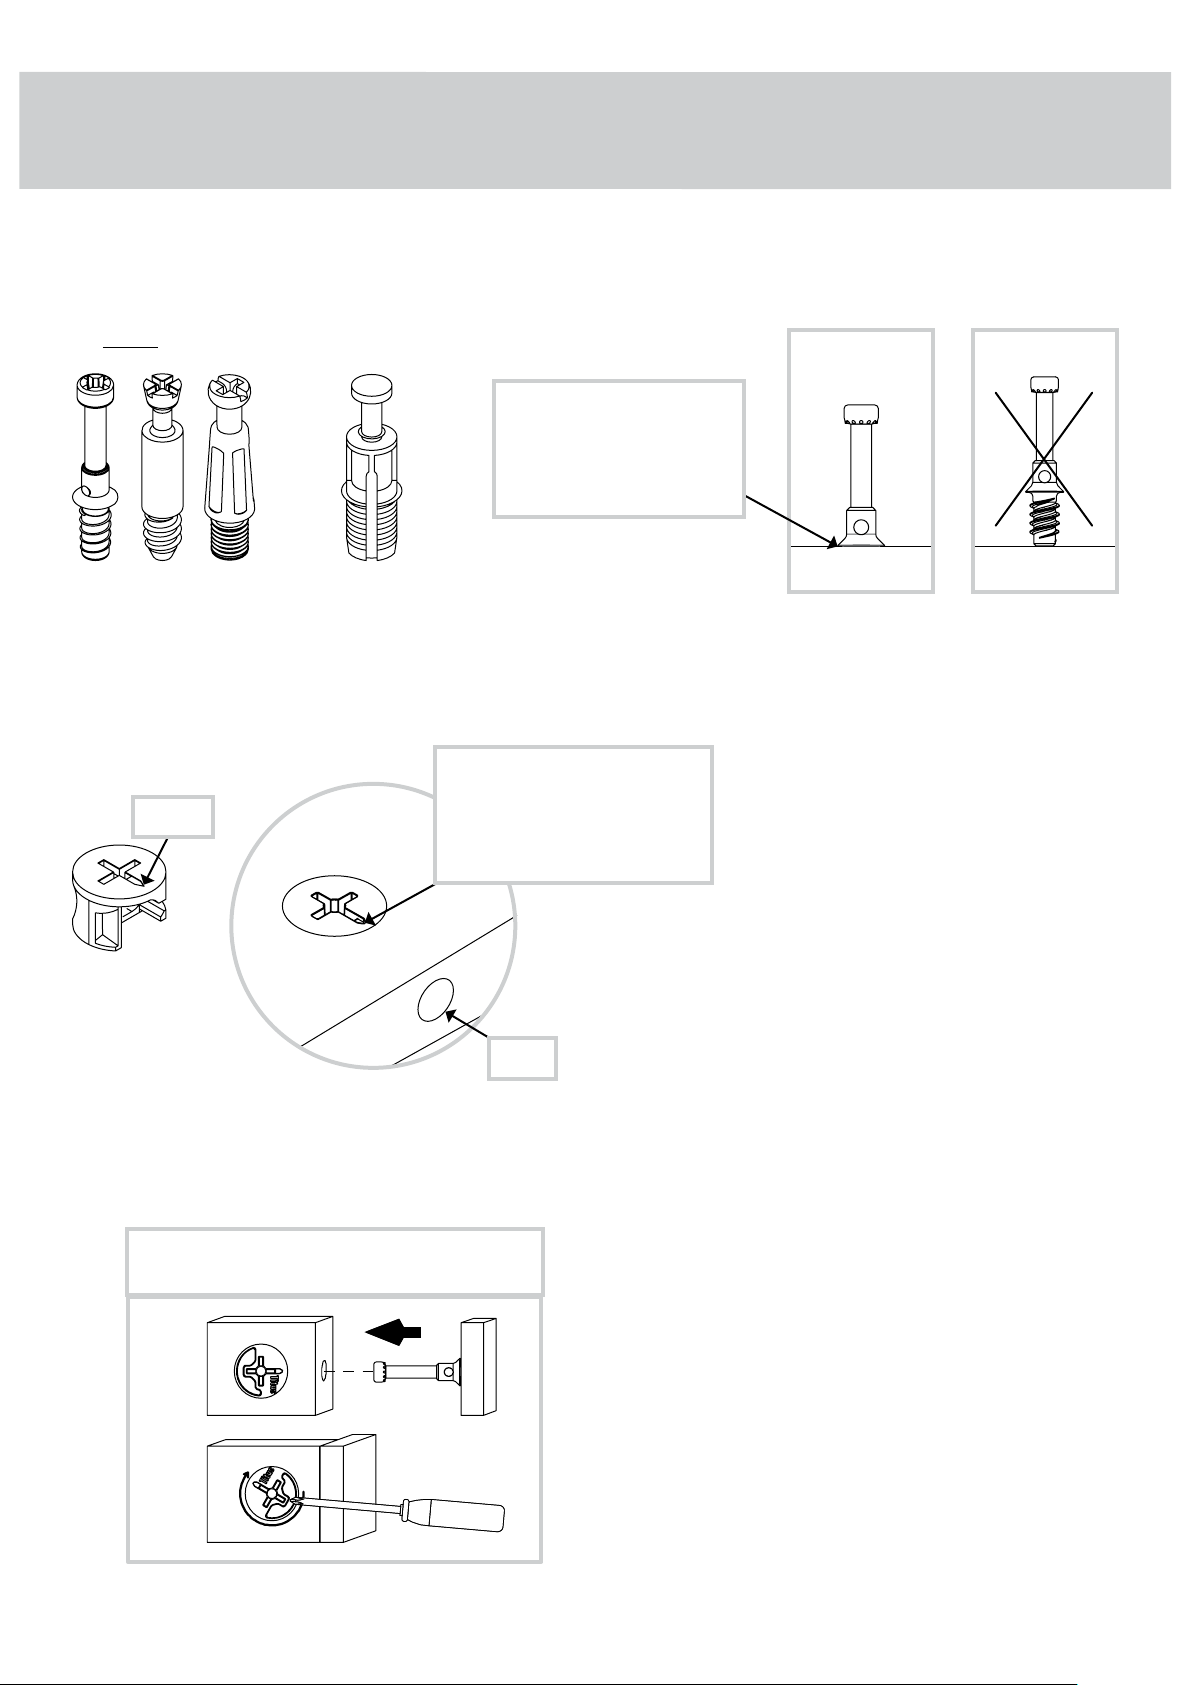
HOW TO USE A HIDDEN CAM & CAM SCREW OR CAM DOWEL
NOTE: Various CAM SCREWS or a CAM DOWEL may be used.
Cam Dowel
Cam Screws
Turn the CAM SCREW
or gently tap the
CAM DOWEL until the
shoulder is against the
surface of the part.
1.
3.
Insert the CAM SCREW or CAM DOWEL into
the HIDDEN CAM. Tighten the HIDDEN CAM.
1
2
2.
Arrow
Push a HIDDEN CAM into
the part. The arrow in
the HIDDEN CAM must
point toward the hole in
the edge of the board.
Hole
Hidden Cam
HARDWARE USAGE GUIDE
429421 whiskersupport.com
Page 6
View our assembly video at
www.whisker.com/support
STEP 1
å NOTE: You will need someone's help later
in assembly.
å Assemble your unit on a carpeted oor or
on the empty carton to avoid scratching
your unit or the oor.
å Fasten two BUSHINGS (7) to both sides of
the UPRIGHT (S) as shown. Use two 9/16"
MACHINE SCREWS (21).
429421whiskersupport.com Page 7
F
L
I
P
O
V
E
R
7
S
S
9/16" MACHINE SCREW
(2 used in this step)
21
Go on, spoil 'em
a little.
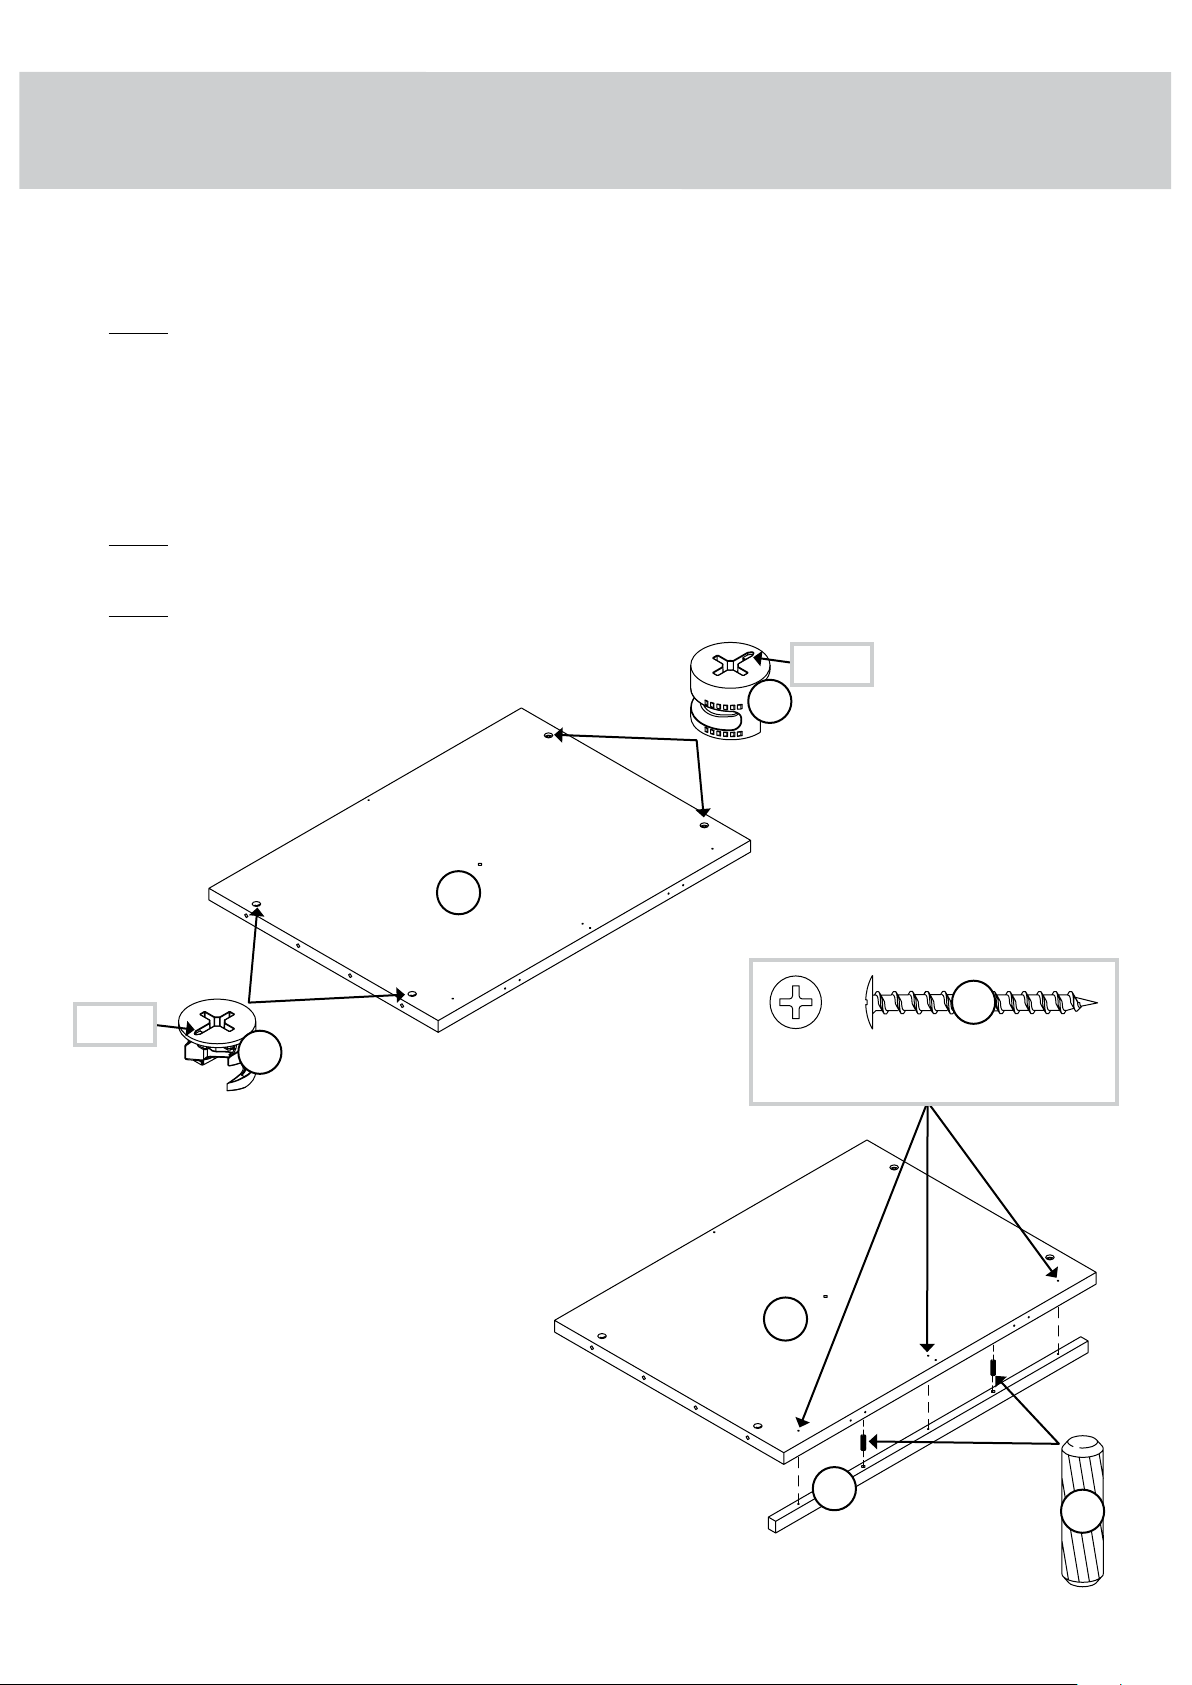
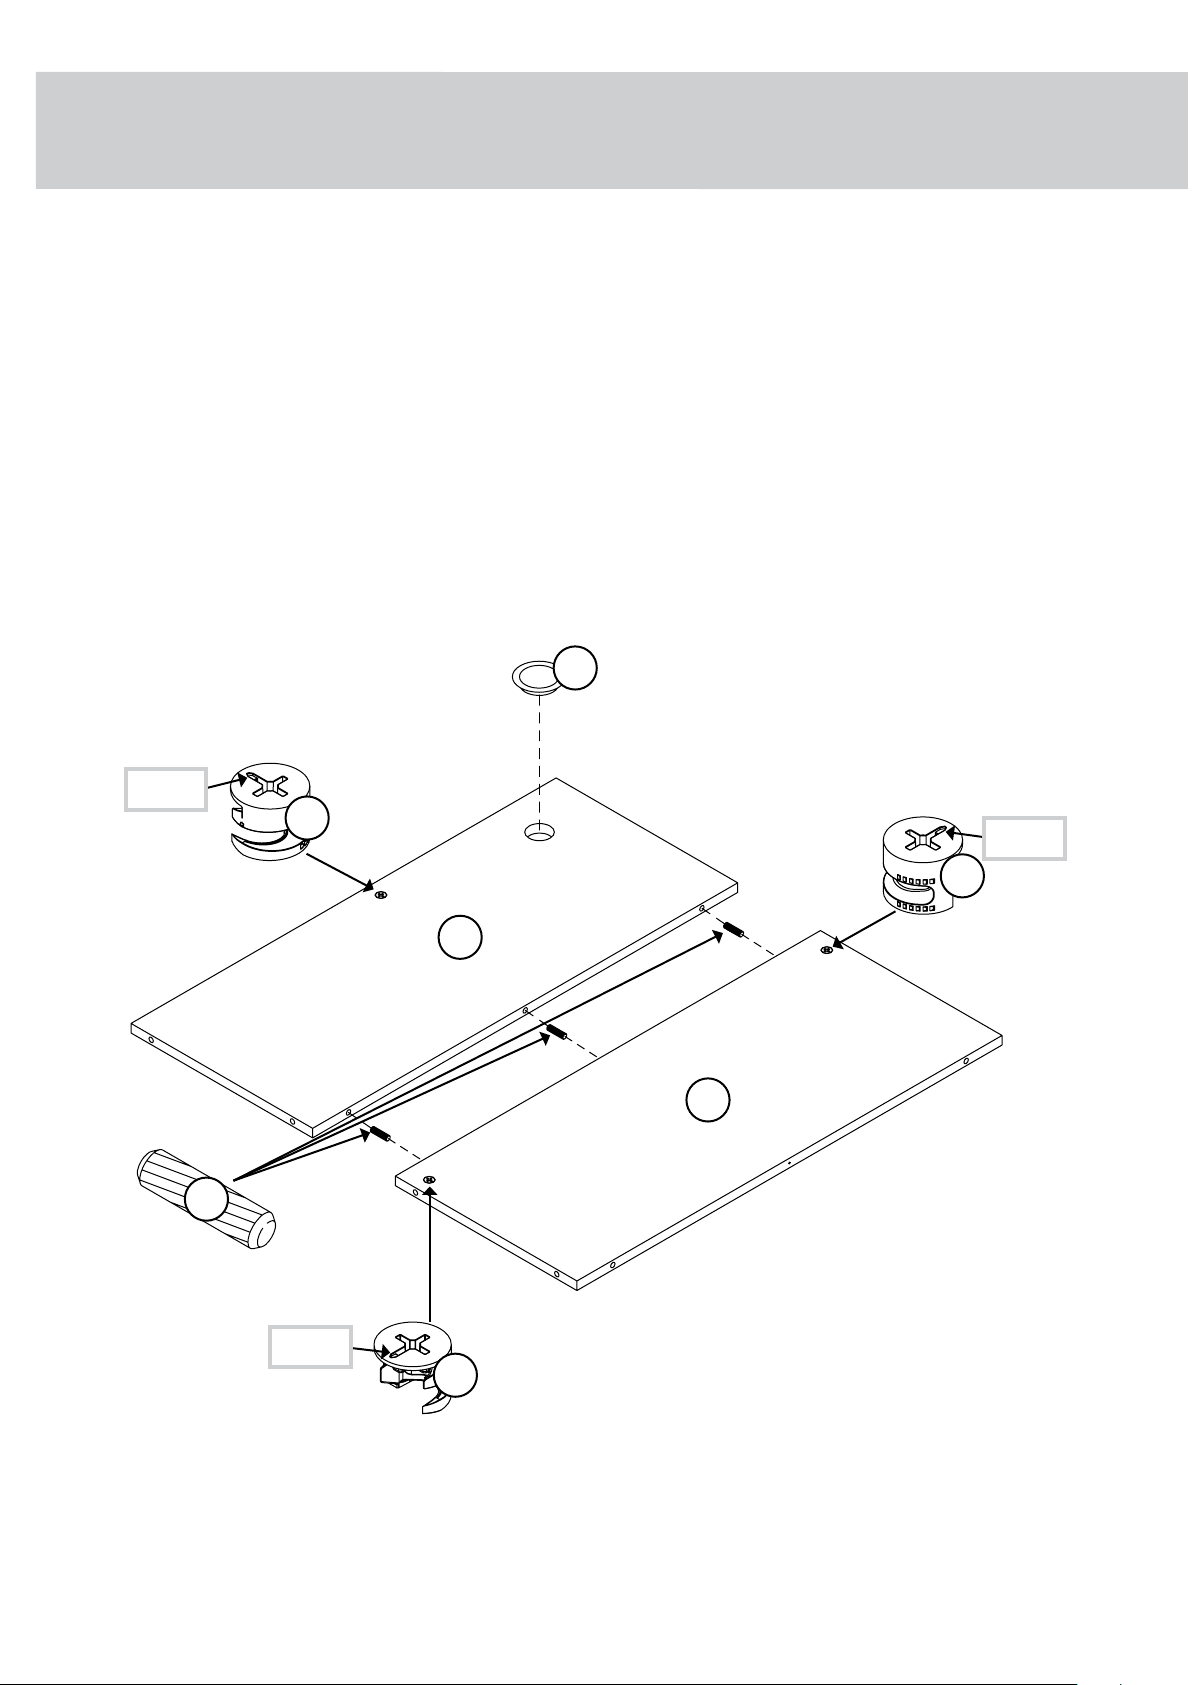
å Push four HIDDEN CAMS (3) into the BOTTOM (C).
å NOTE: Be sure the HIDDEN CAMS are completely
inserted into the holes.
å Insert two LARGE WOOD DOWELS (5) into the
BOTTOM MOLDING (H).
å Fasten the BOTTOM (C) to the BOTTOM MOLDING (H).
Use three 1-9/16" PAN HEAD SCREWS (18).
å NOTE: You should start each SCREW a few turns
before completely tightening any of them.
å NOTE: Be sure the WOOD DOWELS in the MOLDING
insert into the BOTTOM.
STEP 2
429421 whiskersupport.com
Page 8
3
Arrow
Arrow
3
C
H
C
Surface with
HIDDEN CAMS
5
1-9/16" PAN HEAD SCREW
(3 used in this step)
18
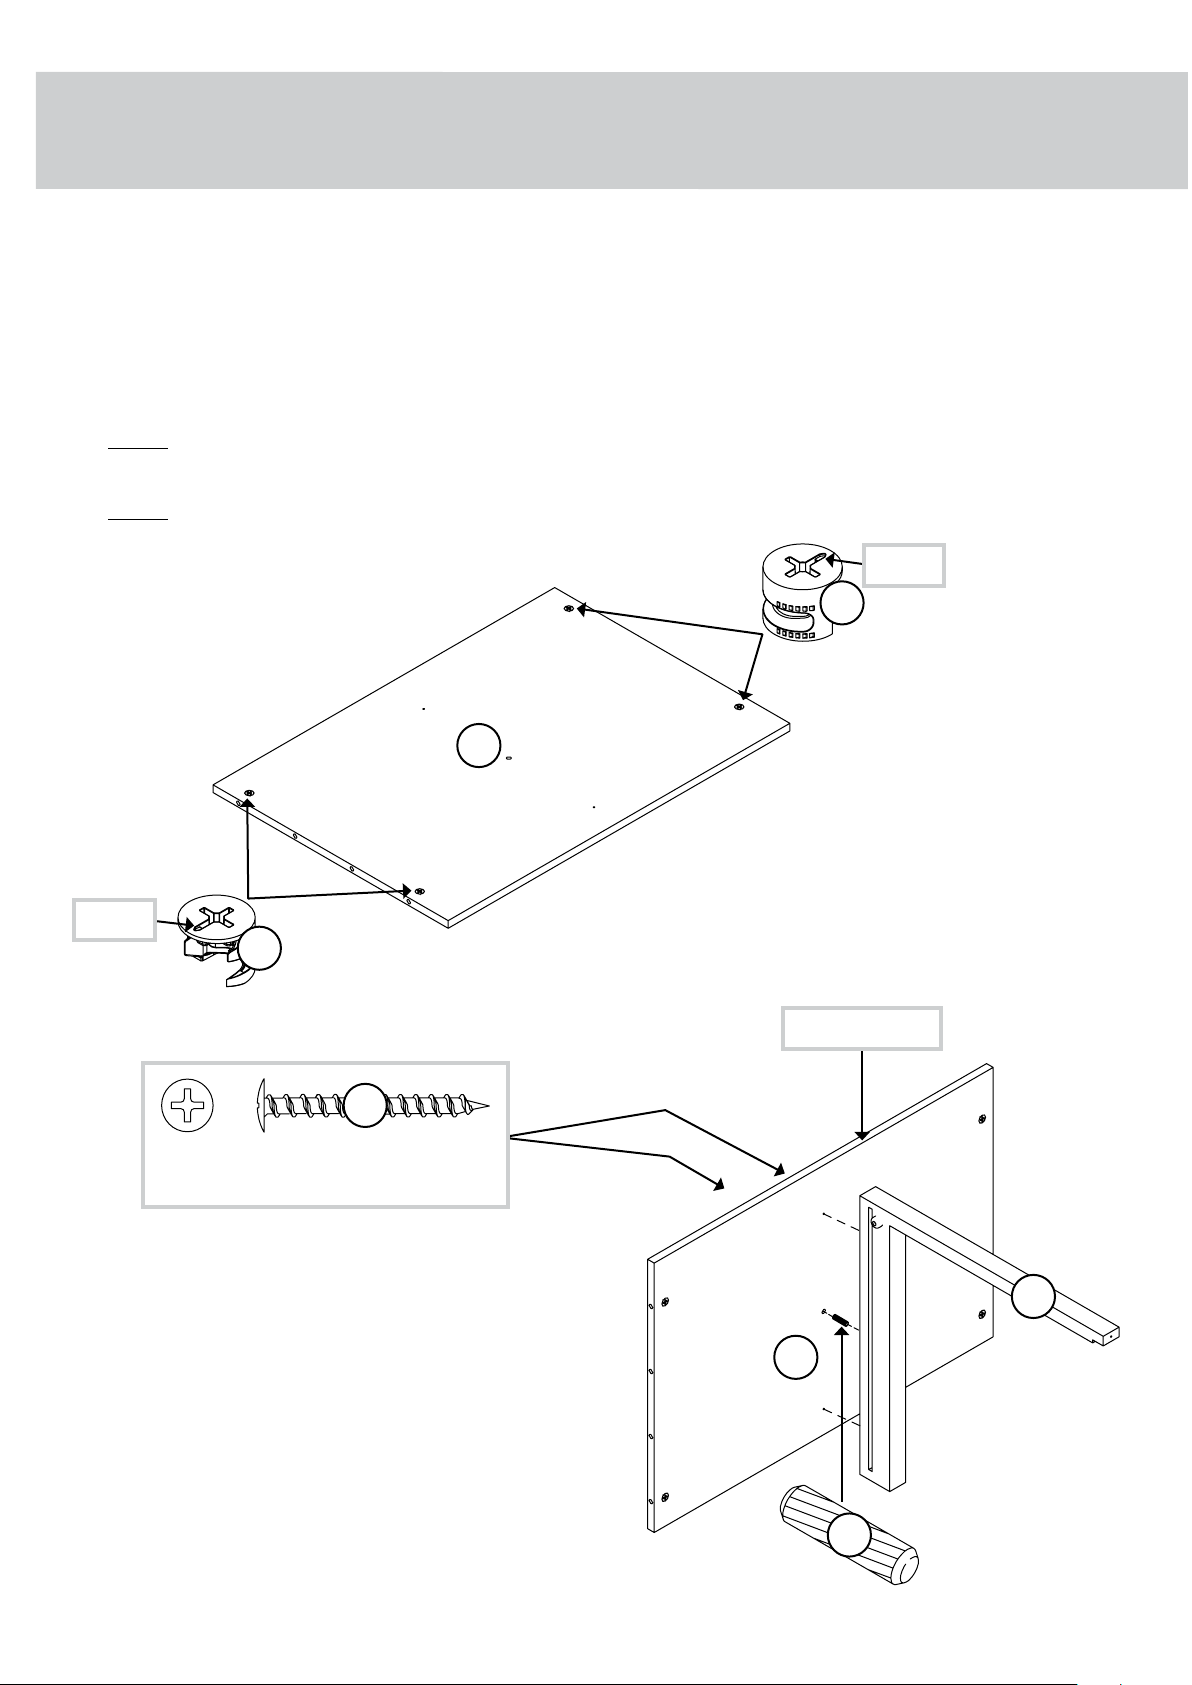
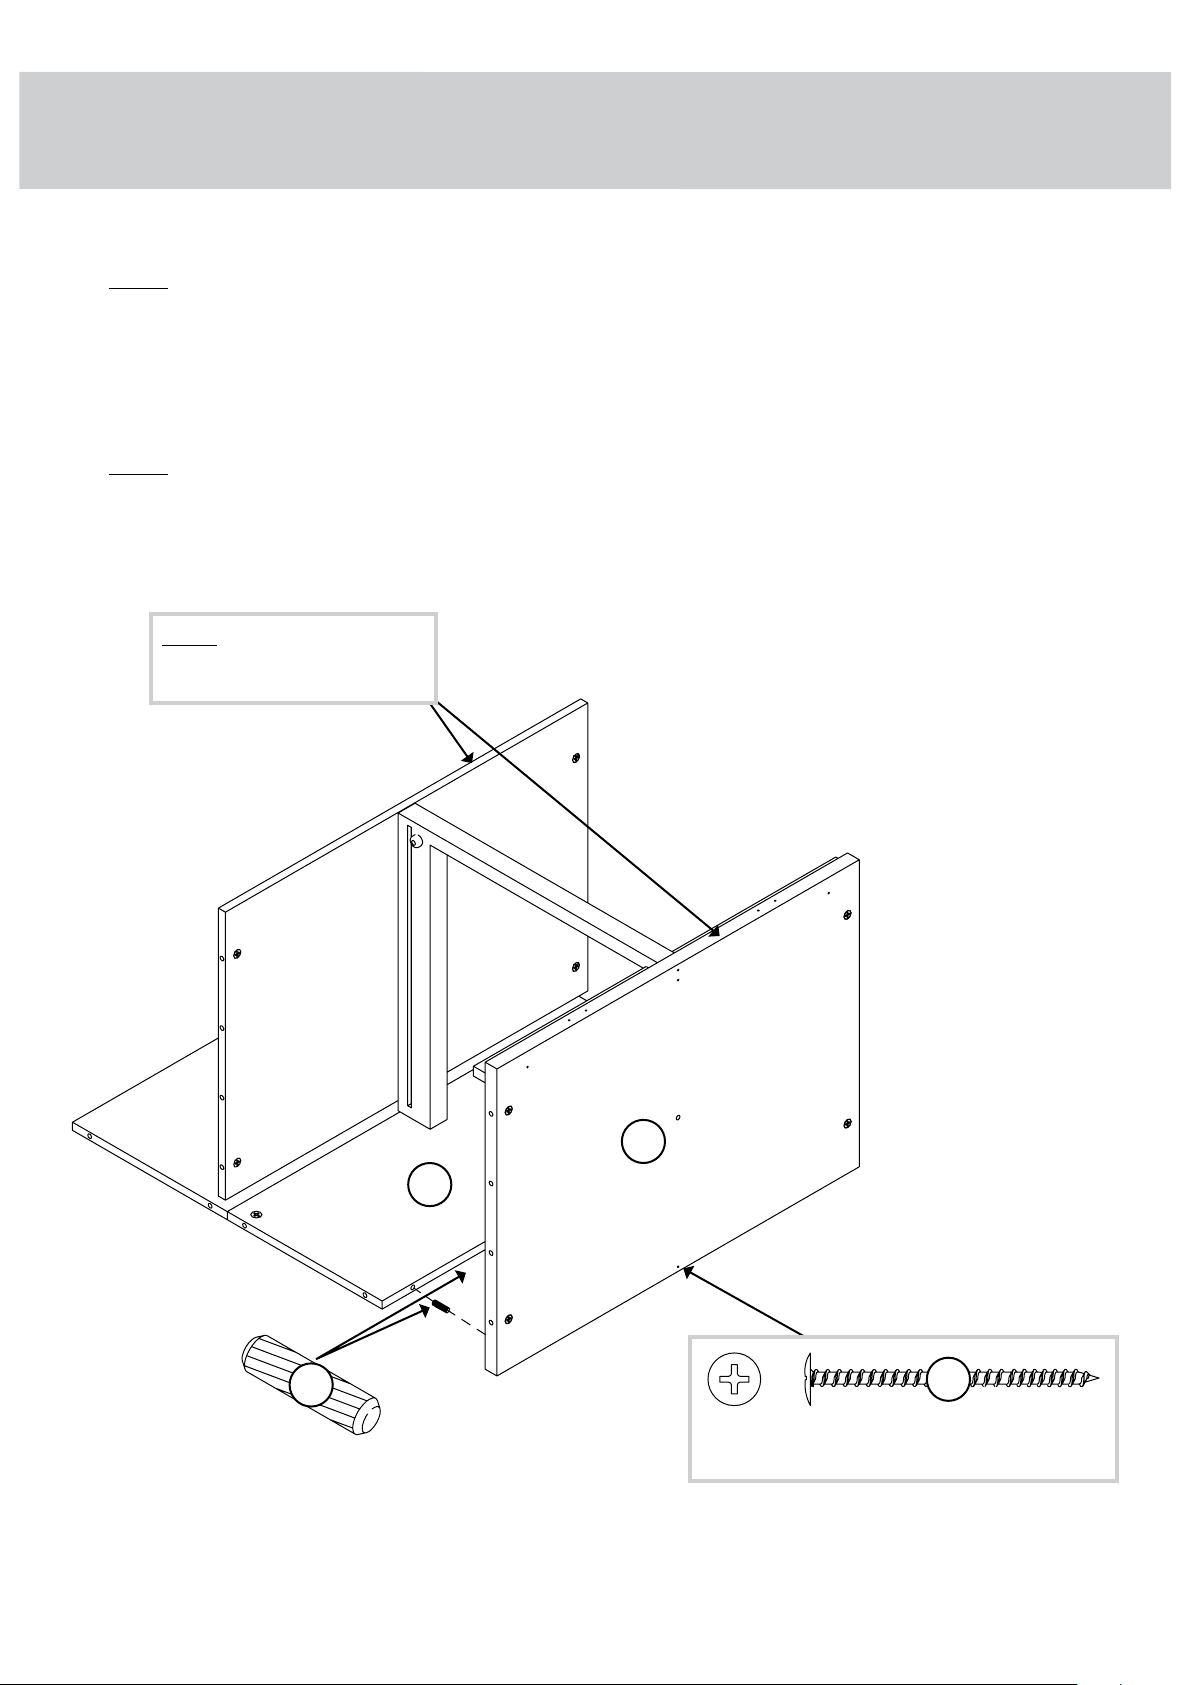
å Push four HIDDEN CAMS (3) into the SHELF (B).
å Insert one LARGE WOOD DOWEL (5) into the SHELF (B).
å Fasten the SHELF (B) to the UPRIGHT (S). Use two
1-9/16" PAN HEAD SCREWS (18).
å NOTE: You should start each SCREW a few turns
before completely tightening any of them.
å NOTE: Be sure the WOOD DOWEL in the SHELF inserts
into the UPRIGHT.
STEP 3
429421whiskersupport.com Page 9
5
3
Arrow
Arrow
3
B
Surface with
HIDDEN CAMS
B
1-9/16" PAN HEAD SCREW
(2 used in this step)
18
Finished edge
S
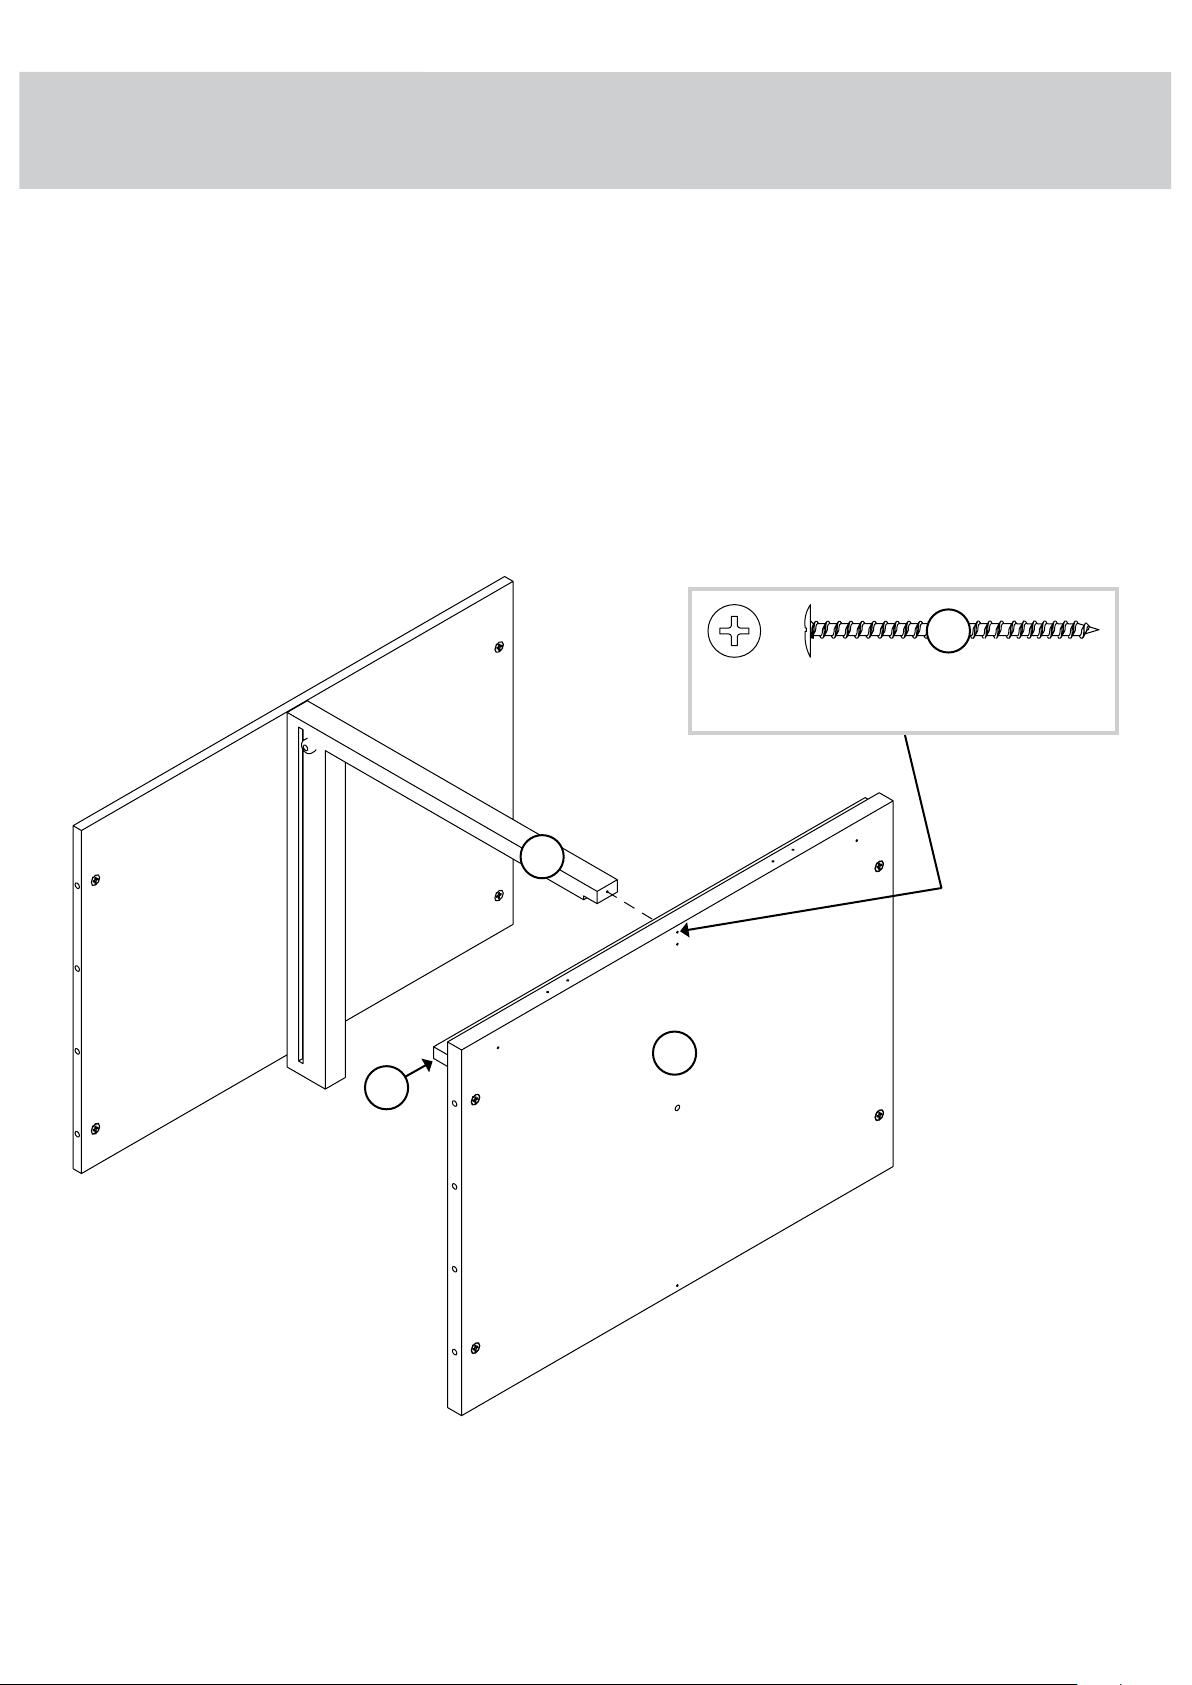
å Fasten the BOTTOM (C) to the UPRIGHT (S).
Use one 2" PAN HEAD SCREW (17).
STEP 4
429421 whiskersupport.com
Page 10
S
C
Surface with
HIDDEN CAMS
2" PAN HEAD SCREW
(1 used in this step)
17
H
å Push three HIDDEN CAMS (3) into the BACKS (D and E).
å Insert three LARGE WOOD DOWELS (5) into the edge of
the UPPER BACK (D).
å Push the LOWER BACK (E) onto the WOOD DOWELS in
the UPPER BACK (D).
å Insert the GROMMET (8) into the large hole in the
UPPER BACK (D).
STEP 5
429421whiskersupport.com Page 11
3
Arrow
Arrow
3
3
Arrow
5
E
D
8
å NOTE: You will need someone's help in this step.
å Insert two LARGE WOOD DOWELS (5) into the
LOWER BACK (E).
å Fasten the BOTTOM (C) to the LOWER BACK (E).
Use one 2" PAN HEAD SCREW (17).
å NOTE: Be sure the WOOD DOWELS in the BACK
insert into the BOTTOM.
STEP 6
429421 whiskersupport.com
Page 12
5
C
E
2" PAN HEAD SCREW
(1 used in this step)
17
NOTE: With someone's
help, carefully lift the
assembly onto the BACKS.
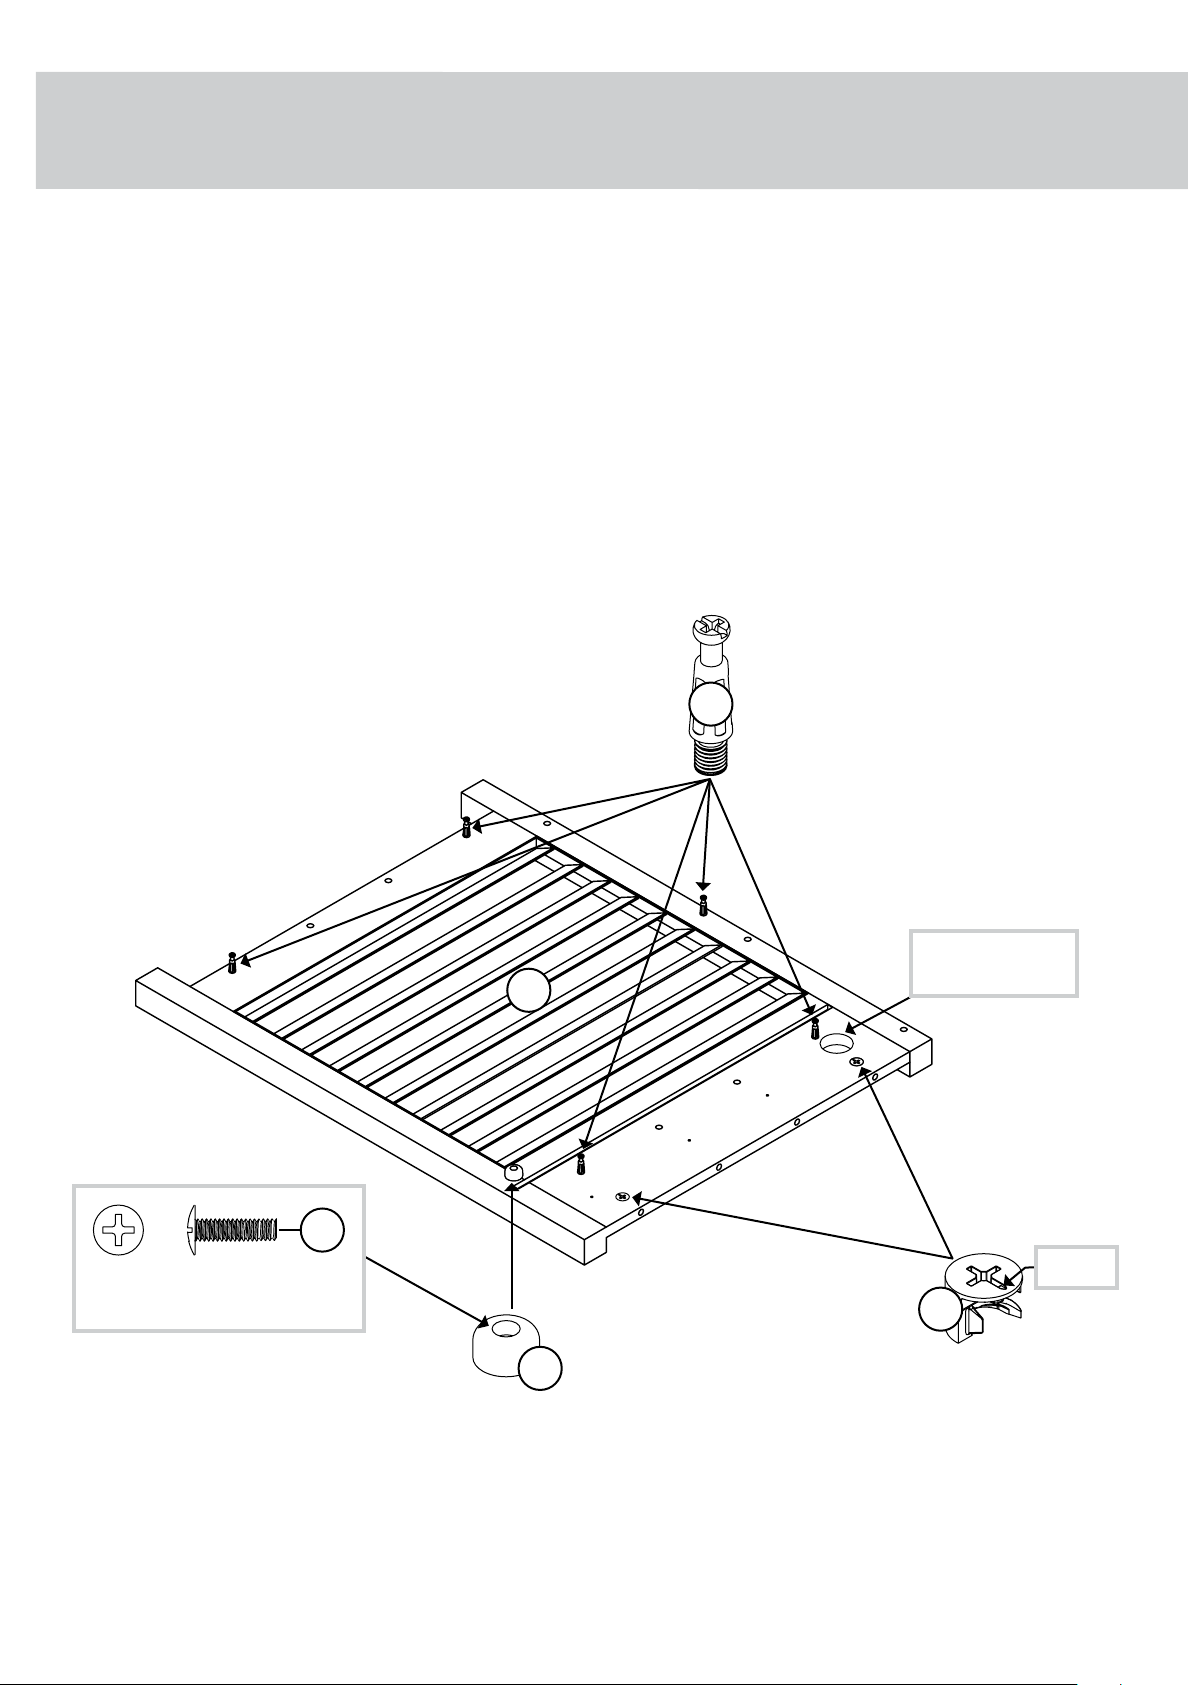
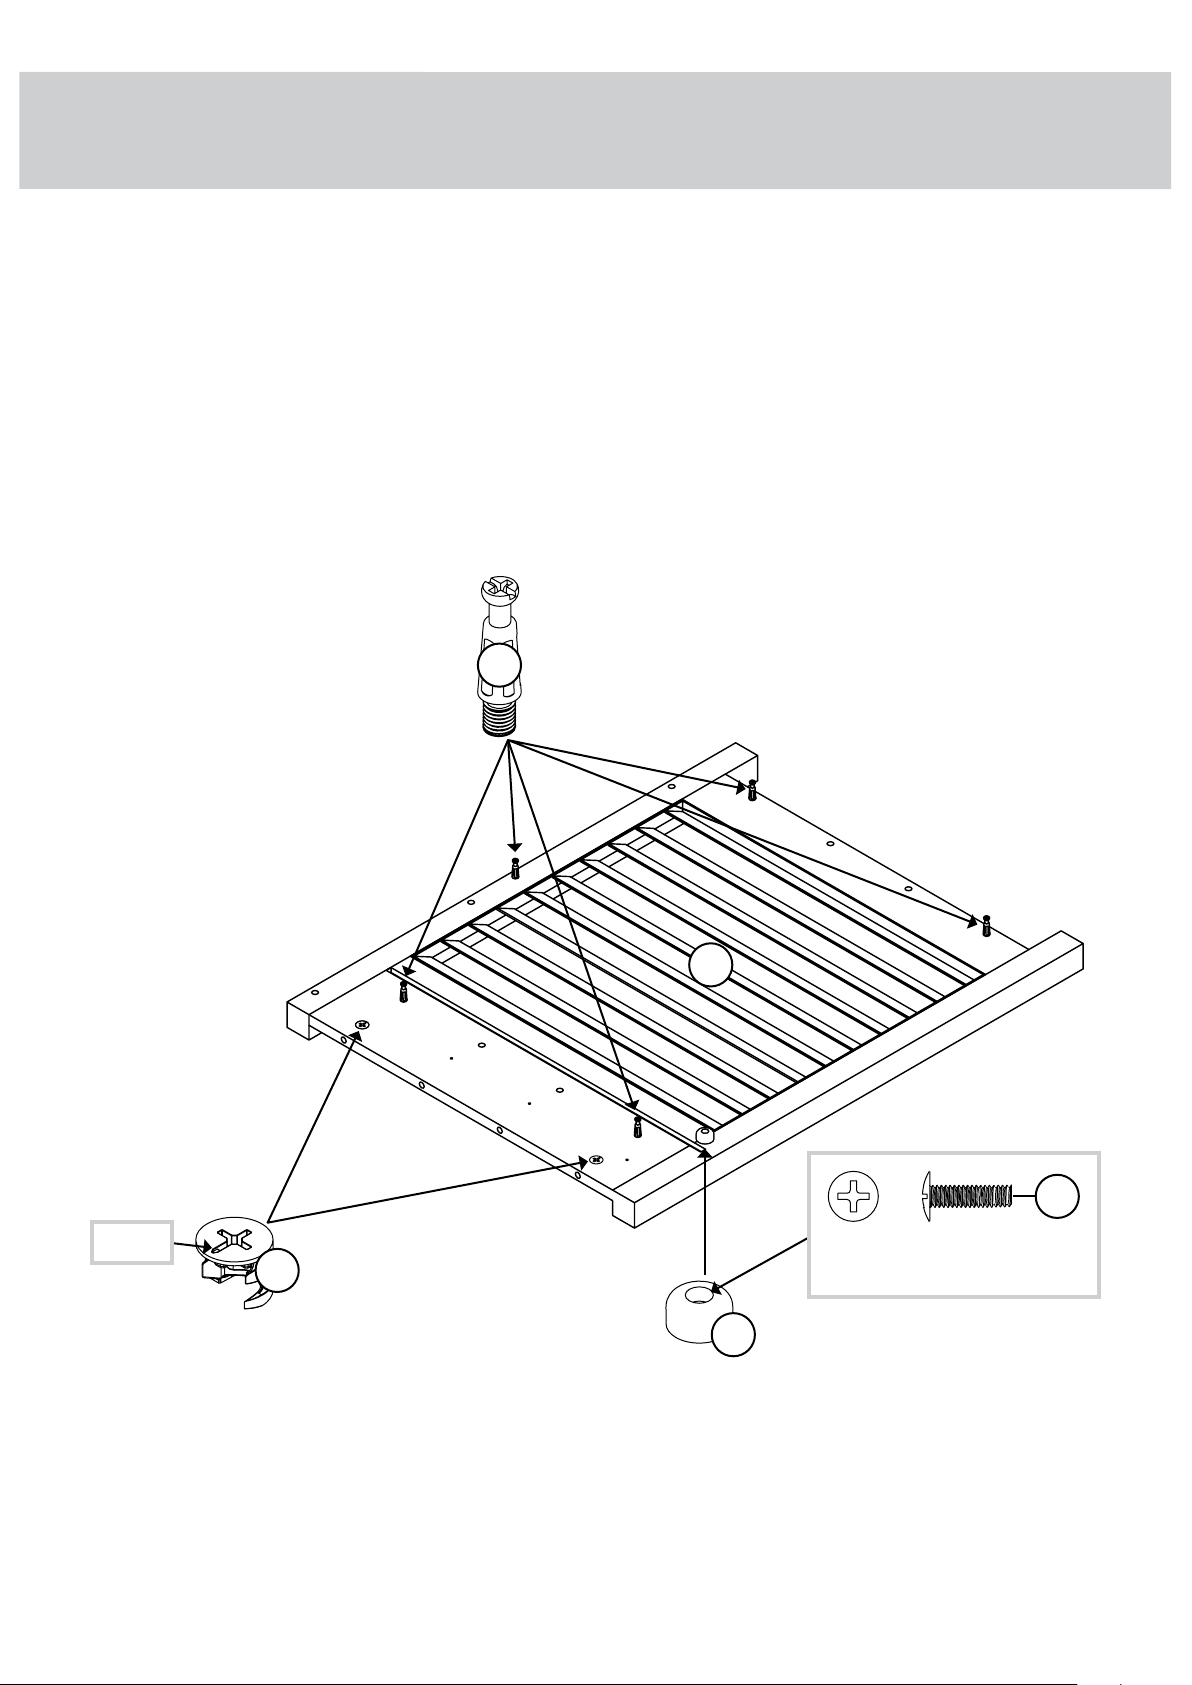
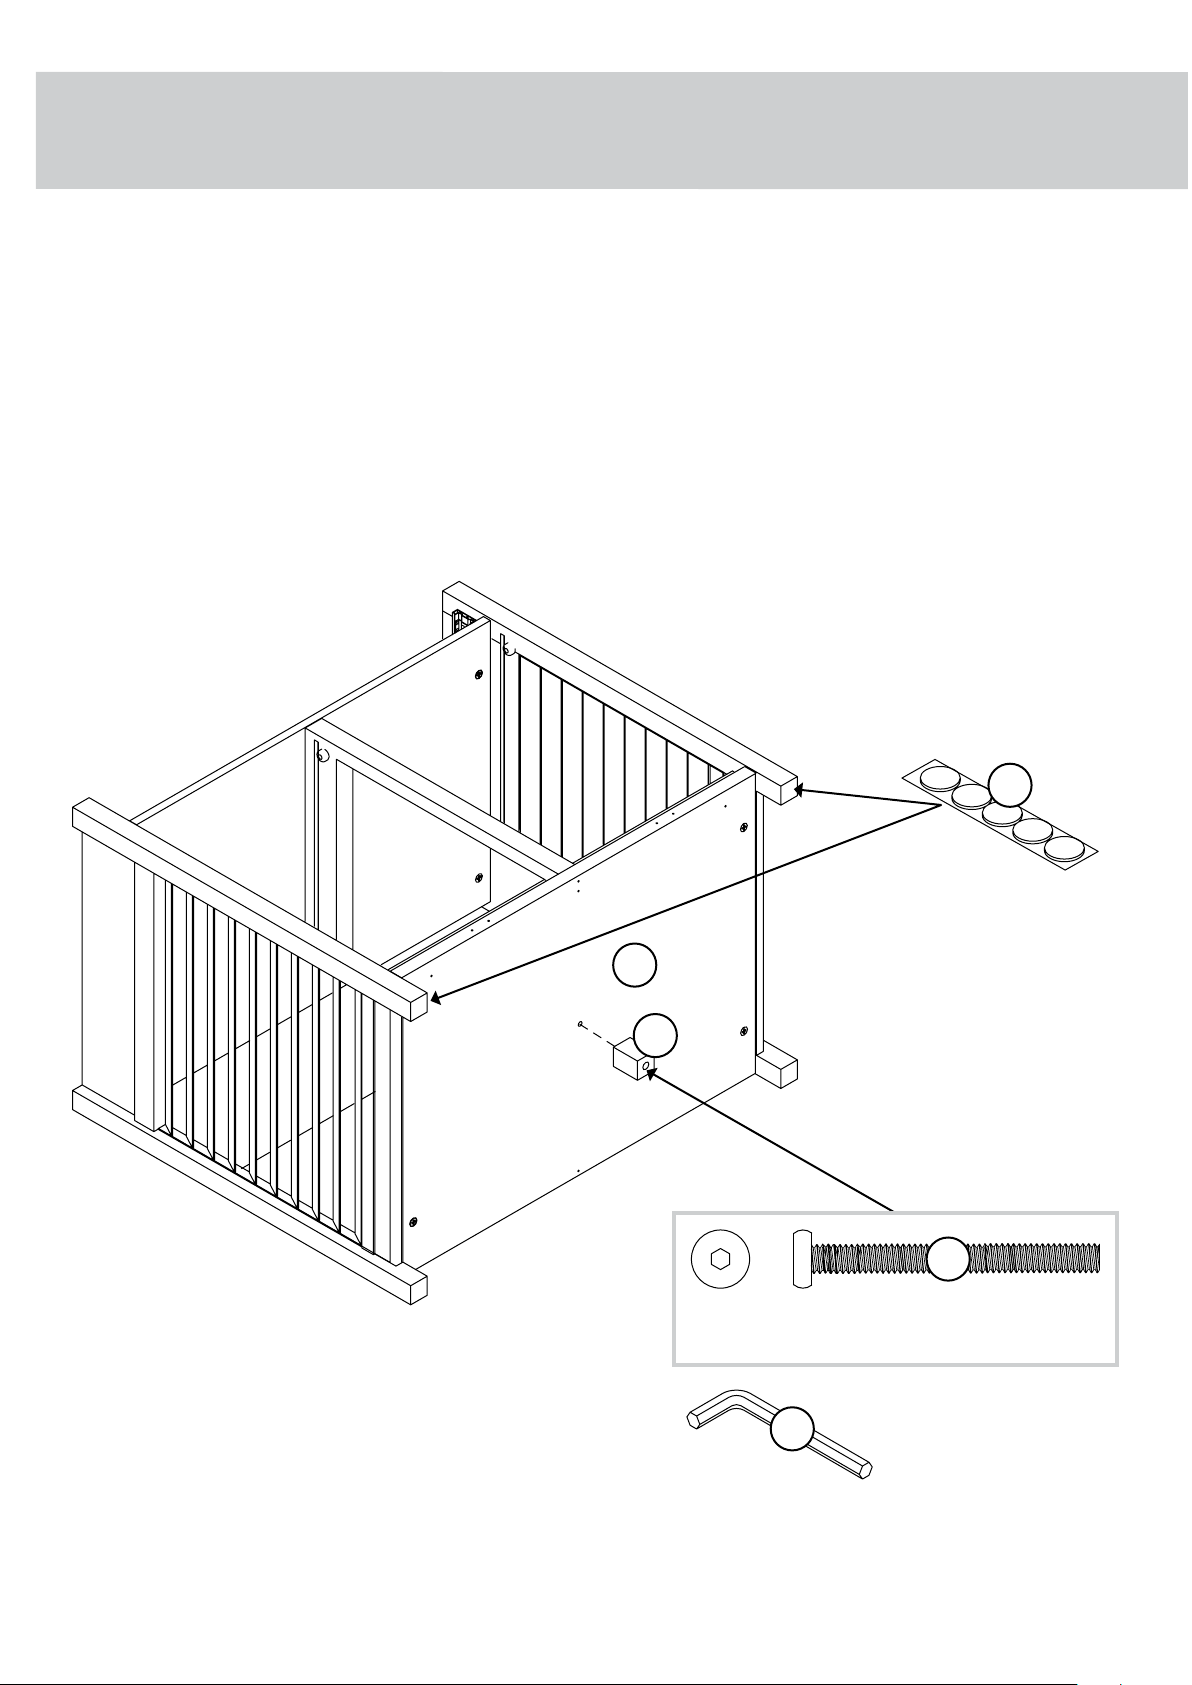
å Turn ve CAM SCREWS (4) into the RIGHT END (G).
å Push two HIDDEN CAMS (3) into the RIGHT END (G).
å Fasten one BUSHING (7) to the RIGHT END (G). Use
one 9/16" MACHINE SCREW (21).
STEP 7
429421whiskersupport.com Page 13
4
Arrow
3
7
9/16" MACHINE SCREW
(1 used in this step)
21
G
The large hole
must be here.
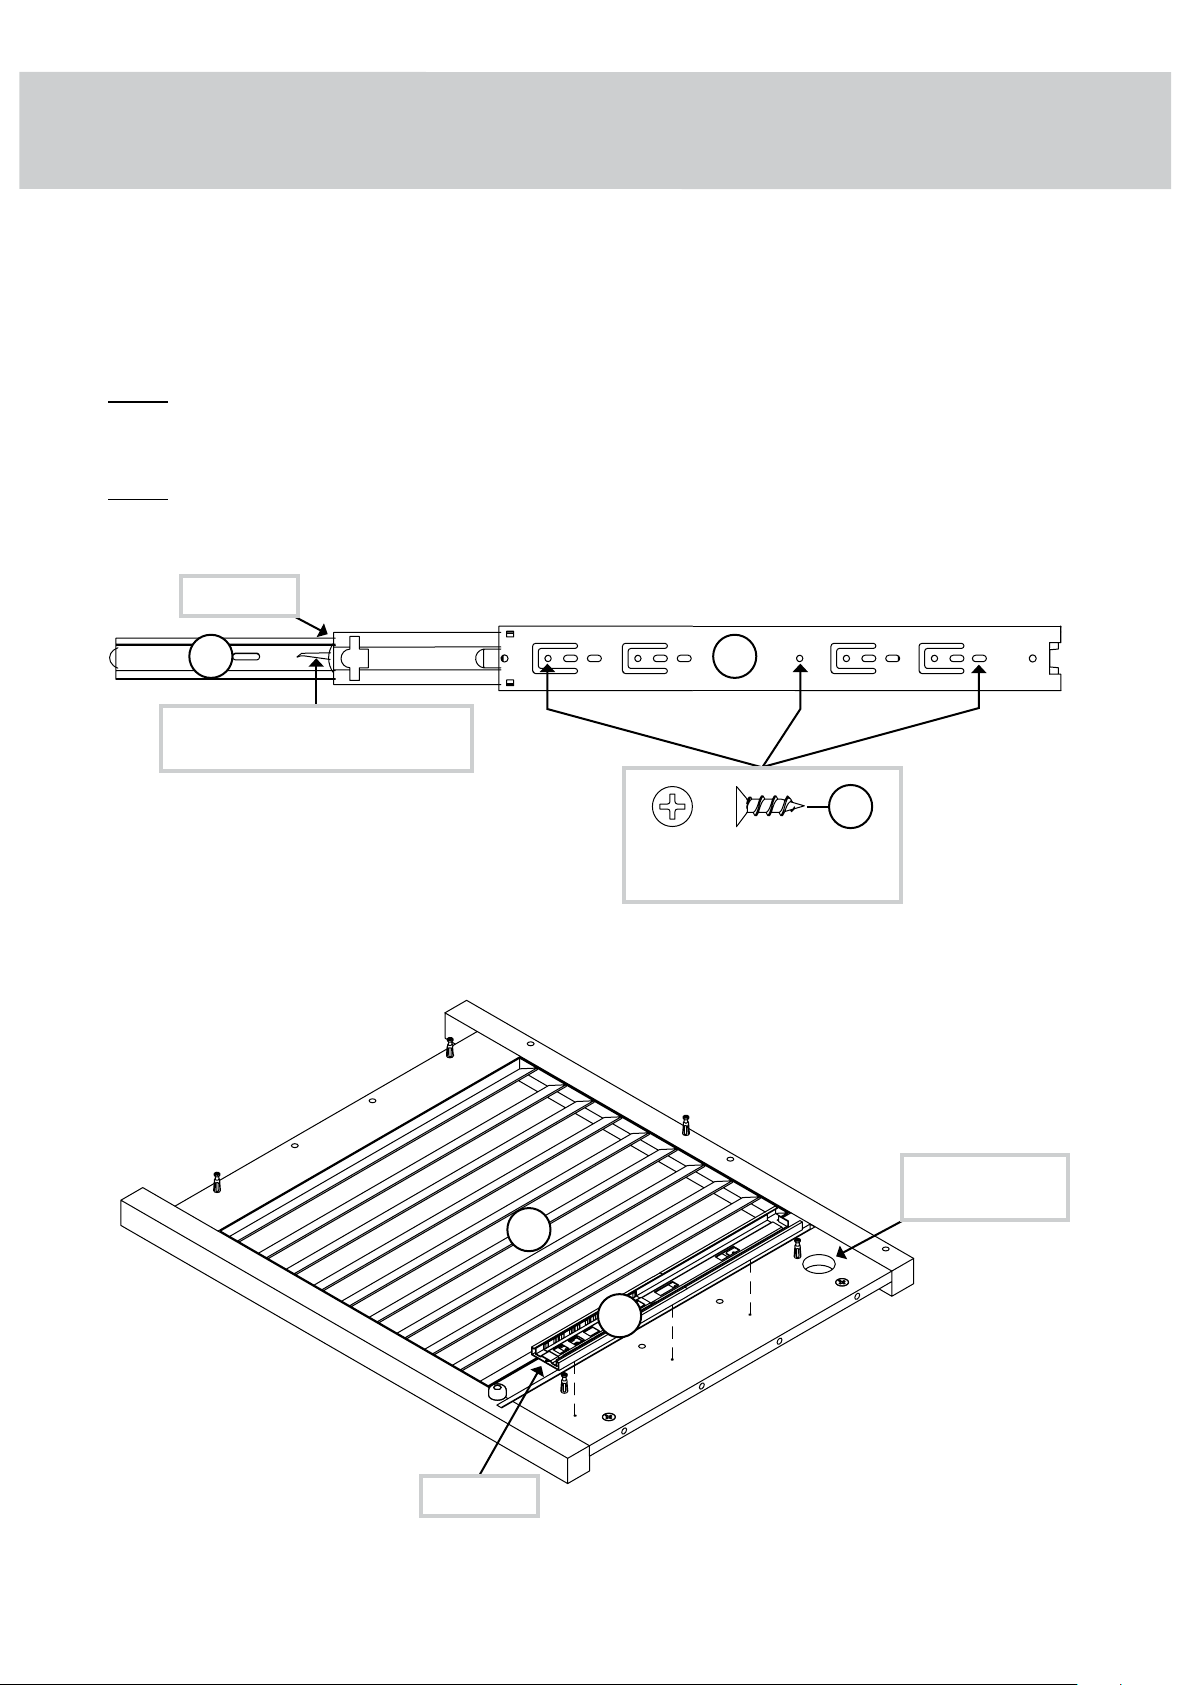
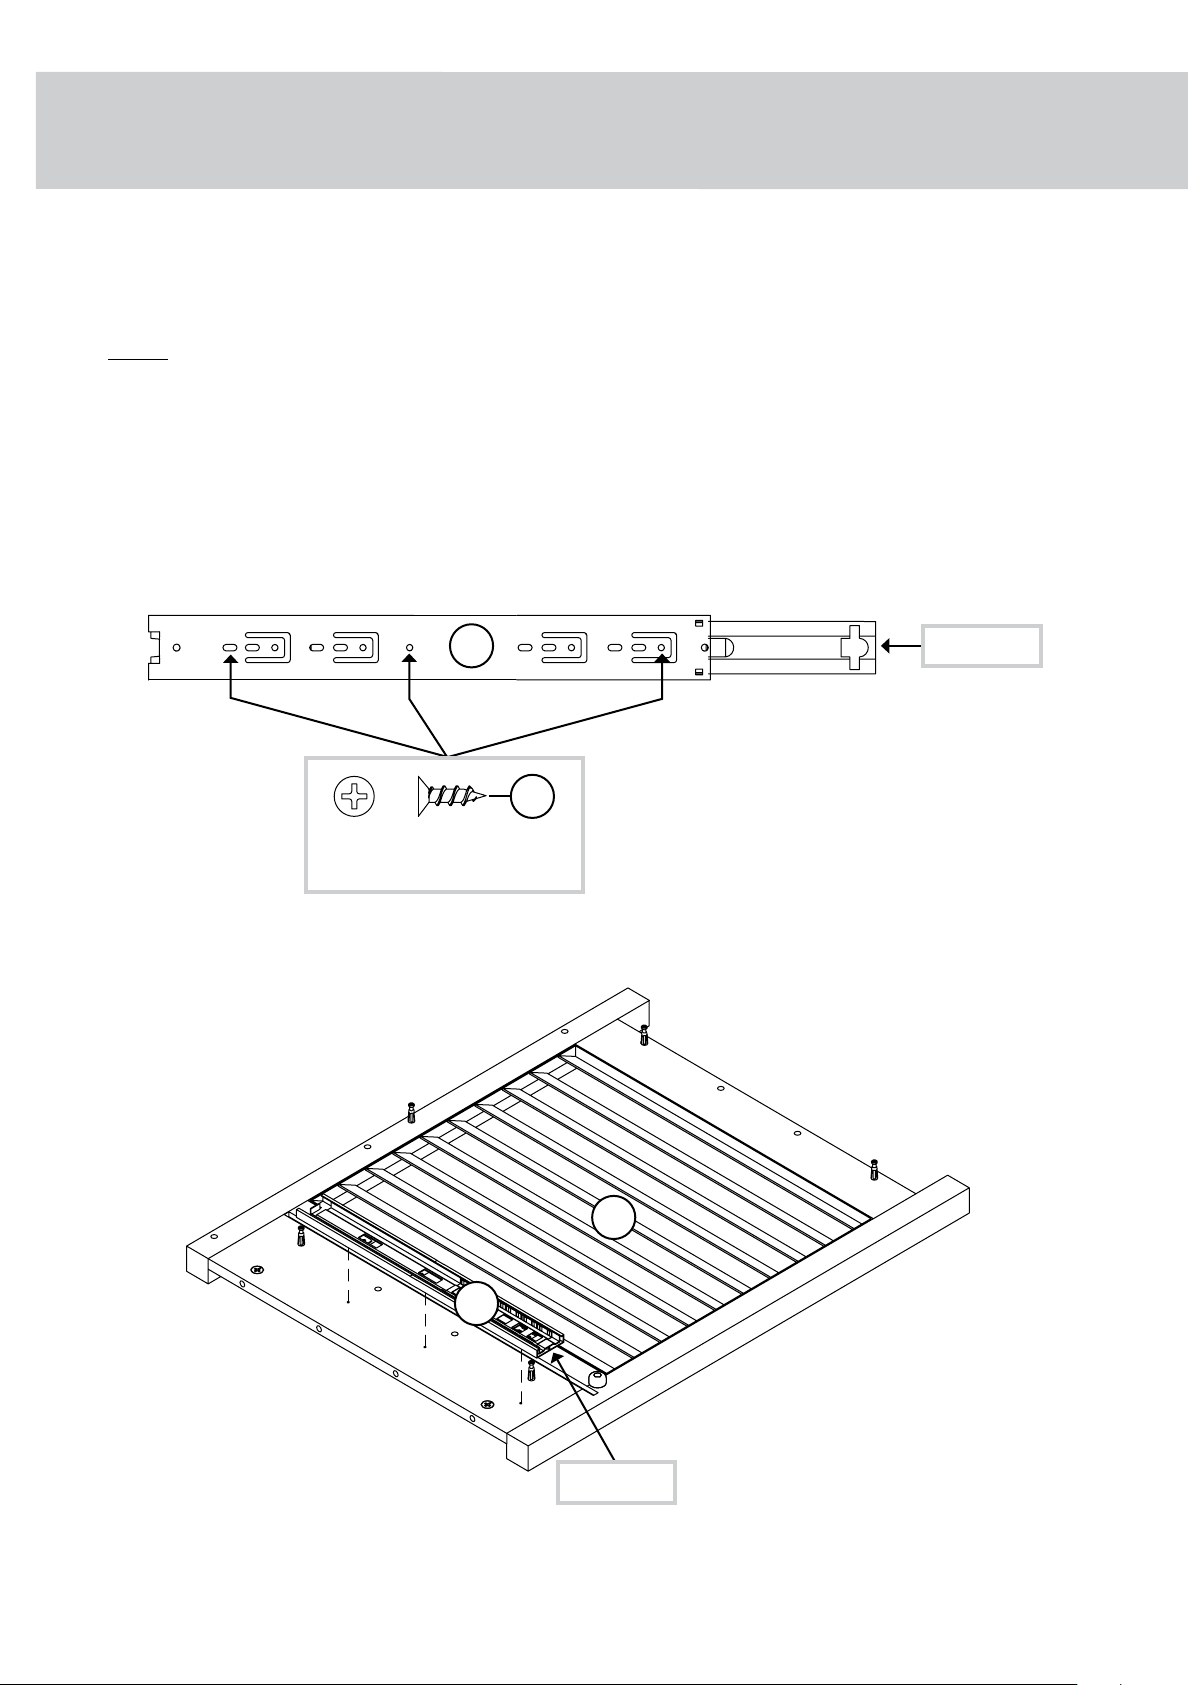
STEP 8
429421 whiskersupport.com
Page 14
å Separate the EXTENSION SLIDES (2) from the EXTENSION RAILS (1) as shown in the upper
diagram below. Be prepared, the parts are greasy.
å Fasten one EXTENSION RAIL (1) to the RIGHT END (G). Use three 1/2" FLAT HEAD SCREWS (23).
å NOTE: For each EXTENSION RAIL, turn a SCREW into the 1st hole shown in the diagram.
Then, slide the inner cartridge of the EXTENSION RAIL in to nd the other holes that line up
with the holes in the END. Turn a SCREW into each hole.
å NOTE: The EXTENSION SLIDES will be used later for the DRAWER.
12
Open end
Push the black lever and pull
the SLIDE from the RAIL.
G
The large hole
must be here.
1
1/2" FLAT HEAD SCREW
(3 used in this step)
23
1st
1st
Open end
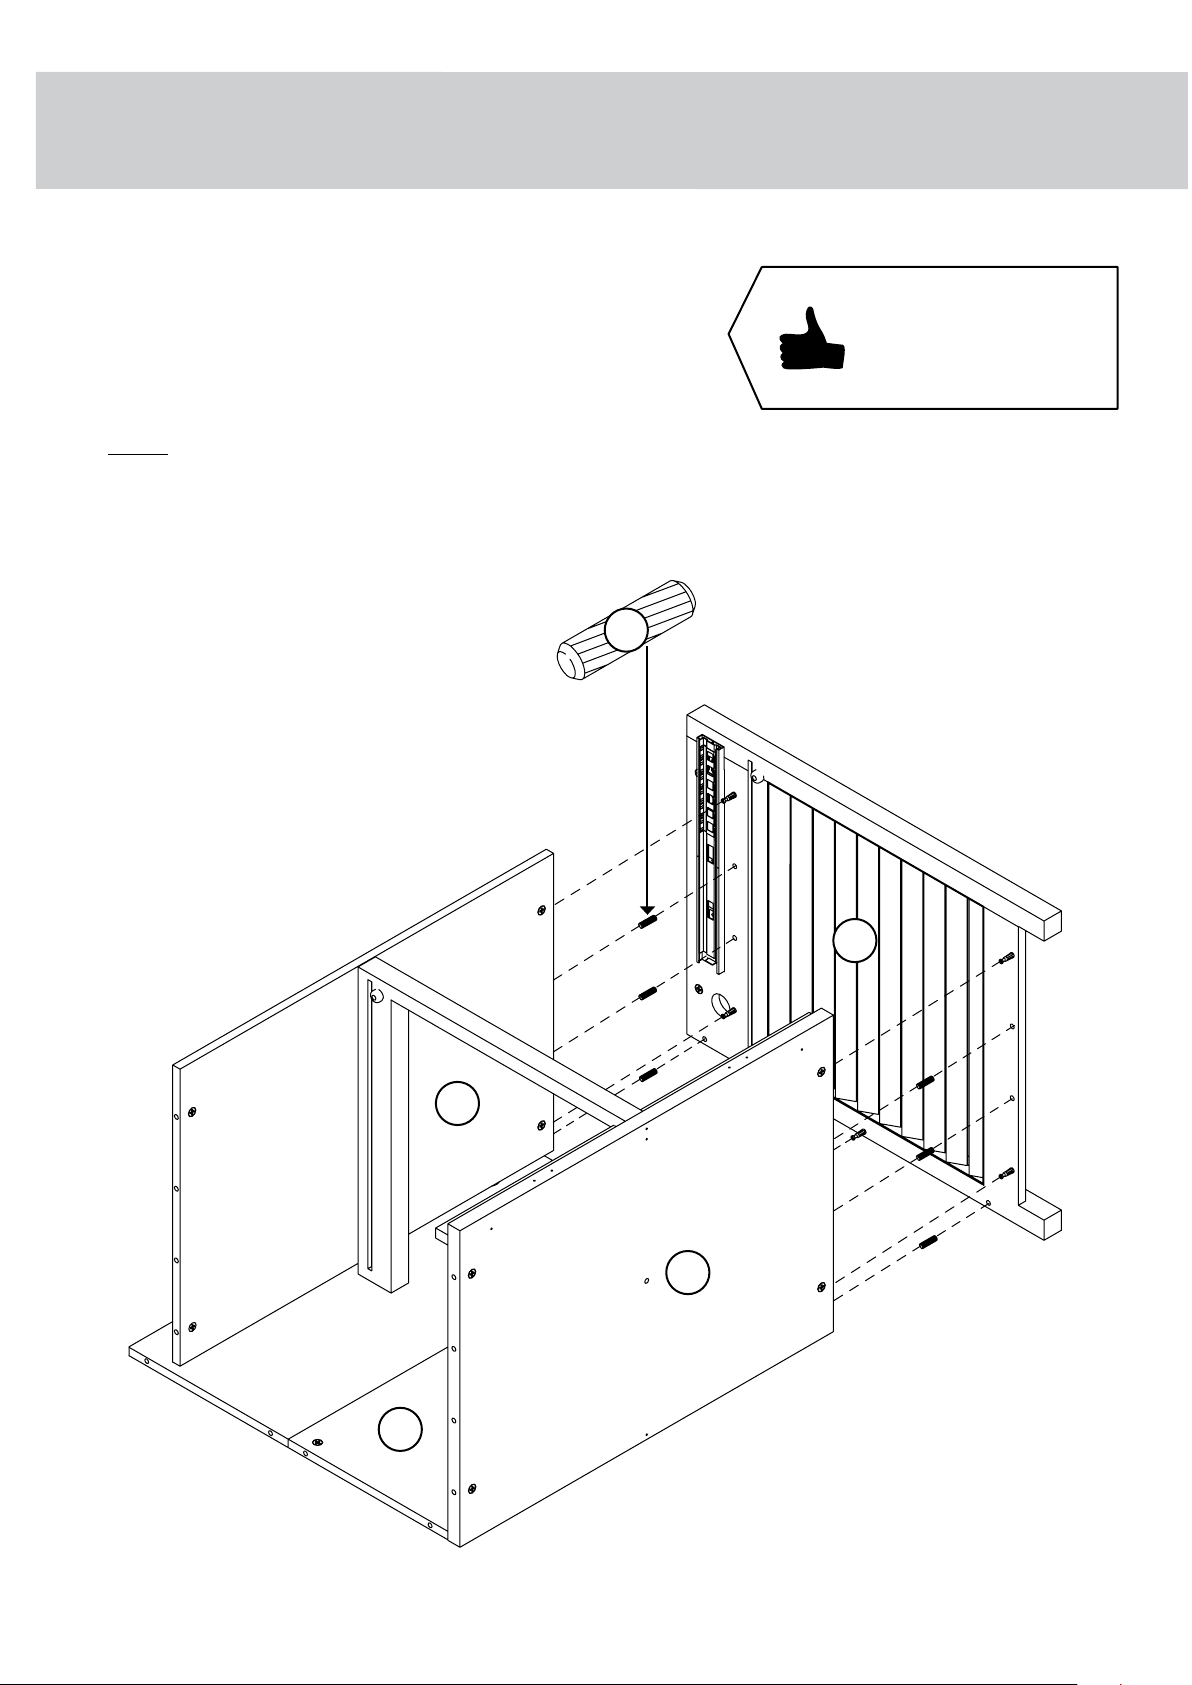
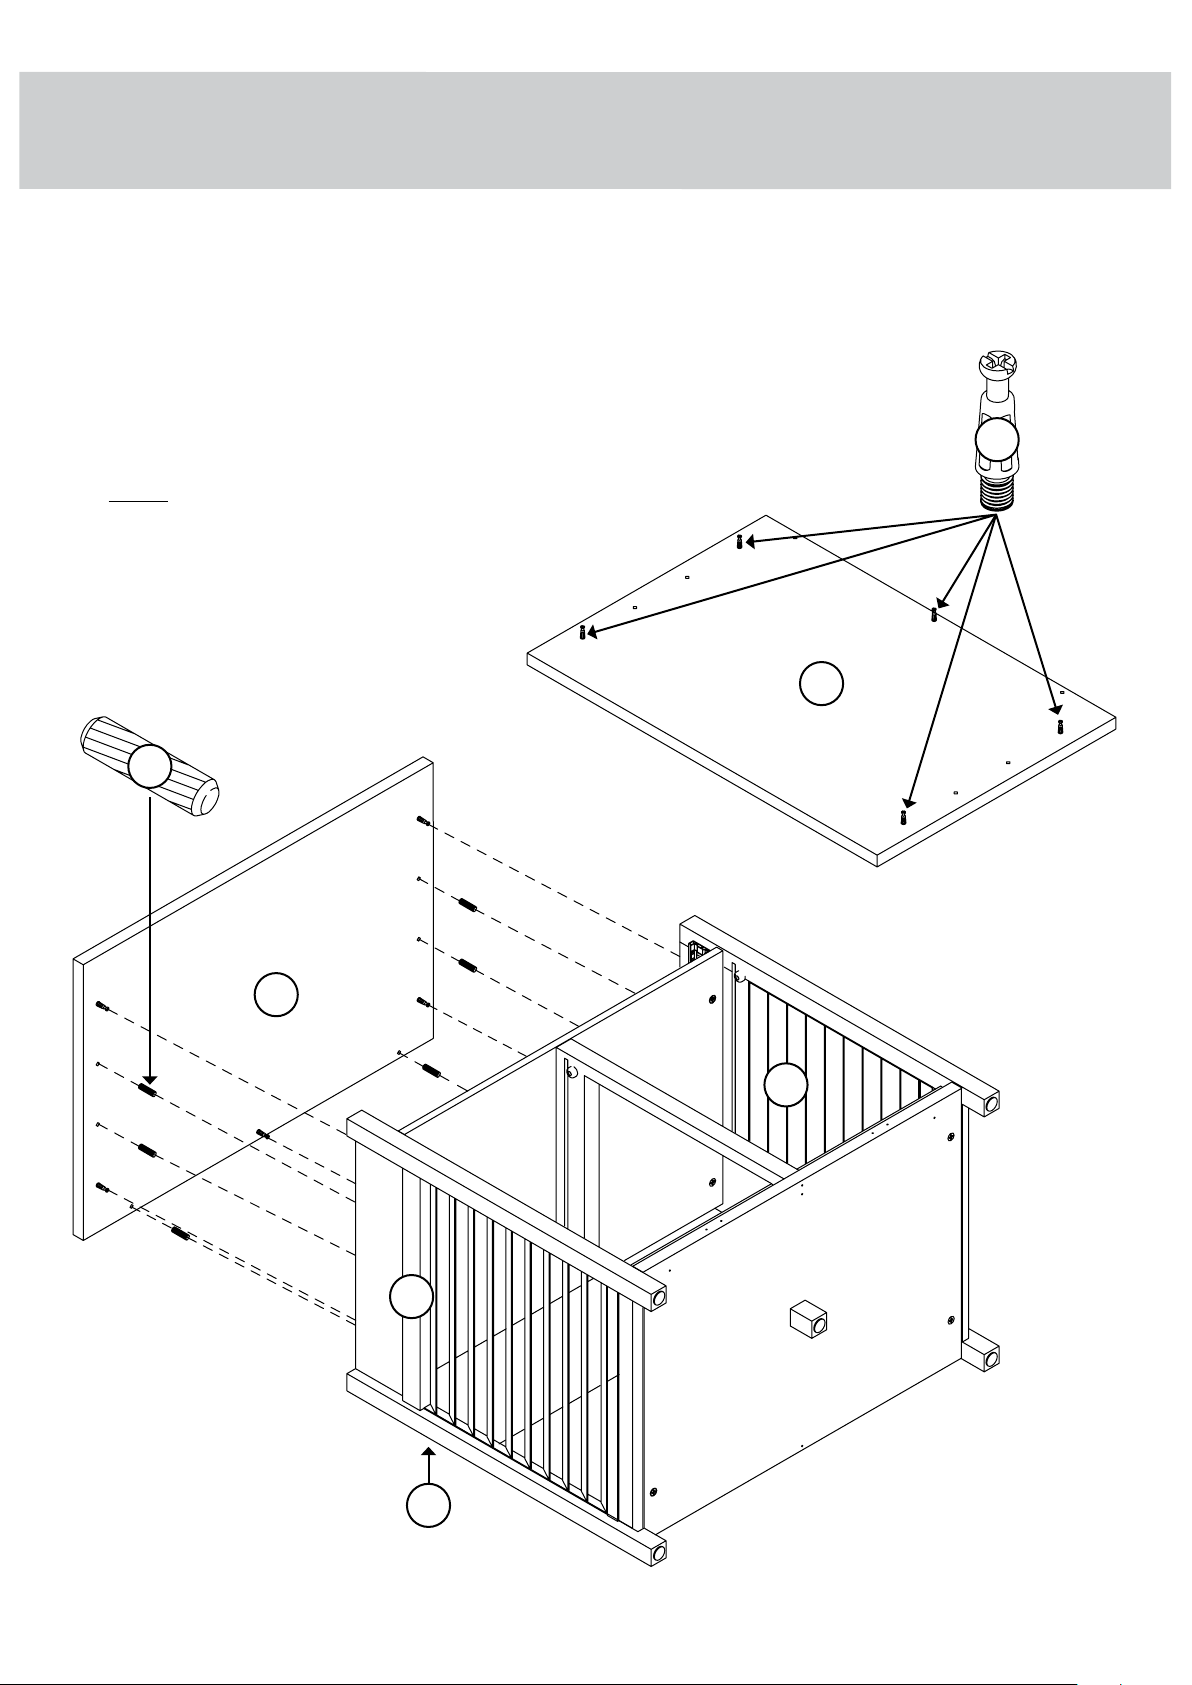
å Insert seven LARGE WOOD DOWELS (5) into
the RIGHT END (G).
å Fasten the RIGHT END (G) to the SHELF (B),
BOTTOM (C), and LOWER BACK (E). Tighten
ve HIDDEN CAMS.
å NOTE: Be sure the WOOD DOWELS in the
END insert into the SHELF, BOTTOM, and
both BACKS.
STEP 9
429421whiskersupport.com Page 15
5
(7 used)
B
C
E
G
Hey! It's starting
to look like
something!
STEP 10
429421 whiskersupport.com
Page 16
å Turn ve CAM SCREWS (4) into the LEFT END (F).
å Push two HIDDEN CAMS (3) into the LEFT END (F).
å Fasten one BUSHING (7) to the LEFT END (F). Use
one 9/16" MACHINE SCREW (21).
4
7
9/16" MACHINE SCREW
(1 used in this step)
21
F
Arrow
3
å Fasten one EXTENSION RAIL (1) to the LEFT END (F).
Use three 1/2" FLAT HEAD SCREWS (23)
.
å NOTE: For each EXTENSION RAIL, turn a SCREW into
the 1st hole shown in the diagram. Then, slide the
inner cartridge of the EXTENSION RAIL in to nd the
other holes that line up with the holes in the END.
Turn a SCREW into each hole.
STEP 11
429421whiskersupport.com Page 17
F
Open end
1
1st
1
1st
1/2" FLAT HEAD SCREW
(3 used in this step)
23
Open end
STEP 12
429421 whiskersupport.com
Page 18
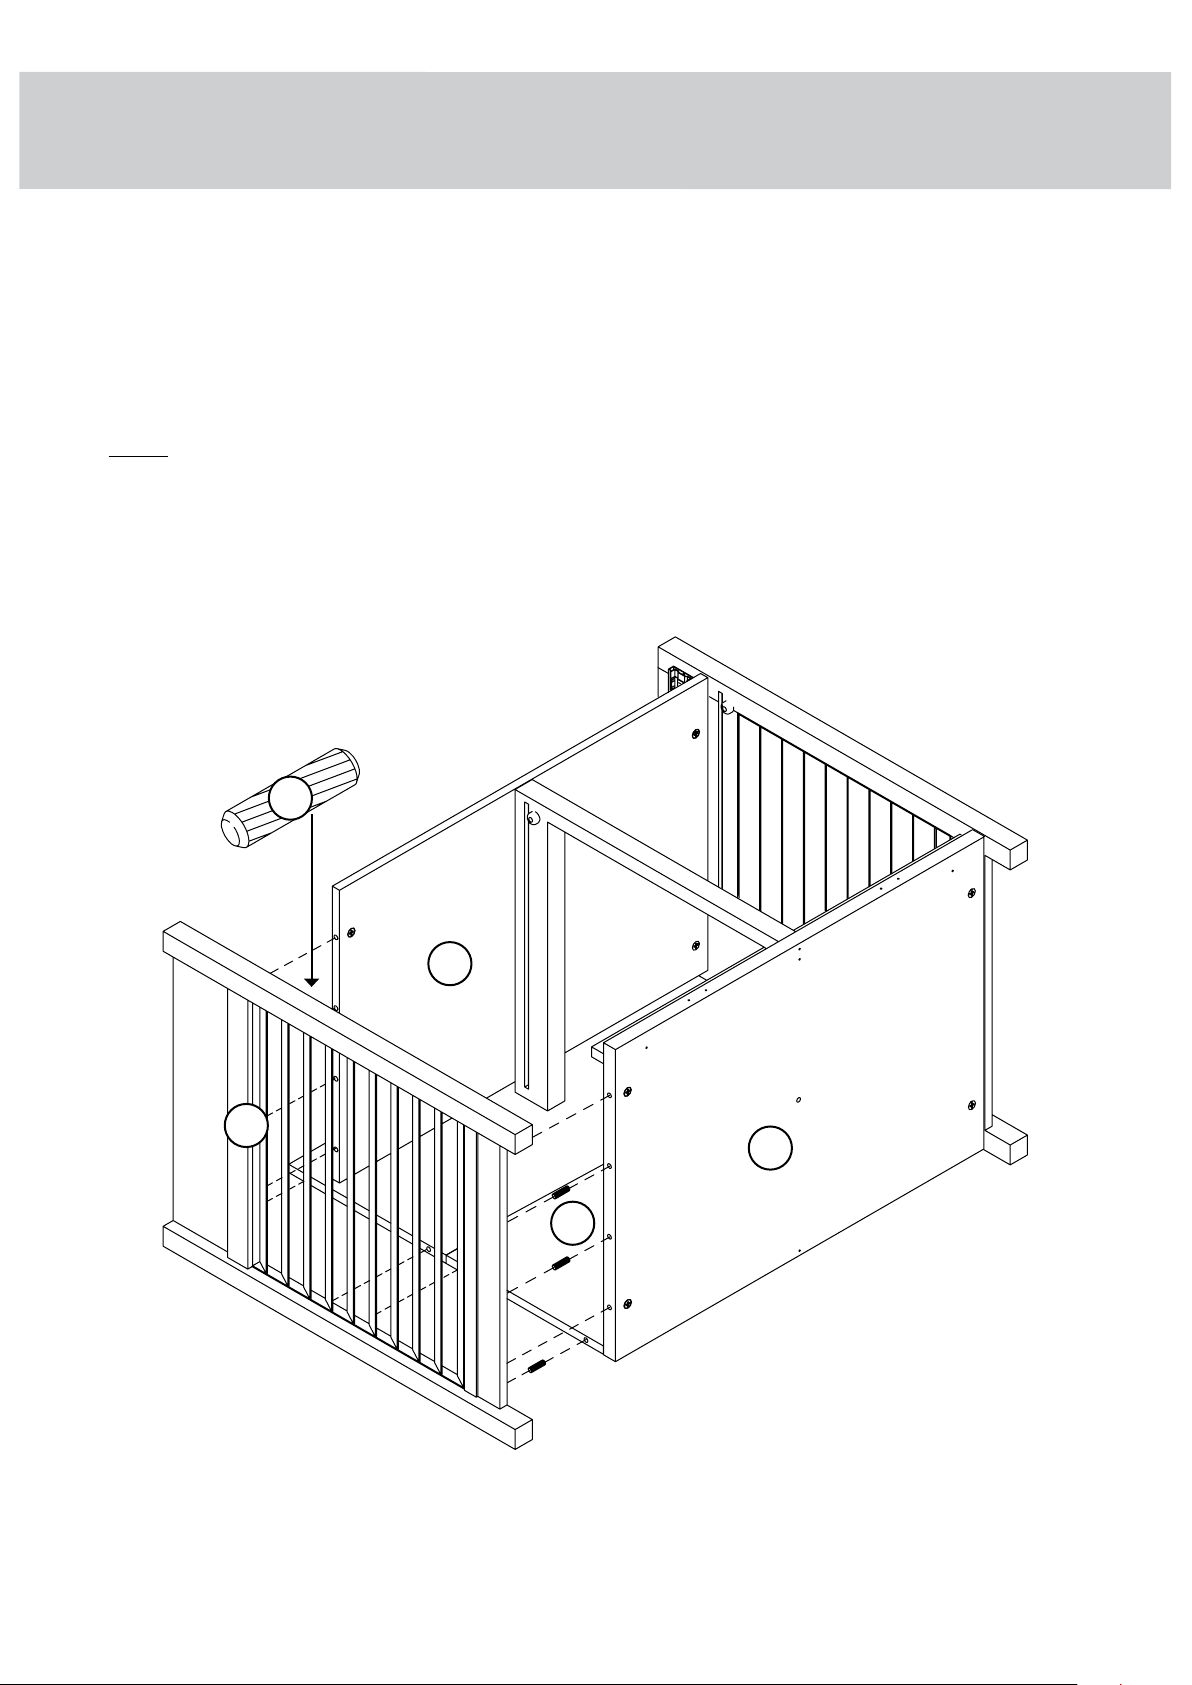
å Insert seven LARGE WOOD DOWELS (5) into
the LEFT END (F).
å Fasten the LEFT END (F) to the SHELF (B),
BOTTOM (C), and LOWER BACK (E). Tighten
ve HIDDEN CAMS.
å NOTE: Be sure the WOOD DOWELS in the
END insert into the SHELF, BOTTOM, and
both BACKS.
5
(7 used)
B
C
E
F
å Fasten the FOOT (K) to the BOTTOM (C).
Tighten one 2" HEX HEAD SCREW (16) using the
L-WRENCH (15).
å Peel FELT DISCS from the FELT DISC CARD (12)
and stick them onto the FOOT (K) and each LEG.
STEP 13
429421whiskersupport.com Page 19
15
K
C
2" HEX HEAD SCREW
(1 used in this step)
16
12
å Turn ve CAM SCREWS (4) into the TOP (A).
å Insert six LARGE WOOD DOWELS (5) into
the TOP (A).
å Fasten the TOP (A) to the UPPER BACK (D)
and ENDS (F and G). Tighten ve
HIDDEN CAMS.
å NOTE: Be sure the WOOD DOWELS in the
TOP insert into the BACK and ENDS.
STEP 14
429421 whiskersupport.com
Page 20
4
F
G
A
A
D
5
(6 used)
Other whisker Pet Care Product manuals

whisker
whisker Litter Robot User manual

whisker
whisker Litter-Robot 4 User manual

whisker
whisker Litter-Robot 3 User manual

whisker
whisker litter robot 3 User manual

whisker
whisker Litter Robot User manual

whisker
whisker Litter-Robot 4 User manual

whisker
whisker Litter Robot User manual

whisker
whisker Litter-Robot 4 User manual

whisker
whisker Litter-Robot 3 User manual


