WH-TANK2
(Not Supplied)
Hot water inlet to faucet
(Silicone Tube)
Black Label
Hot Water Tank Inlet
Hose 1/4” Compression
Blue Label
Water Supply Hose 3/8”
Compression
Water Supply Inlet Stop
(Not Supplied)
Water Filter Optional
(Not Supplied)
*Not Recommended
for RO Filters
Important Note To
Installers & Customers:
Vented Faucets do not shut o like
standard faucets! The valve shuts
o pressure in front of the hot tank.
The water pressure may cause
water to run out of the end of the
faucet spout. This is normal for a
vented faucet and should not be
mistaken for a valve defect or leak.
Installation:
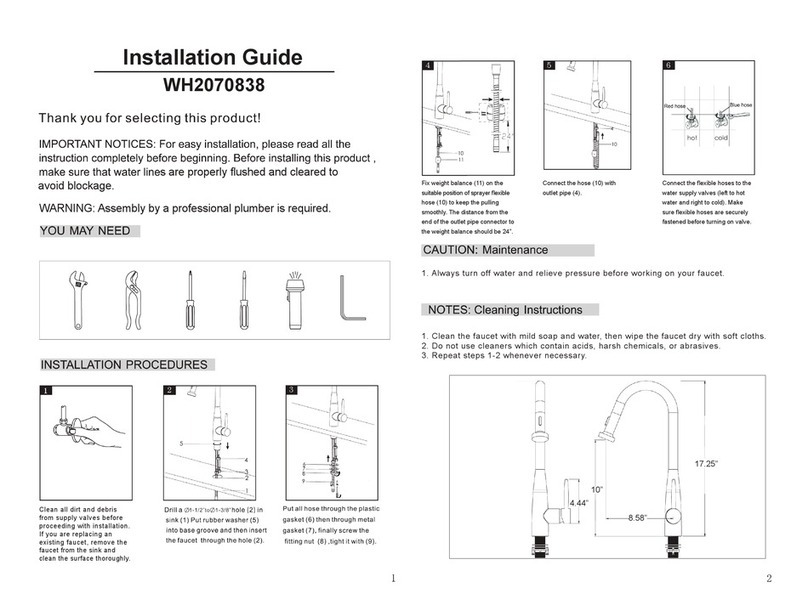
1. Place a small bead of silicone seal around the base of the faucet and insert faucet through
sink. Using mounting nut and washer, fasten faucet to sink. Do not over tighten.
2. Attach rubber line to mounting nipple using a nylon pinch clamp
3. Attach cold water inlet line to cold water supply line.
4. Mount Hot water tank to cabinet wall and hang tank on bracket. DO NOT PLUG IN TANK
5. Attach cold supply from faucet to corner inlet of tank
6. Attach adapter to tank outlet and attach rubber hose to tank with the other pinch clamp.
7. Turn on water supply and check for leaks. Open faucet handles to purge air from the
system.
8. Hold hot handle open to ll the tank with water. Check for leaks. Now plug in tank and turn
knob on.
9. Allow tank to come to temperature - empty completely to rinse debris from system.
Warranty:
Whitehaus Collection Point of Use Hot Water Faucets are warrantied to be
free of manufacture’s defects on both material and workmanship for a period
of 1 year. Finishes: Polished Chrome, Brushed Nickel, Polished Nickel, and Oil
Rubbed Bronze are warrantied for 1 year. Damage to a product caused by
accident, misuse, abuse, or improper installation is not covered by the
warranty. This includes improper care and cleaning or use of plumber’s putty
on our products. Silicon sealing compounds should only be used. Proof of
purchase (original sales receipt) must be provided with all warranty claims.
Whitehaus Collection is not responsible for labor charges, installation, or other
incidental or consequential costs. Liability under warranties expressed or
implied is limited to replacement of defective goods only.
Care and Cleaning
All decorative nishes are protected by the strongest nish while maintaining
their luxurious appearance. While some nishes are more durable than others,
no nish is indestructible. All products should be cleaned with a soft cloth and
mild, non-abrasive soap.
Installation Instructions:
Hot Tanks:
After hot water has been dispensed during normal usage, the tank immedi-
ately starts the reheating process to bring the water in the tank back up to the
temperature the customer has set on the thermostat. During that time, the
water will expand and sometimes condense on the inside of the spout deliv-
ery tube and the unit may drip for a couple of minutes until the water in the
tank reaches the set temperature. Normally, the heating process at startup or
re-heating from a completely cold tank (two quarts) to the highest temperature
setting take no more than 20 minutes. Again, this is normal for a vented faucet
system. However, excessive pressure is not recommended for the hot tank
installation, and recommended no more than 60 psi of incoming water pres-
sure to provide the maximum performance from your system.
Water pressure:
Inlet pressure above 60 psi may cause the water to “cavitate’ inside the
ltration system when water is dispensed. This creates tiny air bubbles and
results in water that looks cloudy. If the water is left to stand and clears after a
few minutes it veries an overpressure condition in the ltration system - not
a defect on the faucet, chiller, or hot tank. If the water remains cloudy, check
the water source or ltration system. As always, never run hot water through a
lter system.
*Forever Hot (WH-TANK2) tank is recommended for Whitehaus hot point of use faucets.
Inlet Tube
Mounting Tube
Out To Tank
Hot
Handle
Inlet Tube
Mounting Tube
Out To Tank
Hot
Handle


