Wichard ProFurl Spinex 0.9 User manual

MANUEL DE MONTAGE
INSTALLATION MANUAL
www.profurl.com
®
Emmagasineur de spi asymétrique
Top down spinnaker furler
inex
0.9
inex
1.5
inex
2.5
inex
5.0
inkit
0.9
inkit
1.5
inkit
2.5
inkit
5.0
Indice A

2
Lexique / Glossary
Sphères / Balls
Terminaison inférieure du câble
Lower end terminal - tting
Emerillon d’amure libre
Tack swivel
Manille - point d’amure /
Shackle - tack point
Séparateurs /
Bearing lock
Poulie crantée NEX /
NEX spool
Emerillon NEX /
NEX swivel
Cosse pour translage /
Sail lashing point Terminaison supérieure du câble
Upper end terminal - tting

3
Note aux installateurs
Ce manuel devra être remis à l’utilisateur qui en prendra connaissance avant l’utilisation du matériel. Il devra être
conservé à bord.
Note to riggers
This installation manual should be given to the boat owner, who should read it before using the system. It must be kept
on board for future needs.
Réception du matériel
et émettre toutes réserves ou exercer tous recours à l’encontre du transporteur dans les délais réglementaires.
Receipt of goods
All goods must be checked on delivery and the purchaser should claim from the carrier within seven days in the event
of loss or damage.
TABLE DES MATIERES / CONTENTS
p. 4 Spinex components
Outillage nécessaire p. 4 Tools needed for tting
Installation du câble p.5-9 Cable installation
Installation de la voile p.10 Sail installation
p.11 NEX installation
p.11 First use
Conditions de garantie p.12 Warranty
Terminaison supérieure du câble
Upper end terminal - tting
Note pour l’installation
Pour une installation plus facile, il est recommandé d’orienter le bateau bout-dehors face au ponton.
Note for an easier installation
To enable an easier installation, it is recommended to turn the boat with the bow sprit facing the deck.

4
COMPOSITION D’UN SYSTÈME SPINEX
spinex components
SPINEX includes the spool, the swivel, the anti-torsion rope with balls, the terminals and the swivel tack point.
The cable must be cut at length. Besides that operation, the system is ready to be used
OUTILLAGE NECESSAIRE ,
TOOLS NEEDED FOR FITTING
Deux bouts pour lashing
Two lashing lines
Colle Frein Filet
Threadlocker
Fourni / You have
Tournevis Cruciforme
A crossed screwdriver
A fournir / You need
1 Couteau / A knife
A fournir / You need
Fourni / You have Fourni / You have Fourni / You have
Clé 6 pans creux
An allen key
Vis à bois
A wood screw
3 vis inox
3 screws
+ + + +
+
A fournir / You need

5
INSTALLATION DU CABLE:
Déterminer la longueur
INSTALLATION OF THE CABLE:
Determining the correct length on the cable
La procédure consiste à déterminer la longueur du câble anti torsion nécessaire. Pour cela il faut installer la
terminaison supérieure sur le mécanisme inférieur.
The procedure for determining your CABLE length and terminating, will start by installing the cable UPSIDE
DOWN : top tting is inserted into the spool and bottom tting with swivel is hoisted with the halyard.
Seq. 1
Insérer la terminaison d’emérillon
sur le mécanisme de tourelle.
Insert the top tting onto the spool.
Fixer le mécansime de tourelle sur
Connect the spool to the bow tting.
Separate from the cable.
Fixer l’emérillon au point d’amure
libre / Connect the lower tting to
the swivel.
Garder l’élastique
de maintien
Keep tting and
rubber band in
place.
Seq. 2
Attacher la drisse de spi à
l’émerillon et hisser la.
Connect the swivel to
the spinnaker halyard
and hoist the cable to the
sheave block.
Etape 1 / Step 1
Seq. 3
Seq. 4

6
Etape 2 /Step 2
2
1
10
1
2
Approcher la partie inférieure du câble
mécanisme de tourelle
Approch the lower end of the cable
near to the spool while pulling down
Seq. 5
avec le haut de la terminaison.
Pick the ball that matches the top of
the tting
REMOVE all the balls below and 10
above
Attention à ne pas perdre les
Be careful not to loose the balls
off the cables
Détacher la terminaison câble du mécanisme de tourelle
Disconnect the tting from the spool.
Attention à garder l’élastique en place
Keep the rupper band in place

7
Etape 3 /Step 3
Prendre la terminaison de câble
supérieure dans votre main
logo Profurl visible.
Take the top tting in your hand
facing the Profurl logo.
Insérer le câble dans la
terminaison par la gauche.
Feed the cable inside, starting
on the left.
Tirer le câble pour mettre les
-
minaison.
Feed the cable until the balls are
packed as much as possible.
Visser temporairement la vis à
bois à travers le câble dans le
Put the temporary wood screw
through the hole above the logo
and through the tail of the rope
Attention, assu-
rez vous d’avoir
au minimum 120
mm de câble en
excédent.
Make sure you
have a minimum
of 120 mm (5
inches) tail.
>120 mm (5 inches)
Seq. 6 Seq. 7
Seq. 8 Seq. 9

8
Etape 4 /Step 4
Attacher la terminaison au mécanisme de tourelle.
Connect the tting as before to the spool.
Hisser le câble en tête. Mettre sous
tension avec le winch -.
Hoist the cable upside down using
a winch to tension the halyard
and cable. THE CABLE MUST BE
STRAIGHT ALL THE WAY UP
Si il n’est pas possible
d’avoir le câble tendu, il est
nécessaire d’enlever des
- Pour cela retourner à
l’étape 3. Le but est d’avoir
possible de la sortie de
drisse de spi.
If you are block to block:
your cable is too long: pro-
ceed to step 3 again and
remove a few more balls.
The goal is to have the
system as close to the
block to block position as
possible.

9
Etape 5 /Step 5 A
1
3
4
2Pendant que le câble est sous tension:
While the cable is under tension :
1st : insert the lower screw with threadlocker: IMPORTANT TO FIT THE
LOWER SCREW FIRST
2nd: remove the wood screw and discard
3rd: then t second screw with threadlocker
4th: then third, with threadlocker
Etape 5 /Step 5 B
Affaler le câble sur le pont. Couper l’excédent de câble en insérant la
lame du couteau dans la gorge de la terminaison.
Drop the cable on the deck. Cut the tail end of the cable using a
sharp serrated knife insert into the cut slot.

10
Etape 6 /Step 6
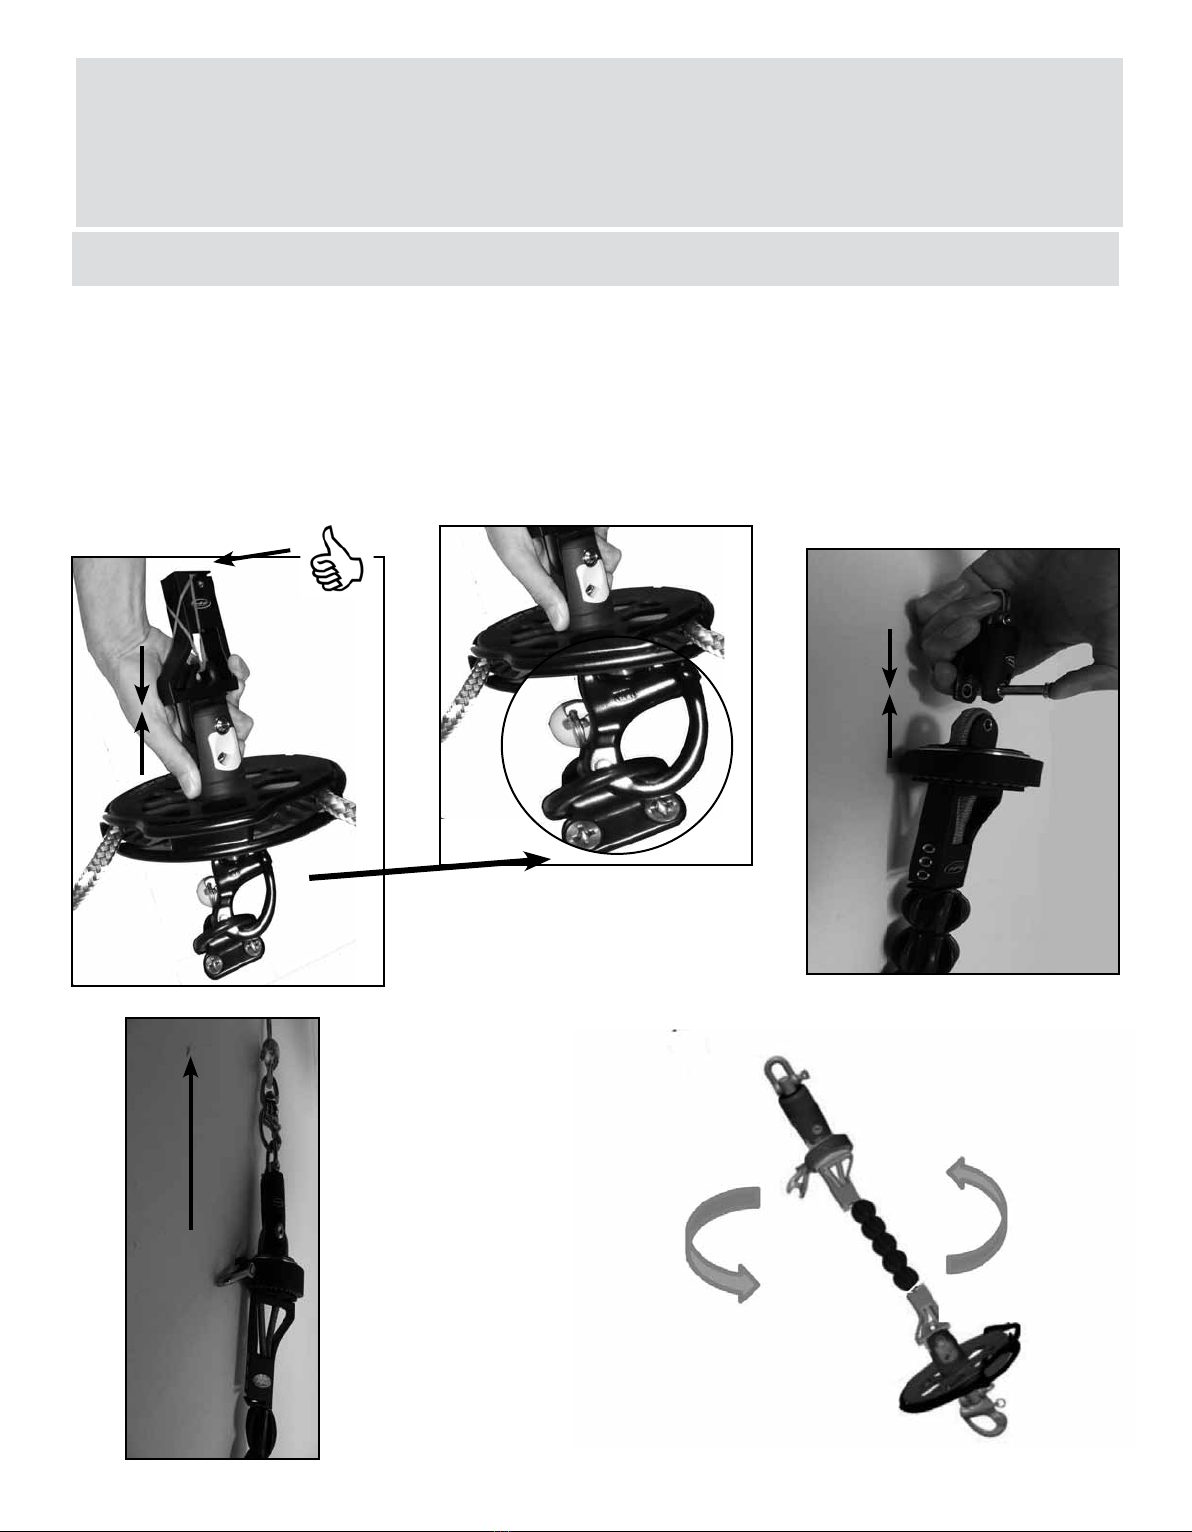
MISE EN PLACE DU SPINEX ET DE LA VOILE
SPINEX AND SAIL INSTALLATION
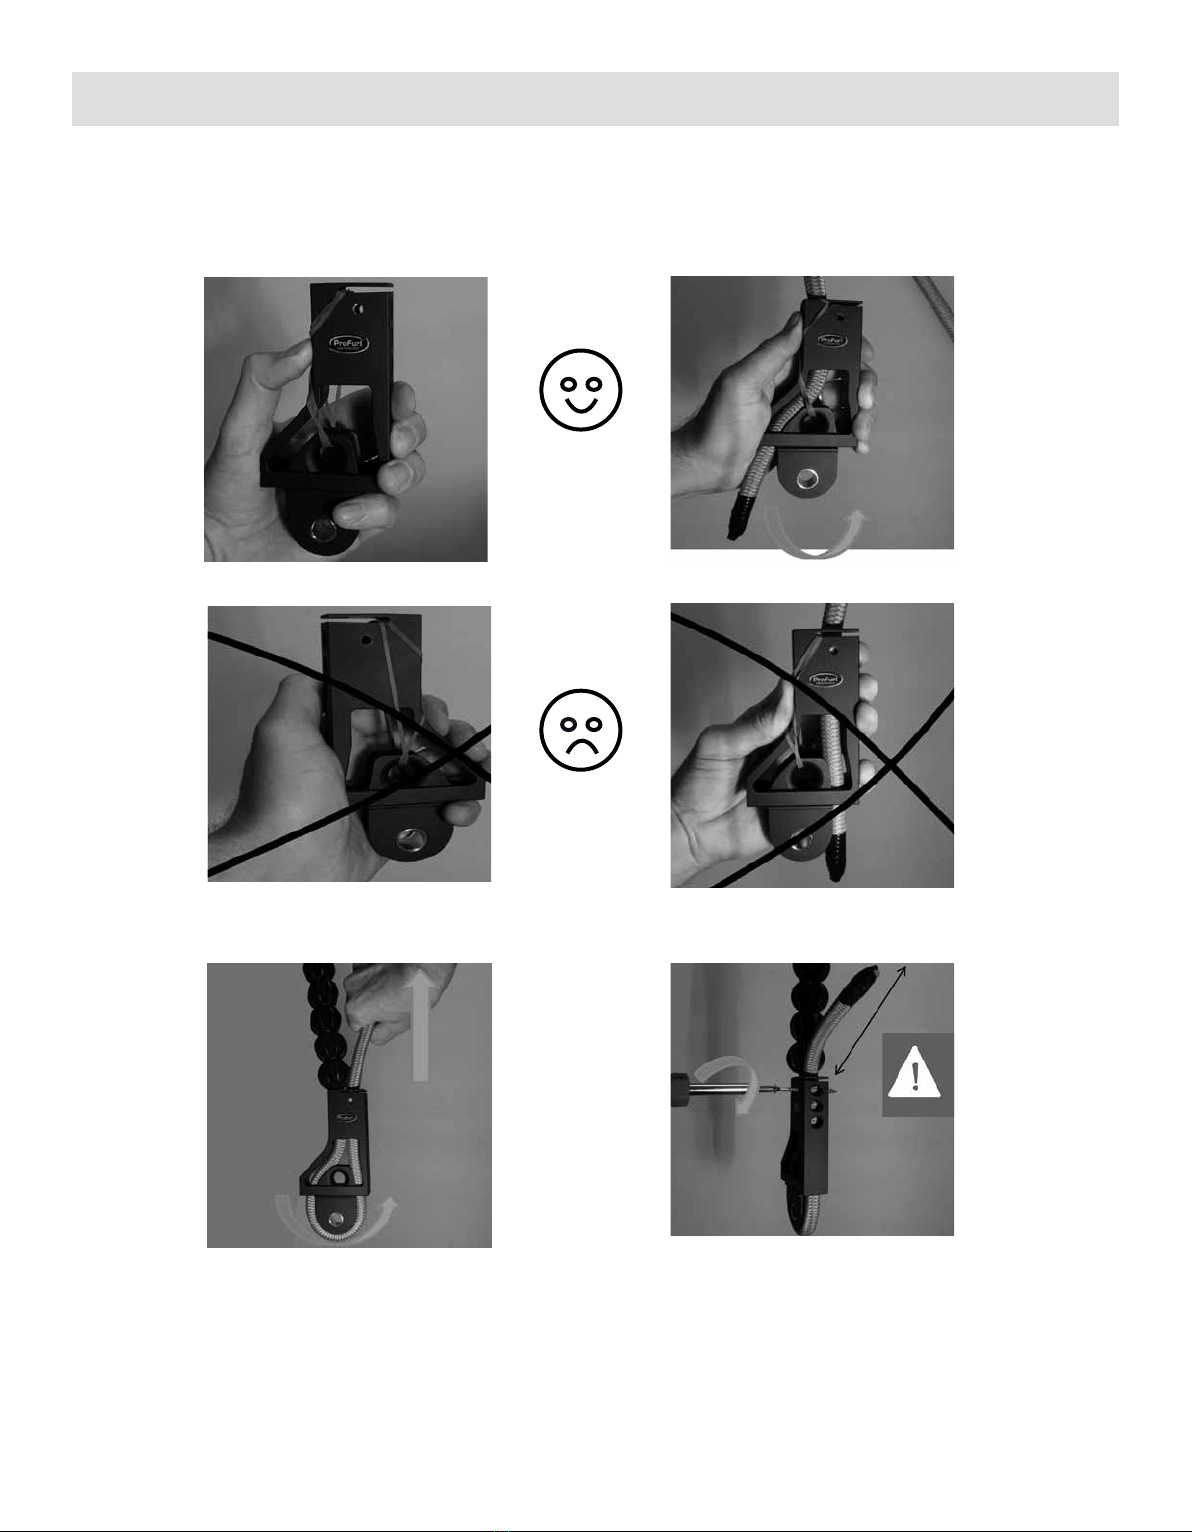
terminaison sur l’émerillon et le point d’amure libre sur le
mécanisme de tourelle.
Put the cable in its upright position.
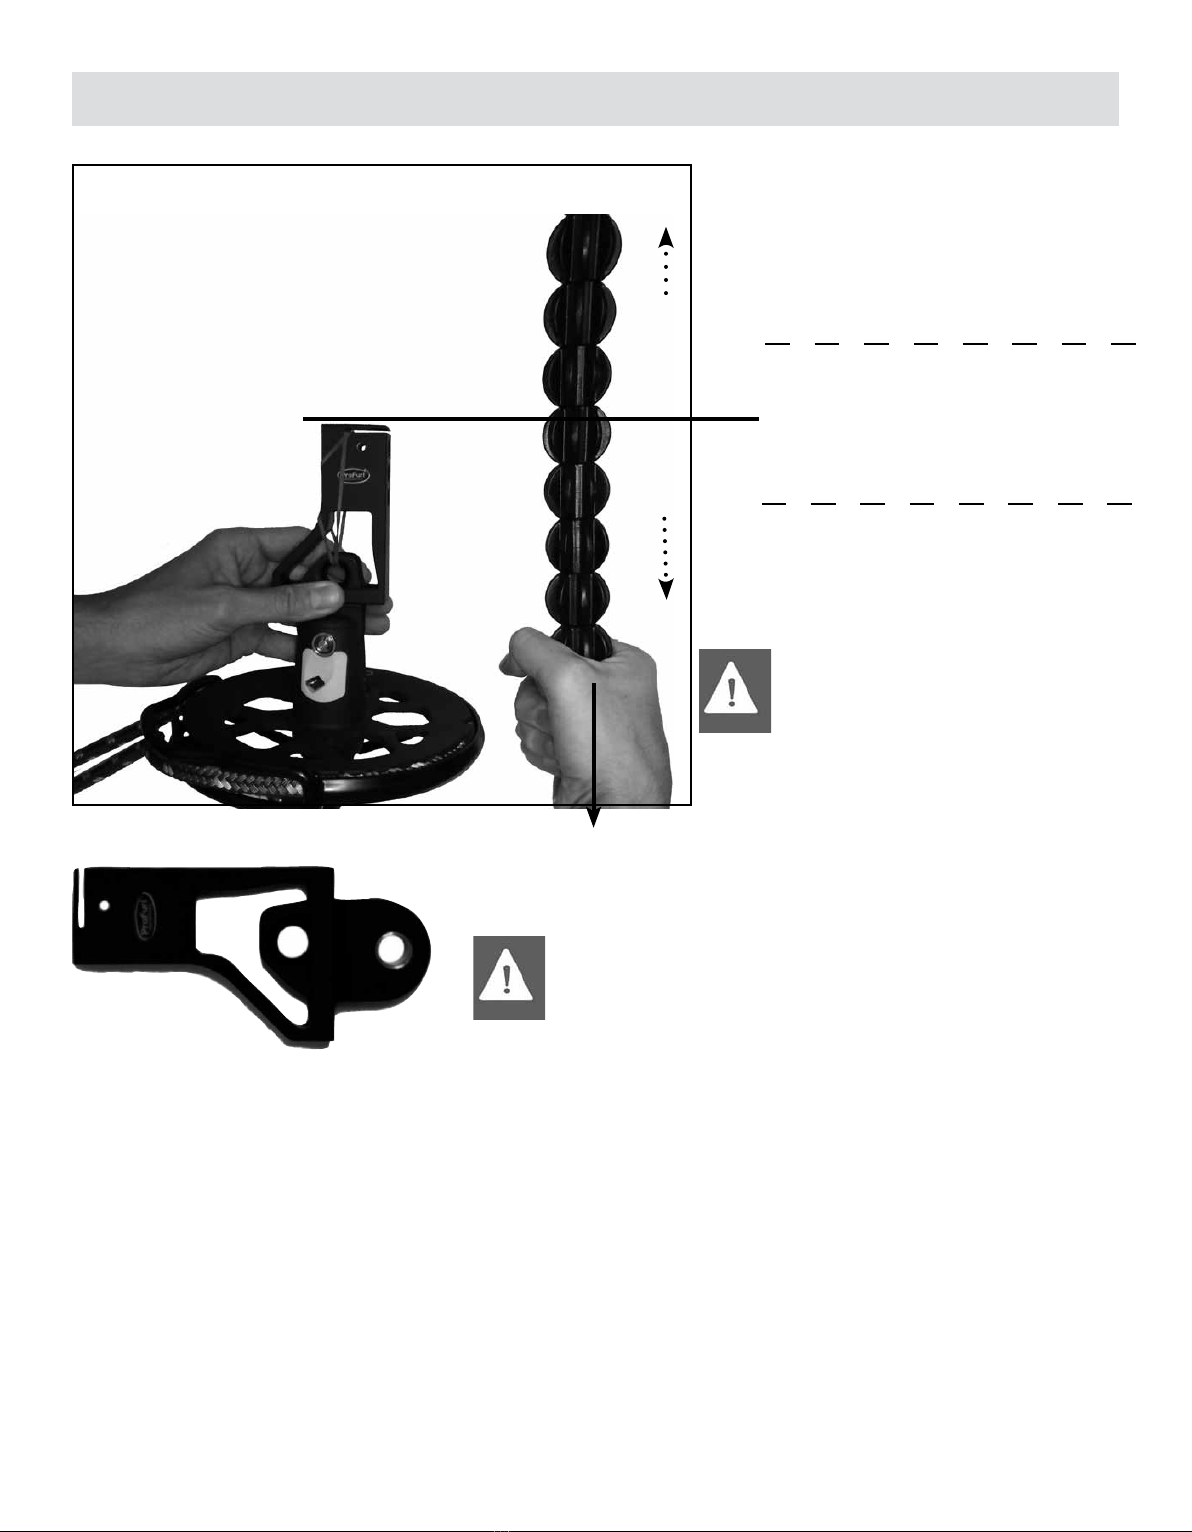
Etape 6b /Step 6b
Attacher la tétiere de votre spinnaker .
Lash the head point of the sail to the
top tting.
Attacher le point d’amure directement
sur la manille pour un guindant
supérieur ou égal à 103% de la lon-
gueur du câble
Connect the tack point directly to the
shackle for sails with luff length equals
to 103% of cable length or greater
point d’amure pour un guindant de
spi entre 98% et 103% / à la longueur
du câble. Use a loop between the
shackle and the tack point for sailss
with luff length 98% to 103% of cable
length use a lashing.
d’amure pour un guindant de spi < à
98% .
For adjustable tack height use the
optional MX shackle for luff length
shorter than 98% of cable length.
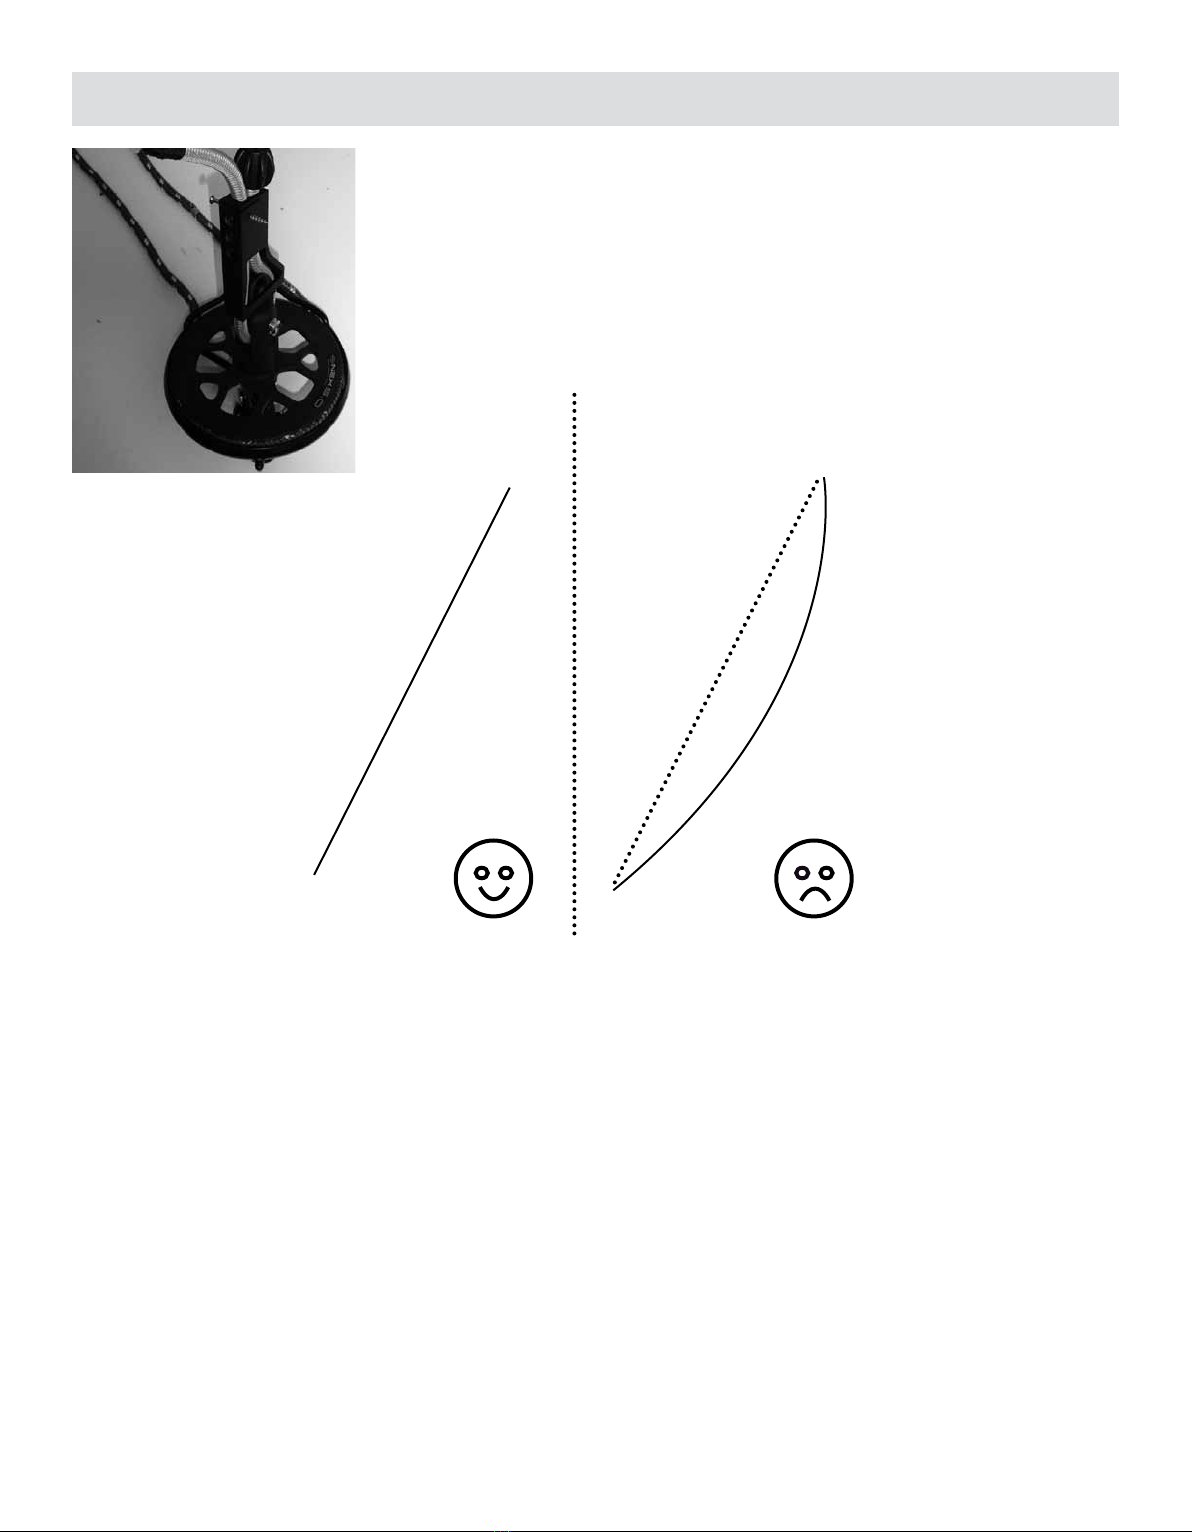
Attention l’estrope ne doit pas dépasser
90 cm et ne doit pas mettre en tension le
guindant de la voile.
Note the lashing must not be longer than
36 inches. Must not tension the luff of the
sail.
Il n’est pas necessaire de prendre de la
tension avant l’enroulement mais il est
important de relacher le point d’amure
it is not necessary to tension the line
before furling but it is necessary to
release the line to nish the furl

11
INSTALLATION DU SYSTEME NEX
NEX INSTALLATION
-
To install the NEX mechanisms (spool and swivel) as well as to t the terminals and the spliced furling line, PLEASE
read the manual delivered together with the NEX.
First hoist:
This is the most difcult part of the installation :
Choose weather conditions that are very light. Ensure sail is not twisted around sheets and tack.
Prepare your furling line: run it along the deck, both lines parallel, loose the purchase and connect the snap hook as
far aft as you can. Hoist the cable and sail together
First furl:
Tension the furling line to ensure the furling line is engaged into the drive unit
Pull one of the side of the furling line and furl the entire sail away, and allow the sheets to wrap around the furled sail,
spiraling down, to avoid the wind from trying to unfurl the sail.
First unfurl:
Release the furling line to a point where the furling line is slack. This disengages the furling line from the spool. Pull on
leeward sheet as sail unrolls. As the wind catches the sail, it will accelerate the unrolling until fully deployed.
If you nd the sail is not unrolling when you pull on the sheet:
- rst check that the furling line is slack, if this does not solve the problem then:
- pull on the furling line this will release the sail.
PREMIERE UTILISATION
FIRST USE
Envoyer la voile pour la première fois:
Cette étape est la plus délicate de l’installation:
point d’amure.
mousqueton de la tourelle sur le point prévu à cet effet. Hissez le câble et la voile en même temps.
Premier enroulement:
Mettez sous tension la drosse d’enroulement pour vous assuree qu’elle est bien engagée dans la poulie crantée du
autour la voile pour éviter un déroulement involontaire de la voile.
Premier déroulement:
sous le vent. Le déroulement de la voile sera accéleré également par la prise du vent dans la voile.
Si la voile ne se déroule pas en bordant l’écoute:

12
Conditions de Garantie - SPINKIT
WICHARD, Inc
Fairfax - VT05454
Tel : +1 401 683 5055
Fax :+1 802 655 4689
Free toll number: + 1 866 621 10 62
WICHARD PACIFIC Pty Ltd
Australia
Tel : + 61 2 9516 0677
Fax : + 61 2 9516 0688
Freecall from Australia: 1800 639 767
WICHARD France
Hotline / Support technique / SAV
Z.A Pornichet Atlantique
16 rue du Gulf Stream
44380 Pornichet - France
SPINKIT terms of warranty
garantie ne peuvent avoir pour effet de prolonger le délai de garantie du matériel. La garantie ne couvre pas les dommages consécutifs à un mauvais montage, à une utilisation
inappropriée ou abusive, à un accident ou à toute fortune de mer.
VERIFICATIONS IMPERATIVES
- la longueur du guindant de la voile est correcte
- l’installation correcte n’entrave pas l’utilisation du produit et des produits environnants
- les différentes vis sont correctement serrées
- la drisse, une fois la voile hissée, est correctement tendue
- Les ennuis consécutifs à ces défauts de montage ou d’utilisation, souvent constatés, ne sont pas couverts par la garantie.
PROCEDURE A SUIVRE EN CAS D’APPEL EN GARANTIE
Your PROFURL SPINKIT top down furler is warranted for a period of 3 (year) year from the date of purchase against parts and materials.
This warranty is limited to the repair and replacement of defective parts by an authorized PROFURL dealer and only after the written consent of WICHARD S.A.S (France),
WICHARD Inc, or WICHARD PACIFIC (addresses below). The warranty is void if the system is modied or repaired prior written consent of WICHARD S.A.S (France), WICHARD
Inc or WICHARD PACIFIC. This warranty covers only the WICHARD parts and materials. Any accidental damage or expenses are not covered by the warranty. This warranty does
not cover damages caused by a system which was installed or used improperly, damaged by collision, or any act of God. In the event of a warranty claim, WICHARD’s liability is
limited to the value of the system at the date of purchase. Packaging costs, shipment or custom charges are at customer’s expense.
OWNER SHOULD CHECK OR HAVE CHECKED BY A SKILLED PERSON THE FOLLOWING
After installation of the system the customer must check the following:
- the sail luff is cut at the correct length
- the anti-torque rope is not damaged (look out for any cuts, tears, wear or damage caused by use, heat, chemical, products, and so on)
- the product installation does not
- all screws are tightened
- the halyard is tight when the sail is hoisted
WHICH PROCEDURE SHOULD YOU FOLLOW IN CASE OF WARRANTY CLAIM?
• In case it is impossible for the owner to have the damage checked by a skilled person, the owner will contact WICHARD S.A.S (France), WICHARD, Inc (USA) or WICHARD
PACIFIC Pty Ltd. Please see address below.
• The defective part should be returned at owner’s expenses to WICHARD S.A.S (France), WICHARD Inc or WICHARD PACIFIC Pty Ltd within 14 (fourteen) days after the damage
occured to the system.
• In case the parts are shipped from a country outside France, USA or Australia, custom duties for return to WICHARD should be prepaid by the owner.
• In case the owner will demand urgent replacement of part before the defective part is received by WICHARD, the replacement part will be charged to the owner, and paid before
shipping (credit cards accepted). In case WICHARD’s responsibility is nally acknowledged, WICHARD will refund the owner.
• No replacement part purchased from a PROFURL dealer will be refunded to the owner.
• In the normal warranty procedure, the parts will be returned to the owner, shipping and customs at owner’s expenses.
Conditions de Garantie - NEX
Les emmagasineurs NEX ont été conçus pour fonctionner sans entretien pendant de nombreuses années. Cependant un rinçage à l’eau claire des mécanismes peut être réalisé autant de
fois que nécessaire. NE JAMAIS UTILISER DE LUBRIFIANT TYPE WD40 (ou équivalent). Les emmagasineurs NEX sont garantis 3 ans. En cas de questions, contacter notre service technique
(coordonnées ci-dessous).
Your NEX ying sail furler requires no special maintenance. You can rinse it with fresh water as often as necessary to remove salt and dirt from components. NEVER USE WD40 (or similar) on the seals in
the mechanisms as it will permanently damage them. In case of questions, contact our hotline (see contact details below). The NEX ying sail furler benets from a 3 year world-wide limited warranty.
SPINKIT terms of warranty
Other manuals for ProFurl Spinex 0.9
1
This manual suits for next models
10
Table of contents
Other Wichard Marine Equipment manuals
Popular Marine Equipment manuals by other brands

Simrad
Simrad SX90 - DATASHEET FOR NAVAL AND COAST GUARD REV... quick start guide

INIM
INIM Air2-Smarty/W Installation and programming manual

Apollo
Apollo Discovery Open Area Voice Sounder installation guide

PRM NEWAGE
PRM NEWAGE PRM 60 Workshop manual

Venitem
Venitem MINI DOGE Technical manual

Patchwork Technology
Patchwork Technology BlackBox air user guide