TM
©2007 Wild Planet Toys, Inc., San Francisco, CA 94104, USA.
All rights reserved. PRINTED IN CHINA. Product specifications subject to change.
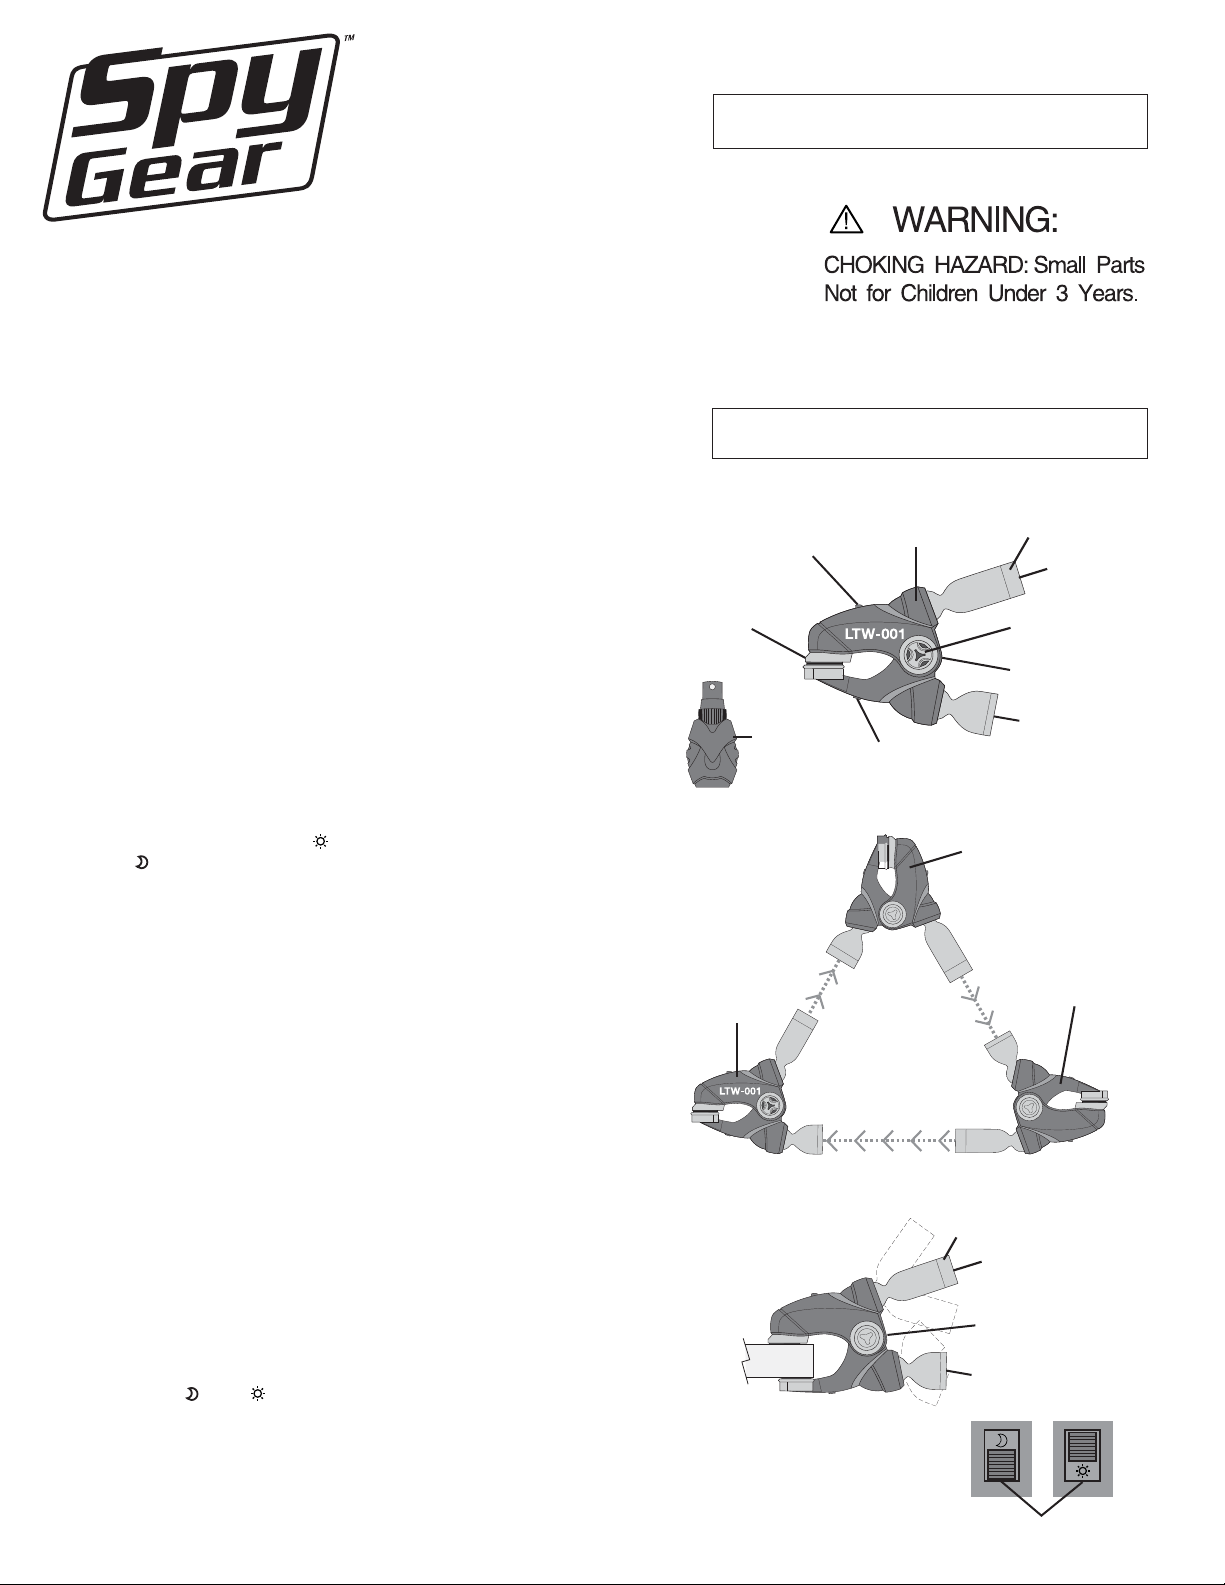
Quick spy code
Push to talk
button (PTT)
Power switch
Code key
Mic/speaker
Antenna
Push to talk
button (PTT)
Belt clip
Fig. 1 Fig. 2
HOW TO USE YOUR WALKIE TALKIES
Note: Both walkie-talkies must be switched on in order to communicate.
1. Turn the POWER SWITCH on each unit to ON.
2. To transmit, press and hold the PTT button and speak. Release the
button when you have finished speaking.
3. To send a coded message, press the CODE KEY while holding
down the PTT button.
4. IMPORTANT: Only one walkie talkie can transmit at a time.
5. Turn the power switch on each unit OFF after use.
6. When performance fades it is time to change the batteries.
TALKIE TIPS
• When you are finished speaking, say “OVER” so the other spy
knows it is his turn to talk.
• When the conversation is complete, say “OVER AND OUT.”
• To send top secret messages, follow the secret spy code
provided—or invent your own!
SECRET SPY CODE
= short beep = long beep
4 beeps
ABORT MISSION
LOOK OUT
COME HERE
ALL CLEAR
STAY UNDERCOVER
TOP SECRET
5 beeps
RED ALERT
GO FOR IT
AWAIT INSTRUCTIONS
MISSION SUCCESSFUL
BATTERY SAFETY INFORMATION
• Requires two 9V (6LR61) batteries.
• Only adults should install and replace batteries.
• Do not recharge non-rechargeable batteries.
• Remove dead or exhausted batteries.
• Insert batteries correctly. Match positive and negative signs.
• The supply terminals are not to be short circuited.
• Do not use rechargeable batteries.
• Do not mix alkaline, standard (carbon-zinc), or rechargeable
(nickel-cadmium) batteries.
• Do not mix old and new batteries.
• Only the batteries of the same or equivalent type are recommended
to be used.
• Do not dispose batteries in a fire; they may explode.
• Dispose of batteries safely.
ATTENTION ADULTS—TO REPLACE BATTERIES
The Walkie Talkies require two 9V (6LR61) batteries.
1. Use a small Phillips head screwdriver to loosen the screw
on the battery compartment. The screw will not fall out.
2. Open battery cover. Remove exhausted batteries.
3. Place new batteries in compartment as shown (Fig. 2).
4. Replace the battery cover and tighten screw.
FCC ID: N3ESPYWT70129 Made in China
This Device complies with Part 15 of the FCC Rules.Operation is
subject to the following two conditions: 1. this device may not cause
harmful interference, and 2. this device must accept any interference
received, including interference that may cause undesired operation.
Note: This equipment has been tested and found to comply with the
limits for a Class B digital device, pursuant to part 15 of the FCC
Rules. These limits are designed to provide reasonable protection
against harmful interference in a residential installation. This
equipment generates, uses and can radiate radio frequency energy
and, if not installed and used in accordance with the instructions,
may cause harmful interference to radio communications. However,
there is no guarantee that interference will not occur in a particular
installation. If this equipment does cause harmful interference to
radio or television reception, which can be determined by turning the
equipment off and on, the user is encouraged to try to correct the
interference by one or more of the following measures:
• Reorient or relocate the receiving antenna.
• Increase the separation between the equipment and receiver.
• Connect the equipment into an outlet on a circuit different from
that to which the receiver is connected.
• Consult the dealer or an experienced radio/TV technician for help.
Walkie Talkies
2 Walkie Talkies With Spy Code!
Warning: Changes or modifications to this toy that are not expressly
approved by Wild Planet Entertainment, Inc. could void the user’s
authority to operate the toy.
Warning: Do not hold close to the ear. Misuse may damage hearing.
ULTIMATE SPY KIT 70246-4000 PR 5/08
IF YOU HAVE ANY QUESTIONS, PLEASE CONTACT US AT
1-800-247-6570
WILDPLANET.COM/HELP
Wild Planet Entertainment, Inc., P. . Box 194087
San Francisco, CA 94119-4087