WildSpy CAM AC-833S User manual

InstructionManual (Ref. 833iR-1; rev. 20151110)
WildSpyCam OutdoorProducts
InfraRed (IR) Scouting TimeLapse Camera
ModelNo: AC-833S

This WildSpyCam unithasbeendesigned to build-in a8Mpixelshigh-resolution digital
scounting camerawith anintegratedTime Lapse camera2 in 1. With alotof benefits and
advancedtechnology in the design, users who expect tryingtosimplifyahuntinggame as easy
aspossible can also take manyprofessionalgameimagesin thefield. Tohelp achievethis, the
controlsare dividedintotwo sections- DigitalCameraControl section andMotionSensor Control
section. Settingandoperating with upper buttons for thedigital cameraissimilartooperate as
many other traditionaldigitalcamerasthat youarealreadyfamiliar with. The 2.4 color TFT
screen allows you to viewpicturesin the fieldandprogram for general cameraoptions.Another
smallLCD andthe buttons on thelowerdisplays andcontrol allscouting settingsof the motion
sensortoletyouknow all detailsof currentscoutingstatus immediately whenyou just open the
cover.
Notonlybe ascountingcamera,itisan allinone solution forcreatingTime Lapse images.All
shots willbe converted to atime lapse videowithourrecommendedfree software. Just turn iton,
setthe timeintervalandshotcapacity, frame your subject,letitrecord, youwillgetamazing
time lapse videosduringscouting period.
You should alsosave thepackingmaterialandboxincaseyou needtoship thisunit. Theboxisalsoprinted
withusefulinformation.
Features
•TakingUp to 8 Mp highquality picturesand 720PHD (1280x720) videowhen amotion isdetected.
•DateandTimeStampon each picture andvideo
•Built-In 2.4 ColorScreen forviewing imagesandvideosin field
•1.2s Fast Capture at NightShotunder FastTrigger mode
•Programmable TimeLapsecapturing
•Twomodesforextendinglongbattery lifeandTurbosnap shotspeed
•CardSlotsupportupto 32G SDHC card
•Motiondetect on duty selection:DAY –NIGHT –24 HOUR
•Videolengthoption:3~90 seconds.
•TV outportsupportNTSC andPALTV
•USBportfordownloadingimagestocomputerandfirmwareupgrade
•Solar power portto accept 6V/1A DCinputfrom the MO6-3WSolar Pack or equivalent
•PowerfulInfra-Red flashto takemonochromeclearpicture andvideo at nightwithin 50feet.
•Separated TFT/LCD screensandkeystosimplifysettingforcamera andmotion sensorcontrols
•PIR Pausesettingoption:0,1,3,5,10,20,30,60minutes for silenttime
•QuickShotmode allowed formoredetection upto3 events before to nextperiodofpause.
•Burst Mode forupto 5rapid shotsinoneevent
•Low Battery indicator
•MotionSensorRadar Icon forSensorON- Duty status
•VideomodeIcon
•Walk-Test / In-Used lightforDistanceandsetup
•Dial foradjustingsensitivityofmotionsensor
•Back lightfor Scouting LCDviewing.
•Power Supply:Dcell Alkalinebattery x4pcs; Ccell batteryx3 pcs (Optional supported bySolarpack
powered,then,onboard batterieswill becomeabackuppower sourse)
•SolarPowerPort support a seriesofeither optionalsolar powerpackSO-3/6/10
AccessoryIncluded
•Mainunit x1
•TV Cable x1
•USBCable x1
•Belt Strap x1
•InstructionManual x1
•Steel mountingbracketplusUbarprovidesstrongersecurityoptionx1set (Optional,itmay not
includinginthispacking)

OPERATINGINSTRUCTIONS
Preparation
1. RemovetheSteelsecuritybar (Optionalparts)
andopenthefrontdoorbypullingupthetwo
latchesontheside ofthecabinet. Pushthe Main
power switchtoOFF (Center).
2. Install 3pcsCtypeAlkalinebatteriesintothe
batterycompartmentontherightforMotion
sensorworking.
3. Install 4pcsDtype Alkalinebatteriestothe
compartment tosupport DigitalCamera andIR-
Light operation.
4. Ifyouconnect asolarpowerpack, all the
installed battrieswill becomeapowerbackup
sourse. Youcanchoosenon-batteryoperation
mode foryour application.
5. Install a SD card intotheslot. Be carefultoinsertthe SD card accordingtodirection shownonthe SD
card. Beforeyoutry to operate withthe camera,besureaSDcardmustbe intotheslot.
Caution: Before replacinga SD card,be sure the Main PW switchisalready atOFF position inorder to
avoid thedatainthe SD mightbe flushed. Afterthat,formatting theSDcard firstlybeforeoperation
will be highly recommendedifit isthefirsttimetobe usedinthisdevice.
Quick Start
An easywaybelowtotellyou stepbystep
forgettingaquick startwith theunit,it will
run underthe factory default ifyou donot
changeanyparameter exceptbelow:
1. Pushthemainpowerswitch
which isallocatedinthebottomof
out-sidecabinettoON
2. AfterPWisON,system will be
readyforsetup. PressCAM-PW to
switch On thecamerasection.
3. Setdate andtimefortheCamera
andchooseeither at Picture or
Videomode.(Seetheparagraph
belowfor “Dateand time
Setting
;StillPicture/ Video Mode)
4. Setother parametersofscoutingandexit thesettingmodeafterfinished.(See more paragraphs
aboutthe Settingfor Motion Sensor below).You canignore thisstepifyou stillarenotquite
understand it whatthey are.
5. Hangunit onasteadytreearound1meterheight withtheattached belt andsetthemotionPIR
sensor almostpointtotheareawhichyou wishtomonitor.
6. Slide themainPW switchtoTEST andturn theSensor Gain Control toMax.(Clock-wise).Afterthe
SELF-TEST lightgoesOFF after1minute,trytowalkinfrontofmotionsensorinorderto verify
howmuch distance andazoneyou will be detected accordingtotheflashingwalk-testlight.
7. PushPWback to ONand you can leave.Nowthescoutingcamera will be ready to work stand-by
after 10seconds since PW isON. Once an eventwill be detected,camerawill takeashot to save
animage aswell aseventcounter will increasearecordautomatically.
Factorydefaultsettings
ForCamera: Capture = Single Picture /AutoExposure/ 3Mpixelsresolution/ BurstMode =Off/Shutter
Speed =Auto/ Quality =Normal /Stamp=ON/Language =English /TV =NTSC/Download=MSDC /Video
Resolution =VGA640x480 /Framerate =15 F/S

ForMotiondetection: Pause=1minute/Quick-Shot=1/Turbo=PW-Save /Work Duty =24 HRs / 3
secondsVideolength
Startup withUser sSetting
It issuggested tocustomizeyoursettings
after you have experience tousethisdevice for
afewtimes.
SwitchthePW ON, thelowerLCD show the
default settings. Youcanable to programwith
yourdesiredparametersinsteadofthe
Factorydefault forbothcameraand motion
detectoroperations.Whentheunitexitfrom
setting modeornochangesince PWON,itwill
goesto themotiondetectionONDutymode
automaticallyafter1minute.
Setting forMotionSensorOperation (PIR
Sensor)
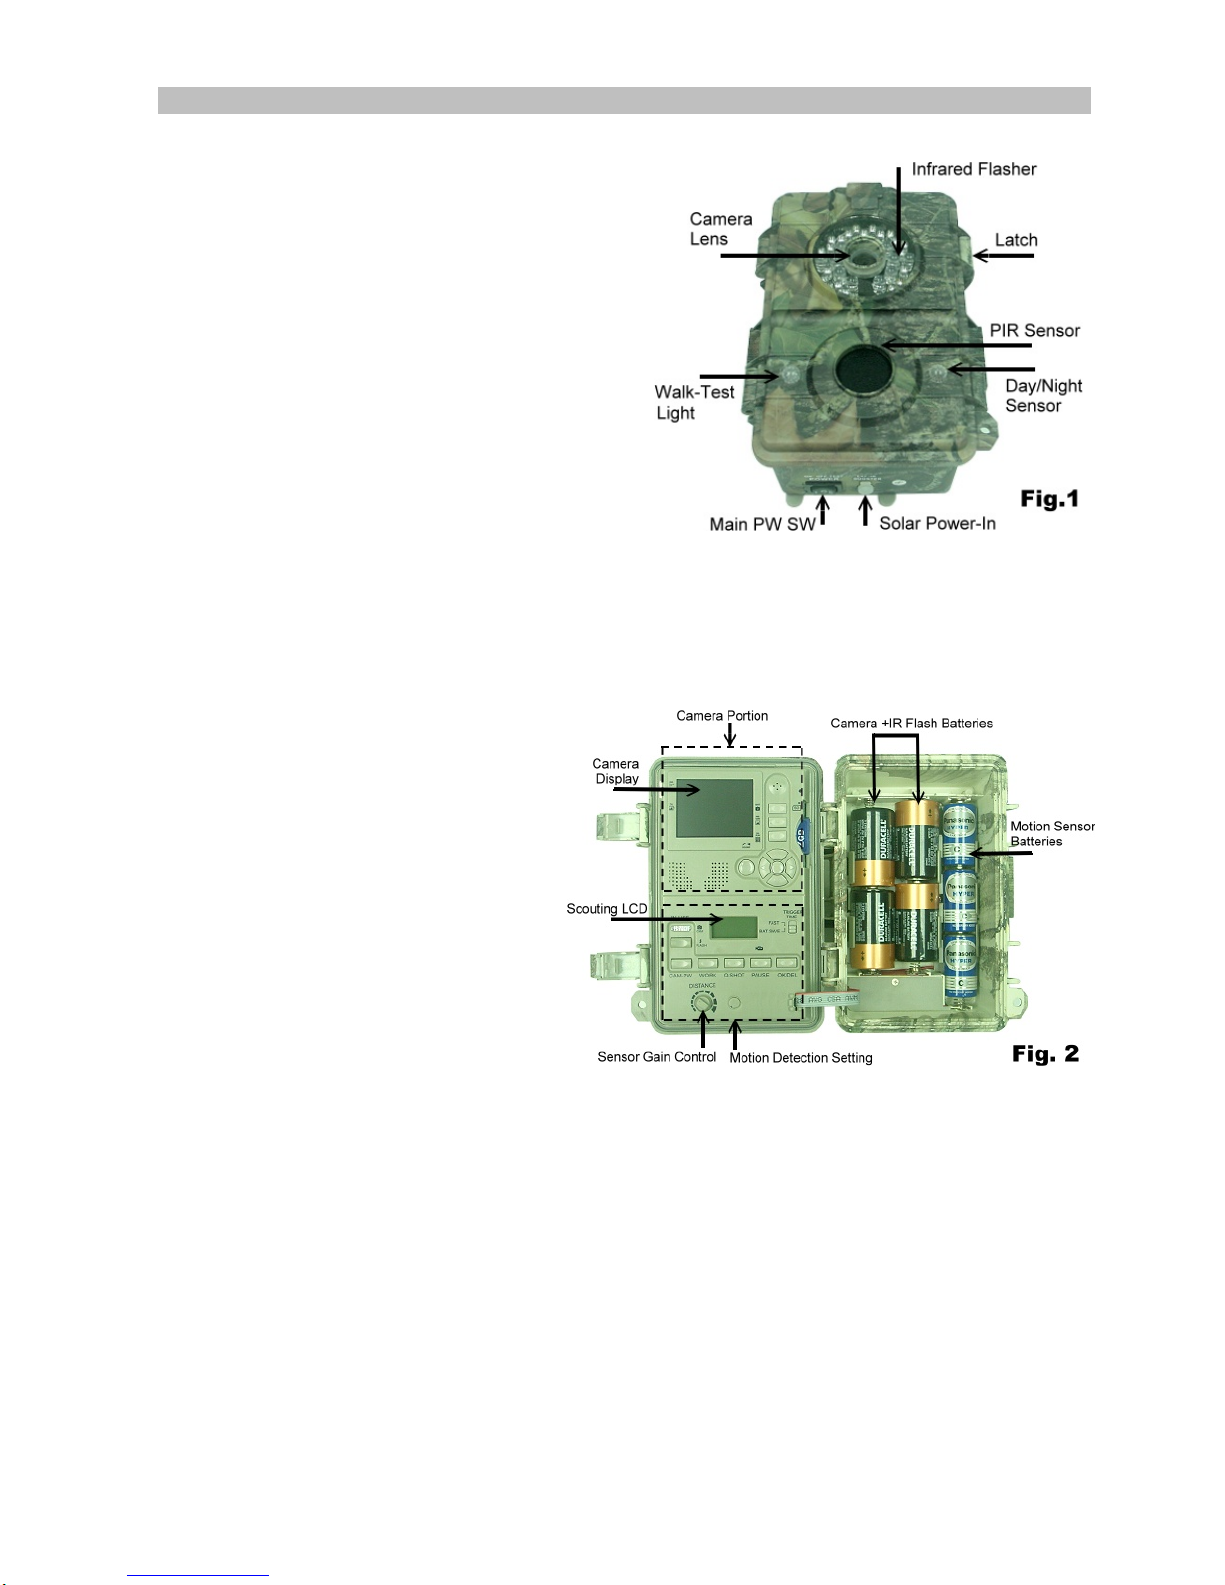
Thesettingsexplaination belowisreferredto keyson thelower portionoftheinnerpanel.Seethe Fig.3
Select ON DUTYfor Day,Nightor24 hours
The WORK buttonispressed once toenter the 24 HOUR > NIGHT > DAYoptions, the24 (Clock) On Duty
iconswill remainblinking.Press thekey againtomovetheblinkingicontotheSUNicon,onemorepressing
will move ittotheMoon.Press theOK/DEL key onyourright toaccept for thedesired icon andthenit become
stable.The Clock iconisrepresentedformotiondetectionwill be valid afull dayandnight.The SUN is
represented fordayworking.The MOON isrepresented forNightworkingonly. IfONDutyis ready,aRadar
icon will run withradiationtoshowthedevice can senseanymotioninthisperiod.
SelectforQuick Shot
Quick Shotallowsformore imagestobe takenif additional motions maybe detected afterthe1st image
andthecamera doesnotshutdown andstillbe ready formore instant shots. IftheBurstmode issetforOFF,
youcanchoose1~3 additional events which willallow camera to shotbetween every20 seconds inorder to
have a group imageswhenmany animals are passing-by. “1isthedefault thatonlyonepicturetobetaken
andthengoestoPAUSEtime.“2or “3willre-armthesensorfortaking shotsin further thesecondandthird
event ifmore animals are following. (Exampleofuse: On atrailwhenyou wantapictureofwhatis
following thefirstyoungdeer.Likeasmartbuck,italwayswalkatthelast). Atime-outofeach shot
isaround20 seconds. Thesystemwill goestoPausemodeafteratotal numberofeventsaredoneortime-out.
Note:Thisfunctionisnotthesameastheburstmode.Theywill beused for differencepurposes.
Pause Time
Thisisa silent timebetween themotionsensordoesabletodetect each eventfor a capture.Thesensorwill
notworkwithinthegap.Youcanselect 00, 01, 03,05, 10,20, 30,45,60 minutesforaPAUSEoption.Press
thePAUSEbuttononcetoenter for start setting,default01 will beblinking.Pressagain to changeit until the
desiredchoice appears.Press OK/DEL on right to accept it.
ChangeforMovieLength
Thisoptionwill letyou determinehowlongforeachvideototake. Thereare 3,5,10, 20, 30,45,60,90
secondsofvideo lengthto beselected.ThePAUSEkeyissharedfortwofunctions. PressandholdthePAUSE
keyfor3seconds, ablinkingvideocameraicon willappear toletyouknowyou already enter forvideolength
setting mode. Then press PAUSErepeatedly until yourdesiredlengthappears. Confirm an updated changeby
theOK/DEL key.
NOTE: Notonly to presetavideolength, youmust be required to changefor VIDEOoptioninthecamera
settingwhenyou wishtotakevideoclips. Otherwise,thedevice still doestake pictures.
OK/DEL
It isakey forshared with twofunctions. Anytimeyouhavedonetoprogram theWORK,Q-SHOTand
PAUSE/Video Length,justpress theOK/DELkeytoaccept a newchange. Ontheotherhand, press andhold
it with 3seconds, itperformtheDELETEfunction that all eventcounts onthelowerLCD will becleared. Butit
isnoteffecttoanycontentsinthecameramemory.All imagesandvideosincamera aresafeeven theevent

counterisclearedinanytime.
EventCounter
Threedigits LCD in thecenteroftheloweraretheeventcounter which allow you to knowhowmany motion
records that upto 999 events foratrail period history.Ifyouwanttorenew thecounter anytime,simplyto
pressandholdtheOK/DELbuttonuntil LCD becomeblinking,thenit will resumeto[000].
Battery Icon
Two iconsarefordifferencebattery groups.TheBat-iconon theuppercorner ofrightisrepresentedfor
motionsensorpower.Thesecondon therightisforcamera power.All Bat-icons will indicatethree statusas
below:
GOOD:Battery Iconshowwithsolid.
LOW: BatteryIcon ishalfblank.
BAD: Battery iconistotally blank.
Note: You haveto replaceallbatteries in camerasectionormotion sensor section for new one
completelywhen either cameraor motion power areBAD. Do nottry toreplacesomeofthem
only. Important: Since this unitdetectsbatteriesbecomingtoo weak and the blankbattery icon for
camera+IR flash does appear,theunit willstoptaking any nightpictures orvideobutstillwill takepicturesor
video at day time.
Walk-Test /SensitivityAdjustment
ThisismainPW switchinthebottomofcabinet. The DISTANCE dial on inner panelisusedforadjusting
sensitivityofthemotion sensor.Byturningthedial totheright,sensorsensitivityissetto theMaxto detect
animal over40feetaway.Youmay reduce thedetectiondistancefortakingwithalargeranimaltarget ina
picture. Walk-Test feature isused toverifythedetectionrangeandpointing zone before placingit inthe
field.Afterhangedtheunit onatree,push thePW switchtoWalk-TEST.TheWalk-TestLEDwill lightuplast1
minutetowarmup. (A radar icon with TESTalertisremainingblinkingduringWalk-Testmode ifyouare
viewingtheinsite panel).Then, Walk-TestLightwillgoesoffandwill alert with3timesflashonceyouwillbe
detectedinfrontofthedevice.Nowyoutrytogofar awaytocheckhowlongthePIR motion sensorwillstill
seeyou. Thecameradoesnottake anypictureduringthistestprocess.
Note:Thesystemwill resume back tonormalON DUTY mode automatically after3minutes(Time-Out) since
thelast triggered detection ofwalk-testtoavoid user mayforgettopushthePWswitchback to ONbefore he
left.
PW-ON Mode
Once thePW-SW ispushed toONmode,theunit willbegintowarmupfor 20 seconds,thenstart todetect
motionfortakingpictures/ Video.Whenan animal orhumanis detected,aneventwill berecordedandthe
camerawill shotimmediately. Ifyouwanttostopthedevice operation,simplyslide itto OFF.
OFF Mode
Slide thePW to thecenterpositionturnthesystempowerOFF.All picturesandcurrentsettingswill be
remained at thismode andinternal realtimeclockwill still run.Note:Remember to removeall batteries out if
thiscamera willbe no longer to use.
TurboShot/Time Lapse
Pushtheknobto Fast Trigger mode,theDC will besetforfastshooting.Inthis mode,capture speedwill be
more than 2x fasterthansettingintheBAT-Save whileamotionisdetected.SettingofBAT_SAVEwill beonly
idealforextendingbatterylife. Also,theTimeLapseoperationwill worksonlyatthismode. (Seemore
paragraphsaboutthe Settingfor TimeLapse Operation below)
Setting forCAMERA/Operation
DescriptionforCameraOperation Keys
SHOT / PREVIEW / PIC/VIDEO / DISPLAY / MENU(CenterKey) /NavigationDisk
CAM-PW(CameraPowerButton)
Before programmingforthecamera,besure MainPowerswitchat ONposition andcameraisnotworking

foranevent.
Thereare twomodesthat are called LIVE VIEWand PREVIEW (PLAY-BACK) foroperatingthecamera,
once you press CAM-PWtoswitchONtheCamera,it always worksatthedefault in LIVE mode. TheIN-USE
Light will stay ONsincecameraisstartingup.DC-PWsmall red lightontherighttopwillalertsfor2secondsto
showcamerais ONalready.Butcamera screenisremainingdark until either DISPLAYorPREVIEWkeyis
pressed. In thiscase,youcan eitherchange any settingofcamera, view pictures, take apicture manually,
downloadpicturestoPC,oranyoperationswhich require camera to be ONdependonwhich modeyouwill
select.Whenyou dofinish usingthecamera,
remember toturnthecamera OFFby pressing
theCAM-PW button again.
Duringcamera is ONmode manually,motion
sensorwill stop scanninguntil cameraPW is
turned toOFF.
Navigator Disk/ Function Keys/ Menu
Button:
Description forCameraOperationKeys,
they are located in theupper portionof
theinnerpanel
SeeFig.4
Menu Key (OKKey)
Thekeyinthecentreisbringupthemenu tabs underCAMERAisONmanually.It isalso usedforaccepting a
changeaftermodification.
Navigator Disk
Foursidesofdiskrepresentforthe Left/Right/Up/Downkeys. Thecenter knobisthe MENU button.
Allcamerasettingswillbe programmed withthem. Press theMENUtodisplaythe 2 titles of setting tabs. Select
atitle thatyouwish to changeby pressingtheleftorrightnavigatorkey.Highlightyourchoice from anitem
underthe displayingtitle bytheUporDown Key.Pressthe RIGHT to enter further options and change itwith
UP/DOWNkeys. And press OKtoconfirm. Afterfinishasetting,quittothemainscreenby pushingLEFTkey.
More Function Keys
Shotkey:Itis usedfor takingpicture orvideo mamaully inLIVEmode andPlay-Backmediafilesin
PREVIEW mode. Push ittotakeapicture at anytimewhile camera isON manually even TFT screen still is
remainingOFF (screenis always OFFbydefault) .Fortakingavideoclip manually,1st pressSHOT tostart
taking,astopwatch counter will work andpressagaintostop.
PIC/VIDEO key:
It isa springboard key fortoggle switchingbetween takingPicture orVideo.IntheLIVEmode after turn ON
cameramanually,pushthiskey to switchfor another shotmode instantly. Then,pressOKtoaccept.
Display (LIVE) key:
Pressthiskey towakeupthescreen for LIVEmode whenstart-upmanually,then press it timebytimeto turn
ONscreen >Remove informationfromscreen > Resumeinformationon screen repeatedly.
Preview key:
WhilecameraisON manually andpressPREVIEWkey,Camera will beswitchedtoPlay-Backmode atonceand
showthelastimage.Itisalsoatoggle button to skipbetweenLiveView andPlay-Backmode.DuringinPlay-
Backmode,theDISPLAYkeybecome as a springboard for Full Viewanimage vs Thumbnail pictures /videos.
So,you have twowaysto enjoy andsearchentire images/videos.
MenuTitle (Tab) for CameraOperating Modes
Thereare twomainmenusfortwomodes.Once cameraisON manually,pressMENUkeytoenter the setting
menu thatconsist 2 titles: A. SystemSetup Mode;B. WorkingOption Mode. BothLive View andPlay-Back
menus areincludingdifference titleswhich described asbelow:
A. SystemSetup Mode
PressMENU toenter toWorkingOptionMode firstly, andthen press theRIGHT key,youwill enter toSystem
Setup Mode, seetheitemsbelowby pressingDOWNkey. Enter tochange furtheroptions bypressingthe
RIGHT key again,push theMENUkeytoconfirm achange.Finally,press LEFT to quit themenu. Ifyoupress
theUPkey to thetop ofmenu, then,press LEFT toskip to the setting tabof thecurrentworkingmode.

1. Date & Time:a. 2013/01/0112:00 /b.YYYY /MM/DD (CalendarDisplay Format)
2. Language:a. English /b. French /c. Chinese
3. TVout:a.NTSC(Defaultsetting,UsedinNorthAmerica) /b. PAL
4. USB
a. MSDC(Defaultforfrequently used todownload filesto PCunderall Windows platform)
b. PCCAM (Only for upgrade Firmware purpose)
5. Format (Erase Everythingsin entirestoragemedia)
6. ResetAll Yes=Proceed (Select itto restoreall factorydefaultsettings)
7. TimeLapse: Off
DateandtimeSetting
Before you would place this unitin thefield,you are recommended toupdate with yourlocaltimefirst. After
enteringtothesetting,press Rightkeyto move theHighlightforcalendarpatternandchangeitby Upor
DOWNkey.PressMenuto accept.NOTE:Thecalendarisshowninmilitary fashionwith24hourformat.
Example: 2:00pmwill beshownas14:00. (Hour:Minute:)
Format
Afterproceedthisfunction,everythingsinthe SD cardwill removed completely.Be careful before proceeding.
Time Lapse Shot: DefaultisOff (Seemore paragraphsaboutthe Settingfor TimeLapse Operation
below) While youenable thisfunction, press DOWNkeyfortwofurther optionstoprogramhowyouwill take
shots.
a. Time LapseInterval: Setyourdesired aperiodic time of shots
b. TimeLapse Capacity: Set anumberoftotal shotsyouexpectto create aTimeLapseVideofuture.
B. Working Option Mode
Youhavetwo ways that enteringtothisworkingoptionmode.Whenyoupress MENUkeywhile camera is
ONmanually,oryou will donotselectanyitemin SystemSettingMenu andpress theLEFT fortheWorking
OptionMode.In thismode,youwill finddifferenceoptionsdependonyouarecurrently atPIC orVIDEOstatus
Single(Picture)Mode: There are several itemsbelowby pressingDOWNkey:
1. Switch To Video
2. Resolution :a. 3264x2448 (8 Mp) /b. 2592x1944 (5 Mp) /c. 2048x1536 (3 Mp) /d. 1024x768(1.3Mp)
3. Quality :a. SuperFine /b. Fine / c.Normal (AdjustImage quality,itwill affect capturespeedtoslow down)
4.Exposure : - / +Adjust (Adjustingforbrightnessofimageinsteadoffactory default)
5.BurstMode : OFF> 2>3> 4(Off=1shotonly foranevent;4=4imageswill becapturedrepeatedlyin
oneevent )
6.Shutter/ISO
aAUTO(ISO 100~ ISO400,Itisthedefault formostofevents andrecommended)
b.Fast(Fixed atISO-200(Used to takeaclearimageagainstamovinganimal.Sometimes forvery short
distancecapturingsettingatnighttoavoidimagesto be overexposure.)
8. DateStampa. Off /b. On ( Calendarstamp ON/OFF optiontoshowwhatever thecalendaron all
images and videos.)
Video Mode
Youcan eitherusethe springboard key PIC/VIDEO or highlight the Video tochangeby pressing MENU
key.Once the VIDEO modeisselected, theunitwill takevideoclipsday and night.Sincea1st eventis
recorded,avideo-camiconwill appear in thescoutingLCD to show that you are in videomode.
IncaseyouwouldswitchbackforSinglePicture mode,justturnONcamera by pressingCAM-PW, then
pressthePIC/VIDEOkey again. PressOKkeytoaccept the SINGLE Mode. Then, require to re-boottheunit
byturnoff themainPW andbackON.Youwill see theVideo-camicondisappear. Otherwise,thecamera will
notworkproperly w/oarebootprocess.
Therearetheoption itemsbelowby pressing DOWNkey:
1. Switch ToSingle
2.MovieSize : a.1280x720 (HD) /b.720x480 /c. 640x480 (VGA)
3. FrameRate : a.High (30f/s)/ b.Low (15f/s)
Time LapseOperation:
You canactivatethe Timelapsefunctionduringanyscoutingperiod.It willworkfine at dayandnightby

slidingtheTurbo switchtoTimeLapseON aswell as enabletheTimeLapseoption inthecameramenu setting.
Camerawill take shotsautomacticallyaccordingtothe furtherprogrammingintheTimeLapsesettings.The
TimeLapseeventwill start torunsince onescountingimagetobetaken.
Caution: Be sure you havetriggered the1st shotbyyourselfbefore leavingfromthesite.Otherwiseitwill be
triggeredtostart upbyanimal.
Further settingsforTime Lapse
Interval: Adjustthedefaut5secondsforyourdesiredperiodictime.Thecamerawill take shotsrepeatedly
accordingtoyourupdate.Anadjustable intervalset willbefrom1secondto23:59:59
Important: Timelapse capture event will be alwaysinterruptedduringday /nighttransitionandwill be
resumedafterthe1st onescoutingeventistriggered duringeach transition.
Capacity: You canlimitaMaximumtotal shotsforamission.More shotswill be created foralongerTime
LapseVideo.AMax. capturecapacitywill be99,999shots.
ResearchQTYofTimeLapsecaptured
TurnonCameramanually,enterto theCapacitySettingofTimeLapseoption.Thefirstdata lineisshowing
howmanyimagesare captured.Thisresult willbeerased once youturntheTimeLapsefunctiontoOFF inthe
system menu.Otherwise, thiscounterwillcontinuewhenthecameraresumefortheTimeLapsemission.
ViewImages fromTime Lapsemission
TouchthePREVIEWkey after turnonCameramanually,youwill seethelastscoutingimage usually.Press
RIGHT key once,thepreviewmode willbechanged forviewingthelastimageoftimelapsemission. In case
you wanttoviewbackthescoutingimageor video,youhave toquit and back on thecamera again. Touch the
LEFTkey toreviewallscoutingimageswhenyouarealready atPREVIEW mode.
CreateATimeLapse Video:
Allofimagesarerequired to import toatimelapsesoftware forconvertingavideo.There aremanychoices
fromweb-sitesoryoucandownload fromourrecommendedwebforafreeware.Youcan trytogetthe
software “Videomach from www.computechnic.com/download.html
Preview (Play-Back) Imageandvideos
1.ViewImage/Video in Built-in Screen
Once press Preview key,screenwillalwaysshowafull screenofthelastshot.Usetheleftorrightkeyto
viewotherpreviousornextimage. Thedisplayedcontentswill bedepended onwhichcurrentmodeitis. If
you expecttoview more pictures orvideosin a sreen,press Display forathumbnailscreen. See more nine
images inaframe bypressingLeft/Rightkey.Thenenlarge it bypressing Display again.
2.ViewImage/VideowithTV
Theunit isequippedwith aTV-out portthat allowyouto connect toTV athomewithanattached cable.
Be sure theRCAendispluggedinthe Video-In ofyourTV.To view pictureson TV setaftercamera isin
Preview mode,all displaying will be switched to TV screen andtheinternal screen willbe OFFinthis
operation.Ifyou pullouttheTVcable,thedigitalcamerawill switchtotheinternal viewing screen
automatically.
NOTE: Thelastpicturetaken will be thefirstto display andwillincluding ofthetotal numberofpicturesstored
andthenumber of current picture.Example:0024/0036isthe24th picture ofatotal of36pictures.
MoreOperation Setting atPREVIEW
Whenyouarein Preview mode,press theMENUkeytodisplay the OperatingMenu with itemsbelow:
1. Lock (Protectfileduringadeletionoperation)
a.Lock/UnlockOne (Protect/Unprotectonefile)
b.LockAll (Protect allsamemediafilesinthememoryandtheywill notbedeleted)
c.UnlockAll (Unprotect all ofprotectedfiles)
2. Delete
a.One (DeleteOne item)
b.. All (DeleteAll itemsexceptprotected items)
3. Rotate (Torotateanimage) a. Rotate /b. Save /c. Back (Recover tooriginal)
4. Resize (Reduceresolutionforasmaller sizeimage in ordertoreleasemorespace in storage)
a.Showingallavailableresolution thatyoumay change
Slideshow
Ina thumbnail screen,press SHOT key forenjoyingaslideshow. Interrupt theshowby pressingOKkey.

Digital Zoom
When inthe Preview toview afull sizepicture,press the UPkey toZoomInandtheDOWNkeytoZoomOut
for enlargeapartofimage to see more detailswhenenjoyingan image.
PAN on an Image
Once youhavezoomedin animage,youcanpanthelenstovieweverywhereinanenlargedpictureby
pressingLEFT orRIGHT keys.
Deleting Photos
PressMENUkeyunderthepreview mode,thenhighlight Delete for Singleor all photos to erase thetarget.
PressMENUkeytoconfirm YES /NO deletion andrepeatedly fordeletingmore.
ProtectanImageor Video
Duringviewingan imageorvideowhichyouwould liketo retain inthememorywithoutwash-outbydelete
processing,press MENUandhighlightthe LOCK optiononce.Then an iconwithsmalllockonthelefttop
cornerofthisimage toshowit isprotected.Repeat thesameprocessingtounlockit. All ofprotected itemswill
notbedeletedexceptyoutry toformat thememory media.
Using a SD card
Thisunit doessupportupto32G SDHCSD card toget alarge storage capacity that allowmorethan ten
thousands ofpicturestobe saved. It will notworksw/oaSDinstalled.
Note: BesuretheMainPWSwitchisOFFbeforereplacing aSD card in ordertominimizeariskto
damageyour SD cardor lossdatapartially.
Important:Ifa SD card cannotbeinserted smoothly,you mustretractitandcheckifthe
directionofcardiscorrector not.Never forcetopushhardlywith the card.Mostofcase witha
problem withcardusageisfound thatcausedbyan improperinsertion.
Warning: Beforeusingablanknew SD card,or everbeen used inothercameras, itissuggestedto formatit
beforeusage. So,youneed to download all ofexistingfilestoPC before usingitinthiscamera.Otherwise,
camerawill notsavepicture andvideo inthedefault directory properly.
Installing Driver for UpgradeFWinyour camera
For somecases,youwill be recommended to upgrade theFirmware foryour camera toremain agood
performance future, so, adriver isrequired that you will beadvised toinstallthedriver once you enterto
upgrademode.Thedriver willbe availabledownloadingfromthedealer’sweb-pageorFTP-site firstly. After
installed thedriver on yourPC properly, connect anUSBcablebetweenPC andcamera,and switchONthe
main PW.Then,pressthePIC/VideoandOKkeyat atimefirstly, touch theCAM_PW to turnONthecamera.
Nowyoucanseethecamera small statuslightwill be steady ON. Youare ready to upgrade the newFW now.
Pleasereferthefurther instruction processing whichwill beprovided from yourdealer.
Downloading photos/ Movies toyour computer
PressCAM-PW toturn thecameraON manually.Connect yourcomputer andthecamerawith an USBcable.
-Apopupto showthemobilehard diskwhichisassigned forthe camera device. Forexample:
x:\DCIM\100MEDIA
-Click intotheproper directorytoseeall filesinside.
MountingDevice
Before startingtoputthiscamera inthefield forscoutinggame,the
cameramustbe mountedinacertain placeproperlyoron atree
whosediameterwill notbe lessthan 6inch(15cm)andlocatednot
higherthan1Mwithyourdesired mountingmethodthat followingthe
installationmethodasshownasbelow.Thedesignisreservedto fit for
twowaysofmounting.
ABeltMount:Thisbelt isattachedinthepacking.See theFig.5
BPython AdjustableLocking Cable(Notincluding in this
packing): SeetheFig.6
Youcan able touseaPython adjustablelockingcableto provide
higher security level to your camera.The “MasterLock brandisagoodchoice.
MetalBracketand UBar:
With more optionalchoices,asteel mountingbracketandUtype
security bar kit can be choosedtoprovide much strongersecurity
ability.Youcan buythisaccessory kit fromyourlocaldealer.
Solar PowerPack Connection:
If You have bought a Solar Power Pack (Example Model: SO6-
3W).PlugtheSolarpackcontrollercabletotheSolar PW port on
the camera unit.TouchthePW button on thecontrollerto supply

thesolar power tothecamera.Thesolar powered packwill alwayssupplyenergyin24/7 andwill becharged
undersunlight.Itisn’tamatterthereare somedayswithcloudy becauseahighcapacitystorage power pack
will support thiscamera towork for more than 10 daysora few thousandshotsafter onetimeoffully charged.
Power Management:
Itis an optional but highlyrecommended toinstall all Alkalinebatteriesintothecameracompartmenteven
you preferto alwaysuseasolar system.Thebackupbatterydosestandby only while thesolar packenergy
stillbe enoughtosupport Cameraoperationasusual. Batteries will bedrainedsince thepower packgoesto
theOFF w/oanychargingforalongtime.Itisideal forremainingthescoutingsettingsevennomore supply
fromSolarpack.
CONNECTExternal Infra-RedBooster
Foranexperienceduser,youalwayswould expect togetextremequality picturesandvideosatnight.
WildSpyCam does providean option “Ext-IRBOOSTER that youcanbuy external IR boosters IRX-810 to
fulfill yourin-need. (850nm modelof WildSpotFlash series).Thusyou getabout2~4X higher illumination
dependonanumberofboosters you will configure. Ifyou wantto upgradethecamera tobea totally invisible
black IR system, another invisible 950nm IRbooster series like IRX-20BorIRX-22B foradvance upgraded.
Forfurtheroption, youcanchoose IRX-22BWwirelessboosterthatyoucan allocate manyboostersnearthe
targetandthey aretriggered through radio frequencysynchronously bythecamera.
Troubleshooting Guide
No animal showinginsomepictures:
1. Checkiftheunit ispointedthedirection wherethesunisrisingorsunset thatthesensormightbe
triggered.
2. ThePIRsensormay detect ananimalsthroughvegetationoutofview fromthecamera.
TheCameraIn-Use lightisremaining ON,butthecameradoes notrespond:
1. Thecameramay betime-outandshutdownautomatically.Repeattopress the CAM-PW to
resumethecameraON or try torebootthesystem.
2. Battery may betoo lower that could notsupport thecamera operation. Replace with4pcsDtype
brandnew batteries iftheBAT iconforCamerais showingEmptytoo.
CameraseemsNOTwrite anypictureintomy “Empty SD”cardand displayed withMemory Full:
1. You mustformatthe SD card whichwaseverused intheotherdevice beforeapplyingit inthiscamera.
2. Checkthecurrent SD card andtry to use a brandNew SD card insteadofyourcurrent SD.
IhavesetTime lapse Enable, butitseemsitisnotworking:
1. YouneedtopushtheTriggerTimeswitch to TIME-LAPSE (Fastmode).
2. Before you will leave,you needto trigger for the1st shotby yourself.
3. Toviewyourtime-lapseimages, justpresstheRIGHT keyafter entered to PREVIEW mode,youwill see
thelastshotofTime-Lapse.Then,press theleftkeytoview thepreviousTime-Lapse shots.
4. TocreateyourTime-lapsevideo,youhave touseanyTime-lapsesoftware toassist.Youcan consult your
dealer or download oneof popularonefromweb.

Table of contents
Other WildSpy CAM Scouting Camera manuals