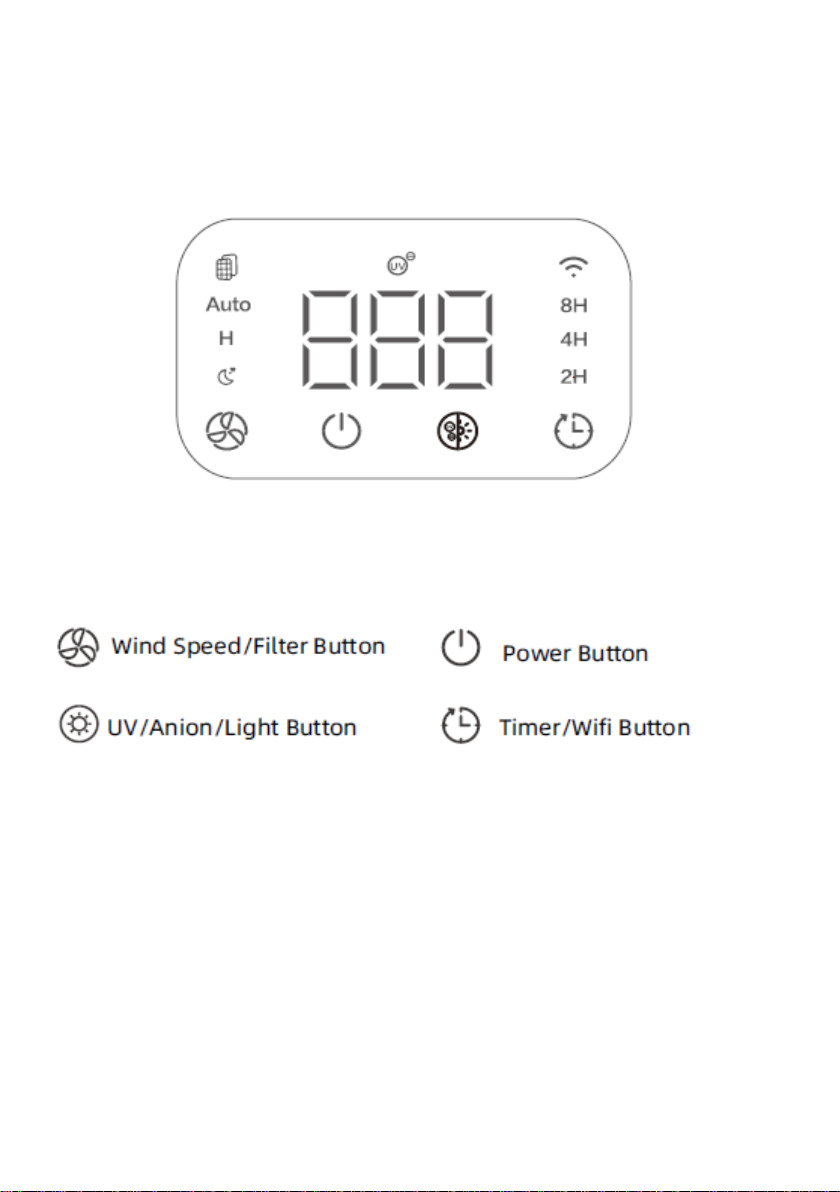
WILMS LR 50 User manual

Operating Manual
Air Purifier
LR 50
Perfection is our aim

appendix II A
Structure of the machine
Portable air purifiers
Manufacturer: Hans Wilms GmbH & Co. KG
Erftstr. 34
Erftstr. 34
D - 41238 Moenchengladbach
D- 41238 Mönchengladbach
Description:
LR 50
is designed, constructed and manufactured in accordance with the
above-mentioned Directive and the low voltage-directive 2014 /35/ EWG,
and the EMC Directive 2014 /30/ EU.
The folowing harmonized standards have been used:
- EN 60335-2-65 - Household and similar electrical appliances - Safety
- EN 55014-1/2 - Electromagnetic compatibility
- EN 62311 - Assessment of electronic and electrical equipment
Mönchengladbach,
25.04.2022 Jochen Wilms
______________ ___________________ ________________________
Place - Date Signature Managing Director
Unterzeichner
- DIN EN 61000-3-2 - Electromagnetic compatibility
- EN 60335-1 - Household and similar electrical appliances - Safety
- EN 62233 - Measurement methods for electromagnetic fields
- EN 61000-3-2/3 - Electromagnetic compatibility
- DIN EN 301489-1/-17 - Electromagnetic compatibility
- EN 300328 - Wideband transmission systems
according to machine directive 2006 / 42 / EEC
EC - Declaration of Conformity

Content Model: LR 50 Page
Safety instructions 1-2
Product overview 3-4
Technical specifications 5
Operating manual 6-10
Maintenance 11
Malfunctions / Troubleshooting 12
Environmental protection and recycling 13
Spare-Parts-List / Exploded View 14-16

Safety instructions
Please read this user manual carefully before using the
unit and keep it for future reference.
Danger Warning
1. To avoid electric shock or fire, keep away liquids or flammable
detergent from the device.
2. Do not spray any flammable liquids around the device.
Safety Warning
1. Before connecting the device, please compare the type plate with the
local supply voltage.
2. In the case of damaged supply cable, it must be replaced by a
specialist.
3. Do not use the device if the supply cable, the device itself or the
connecting plug are damaged.
4. Do not block the air inlet and outlet.
5. Do not insert any foreign objects into the device.
6. Persons with physical or mental disability, or without relevant
experiences and skills (including children) should use it only under
guiding and instructing.
Page 1 of 16

Safety instructions
1. This device can not replace normal ventilation, daily dusting, or even
eliminate kitchen fumes.
2. Check the correct connection to the socket.
3. Do not place any items on or above the device.
4. Be sure to place and use the device on a firm, flat and horizontal
surface.
5. Keep a distance of 30 cm around the device from walls or objects
and at least 50 cm above the device.
6. Do not use the device under air conditioner to prevent
condensation water dropping into the device.
7. Make sure that the filter is properly installed and that the rear cover
is properly closed before turning on the device.
8. Use only original filters approved for the device.
9. Do not use the filter for other purposes to avoid damage.
10. Do not hit the device with hard objects, in particular not on the air
outlet and the air inlet.
11. Do not insert fingers or other objects into the air outlet/inlet to
prevent physical damage or trouble.
12. Do not use this device if you are using an indoor insect repellent
spray, or in areas with flammable gases or chemical fumes.
13. Ensure the device is unplugged before moving, cleaning, maintaining
and replacing filter.
14. Unplug the mains plug before moving the device. Do not pull the wire
to move the machine.
Page 2 of 16

Product overview
Components
Page 3 of 16

Control panel
Page 4 of 16

Technical specifications
Model
Power supply
Power
Noise level
Dimensions
Weight
Filter class
Page 5 of 16
AC 100-240 V
50/60 Hz
L 275 x W 308 x
H 565 mm
< 56 dB/A
LR 50
50 W
Air capacity max.
Typical room size
320 m³
50 m²
5,2 Kg.
Hepa H 14

Function instruction
Steps of installing filter
Before using, please remove the package of the filter.
Ensure the device is unplugged before removing or installing the filter.
1. Open the latch
2. Remove the filter
3. Remove
the
to take out the back cover. from the machine packaging of
the new filter.
4. Put the filter
Page 6 of 16
into the machine.
5. Close the back cover.

Button operation
Power on:
power button LED, wind speed button LED, light button LED and timing
out button LED are on, indicating that the machine is now in standby
mode.
Power Button
After the test run, the corresponding color is displayed according
to the air quality detected by the sensor.
Wind Speed / Filter Button
in the operating mode quiet, fast or automatic, and the corresponding
indicators light up.
Every time you press the button, the buzzer rings one time.
The monitoring module detects the air quality.
Range 0 - 75 excellent air quality. The control light is blue.
Range 70 - 150 moderate air quality. The display is green or yellow.
Range > 150 high pollution. Display is red.
The auto-mode cleans automatically the air according to the air quality.
2. When the machine works in auto-mode, the wind speed will be
adjusted according to the air quality.
Page 7 of 16
The buzzer rings once, all indicators light up once and then go out. The
Press the power button, the machine is running in the automatic gear
the corresponding indicator light is on, and enter the 30-second test run.
1. In the operating mode, press the fan button to adjust the fan speed

3. When the machine works in sleep mode, if no operation for 5 seconds,
the machine will enter sleep mode.
Reminder of replacing filter.
If the unit detects that the filter needs to be replaced, or after 2200
After replacing the filter, press the Wind Speed/Filter Button for
UV / Anion / Light Button
1. In the operating mode, press the UV/Anion/Light button to change
the brightness of the display.
for three seconds to start Anion and UV function. Press ist again,
the Anion and UV function will be off.
Timer / Wifi Button
1. In the condition of working, press the Timer Button to set timer
among the of 2H-4H-8H. Every time you press the button, the buzzer
rings one time, and the corresponding indicator will be on.
2. Press and hold the Timer / Wi-Fi button for 5 seconds to turn on
the Wi-Fi function.
The Wi-Fi display shows the current Wi-Fi status.
After shutting down, the Wi-Fi must be reset.
Page 8 of 16
operating hours, the filter marking LED flashes continuously red.
seven seconds to reset the settings.
2. In the condition of working, press the UV / Anion / Light Button

Wi-Fi Operation
Download and registration
1. Use your mobile phone or tablet to use the following
QR-Code to scan. Download the "Smart Life" App. You can
also search for "Smart Life" in the APP Store or Google Play to install
the app.
2. Open the "Smart Life" App, click "Register", enter your phone number
or email address to create an account and to register "Smart Life".
Then log in to the app.
Add device
1.) Connect the mobile phone to the wireless home network, and turn
on the Bluetooth of the mobile phone.
(Please select 2,4-GHz-Wi-Fi network).
2.) Open the „Smart Life“ APP.
3.) Enter the homepage of the „Smart Life“ APP. Click "+" to add a
device, the APP will display manual addition or automatic discovery.
4.) Automatic discovery: When the corresponding authorisation is turned
on, the device can be automatically discovered and the device needs
to be in the network configuartion state and turned on.
Page 9 of 16

5.) Add manually: Select the name corresponding to the product.
(Wi-Fi + Bluetooth mode.)
Bluetooth configuration (automatically):
Make sure that the WiFi indicator of the device is flashing quickly,
click OK, and then wait for the connection. When successfully
„add 1 device“ appears, it means the connection has been completed
and your device will now be listed in your APP list.
6.) Add manually: Like Pos. 1-3.
Select "Small household appliance" on the left-hand side.
Then select "Air Purifier (Wi-Fi)".
Select the 2.4 GHz. Wi-Fi network.
Enter the name of your network and your network password.
Click on "Continue".
Confirm that the Wi-Fi indicator on your unit is flashing quickly.
Choose the name that corresponds to your product.
Press "+". Now "Add successful" appears. Press "Finish".
Now you can set all individual settings such as operating mode, on/off,
countdown (fixed hour selection), and in the settings personal or
daily or weekly timer settings and so on.
Your device will be listed in your APP list. Now, you can control your
smart device through the mobile APP anytime and anywhere (make
sure your mobile phone and smart device are connected to the network).
Page 10 of 16

Maintenance
Ensure the machine is unplugged before maintenance.
Do not immerse the air purifier into water or any liquid.
Do not use abrasive, corrosive or flammable detergents (such as
bleach or alcohol) to clean any part of the unit.
Clean or replace the filter regularly. Do not wash the filter.
Ensure the machine is unplugged before replacing the filter.
Please sterilize the filter under sunlight regularly.
Do not use a vacuum cleaner to clean the filter or wash it directly.
Cleaning and storage
①Ensure the machine is power-off and unplugged.
②Remove the filter to clean any dust from the surface of it.
③Use a soft cloth with neutral detergent to clean away dust or debris
from the surface of the machine.
④After the filter has dried, install it into the air purifier to restart.
⑤If you do not use the machine for a long time, ensure that the
machine is dry and cover it with a dust bag.
Store the machine in a cool and well-ventilated place.
⑥To ensure a good performance of the machine, please turn on the
machine from time to time for a few minutes.
Notice:
Make sure that no liquids can get into the machine.
Page 11 of 16

Is the house fuse o.k. ?
Is the red filter indicator flashing?
Poor performance Is there any dust in the surface of primary
filter?
Is there any obstacle blocking the
air inlet/outlet?
Is there anything stuck on the fan or in
the air outlet?
Is the machine tilted?
Please set a lower grade of wind speed
if the noise is too loud, or set sleep mode
of wind speed when using at night.
It is the normal phenomenon that the
machine emits the smell of plastic for the
first time.
The machine will emit nasty smell if the
filter is dusty, so in this case, please clean
or replace the filter.
If the burning smell emits from the machine,
please unplug the power socket and contact
with buyer or customer service.
Please press the Wind Speed/Filter button
for 7 seconds to reset the machine and
the life counter of the filter will start.
Notice: If the above instructions can not solve your problems and you
need maintenance, please contact the supplier or after sales service
Page 12 of 16
Malfunctions / Troubleshooting
Fault
Cause
The device does not work
Is the electrical power supply o.k.?
Significant noise
Coming out nasty smell
The filter change indicator
lights up after the filter has
been replaced.
center. Please do not disassemble the machine to maintain by yourself.

Environmental protection and recycling
The air purifier is made exclusively from high quality
materials, most of which are recyclable.
Dispose of packaging material
Dispose of the packaging material in accordance with the locally
applicalbe environmental regulations.
Disposal of waste electrical and electronic equipment
The device is marked with the symbol with a crossed
out waste bin. This means that you must not dispose
of it in normal household waste, but rather dispose of
it in an environmentally friendly manner in a separate
collection.
Proper disposal of this device avoids negative effects on people
and the environment, serves the targeted treatment of pollutants
and enables the reuse of valuable raw materials.
The electronic components are subject to special
regulations for disposal.
Help protect the environment by ensuring that your old
device is only disposed off in an environmental-acceptable
way!
Page 13 of 16

Position Part-No. Qty.
18050065 1
28050066 6
38050067 1
48050066 2
58050068 1
68050069 1
78050070 1
88050066 4
98050071 1
10 8050072 1
11 8050073 2
12 8050074 1
13 8050075 1
14 8050080 1
15 8050081 1
16 8050082 1
17 8050083 1
18 8050084 6
19 8050085 1
20 8050086 1
21 8050087 1
22 8050088 5
23 8050089 1
24 8050090 1
25 8050088 4
26 8050096 1
27 8050097 1
28 8050098 3
29 8050099 1
30 8050100 1
31 8050101 1
32 8050102 1
33 8050103 1
Page 14 of 16
Flat gasket
Motor
Self tapping screw 3x8
Motor bracket top
Slider
Handle
Upper housing
Rear housing
Self tapping screw 3x10
Slide cover
Description
Air outlet grille
Self tapping screw 3x10
Light gide
Self tapping screw 3x10
Damping rubber
Combination screw with gasket
Spring
Back cover
Control box
Control board
Centrifugal wind wheel
Air passage top
Lens hood
Control foil
SPARE-PARTS-LIST LR 50
Control surface cover
Self tapping screw 4x15
Motor bracket cover
Control
Self tapping screw 3x8
Anion
Motor bracket bottom
UV lamp board
Hexagon nut

Position Part-No. Qty.
34 8050104 1
35 8050105 2
36 8050106 1
37 8050107 1
38 8050108 1
39 8050109 1
40 8050066 6
41 8050051 4
42 8050110 1
43 8050111 1
44 8050112 4
45 8050113 1
46 8050114 1
47 8050115 1
48 8050120 1
49 8050121 1
50 8050122 4
51 8050123 4
52 8050124 1
53 8050125 1
54 8050126 1
55 8050127 1
56 8050128 1
57 8050129 1
Page 15 of 16
Electric control box left
Tray support
Tray
Max tray spring
Electric control box right
AC power board
Front housing
Crimping cover right
Crimping cover left
Self tapping screw 3x10
HEPA filter H 14
Description
Infrared sensor
Gasket
Air passage bottom
SPARE-PARTS-LIST LR 50 - Page 2
Door mat
Power cord
DC connection line
Control panel connector
Infrared connector
UV lamp connector
Light belt
Strain relief bushing
Base
Self tapping screw 4x8

Page 16 of 16
EXPLODED VIEW LR 50
This manual suits for next models
1
Table of contents