manuals.online logo
Brands
  1. Home
  2. •
  3. Brands
  4. •
  5. Windward Design Group
  6. •
  7. Outdoor Fireplace
  8. •
  9. Windward Design Group MGP User manual

Windward Design Group MGP User manual

Popular Outdoor Fireplace manuals by other brands

Kingsman FP2085 OWNER'S OPERATION AND INSTALLATION MANUAL

Kingsman

Kingsman FP2085 OWNER'S OPERATION AND INSTALLATION MANUAL

ELEMENTI OFG601 owner's manual

ELEMENTI

ELEMENTI OFG601 owner's manual

Outdoor Plus PISMO OPT-2448 manual

Outdoor Plus

Outdoor Plus PISMO OPT-2448 manual

Legacy Fire Pit owner's manual

Legacy

Legacy Fire Pit owner's manual

Coleman 5055-710 Assembly and instruction sheet

Coleman

Coleman 5055-710 Assembly and instruction sheet

Jensen 300NG owner's manual

Jensen

Jensen 300NG owner's manual

Firegear KWB-NG1 Owners & installation manual

Firegear

Firegear KWB-NG1 Owners & installation manual

Classics FP35077 manual

Classics

Classics FP35077 manual

Mayer Barbecue HEIZA MFK-220 Assembly instructions

Mayer Barbecue

Mayer Barbecue HEIZA MFK-220 Assembly instructions

Target Foxborough Assembly instructions

Target

Target Foxborough Assembly instructions

Blumfeldt Merano manual

Blumfeldt

Blumfeldt Merano manual

Blooma Brasero Ulong manual

Blooma

Blooma Brasero Ulong manual

The Fireplace JETMASTER 700 D installation instructions

The Fireplace

The Fireplace JETMASTER 700 D installation instructions

Superior VRE4543EN Installation and operation instructions

Superior

Superior VRE4543EN Installation and operation instructions

Napoleon PATIOFLAME GPFN Installation and operation instructions

Napoleon

Napoleon PATIOFLAME GPFN Installation and operation instructions

Endless Summer Dakota GAD19101ES owner's manual

Endless Summer

Endless Summer Dakota GAD19101ES owner's manual

Vermont Castings ODGSR36A Homeowner's installation and operating manual

Vermont Castings

Vermont Castings ODGSR36A Homeowner's installation and operating manual

FEUERHAND PYRON user manual

FEUERHAND

FEUERHAND PYRON user manual

manuals.online logo
manuals.online logoBrands
  • About & Mission
  • Contact us
  • Privacy Policy
  • Terms and Conditions

Copyright 2025 Manuals.Online. All Rights Reserved.

Version: 1/15/16 Page 1 of 4
Qty. Description Picture
A1 Table Top
B1 Base
C4 Bolts (1/4 20)
D1 Propane Dolly
L1 Fire Bowl Kit
M1Wind Guard Kit
(sold separately)
Qty. Description
E1 Stainless Steel Bowl
F1Black Rubber
Propane Hose
G1Metal Flex-Line
Hose
H2Bags of Clear
Glass Stones
MGP FIRE PITS
Step 1
Your fire pit comes in two boxes, the first box contains your table
top and the second box will contain everything else. Open your
boxes and makes sure you have everything.
Step 2
Set the table top facing down onto a soft clean surface, preferably
a blanket.
You will need:
7/16” Wrench
Clean Blanket
(1) AAA Battery (not included)
Parts Included:
Fire Bowl Kit Includes:
Use your QR Code reader
to watch a video or visit
www.youtube.com/windwarddesign
A
M
B
D
L
Version: 1/15/16 Page 2 of 4
Step 3
Using two people, place the base upsidedown onto the table top,
lining up the four holes. (Base will sit flush with the top)
Step 4
Use the four bolts provided to attach the base to the top. First, loosely
put in all four bolts, then hand tighten. Finish by doing a 1/2 rotation
using your 7/16” wrench. DO NOT USE POWER TOOLS AND DO NOT
OVER TIGHTEN.
Step 5
Not that the base is securely fastened to the top, use two people and
rotate the entire fire pit back up right.
Step 6
Using the handles, pull the magnetic side door open and set aside.
Place the fire bowl into the top.
Step 7
Find the inside of the control panel and remove the two red caps
protecting the nozzles. (Note: In-order to show the inner control panel
our images do not have the table top mounted)
Step 8
On the bowl you’ll see a flexible metal hose coming out. Attach the
other end to the top nozzle of the control panel.
Step 9
Take the black rubber hose and attach it to bottom nozzle of the control
panel.
Step 10
Add your propane tank to the dolly and make sure the gas is turned
off. Take the black rubber hose and attach it to the propane tank. Use a
wrench to go back through and tighten all four connections.
E
Version: 1/15/16 Page 3 of 4
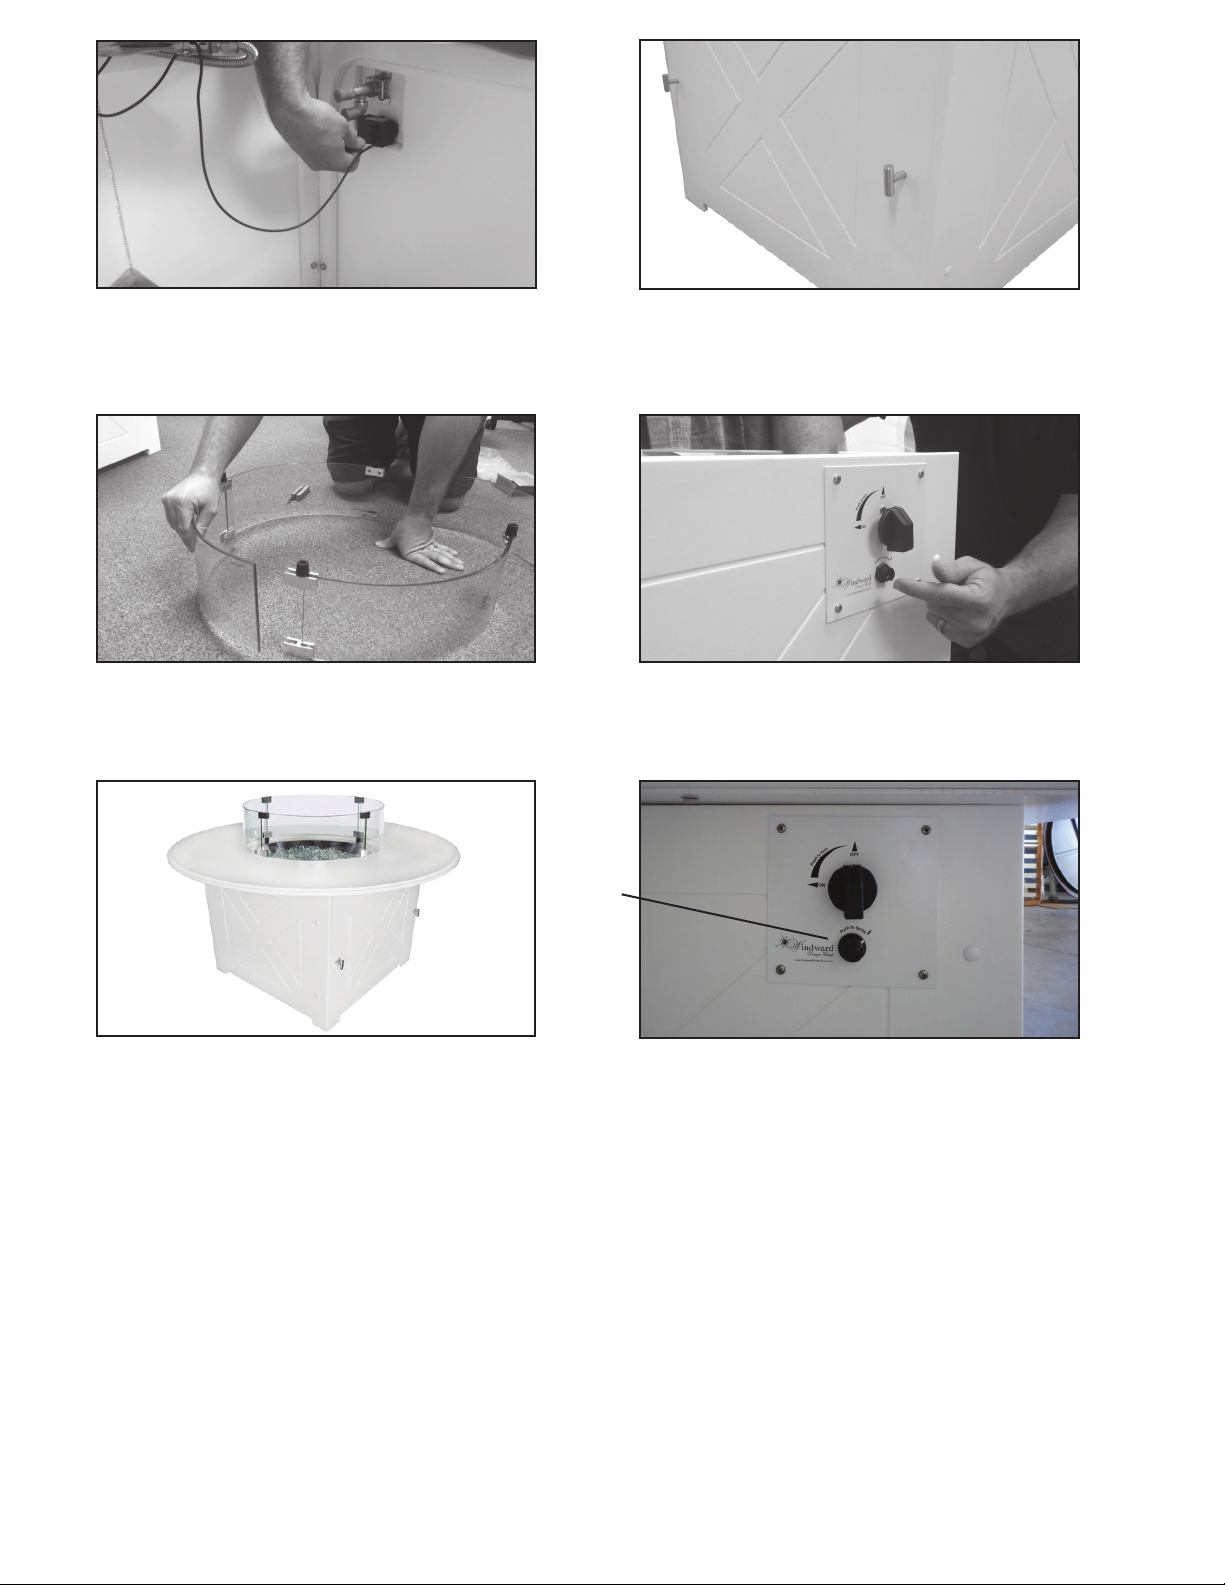
Step 11
Hanging from the fire bowl you’ll find two black wires. Attach both
of them to the black box on the control panel. (Note: there is no
polarity issue, either wire can be connected to either plug)
Step 12
Replace the magnetic door and spread all of the glass stones evenly
in the bowl over the burner area being careful to not hit or bend the
ignitor. Keep glass clear of the spark to avoid blockage.
Step 13
If you purchased a glass wind guard, assemble that (directions on
page 4) and put into place.
Step 14
Go to the front of your control panel. Unscrew the ignitor knob
counter-clockwise and insert a AAA battery (positive facing out).
Replace the ignitor button.
Step 13
Your fire pit is complete!
To Start
Open the magnetic fire pit door and turn the propane tank on and
replace the door. On the front control, turn the knob from “OFF” to
“ON” and press the ignitor button.
NOTES:
• Do not burn your fire without the glass stones!
• Glass stones may split during/after use, this is normal due to the
physical properties of glass.
• Cleaning: Use glass cleaner on the glass wind guard. For the
MGP table top and base clean everyday dirt and stains with a
soft sponge and mixture of mild detergent and water. Be weary
of nylon scrubbies or stiff nylon brushes as excess force can mar
the finish. Stains and marks have been successfully removed
with the following branded products: Goof Off®, Mr. Clean Magic
Eraser®, GOJO Orange Pumice Hand Cleaner and Simple Green.
Test Your Gas Lines
We recommend testing your gas lines before using to test for leaks.
This can be done using the “Soapy Water Method”
1. Apply a soap-and-water solution to each connection in the gas
lines and down the rubber hose.
2. Turn on the gas and look for bubbles.
3. If bubbles form, tighten the fitting slightly with a pipe wrench and
recheck.
4. Be sure to wipe off the old solution and apply a new round of the
soapy mixture.
5. If you see bubbles coming from the rubber hose line (not the
fitting) turn the gas off and call for a replacement rubber hose.
Ignitor
Version: 1/15/16 Page 4 of 4
MGP FIRE PITS: Glass Wind Guard
(Sold Separately)
You will need:
Flat, Clean Table
Phillips Screwdriver
Use your QR Code reader
to watch a video or visit
www.youtube.com/windwarddesign
Qty. Description Picture
I4 Glass Panes
J4 Bottom Connectors
K4 Top Connectors
Wind Guard Kit Includes:
Step 1
Open the wind guard kit and check to make sure you have
everything.
Step 2
On a flat surface, use a phillips screwdriver to put all four connectors
onto one glass pane. As picture above, do it upside down with the
bottom connectors on top, and the top connectors flush to the
ground with the glass. Repeat with a second glass pane.
Step 3
Set the two complete glass panes across from each other. Slide a
third pane in-between the two and screw into place. Add the fourth
pane to complete the circle and screw into place.
Step 4
Using two people, carefully flip the entire glass pane over (you may
require the help of a second person) and then place onto your fire
pit.
I
J
K
J
KI