Winsome house WHOF243 User manual

ID DESCRIPTION QTY ID DESCRIPTION QTY
A
Bed
1 B
Side Panels
2
C
Front Panels
1 D
Back Panel
1
E
Wheels
4 F
Front axle support assembly
1
G
Poly connection
1 H
Handle
1
I
Rear axle support assembly
1 J
Front handle connection bar
1
ID DESCRIPTION QTY ID DESCRIPTION QTY
A
M12 Washers
7 B
M12 Nylon Nuts
7
C
M8 Washers
3 D
M8 Nylon Nuts
3
E
M8*60 Hex Bolts
3 F
Fence Assembly Pins
8
Thank you for purchasing this Winsome House product. This product has been manufactured with the highest standards of safety and quality.
Product Name:
METAL WAGON, GREEN
SKU #:
WHOF243
Parts List
Hardware List
Instruction Manual
Please save this manual for future reference.
H
I
J
Make sure all nuts are tightened and assembly is complete.
Tighten each bolt nuts firmly. DO NOT over tighten any of the bolt nuts as this may cause stripping.
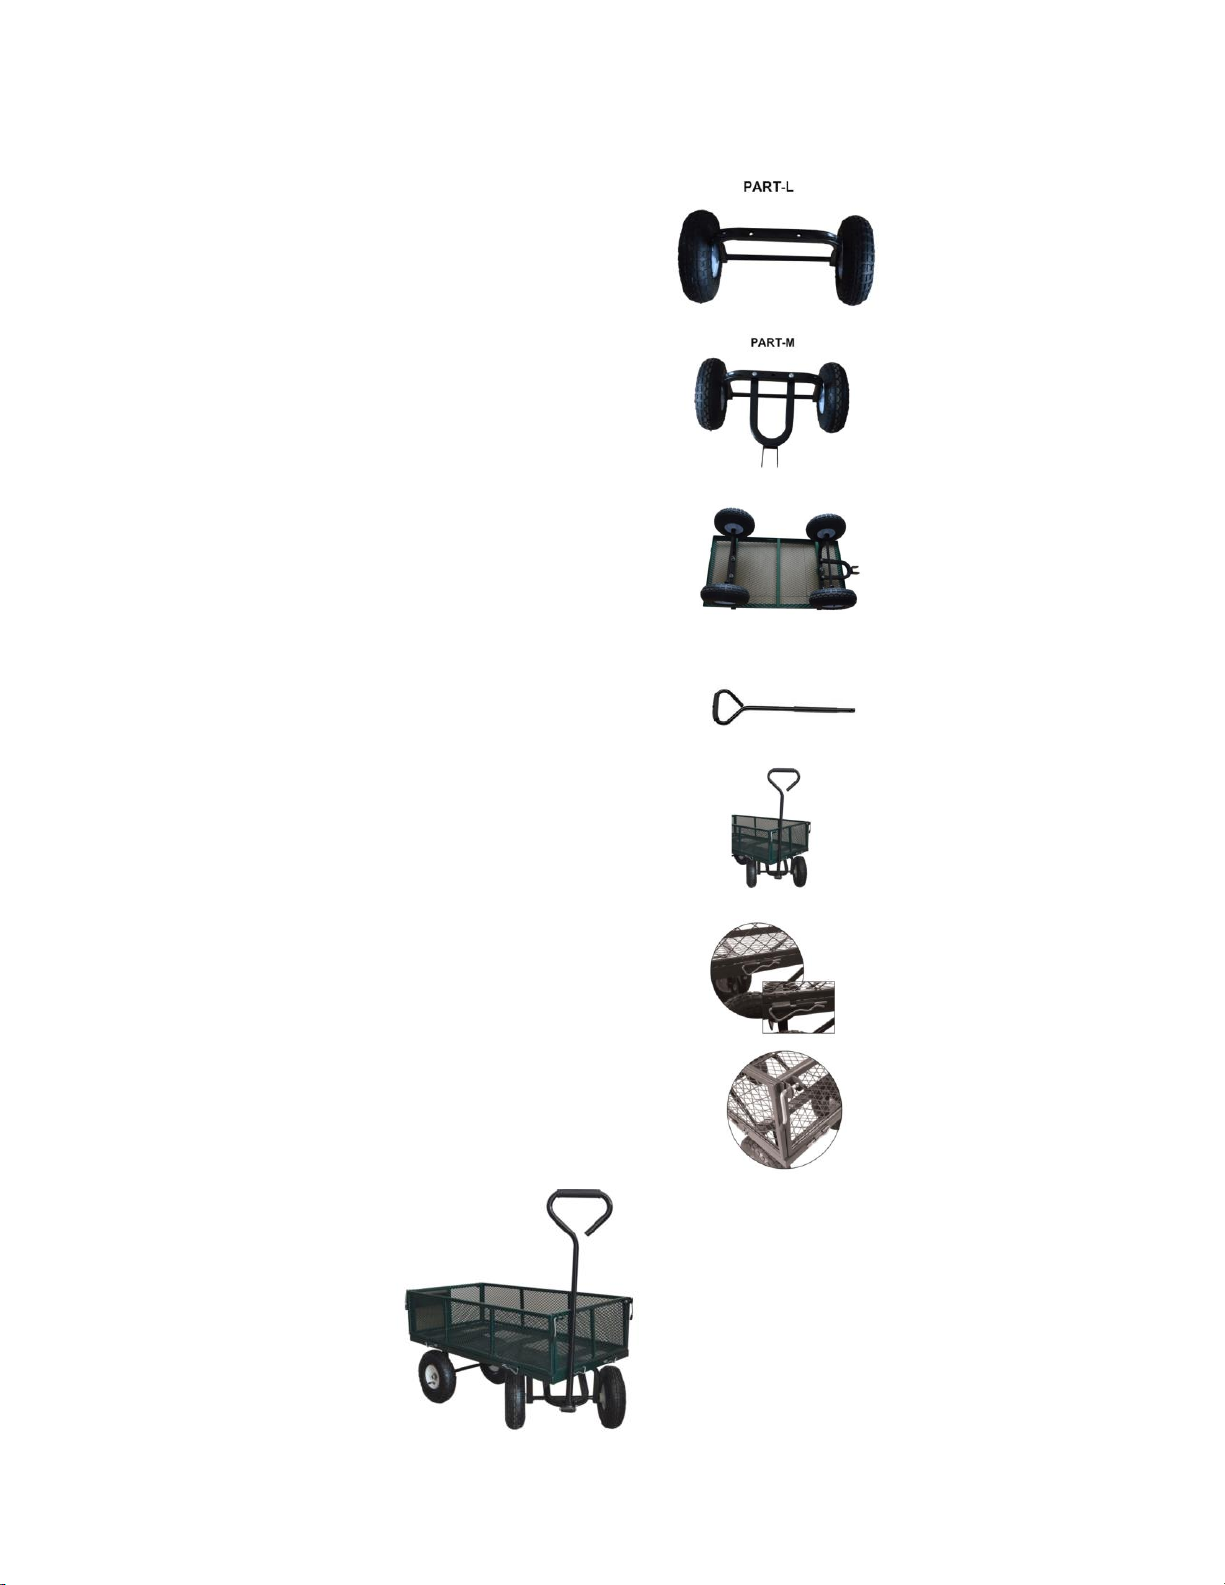
1. Remove parts from carton. Place carton on flat surface and complete assembly on the carton to
keep from scratching or damaging the finish of parts.
To assemble truck use socket wrench, an adjustable crescent wrench, or the wrench provided in the
hardware package.
2. Install two wheels (E) to the rear Axle Support Assembly (I)
using M12 Nylon Nuts (B) and M12 Washers (A).
Install two Wheels (E) to the Front Axle Support Assembly (F)
using M12 Nylon Nuts (B) and M12 Washers (A).
Next install the front handle connection bar (J) to the
Front Axle Support Assembly (F) using M8 x 60 Hex Bolts (E)
and M8 Nylon Nuts (D).
3. Attach PART-L to the rear side of the Bed (A) using
M12 Nylon Nuts (B) and M12 Washers(A).
Attach PART-M to the front side of the Bed (A) using
M12 Nylon Nuts (B) and M12 Washers (A).
4. Connect the Handle (H) with PART-M using Poly connection (G),
M8 x 60 Hex Bolt (E), and M8 Nylon Nut (D).
5. One at a time, attach the side panels by aligning the hinges,
sliding Fence Assembly Pins (F).
To lock the sides in place, hold side panel in the up position.
Rotate side panel lock lever from the up position to the down
position, and in doing so capture the side panel hook.
To fold truck sides down rotate the side panel lock levers into the up position
and fold panels down.

IMPORTANT SAFETY INSTRUCTIONS:
MAINTENANCE
g. DO NOT allow children to use this cart. It is not a toy.
a. MAX LOAD:600lbs. NEVER OVERLOAD THIS CART.
h. It's recommended that you do not modify or use this cart for any application other than that for which it was designed.
a. When not in use, store the cart in a place which is dry and out of direct sunlight.
b. Periodically check tire pressure. The tire pressure should be set at 30 +/-2 PSI.
c. Periodically check hardware. Retighten if any hardware is loose.
b. DO NOT inflate more than 30 PSI.
c. DO NOT operate if any parts are damaged or broken.
d. Lower fence rails when loading large items onto cart.
e. Distribute load evenly in cart bed.
f. DO NOT use on steep inclines where tipping may occur.


