PBC400
Benutzerhandbuch
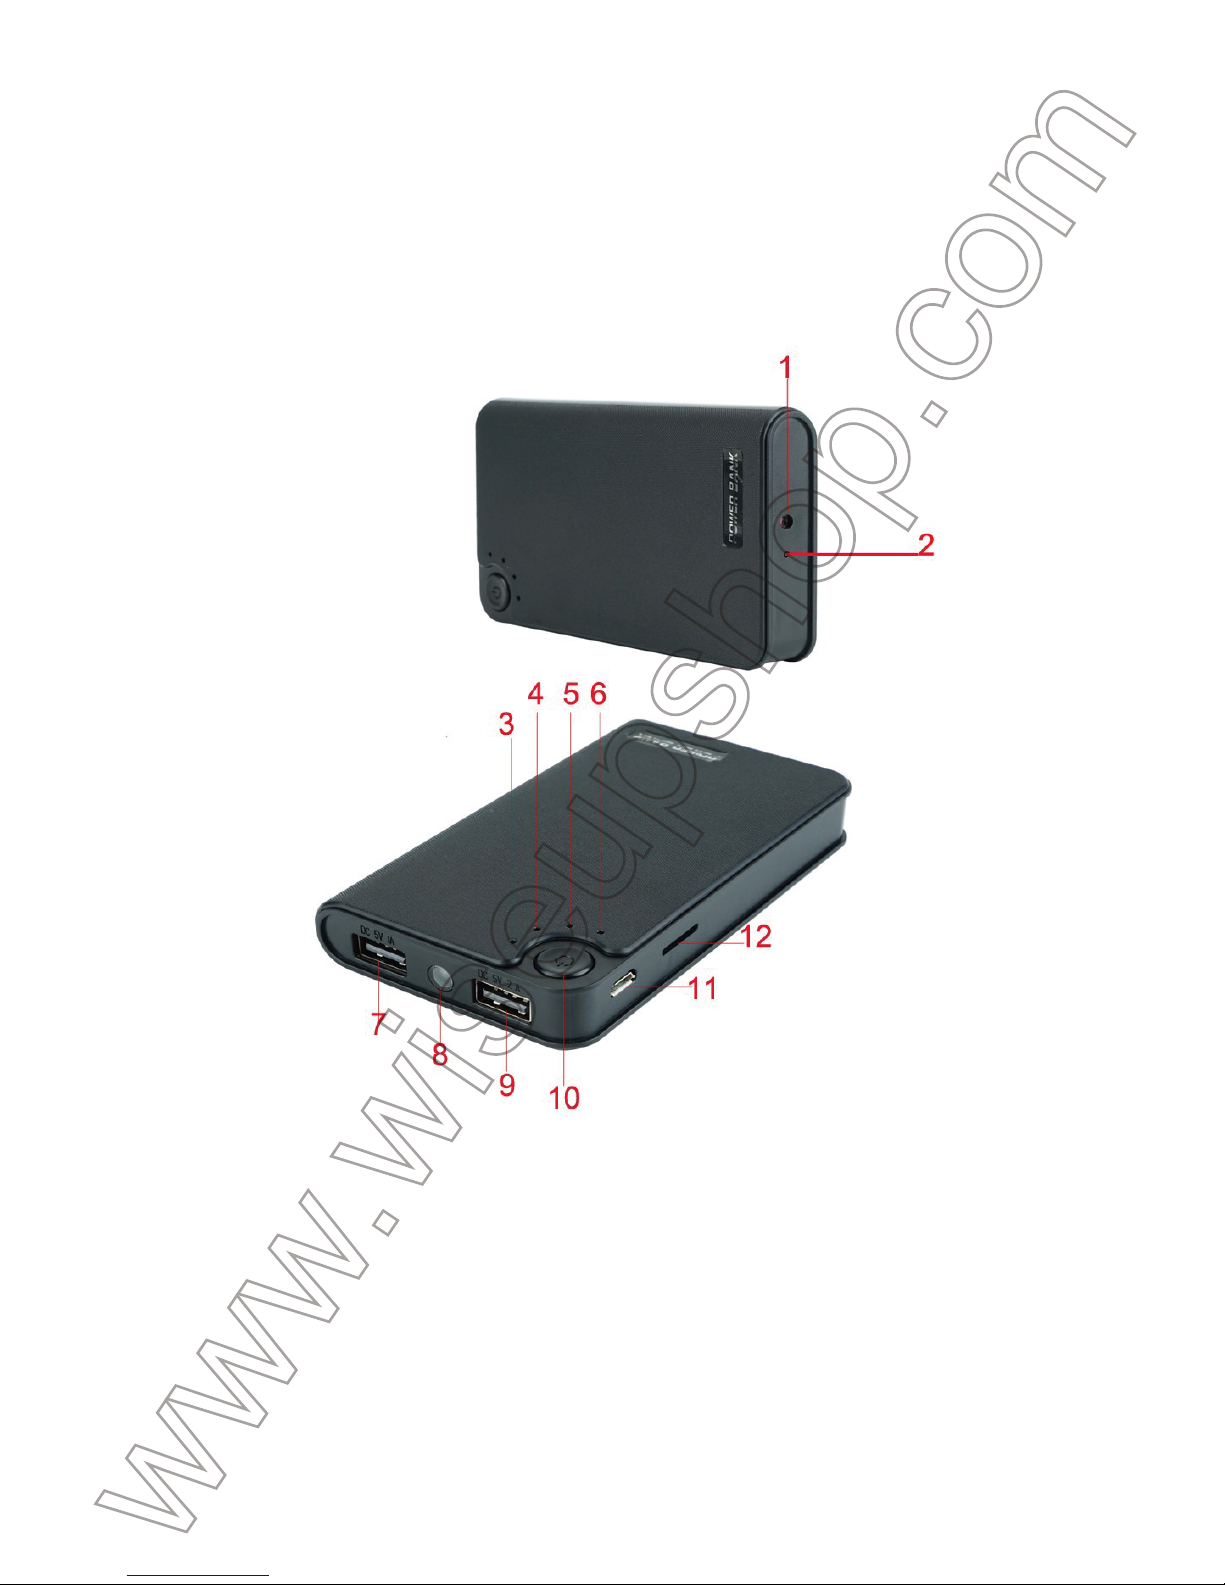
I. Produktübersicht
1. Kameraobjektiv
2. Mikrofon
3. Leistungs-Ausgangsindikator-Licht
4. Leistungsindikator-Licht
5. Standby-Anzeigeleuchte
6. Funktions-Anzeigelampe
7. DC5V 1A Ausgangsleistung
8. LED-Lampe
9. DC5V 2A Ausgangsleistung
10. Netzschalter
11. Mini-USB-Port / Stromeingang / Datenausgang
12. Mikro-Sd-Einbauschlitz
II. Was ist in der Box
-1 × Energien-Bank-Kamera
-1 × USB-Kabel
-1 × AC110-230V zum DC5V aufladenadapter
-1 × 8GB Micro SD-Karte (in den Micro SD-Kartensteckplatz bereits eingebaut)
III. Betrieb
>> Stellen Sie vor der Inbetriebnahme sicher, dass die Stromversorgungskamera
vollständig aufgeladen ist.
>> Vergewissern Sie sich, dass die Micro SD-Karte (4GB-64GB) bereits formatiert wurde
und sicher in den SD-Kartenslot der Stromversorgungskamera eingesteckt ist, oder es
funktioniert nicht. Eine SDHC Klasse 10 Micro SD-Karte wird empfohlen.
3.1. EINSCHALTEN / AUSSCHALTEN
3.1.1. Schalten Sie die Stromversorgungskamera ein, indem Sie den Netzschalter 2
Sekunden lang drücken. Die Standby- und Funktionsanzeige leuchten für 2
Sekunden blau. Dann schaltet sich die Funktionskontrollleuchte aus, während die
Standby-Kontrollleuchte konstant blau leuchtet und zeigt an, dass die
Stromversorgungskamera automatisch in den Standby-Modus versetzt wurde.
3.1.2. Schalten Sie die Stromversorgungskamera aus, indem Sie den Netzschalter 2
Sekunden lang erneut drücken. Die Bereitschaftsanzeige erlischt.
[Hinweis]: Die Energiebank schaltet sich automatisch ab, wenn sie sich im Standby-Modus befindet,
ohne dass der Betrieb länger als 3 Minuten ist.
3.2. VIDEOAUFNAHME
3.2.1. Schalten Sie die Stromversorgungskamera ein, indem Sie den Netzschalter
2 Sekunden lang drücken. Die Standby- und Funktionsanzeige leuchten für 2
Sekunden blau. Dann schaltet sich die Funktionskontrollleuchte aus, während die
Standby-Kontrollleuchte konstant blau leuchtet und zeigt an, dass die
Stromversorgungskamera automatisch in den Standby-Modus versetzt wurde.
3.2.2. Drücken Sie einmal die Ein / Aus-Taste, um das Video aufzunehmen. Die
Bereitschaftsanzeige blinkt dreimal blau und schaltet sich aus.
3.2.3. Drücken Sie die Ein- / Austaste erneut, um die Aufnahme zu beenden. Die
Standby-Anzeige leuchtet blau und zeigt an, dass die Stromversorgungskamera wieder
in den Standby-Modus schaltet.
[Hinweis]:
1). Eine Videodatei wird alle 10 Minuten automatisch generiert und gespeichert.
2). Die Energienbankkamera kann Video für 10 Stunden ununterbrochen auf einer vollen
Aufladung aufzeichnen.
3). Videoentschließung: 1920x1080P, 1280 x 720P, 640 x 480, 320 x 240 auswählbar
4). Video-Format: AVI
3.3. KAMERA / STILL FOTOGRAFIE
3.3.1. Schalten Sie die Stromversorgungskamera ein, indem Sie den Netzschalter 2
Sekunden lang drücken. Die Standby- und Funktionsanzeige leuchten für 2 Sekunden blau.
Dann schaltet sich die Funktionskontrollleuchte aus, während die Standby-Kontrollleuchte
konstant blau leuchtet und zeigt an, dass die Stromversorgungskamera automatisch in den
Standby-Modus versetzt wurde.
3.3.2. Drücken Sie die Power-Taste zweimal, um ein Foto aufzunehmen. Die
Standby-Kontrollleuchte ändert sich nicht, solange die Funktionskontrollleuchte
einmal blinkt und sich dann ausschaltet,
dann schaltet sich die Stromversorgungskamera wieder in den Standby-Modus.
3.4. AUDIO AUFNAHME
3.4.1. Schalten Sie die Stromversorgungskamera ein, indem Sie den Netzschalter 2
Sekunden lang drücken. Die Standby- und Funktionsanzeige leuchten für 2
Sekunden blau. Dann schaltet sich die Funktionskontrollleuchte aus, während
die Standby-Kontrollleuchte konstant blau leuchtet und zeigt an, dass die
Stromversorgungskamera automatisch in den Standby-Modus versetzt wurde.
3.4.2. Drücken Sie den Netzschalter 3 Mal hintereinander, um Audio aufzuzeichnen. Die
Standby-Kontrollleuchte ändert sich nicht, solange die Funktionskontrolllampe blau blinkt.
3.4.3. Drücken Sie einmal die Ein- / Aus-Taste, um die Aufnahme zu stoppen, und die
Funktionsanzeige leuchtet, und zeigt an, dass die Stromversorgungskamera wieder in den
Standby-Modus zurückkehrt.
[Hinweis]:
1). Eine Audiodatei wird alle 60 Minuten automatisch generiert und gespeichert.
2). Audio-Format: WAV
3.5. TASCHENLAMPE
3.5.1. Schalten Sie die Stromversorgungskamera ein, indem Sie den Netzschalter 2
Sekunden lang drücken. Die Standby- und Funktionsanzeige leuchten für 2 Sekunden
blau. Dann schaltet sich die Funktionskontrollleuchte aus, während die
Standby-Kontrollleuchte konstant blau leuchtet und zeigt an, dass die
Stromversorgungskamera automatisch in den Standby-Modus versetzt wurde.
3.5.2. Drücken Sie die Power-Taste 5 Mal hintereinander, um die LED-Lampe
einzuschalten.
3.5.3. Drücken Sie einmal die Ein- / Aus-Taste, um die LED-Lampe auszuschalten.
IV. Video / Bilddateien Uploads
4.1. Schalten Sie die Stromversorgungskamera aus, entfernen Sie die Micro SD-Karte
und stecken Sie sie in einen Kartenleser ein.
4.2. Stecken Sie den Kartenleser in einen PC-Computer.
4.3. Wechseldatenträgerordner wird angezeigt.
4.4. Auf alle Dateien kann im "DCIM" zugegriffen werden.
V. Einstellzeit / Datumsstempel
5.1. Schalten Sie die Stromversorgungskamera aus, entfernen Sie die Micro SD-Karte
und stecken Sie sie in einen Kartenleser ein.
5.2. Stecken Sie den Kartenleser in einen PC-Computer.
5.3. Wechseldatenträgerordner wird angezeigt.
5.4. Klicken Sie auf das Laufwerk im Stammverzeichnis und im Stammverzeichnis, erstellen
Sie eine Datei mit dem Namen "timeset.txt".
5.5. Schreiben Sie das aktuelle Datum und die Uhrzeit in der Datei "timeset.txt" mit dem
richtigen Format:
YYYY.MM.DD HH: MM: SS Y (Beispiel: 2016.10.09 15:25:13 Y). Speichern Sie diese Datei.
Wenn Sie den Stempel auf den Video- oder Bilddateien nicht benötigen, ändern Sie die Y in
N in der Datei "timeset.txt".
5.6. Starten Sie die Stromversorgungskamera neu, und das System aktualisiert das
Programm automatisch.
VI. Einstellung der Videoauflösung
6.1. Schalten Sie die Stromversorgungskamera aus, entfernen Sie die Micro SD-Karte
und stecken Sie sie in einen Kartenleser ein.
6.2. Stecken Sie den Kartenleser in einen PC-Computer.
6.3. Wechseldatenträgerordner wird angezeigt.
6.4. Klicken Sie auf das Laufwerk im Stammverzeichnis und im Stammverzeichnis, erstellen
Sie eine Datei mit dem Namen "sizeset.txt".
6.5. 1 steht für 320 x 240, 2 für 640 x 480, 3 für 1280 x720P und 4 für 1920 x 1080P.
Einfach die gewünschte Nummer in die Datei "sizeset.txt" eingeben und speichern.
6.6. Legen Sie die Micro SD-Karte in die Stromversorgungskamera ein, starten Sie sie
neu und das System aktualisiert das Programm automatisch.
VII. Aufladen
7.1. Schließen Sie die Stromversorgungskamera an eine Netzsteckdose an, indem Sie
den DC 5V Ladeadapter und das mitgelieferte USB-Kabel verwenden.
7.2. Es dauert 4 Stunden, um eine volle Ladung zu erhalten.
7.3. Die Betriebsanzeige leuchtet während des Ladevorgangs blau.
7.4. Wenn die Stromversorgungskamera voll aufgeladen ist, schaltet sich die
Stromversorgungsanzeige aus.