Wittenstein LP+ User manual

Artisan Technology Group is your source for quality
new and certied-used/pre-owned equipment
• FAST SHIPPING AND
DELIVERY
• TENS OF THOUSANDS OF
IN-STOCK ITEMS
• EQUIPMENT DEMOS
• HUNDREDS OF
MANUFACTURERS
SUPPORTED
• LEASING/MONTHLY
RENTALS
• ITAR CERTIFIED
SECURE ASSET SOLUTIONS
SERVICE CENTER REPAIRS
Experienced engineers and technicians on staff
at our full-service, in-house repair center
WE BUY USED EQUIPMENT
Sell your excess, underutilized, and idle used equipment
We also offer credit for buy-backs and trade-ins
www.artisantg.com/WeBuyEquipment
REMOTE INSPECTION
Remotely inspect equipment before purchasing with
our interactive website at www.instraview.com
LOOKING FOR MORE INFORMATION?
Visit us on the web at www.artisantg.com for more
information on price quotations, drivers, technical
specications, manuals, and documentation
Contact us: (888) 88-SOURCE | sales@artisantg.com | www.artisantg.com
SM
View
Instra

2022
-
D018479
05
2022-D018479 Revision: 05
LP+/ LPB+
Operating Manual
Artisan Technology Group - Quality Instrumentation ... Guaranteed | (888) 88-SOURCE | www.artisantg.com

LP+/ LPB+
2022-D018479 Revision: 05
Revision history
Revision Date Comment Chapter
01 20.01.03 new version all
02 16.01.07 technical data updated 6.4.1
03 22.12.08 technical data updated
Layout WITTENSTEIN
all
04 01.08.09 Machinery Directive 1, 2, 3, 4, 6
05 07.09.10 technical data updated 5.4, 9.1
Service
In case you have technical questions,
please contact:
WITTENSTEIN alpha GmbH
Customer Service
Walter-Wittenstein-Straße 1
D-97999 Igersheim
Tel.: +49 7931 493-10900
Fax: +49 7931 493-10903
E-mail: [email protected]
© WITTENSTEIN alpha GmbH 2010
This documentation is copyright protected.
WITTENSTEIN alpha GmbH reserves all the rights to photo-mechanical reproduction,
copying, and the distribution by special processes (such as computers, file media, data
networks), even in parts.
Subject to technical and content changes without notice.
Artisan Technology Group - Quality Instrumentation ... Guaranteed | (888) 88-SOURCE | www.artisantg.com

LP+/ LPB+
Revision: 05 2022-D018479 en-1
Contents
1 Regarding this manual.........................................................................................2
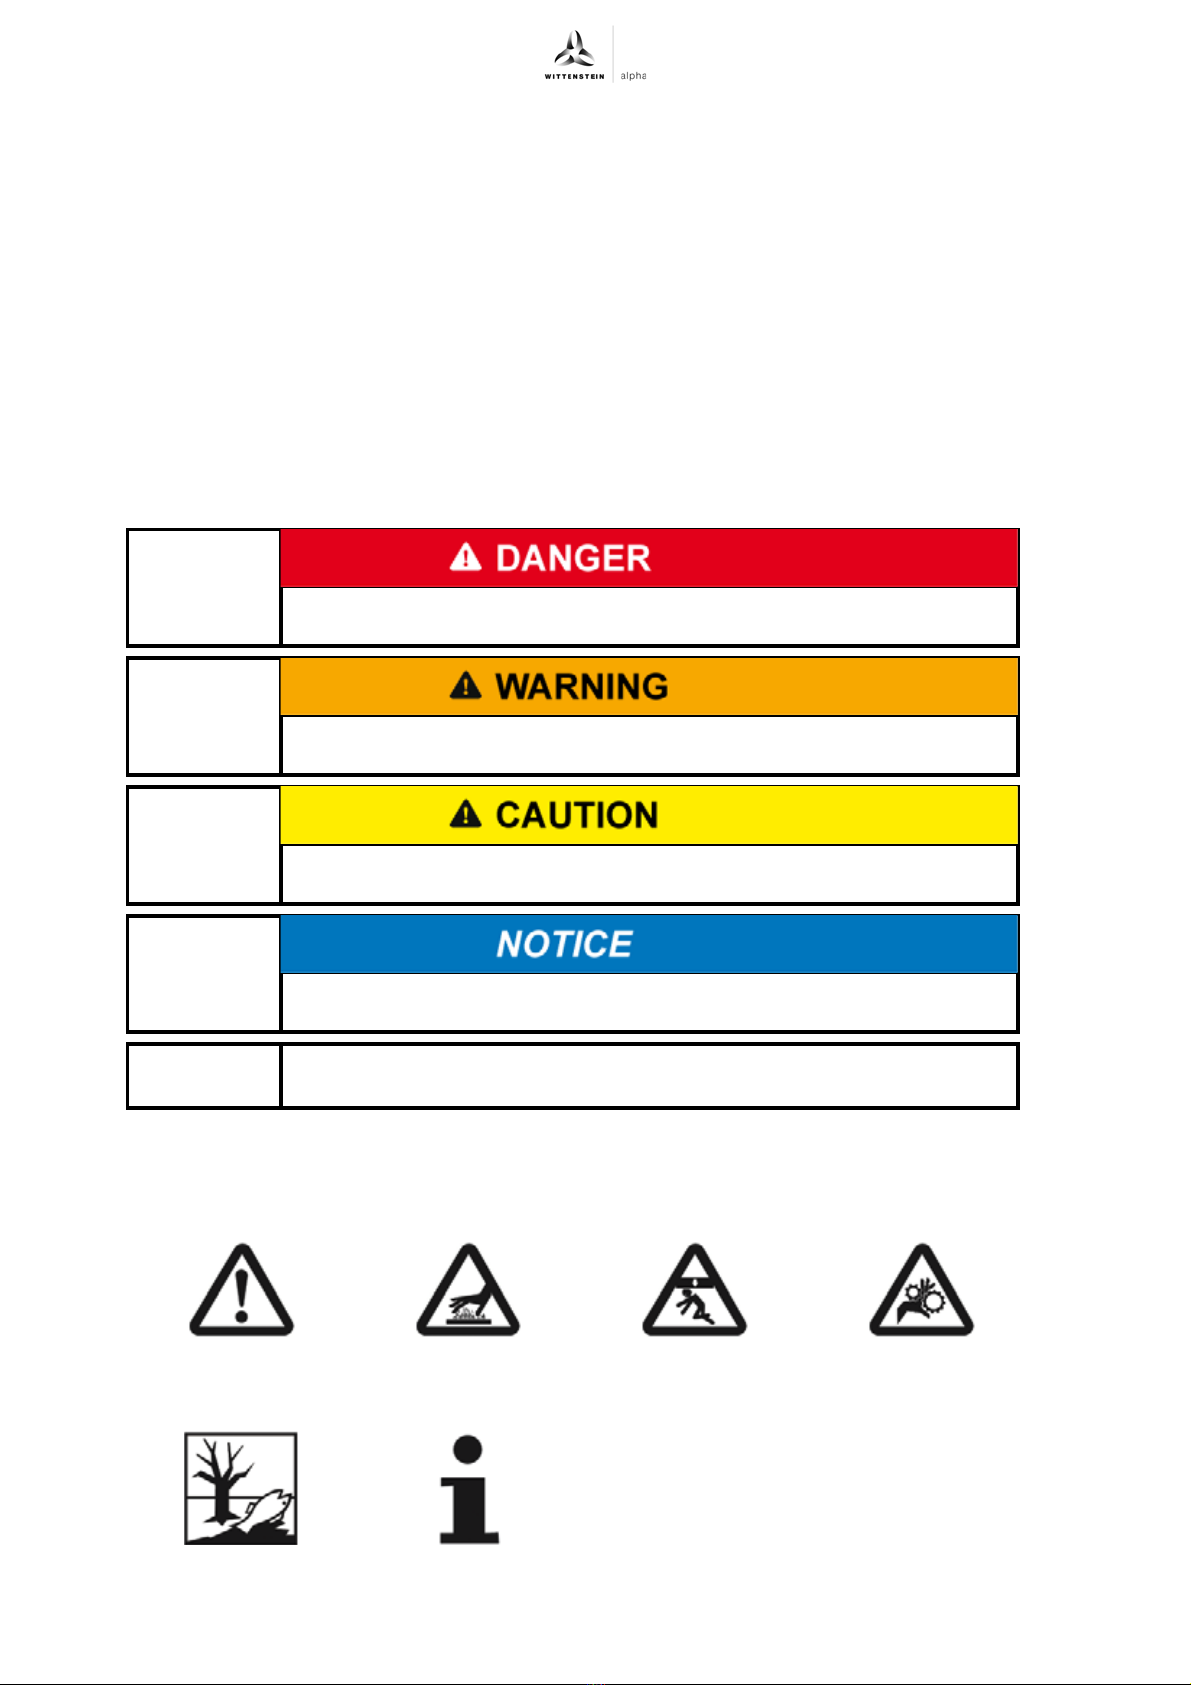
1.1 Signal words ........................................................................................................2
1.2 Safety symbols.....................................................................................................2
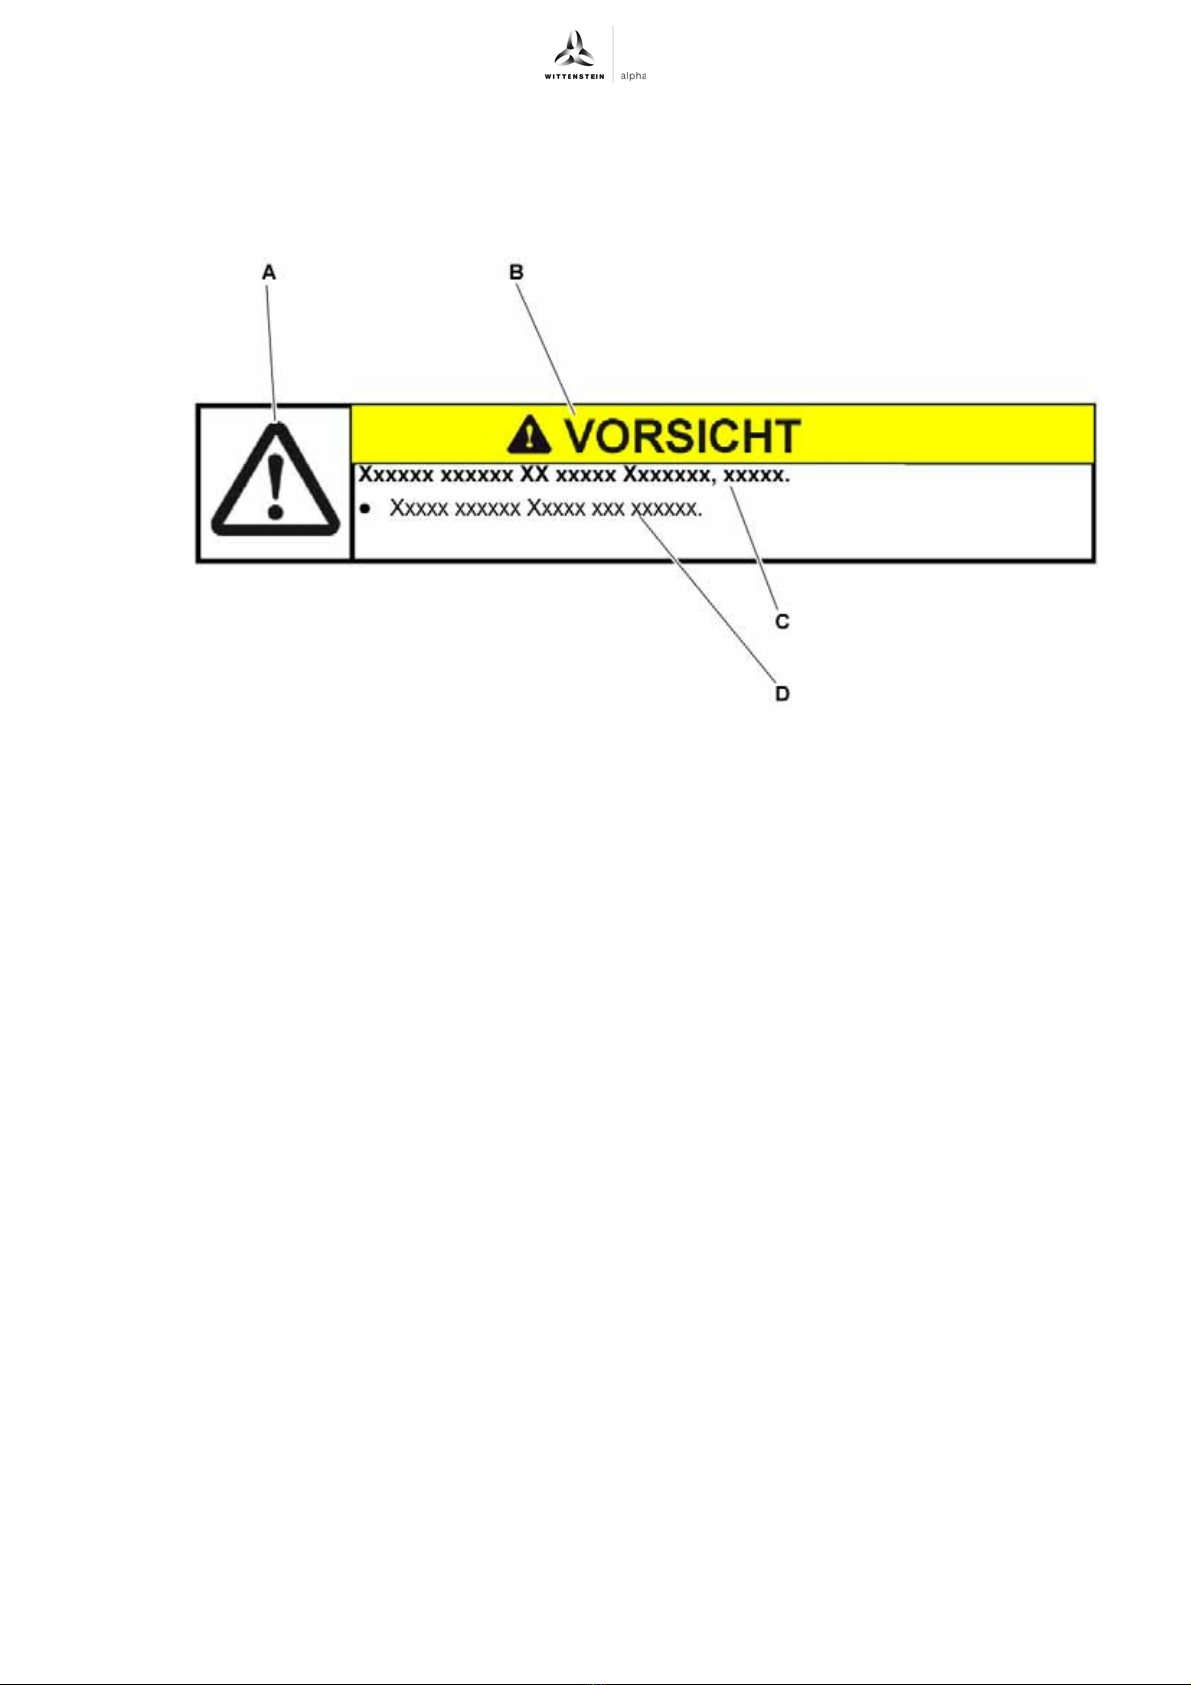
1.3 Design of the safety instructions ..........................................................................3
1.4 Information symbols.............................................................................................3
2 Safety.....................................................................................................................4
2.1 EC – Machinery directive .....................................................................................4
2.2 Dangers ...............................................................................................................4
2.3 Personnel.............................................................................................................4
2.4 Intended use ........................................................................................................4
2.5 Reasonably predictable misuse ...........................................................................4
2.6 Guarantee and liability .........................................................................................4
2.7 General safety instructions ..................................................................................5
3 Description of the gearhead................................................................................6
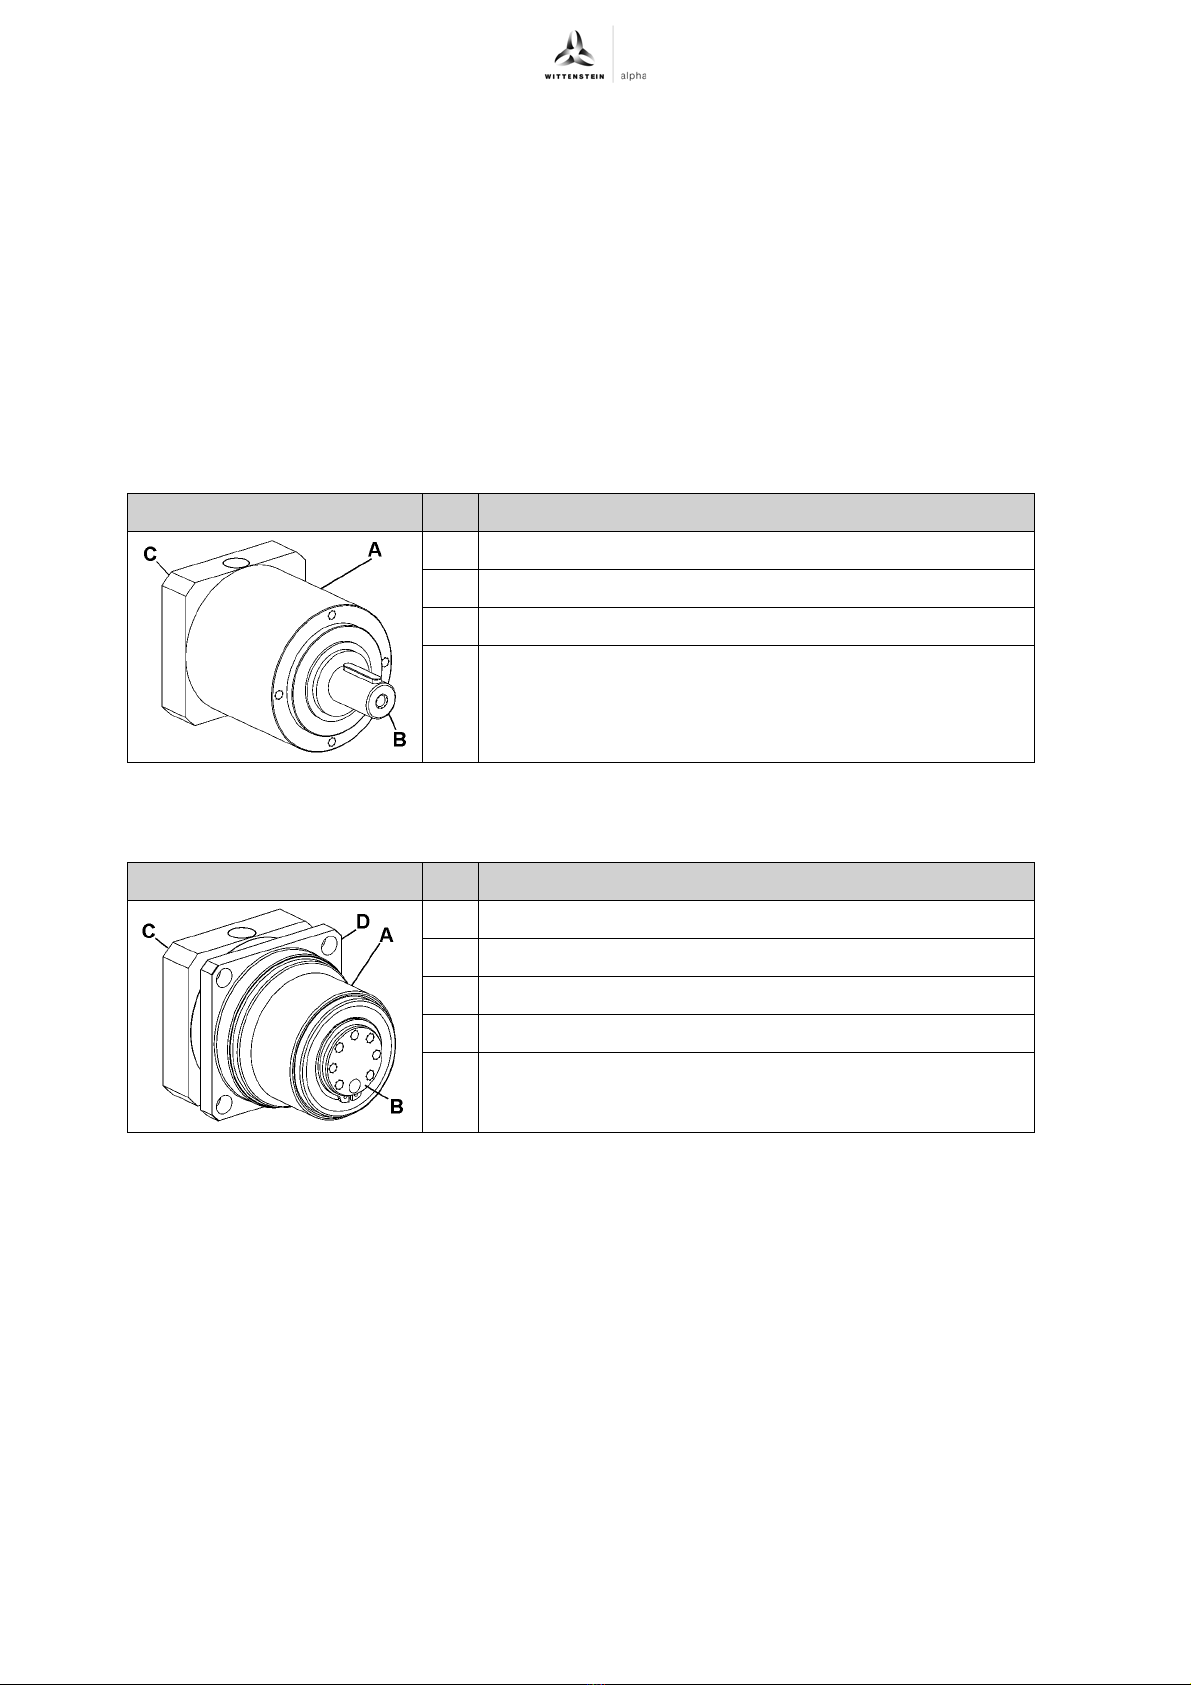
3.1 Overview of the gearhead components ...............................................................6
3.1.1 Overview of the gearhead components LP+....................................................6
3.1.2 Overview of the gearhead components LPB+.................................................6
3.2 Type plate ............................................................................................................7
3.3 Ordering key ........................................................................................................7
3.4 Performance statistics..........................................................................................8
3.5 Weight..................................................................................................................8
4 Transport and storage.........................................................................................9
4.1 Scope of delivery .................................................................................................9
4.2 Packaging ............................................................................................................9
4.3 Transport..............................................................................................................9
4.4 Storage ................................................................................................................9
5 Assembly ............................................................................................................10
5.1 Preparations.......................................................................................................10
5.2 Mounting the gearhead to a machine (LPB+).....................................................11
5.3 Mounting the motor onto the gearhead (LP+/ LPB+) ..........................................12
5.3.1 Pre-mounting adapter plate (only LPB+) .......................................................12
5.3.2 Mounting the motor (LP+/ LPB+) ...................................................................13
5.4 Mounted components on the gear output side...................................................14
5.4.1 Mountings on the output flange (LPB+) .........................................................14
5.5 Mounting the gearhead to a machine (LP+) .......................................................15
6 Startup and operation........................................................................................16
7 Maintenance and disposal.................................................................................17
7.1 Maintenance work..............................................................................................17
7.1.1 Visual inspection ...........................................................................................17
7.1.2 Checking the tightening torques....................................................................17
7.2 Startup after maintenance work .........................................................................17
7.3 Maintenance schedule .......................................................................................17
7.4 Notes on the lubricant used ...............................................................................18
7.5 Disposal .............................................................................................................18
8 Malfunctions.......................................................................................................19
9 Appendix.............................................................................................................20
9.1 Specifications on mounting onto a motor...........................................................20
9.2 Specifications on mounting onto a machine ......................................................20
9.3 Tightening torques for common thread sizes in general mechanics ..................21
Artisan Technology Group - Quality Instrumentation ... Guaranteed | (888) 88-SOURCE | www.artisantg.com

Regarding this manual LP+/ LPB+
en-2 2022-D018479 Revision: 05
1 Regarding this manual
These instructions contain necessary information for the safe operation of the planetary gearhead
LP+/LPB+, referred to as gearhead in the following.
The operator must make sure that this operating manual is read through by all persons assigned to
install, operate, or maintain the gearhead, and that they understand them.
Store these instructions within reach near the gearhead.
These safety instructions should be shared with colleagues working in the vicinity of the device
to ensure individual safety.
The original instructions were prepared in German; all other language versions are translations of
these instructions.
1.1 Signal words
The following signal words are used to bring your attention to dangers, prohibitions, and important
information:
1.2 Safety symbols
The following safety symbols are used to bring your attention to dangers, prohibitions, and
important information:
This signal word points to an imminent danger that can cause serious
injuries and even death.
This signal word points to a possible danger that can cause serious
injuries and even death.
This signal word points to a possible danger that can cause slight to
serious injuries.
This signal word points to a possible danger that can cause material
damage.
A note without signal word draws your attention to application tips or
especially important information when handling the gearhead.
General danger Hot surface Suspended loads Danger of being
pulled in
Environment
protection
Information
Artisan Technology Group - Quality Instrumentation ... Guaranteed | (888) 88-SOURCE | www.artisantg.com

LP+/ LPB+Regarding this manual
Revision: 05 2022-D018479 en-3
1.3 Design of the safety instructions
The safety instructions of this operating manual are designed according to the following pattern:
1.4 Information symbols
The following information symbols are used:
zrequires you to carry out an action
Âindicates the results of an action
Lprovides additional information on handling
A= Safety symbol (see Chapter 1.2 "Safety symbols")
B= Signal word (see Chapter 1.1 "Signal words")
C= Type and consequence of the danger
D= Prevention of the danger
Artisan Technology Group - Quality Instrumentation ... Guaranteed | (888) 88-SOURCE | www.artisantg.com

Safety LP+/ LPB+
en-4 2022-D018479 Revision: 05
2 Safety
These instructions, especially the safety instructions and the rules and regulations valid for the
operating site, must be observed by all persons working with the gearhead.
In addition to the safety specifications mentioned in this operating manual, the general and also the
local regulations on the prevention of accidents (for instance, personal safety equipment) and on
environmental protection should be observed.
2.1 EC – Machinery directive
The gearhead is considered a "machine component" and is therefore not subject to the EC
Machinery Directive 2006/42/EC.
Operation is prohibited within the area of validity of the EC directive until it has been determined
that the machine in which this gearhead is installed corresponds to the regulations within this
directive.
2.2 Dangers
The gearhead has been constructed according to current technological standards and accepted
safety regulations.
To avoid danger to the operator or damage to the machine, the gearhead may be put to use only
for its intended usage (see chapter 2.4 "Intended use") and in a technically flawless and safe state.
zBe informed of the general safety instructions before beginning work. (see Chapter 2.7
"General safety instructions").
2.3 Personnel
Only persons who have read and understood these instructions may carry out work on the
gearhead.
2.4 Intended use
The gearhead serves to convert torques and speeds. It is built for industrial applications that do not
fall under article 2 of the directive 2002/95/EU (usage restriction of certain dangerous materials on
electro and electronic equipment).
The gearhead is specified for installment on motors that:
- correspond to the design B5 (for any divergences, please consult our Customer Service
Department [technical customer service])
- show a radial and axial runout tolerance of at least “N” according to DIN 42955 and
- have a smooth shaft
2.5 Reasonably predictable misuse
Any usage that exceeds the maximum permitted speeds, torques and temperature is considered a
misuse and is therefore prohibited.
2.6 Guarantee and liability
Guarantee and liability claims are excluded for personal injury and material damage in case of
- Ignoring the information on transport and storage
- Improper use (misuse)
- Improper or neglected maintenance and repair
- Improper assembly / disassembly or improper operation
- Operation of the gearhead when safety devices and equipment are defective
- Operation of the gearhead without lubricant
- Operation of a heavily soiled gearhead
- Modifications or reconstructions that have been carried out without the approval of
WITTENSTEIN alpha GmbH
Artisan Technology Group - Quality Instrumentation ... Guaranteed | (888) 88-SOURCE | www.artisantg.com

LP+/ LPB+Safety
Revision: 05 2022-D018479 en-5
2.7 General safety instructions
Objects flung out by rotating components can cause serious injuries.
zRemove objects and tools from the gearhead before putting it into
operation.
Rotating components on the gearhead can pull in parts of the body
and cause serious injuries and even death.
zKeep a sufficient distance to rotating machinery while the gearhead is
running.
zSecure the machine against restarting and unintentional movements
during assembly maintenance work.
Hot gearhead housing can cause serious burns.
zTouch the gearhead housing only when wearing protective gloves or
after the gearhead has been at standstill for some time.
Loose or overloaded screw connections can damage the gearhead.
zUse a calibrated torque wrench to tighten and check all screw
connections for which a tightening torque has been specified.
Solvents and lubricants can pollute soil and water.
zUse and dispose of cleaning solvents as well as lubricants appropriately.
Artisan Technology Group - Quality Instrumentation ... Guaranteed | (888) 88-SOURCE | www.artisantg.com

Description of the gearhead LP+/ LPB+
en-6 2022-D018479 Revision: 05
3 Description of the gearhead
The gearhead is a single- or multistage, low-backlash planetary gearhead, which is manufactured
as standard in the "M" version (motor installation). The output shaft bearing is designed to withstand
high tilting moments and axial forces.
The motor is centered using the clamping hub and not with the adapter plate. A radial distortion of
the motor is avoided.
Adaptation to various motors is done by an adapter plate and a bushing.
The optional LPB+has an output flange instead of an output shaft. You thus have the option of
mounting a toothed belt pulley.
3.1 Overview of the gearhead components
3.1.1 Overview of the gearhead components LP+
3.1.2 Overview of the gearhead components LPB+
Gearhead components LP+
A Gearhead housing
B Output shaft
C Adapter plate
Tbl-1: Overview of the gearhead components
Gearhead components LPB+
A Gearhead housing
B Output flange
C Adapter plate
D Mountable flange
Tbl-2: Overview of the gearhead components
Artisan Technology Group - Quality Instrumentation ... Guaranteed | (888) 88-SOURCE | www.artisantg.com

LP+/ LPB+Description of the gearhead
Revision: 05 2022-D018479 en-7
3.2 Type plate
The type plate is attached to the gearhead housing.
3.3 Ordering key
Designation
A Ordering key (see chapter 3.3
"Ordering key")
BRatio
C Serial number
D Lubrication information
E Production date
Tbl-3: Type plate (sample values)
The ratio (e.g. i = 10) can also be found on a label on the plug socket. The
bushing is properly aligned when the slit points to the label.
WITTENSTEIN alpha GmbH - Walter Wittenstein-Str.1 - 97999 Igersheim
LP 155-M01-10 -111-000
SN: 1234567
DMF: 24/08
Lubrication: For Lifetime
Made in Germany
i= 10
A
CD
B
E
10
Size
LPB+ 070/090/120
LP+ 050/070/090/120/155
Gearhead versions
Motor-mounted gearhead
M=
Gearhead type
Standard designO=
Stage number
1 = 1-stage
2 = 2-stage (only LP+)
Ratio i
Type of output shaft
0 = Smooth shaft
1 = Feather key DIN6885 type A
LP+
1 = centering on output side
3 = centering on motor side
LPB+
Clearance specification
1 = Standard
Bore diameters of the
clamping hub
ee catalogue)1 = Standard (S
LPB 090-MO1-3-111
Artisan Technology Group - Quality Instrumentation ... Guaranteed | (888) 88-SOURCE | www.artisantg.com

Description of the gearhead LP+/ LPB+
en-8 2022-D018479 Revision: 05
3.4 Performance statistics
Please refer to our catalogue or our Internet page for the maximum permitted speeds and
torques:http://www.wittenstein-alpha.de
3.5 Weight
The table "Tbl-4" specifies the gearhead dimensions with medium-sized adapter plate. If another
adapter plate is mounted, the actual dimensions can deviate by up to 20%.
Please consult our Customer Service department if your gearhead is
older than a year. You will then receive the valid performance data.
Gearhead size LP+050 070 090 120 155
1-stage [kg] 0.75 2.0 4.0 8.6 17.0
2-stage [kg] 0.95 2.4 5.0 11.0 21.0
Gearhead size LPB+050 070 090 120 155
1-stage [kg] — 1.6 3.3 7.3 —
Tbl-4: Weight
Artisan Technology Group - Quality Instrumentation ... Guaranteed | (888) 88-SOURCE | www.artisantg.com

LP+/ LPB+Transport and storage
Revision: 05 2022-D018479 en-9
4 Transport and storage
4.1 Scope of delivery
zCheck the completeness of the delivery against the delivery note.
LMissing parts or damage must be notified immediately in writing to the carrier, the
insurance, or WITTENSTEIN alpha GmbH.
4.2 Packaging
The gearhead is delivered packed in foil and cardboard boxes.
zDispose of the packaging materials at recycling sites intended for that. Observe the locally
valid regulations for disposals.
4.3 Transport
No special transport mode is prescribed for transporting the gearhead.
Specifications on the weights, refer to Chapter 3.5 "Weight".
4.4 Storage
Store the gearhead in horizontal position and dry surroundings at a temperature of 0 °C to +40 °C
in the original packaging. Store the gearhead for a maximum of 2 years.
For storage logistics, we recommend the "first in – first out" method.
Hard knocks, for instance because of falling or hard dropping, can
damage the gearhead.
zOnly use hoisting equipment and transports with sufficient capacity.
zThe maximum permitted lift capacity of a hoist may not be exceeded.
zLower the gearhead slowly.
Suspended loads can fall and can cause serious injuries and even
death.
zDo not stand under suspended loads.
Artisan Technology Group - Quality Instrumentation ... Guaranteed | (888) 88-SOURCE | www.artisantg.com

Assembly LP+/ LPB+
en-10 2022-D018479 Revision: 05
5 Assembly
zBe informed of the general safety instructions before beginning work. (see Chapter 2.7
"General safety instructions").
5.1 Preparations
The differences in the assembly sequence of LP+and LPB+are listed in the table "Tbl-5".
LIf you have any questions, please contact our Customer Service department.
The bolts for mounting are not included in the delivery and need to be provided by the customer.
Information can be found in the individual assembly steps.
zClean/de-grease the following components with a clean and lint-free cloth and grease-
dissolving, non-aggressive detergent:
- All fitting surfaces to neighboring components
- Centering
- The motor shaft
- The inner diameter of the plug receptacle
- The bushing inside and out
zCheck the fitting surfaces additionally for damage and impurities.
LP+LPB+
—1
5.2 "Mounting the
gearhead to a
machine (LPB+)"
1
5.3 "Mounting the
motor onto the
gearhead (LP+/
LPB+)"
2
5.3 "Mounting the
motor onto the
gearhead (LP+/
LPB+)"
2
5.4 "Mounted
components on the
gear output side"
3
5.4 "Mounted
components on the
gear output side"
3
5.5 "Mounting the
gearhead to a
machine (LP+)"
—
Tbl-5: Assembly sequence
Pressurized air can damage the gearhead seals.
zDo not use pressurized air to clean the gearhead.
Artisan Technology Group - Quality Instrumentation ... Guaranteed | (888) 88-SOURCE | www.artisantg.com

LP+/ LPB+Assembly
Revision: 05 2022-D018479 en-11
5.2 Mounting the gearhead to a machine (LPB+)
There are two centering mechanisms for assembling the gearhead to the machine:
LIf necessary, a spacer (E) may need to be placed between the gear reducer and your machine
to position the gear reducer precisely. Such a spacer is not part of the drive's delivery and
needs to be provided by the customer.
zThoroughly clean the output flange, centering, fitting surface, spacer and toothed belt pulley.
The anti-corrosion agent on the toothed belt pulley must be removed.
LTo remove the Aceton or Loctite 7063 anti-corrosion agent, use a clean, lint-free cloth.
zAlso clean the browned toothed belt pulley with a brush and remove any salt residue between
the flanged wheel and toothed belt wheel.
zObserve the safety and processing instructions of the cleaning agents
and screw-bonding agents to be used.
centering
Amotor side
Bgear output side
Tbl-6: Centering mechanisms
Artisan Technology Group - Quality Instrumentation ... Guaranteed | (888) 88-SOURCE | www.artisantg.com

Assembly LP+/ LPB+
en-12 2022-D018479 Revision: 05
The fastening screws need to be provided by the customer.
LYou can find the prescribed screw sizes and tightening torques in Chapter 9.2 "Specifications
on mounting onto a machine", table "Tbl-17".
LWhen using hollow profiles (C): Position the toothed belt pulley (D) in the hollow profile before
you attach the gearhead.
zSmear screw-bonding agent (for example Loctite 243) onto the fastening bolts.
zFasten the gearhead to the machine with the fastening screws through the through-holes.
LMount the gearhead in such a way that the type plate remains legible, if possible.
LDo not use washers (e.g. plain washers, tooth lock washers).
5.3 Mounting the motor onto the gearhead (LP+/ LPB+)
The standard delivery of a gearhead does not have a motor. The motor to be mounted has to:
- correspond to the B5 design
- have a radial and axial runout tolerance of ”N” according to DIN 42955 and
- if possible, have a smooth shaft.
LIf a motor is included in the delivery, then it is:
- already firmly mounted on the LP+(no assembly necessary).
- only mounted hand-tight on the LPB+(assembly necessary).
5.3.1 Pre-mounting adapter plate (only LPB+)
The following information is valid for only the LPB+. On the LP+, the adapter plate is already
mounted.
The adapter plate (B) along with the four
fastening bolts (A) are included in the scope of
delivery.
zPlace the adapter plate onto the housing and
hand-tighten the bolts at first.
zTighten the bolts in diagonal order in at least
two passes to the required tightening torque.
See table "Tbl-7"
Gearhead size
LPB+Size Tightening torque
[Nm]
070 M4 2,64
090 M6 8,99
120 M6 8,99
Tbl-7: Fastening bolts adapter plate
Artisan Technology Group - Quality Instrumentation ... Guaranteed | (888) 88-SOURCE | www.artisantg.com

LP+/ LPB+Assembly
Revision: 05 2022-D018479 en-13
5.3.2 Mounting the motor (LP+/ LPB+)
zSmear screw-bonding agent (for example Loctite 243) onto the four bolts (E).
zFasten the motor (C) onto the adapter plate (D) with the four screws (E).
zTighten the threaded pin (B) of the plug receptacle (A).
LFor bolt sizes and specified torques refer to chapter 9.1 "Specifications on mounting onto a
motor", tables "Tbl-15".
zPress the enclosed stopper plugs up to their stop in the mounting bores of the
adapter plate (D).
zObserve the general information and safety instructions of the motor
manufacturer.
zObserve the safety and processing instructions of the screw-bonding
agents to be used.
zEnsure that the motor is mounted if possible
in a vertical direction.
zIf the motor shaft has a shaft key, remove the
shaft key.
LIf recommended by the motor
manufacturer, insert a half wedge.
zTurn the plug socket (A) so that the threaded
pin (B) can be reached through the mounting
holes.
zPush the motor shaft into the plug receptacle
of the gearhead.
LThe maximum permitted axial forces may
not be exceeded, see Chapter 9.1
"Specifications on mounting onto a
motor", table "Tbl-15". The motor shaft
should slip in easily. If this is not the case,
the threaded pin needs to be loosened
more.
LThe slit of the bushing has to line up with
the groove (if existing) of the motor shaft
and be turned by 90° to the threaded pin,
see table "Tbl-8".
LNo gap is permitted between motor (C)
and the adapter plate (D).
Designation
A Plug receptacle
B Threaded pin
F Bushing
G Smooth shaft
H Keyed shaft
Tbl-8: Arrangement of motor shaft, plug receptacle and bushing
B
G
F
A
H
Artisan Technology Group - Quality Instrumentation ... Guaranteed | (888) 88-SOURCE | www.artisantg.com

Assembly LP+/ LPB+
en-14 2022-D018479 Revision: 05
5.4 Mounted components on the gear output side
5.4.1 Mountings on the output flange (LPB+)
Distortions during mounting operations can damage the gearhead.
zMount gearwheels and toothed belt pulleys onto the output shaft without
forcing.
zDo not on any account attempt an assembly by force or hammering!
zOnly use suitable tools and equipment for assembly.
zIf you pull on or shrink-fit a gear wheel onto the output shaft, you must
make sure that the maximum permitted static axial forces of the output
bearing (see table "Tbl-9") are not exceeded.
Size LP+/ LPB+050 070 090 120 155
Fa max[N] 1800 4300 5100 11300 18500
Tbl-9: Maximum permitted static axial forces at static bearing statistic (s0) = 1.8 and
radial force (Fr) = 0
zObserve the safety and processing instructions of the cleaning agents
and screw-bonding agents to be used.
Only the version LPB+features an output flange
on which a toothed belt pulley can be mounted
with the bolts.
zThoroughly clean the output flange,
centering, fitting surface and toothed belt
pulley. The anti-corrosion agent on the
toothed belt pulley must be removed.
LTo remove the Aceton or Loctite 7063
anti-corrosion agent, use a clean, lint-free
cloth.
zAlso clean the browned toothed belt pulley
with a brush and remove any salt residue
between the flanged wheel and toothed belt
wheel.
zPlace the toothed belt pulley onto the output
flange.
zBrush the screws with a screw-bonding
agent (such as Loctite 243) and tighten the
screws by hand initially.
zTighten the fastening bolts (F) and the close-
tolerance bolt (E) (1 piece) in diagonal order
making at least two passes to the required
tightening torque (see table "Tbl-10").
Artisan Technology Group - Quality Instrumentation ... Guaranteed | (888) 88-SOURCE | www.artisantg.com

LP+/ LPB+Assembly
Revision: 05 2022-D018479 en-15
The tension of the tooth belt is brought about by its construction. The toothed belt's prestressing
force influences the ball bearing life of the gearhead.
zYou can determine the theoretical bearing life for each case using our analysis software
cymex®.
zSet your toothed belt so that there are no lateral starting loads pressing on the toothed belt
pulley.
5.5 Mounting the gearhead to a machine (LP+)
Gearhead
size
LPB+
Close-tolerance bolt Fastening bolts
Thread x
depth
[mm] x [mm]
Tightening torque
[Nm]
(Property class 10.9)
Quantity x
Thread x Depth
[] x [mm] x [mm]
Tightening torque
[Nm]
(Property class 12.9)
070 M5 x 12 7,69 5 x M5 x 12 9
090 M6 x 16 13,2 7 x M6 x 16 15,4
120 M6 x 16 13,2 7 x M8 x 20 37,3
Tbl-10: Fastening the toothed belt pulley
Four threaded bores are available in the gear unit housing for
bolting it to your machine.
zThoroughly clean the output shaft, centering, and fitting
surface.
The bolts need to be provided by the customer. You can find
the prescribed screw sizes and tightening torques in
Chapter 9.2 "Specifications on mounting onto a machine",
table "Tbl-16".
zSmear screw-bonding agent (for example Loctite 243) onto
the four bolts.
zFasten the gearhead on the machine with the fastening bolt
through the holes.
LMount the gearhead in such a way that the type plate
remains legible.
LDo not use washers (e.g. plain washers, tooth lock
washers).
Artisan Technology Group - Quality Instrumentation ... Guaranteed | (888) 88-SOURCE | www.artisantg.com

Startup and operation LP+/ LPB+
en-16 2022-D018479 Revision: 05
6 Startup and operation
zBe informed of the general safety instructions before beginning work. (see Chapter 2.7
"General safety instructions").
Improper use can cause damage to the gearhead.
zMake sure that
-theambient temperature does not drop below –15 °C or
exceed +40 °C and
-theoperating temperature does not exceed +90 °C.
zAvoid icing, which can damage the seals.
zFor other conditions of use, please consult our Customer Service
Department.
zOnly use the gearhead only up to its maximum limit values, see
Chapter 3.4 "Performance statistics".
zOnly use the gearhead only in a clean, dust-free and dry environment.
Artisan Technology Group - Quality Instrumentation ... Guaranteed | (888) 88-SOURCE | www.artisantg.com

LP+/ LPB+Maintenance and disposal
Revision: 05 2022-D018479 en-17
7 Maintenance and disposal
zBe informed of the general safety instructions before beginning work. (see Chapter 2.7
"General safety instructions").
7.1 Maintenance work
7.1.1 Visual inspection
zCheck the entire gearhead for exterior damage.
zThe radial shaft seals are subject to wear. Therefore also check the gearhead for leakage
during each visual inspection.
LYou can find more general information on radial shaft seals on our partner's Internet site at
http://www.simrit.de.
LCheck the mounting position, so that no foreign medium (e.g. oil) has collected on the
output shaft.
7.1.2 Checking the tightening torques
zCheck the tightening torque of the fastening bolts on the gearhead housing. For LPB+
gearheads, also check the fastening bolts on the toothed belt pulley.
LYou can find the prescribed tightening torques in Chapter 9.2 "Specifications on mounting
onto a machine", tables "Tbl-16" and "Tbl-17" as well as in Chapter 5.4.1 "Mountings on
the output flange (LPB+)", table "Tbl-10".
zCheck the tightening torque of the threaded pin on the motor mounting.
LYou can find the prescribed tightening torques in chapter 9.1 "Specifications on mounting
onto a motor", table "Tbl-15".
7.2 Startup after maintenance work
zClean the outside of the gearhead.
zAttach all safety devices.
zDo a trial run before releasing the gearhead again for operation.
7.3 Maintenance schedule
Maintenance work At startup First time after
500 operating
hours or 3
months
Every 3
months Yearly
Visual inspection XXX
Checking the
tightening torques XX X
Tbl-11: Maintenance schedule
Artisan Technology Group - Quality Instrumentation ... Guaranteed | (888) 88-SOURCE | www.artisantg.com
This manual suits for next models
1
Table of contents
Other Wittenstein Industrial Equipment manuals
Popular Industrial Equipment manuals by other brands

Sonny's
Sonny's APP100P2 owner's manual

JJM Boiler Works
JJM Boiler Works JM Series Installation operation & maintenance

LMT
LMT FETTE T18F operating manual

Laars
Laars ProtoNode FPC-N54 Installation and operating manual

CIM
CIM MDT500 HE Operator's manual

Wacker Neuson
Wacker Neuson AR 75 Series Operator's manual