WMH Tool Group JET JCP Series User manual

OWNER'S MANUAL
JCP Series Cable Pullers
Model JCP-2 shown
WMH TOOL GROUP
Industrial Tool Division
2420 Vantage Drive
Elgin, IL 60123
Ph: 847-543-3224 Fax: 1-800-543-3225
E-mail: jet@wmhtoolgroup.com M-180410 9/03
www.wmhtoolgroup.com Copyright © WMH Tool Group

2
This manual has been prepared for the owner and operators of a JET JCP Series Cable Pullers. Its
purpose, aside from cable puller operation, is to promote safety through the use of accepted correct
operating and maintenance procedures. Completely read the safety and maintenance instructions before
operating or servicing the cable puller. To obtain maximum life and efficiency from your cable puller,
and to aid in using the product safely, read this manual thoroughly and follow instructions carefully.
Warranty & Service
WMH Tool Group warrants every product it sells. If one of our tools needs service or repair, one of our
Authorized Repair Stations located throughout the United States can give you quick service.
In most cases, any one of these WMH Tool Group Repair Stations can authorize warranty repair, assist
you in obtaining parts, or perform routine maintenance and major repair on your JET, Performax,
Powermatic or Wilton tools.
For the name of an Authorized Repair Station in your area, call 1-800-274-6848.
More Information
WMH Tool Group is consistently adding new products to the line. For complete, up-to-date product
information, check with your local WMH Tool Group distributor or visit wmhtoolgroup.com.
Limited Warranty
WMH Tool Group (including JET, Performax, Powermatic and Wilton brands) makes every effort to
assure that its products meet high quality and durability standards and warrants to the original retail
consumer/purchaser of our products that each product be free from defects in materials and
workmanship as follows: 1 YEAR LIMITED WARRANTY ON ALL PRODUCTS UNLESS SPECIFIED
OTHERWISE. This warranty does not apply to defects due directly or indirectly to misuse, abuse,
negligence or accidents, normal wear-and-tear, repair or alterations outside our facilities, or to a lack of
maintenance.
WMH TOOL GROUP LIMITS ALL IMPLIED WARRANTIES TO THE PERIOD SPECIFIED ABOVE,
FROM THE DATE THE PRODUCT WAS PURCHASED AT RETAIL. EXCEPT AS STATED HEREIN,
ANY IMPLIED WARRANTIES OR MERCHANTIBILITY AND FITNESS ARE EXCLUDED. SOME
STATES DO NOT ALLOW LIMITATIONS ON HOW LONG THE IMPLIED WARRANTY LASTS, SO THE
ABOVE LIMITATION MAY NOT APPLY TO YOU. WMH TOOL GROUP SHALL IN NO EVENT BE
LIABLE FOR DEATH, INJURIES TO PERSONS OR PROPERTY, OR FOR INCIDENTAL,
CONTINGENT, SPECIAL, OR CONSEQUENTIAL DAMAGES ARISING FROM THE USE OF OUR
PRODUCTS. SOME STATES DO NOT ALLOW THE EXCLUSION OR LIMITATION OF INCIDENTAL
OR CONSEQUENTIAL DAMAGES, SO THE ABOVE LIMITATION OR EXCLUSION MAY NOT APPLY
TO YOU.
To take advantage of this warranty, the product or part must be returned for examination, postage
prepaid, to an Authorized Repair Station designated by our office. Proof of purchase date and an
explanation of the complaint must accompany the merchandise. If our inspection discloses a defect,
WMH Tool Group will either repair or replace the product, or refund the purchase price if we cannot
readily and quickly provide a repair or replacement, if you are willing to accept a refund. WMH Tool
Group will return repaired product or replacement at our expense, but if it is determined there is no
defect, or that the defect resulted from causes not within the scope of our warranty, then the user must
bear the cost of storing and returning the product. This warranty gives you specific legal rights; you may
also have other rights, which vary from state to state.
WMH Tool Group sells through distributors only. WMH Tool Group reserves the right to effect at any
time, without prior notice, those alterations to parts, fittings, and accessory equipment which they may
deem necessary for any reason whatsoever.

3
1. Read and understand owner’s manual before operating cable puller.
2. Do not exceed rated capacity.
3. Supporting structure used with this device must provide adequate support to handle all puller
operations plus the weight of the puller and attached equipment. If in doubt, consult a registered
structural engineer.
4. Never use handle extensions (cheaters).
5. Do not use with twisted, kinked or damaged wire rope.
6. Do not use if cable puller is damaged or malfunctioning.
7. Do not lift people or loads over people. Always keep people clear from load path.
8. Always keep a minimum of (3) wraps of wire rope on drum.
9. Do not use with open or twisted hook, or without safety latch.
10. Never run wire rope over a sharp edge.
11. Never leave a suspended load unattended.
12. Do not swing a suspended load.
13. Always inspect cable puller before each use. Replace if any component is damaged or malfunctioning.
14. Always use gloves when handling wire rope. Do not wear loose clothing which can become entangled
in moving parts.
15. Failure to comply with the above warnings may result in personal injury and/or property damage.
Specifications: JCP Series Cable Pullers
Model ...................................................................... JCP-1 ............................ JCP-2 ......................JCP-4
Stock Number........................................................ 180410 .......................... 180420 ....................180440
Weight Capacity (ton)...................................................... 1 .................................... 2 ............................4
Maximum Lift (ft) ........................................................... 12 .................................... 6 ..............................6
Lever Ratio................................................................. 18:1 ............................... 36:1 .........................36:1
Lever Length (in) ..................................................... 16-1/2 ............................ 16-1/2 ......................20-1/2
Minimum Distance Between Hooks (in).......................... 17 .................................. 21 ......................21-3/4
Wire Rope Diameter (in)............................................. 3/16 .............................. 3/16 ...........................1/4
Net Weight (lbs)............................................................... 7 .................................... 9 ............................14
The specifications in this manual are given as general information and are not binding. WMH Tool
Group reserves the right to effect, at any time and without prior notice, alterations to parts, fittings, and
necessary equipment deemed necessary for any reason whatsoever.
WARNING

4
JCP Series Cable Pullers
Fig. 1
A – Handle
B – Forward/Reverse Latch
C – Spring
D – Pawl
E – Wire Rope
F – Locking Lever Plunger
G – Locking Lever Spring
H – Ratchet Wheel
J – Locking Lever
K – Bottom Hook
L – Snatch Block (models JCP-2, JCP-4 only)
M – Wire Rope Guide Bolt
N – Top Hook
O – Wire Rope Guide
Operation
Hook Positioning with No Load (Freewheel)
(Fig. 1)
1. With no load on cable puller, position
forward/reverse latch (B) as shown on
dotted lines, to hold pawl (D) off ratchet
wheel (H).
2. Hold puller firmly with handle in uppermost
position, and press locking lever (J) to
disengage locking lever from ratchet wheel.
3. Have an assistant, also wearing gloves, pull
wire rope out; or, anchor the bottom hook
(K) to the load and walk backward with the
puller to the anchor point, freewheeling the
wire rope behind you.
WARNING
Always keep at least three wraps of rope on
the hub when puller is under load.
4. Release locking lever, and re-set
forward/reverse latch to engage pawl with
ratchet wheel and begin "winching in."
Pulling or Lifting Load (Fig. 1)
1. Place forward/reverse latch (B) to position
as shown by solid lines. This enables pawl
(D) to engage ratchet wheel (H) with spring
(C) assistance.
2. Load is held and locked in position by
locking lever (J) and pawl engaging ratchet
wheel firmly.
3. Move handle (A) towards load, and ratchet
handle back and forth.
4. When pressure on handle is relieved at the
end of its travel, locking lever (J) engages
ratchet wheel and locks the load. Repeat
ratcheting cycle.

5
Releasing or Lowering Load (Fig. 1)
Cable puller is designed to ratchet load tension
down one ratchet wheel tooth at a time:
1. While under load, place forward/reverse
latch (B) to the position as shown by the
dotted lines, freeing the handle (A) to move
in the direction of the top hook (N).
2. As the handle nears the end of its travel,
the pawl (D) is forced into contact with
ratchet wheel (H), by spring loaded locking
lever plunger (F) and eventually locks into
one of the ratchet wheel teeth.
3. Continue to pull handle, causing pawl to
turn ratchet wheel slightly, relieving full
load from locking lever (J). When you
have taken full load from locking lever,
allow handle to move back towards load.
The ratchet wheel will move one tooth,
releasing wire rope the same amount, until
locking lever locks into place once more.
Repeat ratcheting cycle.
Using Snatch or Pulley Block (Fig. 1)
Models JCP-2 and JCP-4 are provided with a
snatch or pulley block (safety hook with a
pulley). This allows a 2:1 lifting ratio. The
bottom hook (K) is looped back and hooked
over bolt (M) which secures the cable guide (O).
The snatch block is then attached to the load.
The length of the pull is thereby halved, but the
load capacity is doubled.
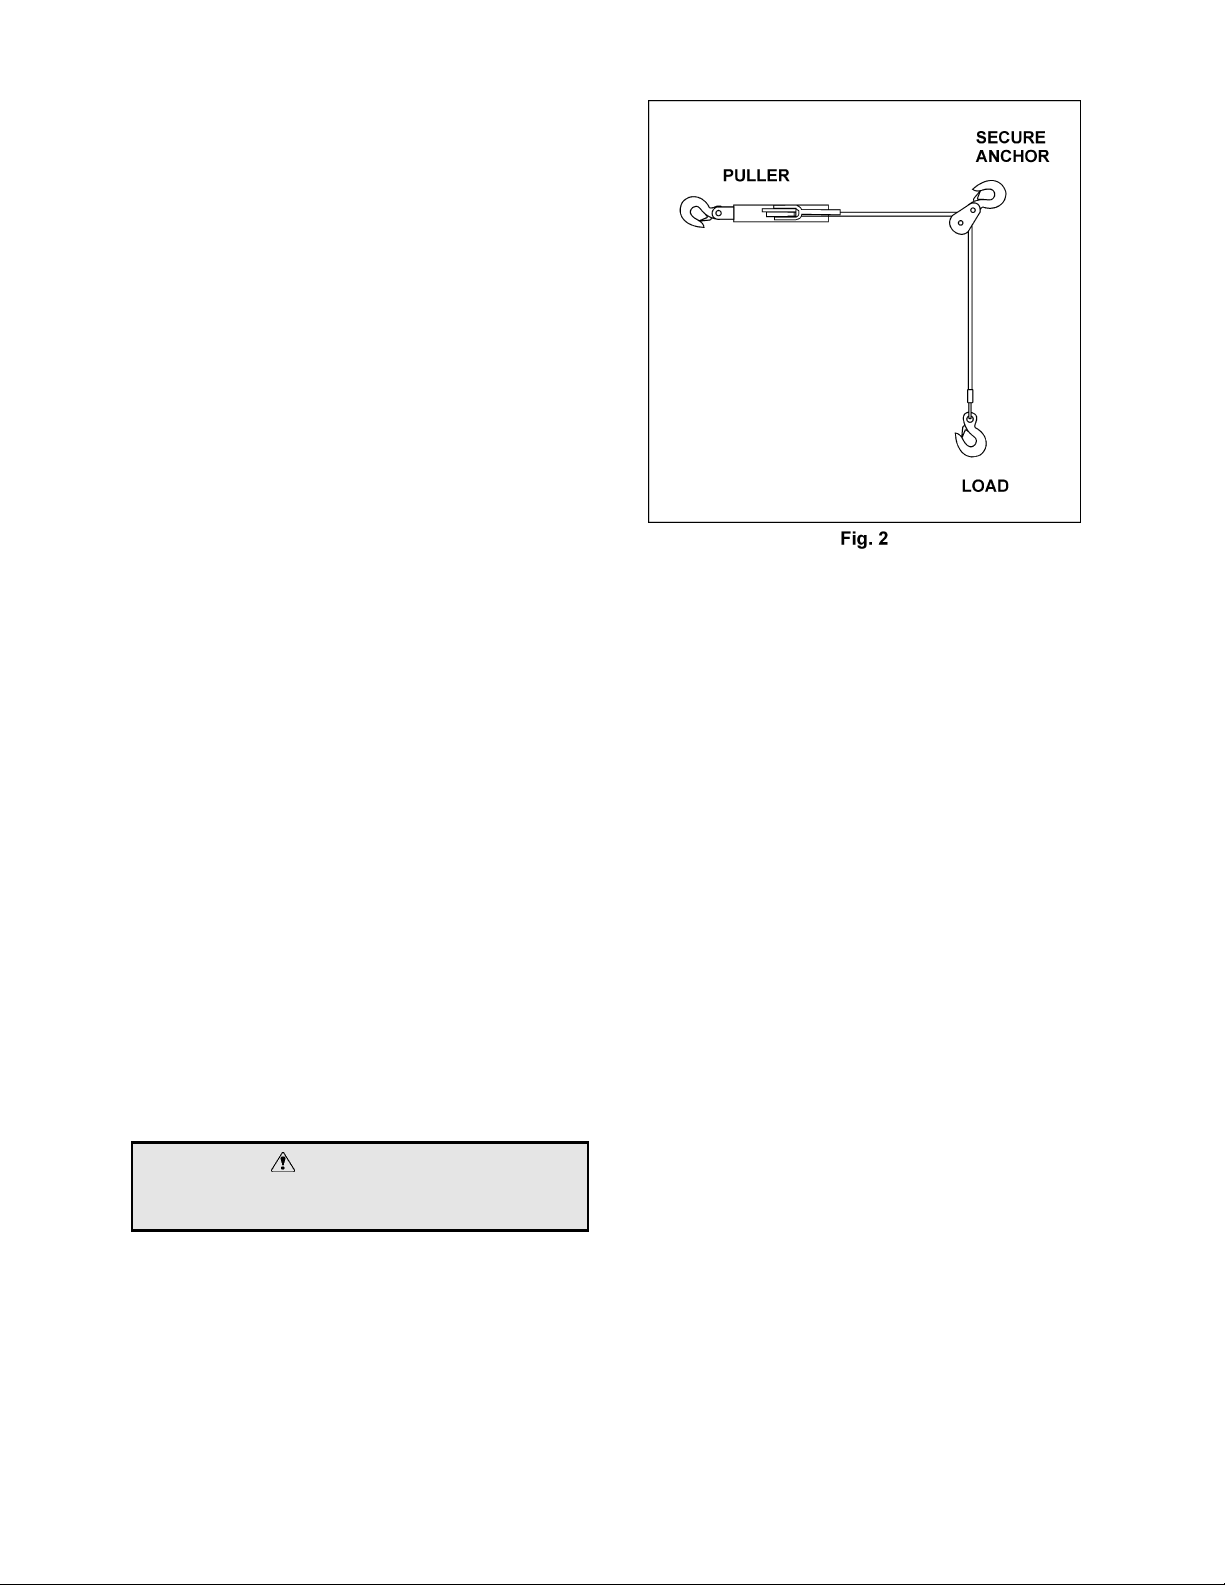
Pulling in Confined Spaces (Fig. 2)
The snatch block is also useful for pulling a load
that is not directly in line with the puller. The
snatch block must be firmly anchored. The wire
rope passes over the pulley and to the load as
shown.
WARNING
Snatch block must be firmly anchored when
winching load out of line with puller.
Maintenance
1. Inspect the cable puller before each use for
any damage. If cracking or distortion
appears in the frame, the cable puller is
considered beyond repair, should not be
used, and must be replaced.
2. Keep pawl, hook pins, hook latch pins,
ratchet pivots, and wire rope lightly oiled at
all times.
3. Inspect wire rope for kinks, corrosion,
fraying, etc. If corrosion is apparent, clean
with a stiff wire brush and lightly oil. Do not
use if wire rope is damaged or badly
corroded.
4. Inspect hooks for wear, twisting or damage.
Replace cable puller if hooks are worn,
twisted or damaged.
5. Keep cable puller clean from dirt, grease
and water. Always store cable puller in a no
load condition and hang in dry area.
6. For more information concerning additional
operation, inspection, maintenance, safety
standards and regulations, read
ANSI/ASME B30.21.

6
JCP Cable Puller Trouble-Shooting
Trouble Possible Cause Remedy
Puller will not ratchet.
1. Broken spring (L).
2. Broken ratchet tooth.
3. Frame bent.
1. Replace cable puller.
2. Replace cable puller.
3. Replace cable puller.
Puller will not ratchet in.
1. Pawl (D) not in correct
position.
2. Spring (L) damaged.
1. Move forward/reverse latch
(B) to position as shown by solid
line.
2. Replace cable puller.
Puller will not ratchet out.
1. Pawl not in correct position.
2. Spring (L) damaged.
3. Wire rope incorrectly spooled
onto ratchet drum.
1. Move forward/reverse latch
(B) to position as shown by
dotted line.
2. Replace cable puller.
3. Remove wire rope and rewind
onto drum under tension.

7
Compliance: ANSI/ASME B30.21
WMH TOOL GROUP
Industrial Tool Division
2420 Vantage Drive
Elgin, IL 60123
Ph: 847-543-3224 Fax: 1-800-543-3225
E-mail: jet@wmhtoolgroup.com
www.wmhtoolgroup.com

8
WMH TOOL GROUP
2420 Vantage Drive
Elgin, IL 60123
TEL: 1-847-851-1000
FAX: 1-888-605-2101
www.wmhtoolgroup.com
e-mail: jet@wmhtoolgroup.com
This manual suits for next models
3
Table of contents