WOLFF 52549 User manual
WOLFF | A Brand of UFLOOR Systems
WOLFF | A Brand of UFLOOR Systems | 71665 Vaihingen/Enz | Dieselstraße 19 | Tel. +49 (0)70 42 95 11- 0 | Fax +49 (0)70 42 95 11- 44 | E-mail [email protected] | Internet www.wolff-tools.de
Operating instructions
Parquet sanding machine
Cobra 2.5 kW(3,2kW)/50 Hz
Item no. 052549 + 052551 + 054720 + 054891
Item no. 054004

As of: March 2009
© 2009
All rights reserved.
Reproduction in whole or in parts requires written permission from
Hermann FRANK GmbH & Co. KG, 75038 Oberderdingen, Germany.
No liability for any damage arising from the use of this brochure.
Subject to alterations.
Hermann FRANK GmbH & Co. KG
Östliche Bahnhofstr. 8
75038 Oberderdingen
Germany
Tel.: +49 (0)72 58 / 60 88-0
Fax: +49 (0)72 58 / 60 88-11
E-mail: [email protected]
www.hermannfrank.de
2 03/2009

3 03/2009
This brochure uses the following symbol to mark important instructions for safety
and preventing damage:
Please give special attention to the marked instructions. They refer to a potentially dangerous situation.
Failure to comply can result in fatal or severe injuries and damage to property.

4 03/2009
Contents
1 Introduction . . . . . . . . . . . . . . . . . . . . . . . . . . . . . . . . . . . . . . . . . . . . . . . . . . . . . . . . . . . . . . . . . . . . . . . .5
2 Scope of delivery . . . . . . . . . . . . . . . . . . . . . . . . . . . . . . . . . . . . . . . . . . . . . . . . . . . . . . . . . . . . . . . . . . . .6
3 Description of the parquet sanding machine Cobra . . . . . . . . . . . . . . . . . . . . . . . . . . . . . . . . . . . . . . . .7
3.1 Important components . . . . . . . . . . . . . . . . . . . . . . . . . . . . . . . . . . . . . . . . . . . . . . . . . . . . . . . . . . . . . . . . . . . . . . . . .7
3.2 Techn cal data . . . . . . . . . . . . . . . . . . . . . . . . . . . . . . . . . . . . . . . . . . . . . . . . . . . . . . . . . . . . . . . . . . . . . . . . . . . . . . .8
3.3 Safety and mach ne protect on dev ces . . . . . . . . . . . . . . . . . . . . . . . . . . . . . . . . . . . . . . . . . . . . . . . . . . . . . . . . . . . .8
4 roper use . . . . . . . . . . . . . . . . . . . . . . . . . . . . . . . . . . . . . . . . . . . . . . . . . . . . . . . . . . . . . . . . . . . . . . . . .8
5 Starting the machine . . . . . . . . . . . . . . . . . . . . . . . . . . . . . . . . . . . . . . . . . . . . . . . . . . . . . . . . . . . . . . . . .9
5.1 Mount ng the handle . . . . . . . . . . . . . . . . . . . . . . . . . . . . . . . . . . . . . . . . . . . . . . . . . . . . . . . . . . . . . . . . . . . . . . . . . .9
5.2 Mount ng the dust p pe . . . . . . . . . . . . . . . . . . . . . . . . . . . . . . . . . . . . . . . . . . . . . . . . . . . . . . . . . . . . . . . . . . . . . . . .10
5.3 Mount ng the motor . . . . . . . . . . . . . . . . . . . . . . . . . . . . . . . . . . . . . . . . . . . . . . . . . . . . . . . . . . . . . . . . . . . . . . . . . . .11
5.4 Mount ng the belt . . . . . . . . . . . . . . . . . . . . . . . . . . . . . . . . . . . . . . . . . . . . . . . . . . . . . . . . . . . . . . . . . . . . . . . . . . . .12
5.5 Mount ng the dust bag . . . . . . . . . . . . . . . . . . . . . . . . . . . . . . . . . . . . . . . . . . . . . . . . . . . . . . . . . . . . . . . . . . . . . . . .13
5.6 Adjust ng the wall bumper wheels . . . . . . . . . . . . . . . . . . . . . . . . . . . . . . . . . . . . . . . . . . . . . . . . . . . . . . . . . . . . . . . .14
5.7 Connect ng the Cobra to the ma ns supply . . . . . . . . . . . . . . . . . . . . . . . . . . . . . . . . . . . . . . . . . . . . . . . . . . . . . . . . .15
6 Disassembling for transportation . . . . . . . . . . . . . . . . . . . . . . . . . . . . . . . . . . . . . . . . . . . . . . . . . . . . .16
6.1 Remov ng the handle . . . . . . . . . . . . . . . . . . . . . . . . . . . . . . . . . . . . . . . . . . . . . . . . . . . . . . . . . . . . . . . . . . . . . . . . .16
6.2 Remov ng the motor . . . . . . . . . . . . . . . . . . . . . . . . . . . . . . . . . . . . . . . . . . . . . . . . . . . . . . . . . . . . . . . . . . . . . . . . . .17
6.3 Transport ng the mach ne . . . . . . . . . . . . . . . . . . . . . . . . . . . . . . . . . . . . . . . . . . . . . . . . . . . . . . . . . . . . . . . . . . . . . .18
7 Operating the Cobra . . . . . . . . . . . . . . . . . . . . . . . . . . . . . . . . . . . . . . . . . . . . . . . . . . . . . . . . . . . . . . . .19
7.1 Proper cloth ng and equ pment . . . . . . . . . . . . . . . . . . . . . . . . . . . . . . . . . . . . . . . . . . . . . . . . . . . . . . . . . . . . . . . . .19
7.2 Safety nstruct ons regard ng dust . . . . . . . . . . . . . . . . . . . . . . . . . . . . . . . . . . . . . . . . . . . . . . . . . . . . . . . . . . . . . . . .20
7.3 D sposal of sand ng dust . . . . . . . . . . . . . . . . . . . . . . . . . . . . . . . . . . . . . . . . . . . . . . . . . . . . . . . . . . . . . . . . . . . . . . .21
7.4 Replac ng the abras ve belt . . . . . . . . . . . . . . . . . . . . . . . . . . . . . . . . . . . . . . . . . . . . . . . . . . . . . . . . . . . . . . . . . . . . .22
7.5 Adjust ng the sand ng pressure . . . . . . . . . . . . . . . . . . . . . . . . . . . . . . . . . . . . . . . . . . . . . . . . . . . . . . . . . . . . . . . . . .23
7.6 Safety nstruct ons for electr c cable and connectors . . . . . . . . . . . . . . . . . . . . . . . . . . . . . . . . . . . . . . . . . . . . . . . . .24
7.7 Remarks about sand ng woodfloor and floorboard floors . . . . . . . . . . . . . . . . . . . . . . . . . . . . . . . . . . . . . . . . . . . . . .25
7.8 Sw tch ng on/off the Cobra w th the cockp t control panel . . . . . . . . . . . . . . . . . . . . . . . . . . . . . . . . . . . . . . . . . . . . . .28
7.9 Sand ng w th the Cobra . . . . . . . . . . . . . . . . . . . . . . . . . . . . . . . . . . . . . . . . . . . . . . . . . . . . . . . . . . . . . . . . . . . . . . . .29
8 Maintenance . . . . . . . . . . . . . . . . . . . . . . . . . . . . . . . . . . . . . . . . . . . . . . . . . . . . . . . . . . . . . . . . . . . . . . .34
8.1 Replac ng the sand ng roller . . . . . . . . . . . . . . . . . . . . . . . . . . . . . . . . . . . . . . . . . . . . . . . . . . . . . . . . . . . . . . . . . . . .34
8.2 Adjust ng the runn ng wheels . . . . . . . . . . . . . . . . . . . . . . . . . . . . . . . . . . . . . . . . . . . . . . . . . . . . . . . . . . . . . . . . . . .36
8.3 Adjust ng the castors . . . . . . . . . . . . . . . . . . . . . . . . . . . . . . . . . . . . . . . . . . . . . . . . . . . . . . . . . . . . . . . . . . . . . . . . . .37
8.4 Adjust ng the tens on roller . . . . . . . . . . . . . . . . . . . . . . . . . . . . . . . . . . . . . . . . . . . . . . . . . . . . . . . . . . . . . . . . . . . . .38
8.5 Replac ng the lamp . . . . . . . . . . . . . . . . . . . . . . . . . . . . . . . . . . . . . . . . . . . . . . . . . . . . . . . . . . . . . . . . . . . . . . . . . . .39
9. Declaration of conformity . . . . . . . . . . . . . . . . . . . . . . . . . . . . . . . . . . . . . . . . . . . . . . . . . . . . . . . . . . . .39
10. Warranty . . . . . . . . . . . . . . . . . . . . . . . . . . . . . . . . . . . . . . . . . . . . . . . . . . . . . . . . . . . . . . . . . . . . . . . . . .40

1 Introduction
Dear customer:
Congratulations on purchasing the FRANK parquet sanding machine Cobra, the correct
choice with respect to quality and performance.
The Cobra is the result of a consistent implementation of many years of experience.
This machine combines extraordinary high sanding performance and excellent sanding
quality with easy to operate, proven and reliable technology.
These operating instructions contain important information for the use and safe operation of
the Cobra.
Caution!
Read these operating instructions carefully before assembling or operating
the Cobra. Ensure that all operators read these instructions before they use the
machine. Adherence to the safety notes helps to avoid potential danger of life
and limb. It also prevents improper use of the machine.
Before starting to work, make yourself familiar with the operation of the machine.
It’s too late if you do it while working!
Never allow anybody to operate the machine without sufficient skills and knowledge.
5 03/2009
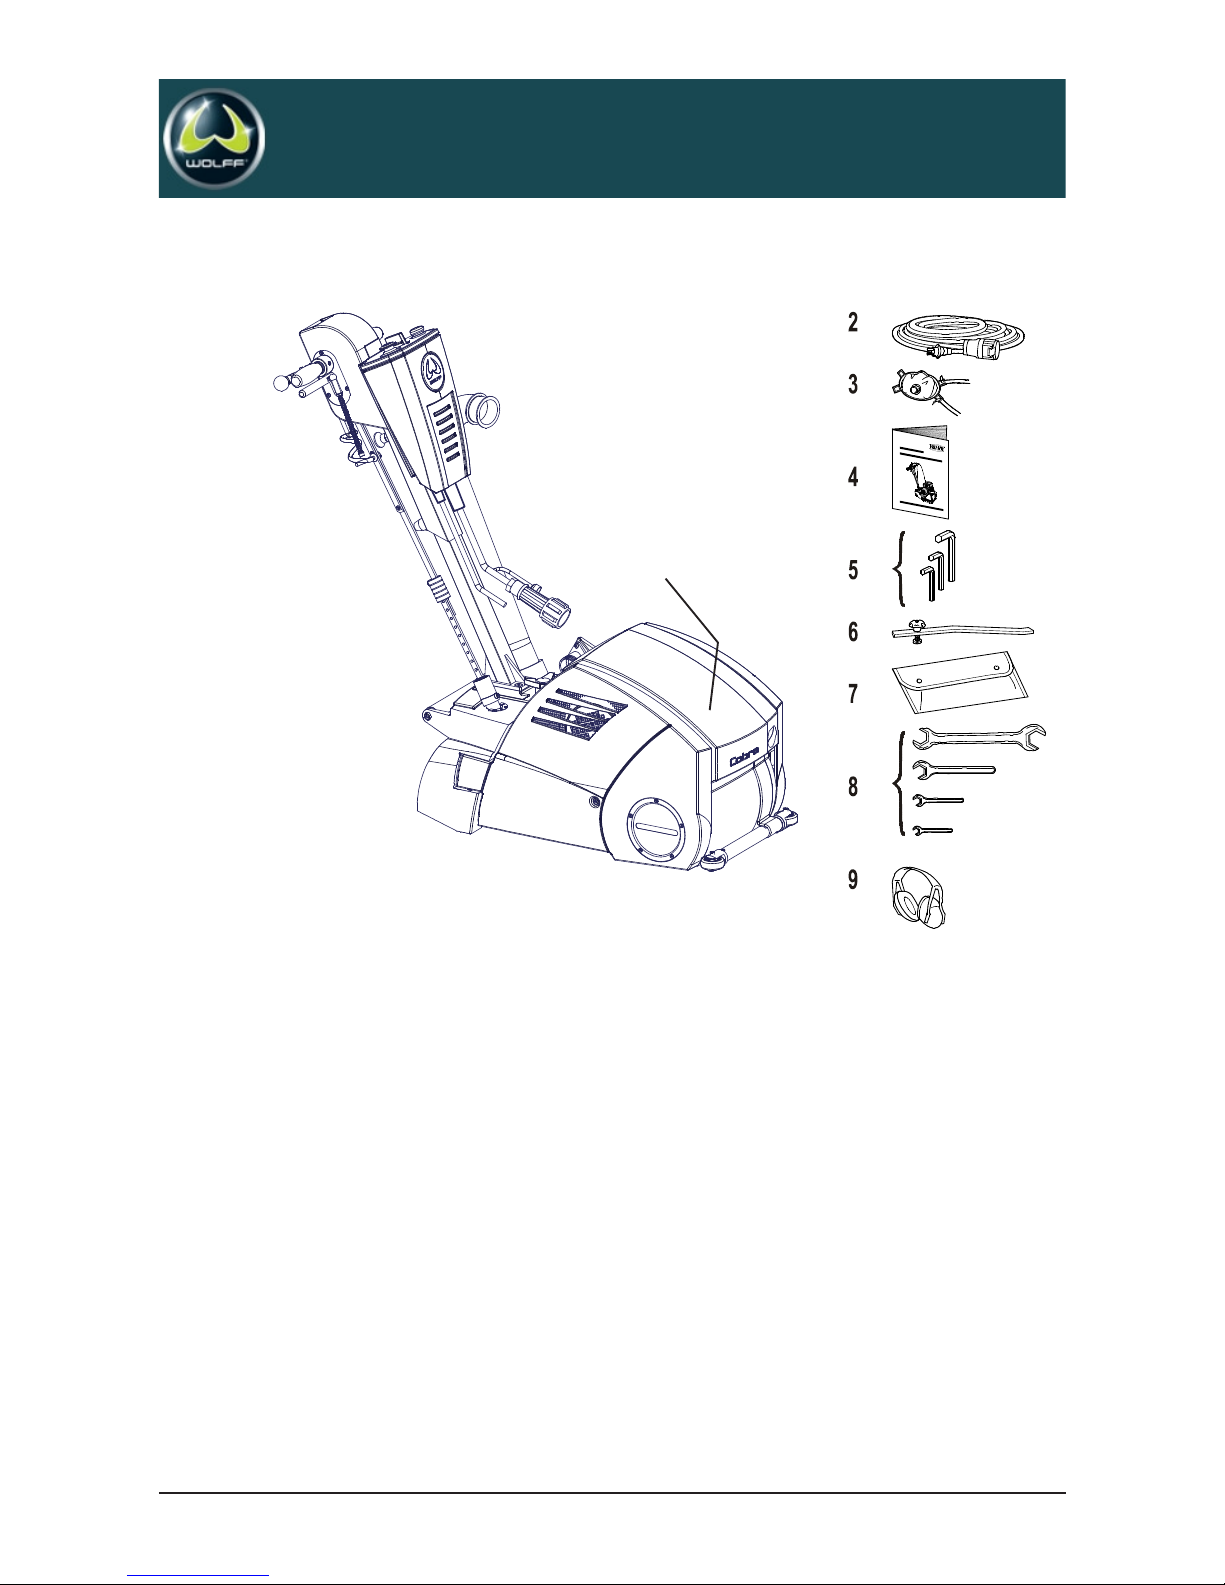
2 Scope of delivery
1. Machine
2. PUR cable with plug and coupling
3. Dust mask
4. Operating instructions
5. Allen keys
5 mm, 6 mm, 10 mm
6. Running wheel adjustment gauge
7. Tool bag
8. Fixed spanners
10 mm, 13 mm, 17 mm, 30/36 mm
9. Hearing protection
Not shown: 2 dust bags
Not shown: Abrasive belts (10 pcs. each with grit 36, grit 60, grit 100)
Not shown: 10 plastic inlays
6 03/2009
1
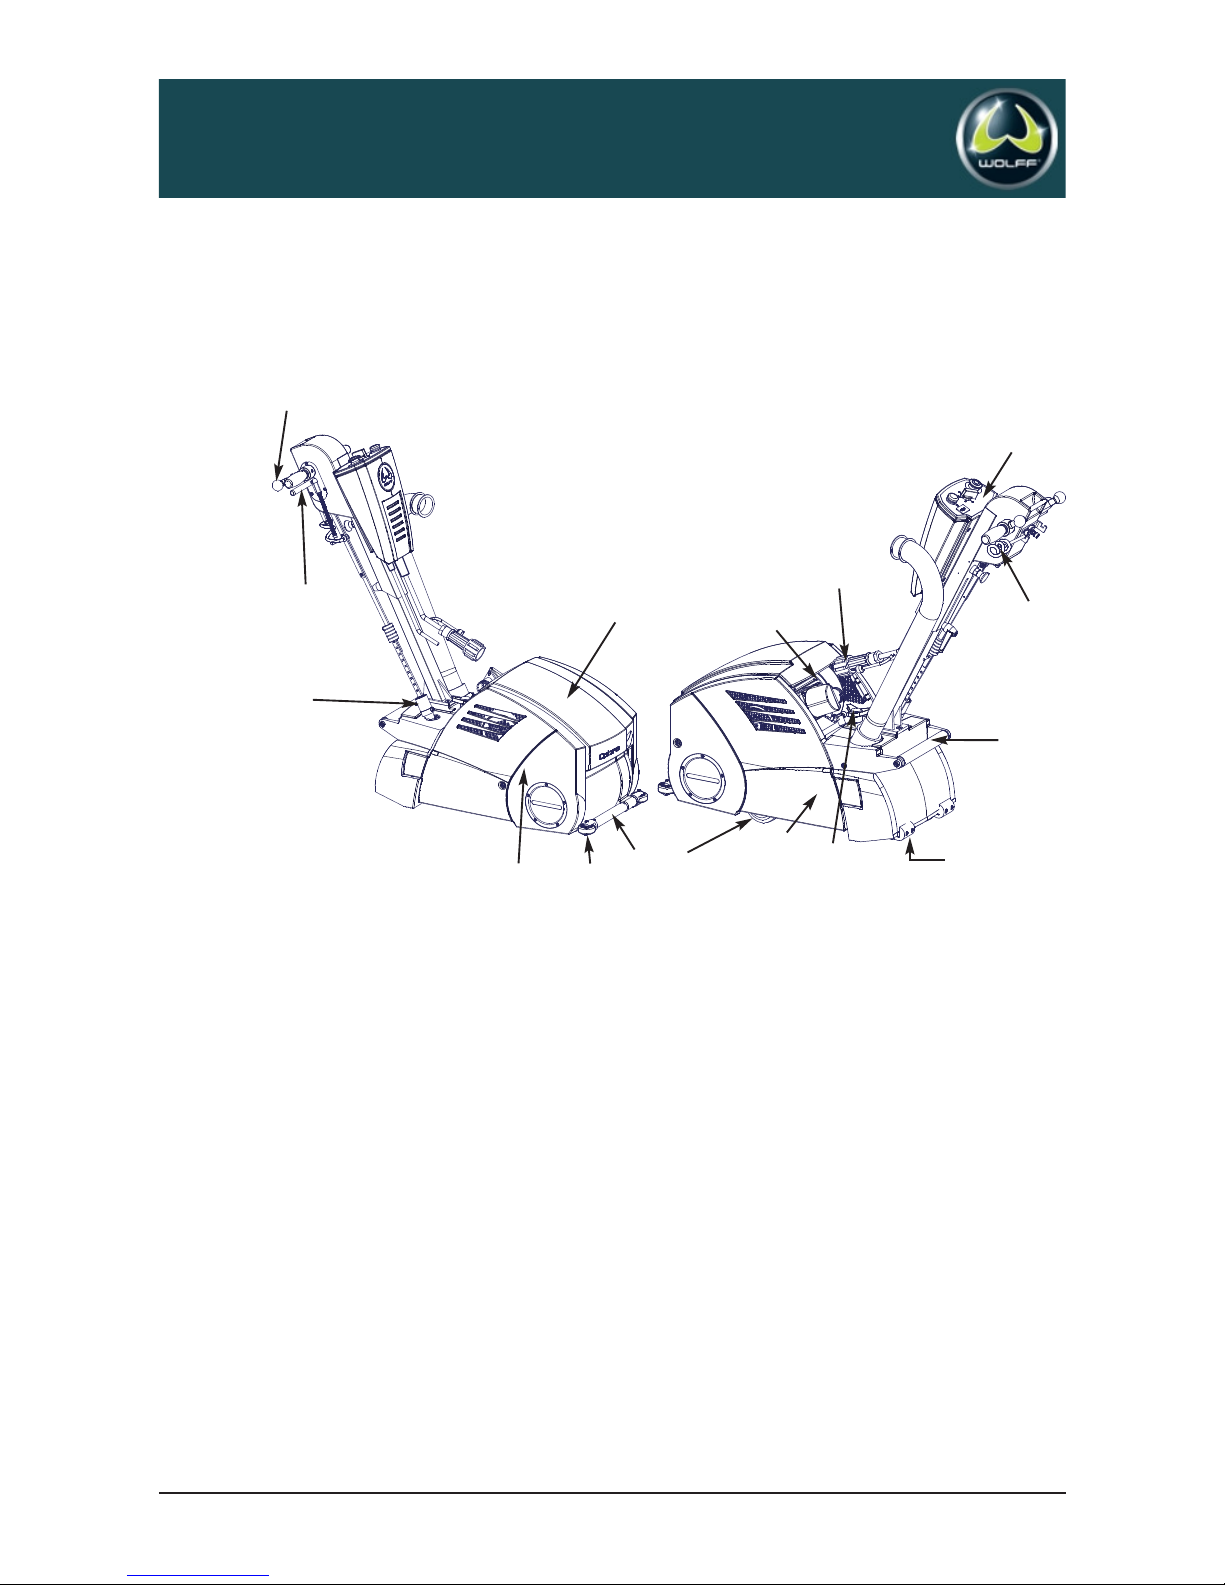
3 Description of the parquet sanding machine Cobra
3.1 Important components
1 Sanding pressure regulator 9 Belt cover
2 Castors 10 Motor
3 Running wheels 11 Cockpit
4 Roller cover 12 Cable arm
5 Star-shaped knob 13 Rear carrying bar
6 Motor plug 14 Main lifting lever
7 Front carrying bar 15 Soft lowering lever
8 Wall bumper wheel 16 Hood
7 03/2009
11
12
10
13
2
95
7
483
1
15
14
6
16

8 03/2009
3.2 Technical data
Single-phase AC motor . . . . . . . . . . . . . . . . . . . . 230 V (240 V), 50 Hz
Motor capacity . . . . . . . . . . . . . . . . . . . . . . . . . . . . . . . 2.5 kW (3,2 kW)
Roller speed . . . . . . . . . . . . . . . . . . . . . . . . . . . . . . . . . . . . . 2,100 rpm
Sanding width . . . . . . . . . . . . . . . . . . . . . . . . . . . . . . . . . . . . . . 200 mm
Abrasive belt dimensions. . . . . . . . . . . . . . 200 mm x 750 mm, endless
Weight: Handle compl. . . . . . . . . . . . . . . . . . . . . . . . . . . . . 12,8 kg
Motor compl. . . . . . . . . . . . . . . . . . . . . . . . . . . . . . 26,2 kg
Basic unit compl. . . . . . . . . . . . . . . . . . . . . . . . . . . 49,2 kg
Dust pipe . . . . . . . . . . . . . . . . . . . . . . . . . . . . . . . . . 1,5 kg
Machine compl. . . . . . . . . . . . . . . . . . . . . . . . . . . . 89,7 kg
3.3 Safety and machine protection devices
The parquet sanding machine Cobra is equipped with a
- zero voltage switch.
The zero voltage switch switches off the machine in case of power failure and the motor will not
restart automatically when power returns.
4 roper use
The parquet sanding machine Cobra is suitable for dry sanding of woodfloor and
floorboard floors. No other use shall be allowed.
Caution!
Do not use the Cobra for wet finishing (danger of death from electric shock)!
5 Starting the machine
5.1 Mounting the handle
Note!
The Cobra is delivered with handle and dust pipe dismantled.
Caution!
There is the risk of injury or damage caused by an unintentional starting of the machine.
Disconnect the machine from the mains supply before working on the machine!
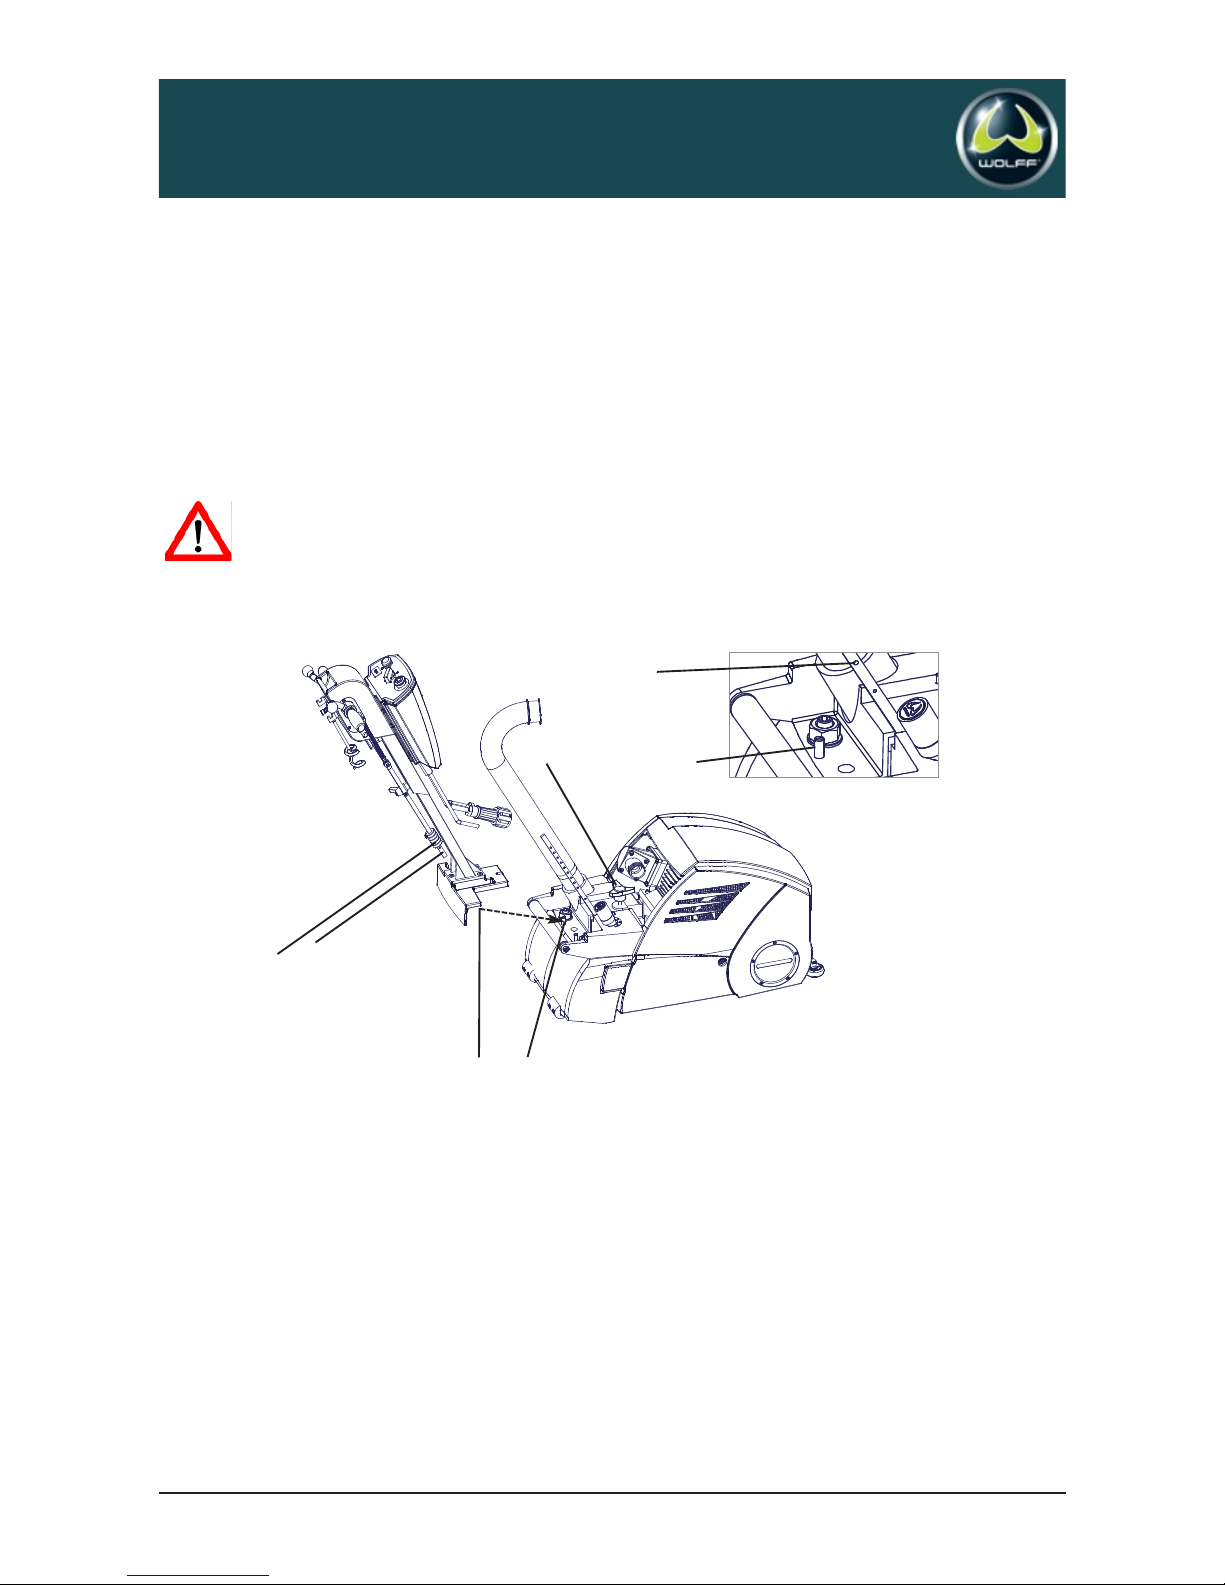
How to mount the handle:
1. nsert the bottom part of the connecting rod through the slot of the handle mount.
Make sure that the fixing studs ( 1 ) are inserted into the positioning holes ( 2 ).
2. Tighten the star-shaped knob ( 3 ).
3. Check the position number of the handle.
4. nsert the stud ( 4 ) on the rod into the corresponding hole ( 5 ).
5. The clamp sleeve ( 6 ) firmly fixes the two parts of the connecting rod.
9 03/2009
1
4
2
6
5
31

5.1.1 Adjusting the handle height
1. Lower the main lifting lever ( 1 ) to the front.
2. Slide the clamp sleeve ( 2 ) to the top and take apart the connecting rod ( 3 ).
3. Loosen the clamp bolt ( 4 ).
4. Pull the locking stud ( 5 ) and have it snapped in at the desired position.
5. Assemble the connecting rod ( 3 ) on this position.
5.2 Mounting the dust pipe
nsert the dust pipe ( 1 ) into the pipe connection ( 2 ) while gently rotating it.
t is sealed with 2 O-rings.
10 03/2009
3
4
5
2
1
2
1
This manual suits for next models
7
Table of contents
Other WOLFF Sander manuals


