Wolo HIDEAWAY BLAST 900 User manual

Your purchase of a Wolo HIDEAWAY BLAST is the perfect choice to compliment your motorcycle.
Wolo’s horns are manufactured with the finest materials. Before being packaged, Wolo tests each
horn to ensure it meets our high standards, ensuring a perfect working horn. Quality workmanship and
components will provide years of dependable service. If you need help or have any questions using
your new Wolo horn, our technicians are available to answer your questions, Monday thru Friday, from
9 AM to 4 PM EST at 888-550-4676.
Before installation of the horn is attempted, it is important to read the installation manual completely,
and note any messages marked “IMPORTANT” or “WARNING’’. The lives of people are dependent
upon a proper installation of the horn. The person installing the horn should have basic knowledge of
the motorcycle’s electrical system and crimping wire terminals. A safe installation will prevent serious
injury or damage to the motorcycle.
HIDEAWAY BLAST comes complete and has a factory wired 30-amp waterproof relay. The heavy-
duty compressor that powers the HIDEAWAY BLAST will be installed in the left side saddle bag,
using Wolo’s exclusive patented mounting bracket that secures the compressor in place using 3MTM
Dual LockTM tape. Installation requires drilling one 25/32” hole in the side of the saddle bag out of
view (close to the location the compressor is mounted). The hole is required to route the air hose
and power wire to the compressor. A heavy-duty waterproof connector is provided, the connector will
secure the harness to the saddle bag.
REMOVAL OF HORN COVER AND FACTORY HORN
1. The factory horn is secured inside the horn housing. The horn housing is removed from the
motorcycle by removing the nut, which secures the housing’s bracket to the motorcycle. See Fig. 1.
2. Once the nut is removed the horn housing will slide off the screw stud.
3. The factory horn is removed from the horn housing by removing the nut that secures the horn to
the housing bracket. The factory horn will easily slide out of the housing. See Fig. 2 & 3.
4. There are two (2) wires connected to the factory horn, both wires need to be disconnected
from the horn. The recommended method to remove the wires is to wiggle and firmly pull on
the insulated terminal of one wire until the terminal separates from the horn, repeat the same
procedure to remove the second wire. See Fig. 3.
INSTALLING THE HIDEAWAY HORN INTO THE FACTORY HORN HOUSING
IMPORTANT: The Hideaway Blast comes with two different mounting brackets, which are numbered
1 or 2. See Fig. 4.
To select the correct mounting bracket to be used, see Fig. 5 & 6. Select the factory horn housing that
matches the housing on your motorcycle.
CHANGING THE MOUNTING BRACKET
IMPORTANT: The Hideaway Blast comes with the number 1 bracket factory installed to the horn. If
mounting bracket number 1 is going to be used, skip to step 9.
IMPORTANT: Note the position of the bracket number 1 before removing it from the horn. The number 2
bracket will extend outward from the horn in the same direction as the number 1. See Fig. 7.
5. To change the mounting bracket, remove the nut that secures the bracket to the horn, and the
number 1 bracket can be separated from the horn. See Fig. 7.
6. Position the number 2 bracket onto the mounting screw that is extending from the horn’s slotted
channel, make sure the brackets tabs are fully inserted into the slotted channel. See Fig 8.
HIDEAWAY BLASTTM MODEL 900
DROP IN REPLACEMENT HORN
INSTALLATION MANUAL

7. Secure the number 2 bracket in place using the locking nut removed in step 5.
8. Place the flat speed nut (provided) onto the end of the mounting bracket.
IMPORTANT: The speed nut should be positioned on the bracket end so that the flat side is
facing outward. See Fig. 9.
INSTALLING HIDEAWAY BLAST INTO THE HORN HOUSING
9. Face the horn housing downward onto a soft shop towel to prevent scratching.
10. Remove the two 3/8 bolts that secure the hanger bracket to the horn housing. See Fig. 10.
11. The bracket can be now separated from the horn housing.
12. Route the horn’s black flex tubing containing the air hose and two relay wires through the bottom
of the horn housing, exiting out of the housing through the top. See Fig. 11 & 12.
13. Push the horn into housing, keeping the horns mounting bracket centered. IMPORTANT: If the
fit of the horn into the housing is too tight, there are three simple procedures to try that will help
get the horn to slide into the housing.
A. With the horn housing facing downward, grab the left and right side walls of the housing and
bend slightly outward. You should now be able to slide the horn into the horn housing. See
Fig. 13.
B. Remove the black circular sound chamber cover by holding the edge and pulling. You should
now be able to slide the horn into the horn housing. Place the sound chamber cover back onto
the horn. See Fig. 14.
C. If there is a factory speed nut on the horn housing bracket, bottom hole, remove it and
discard. You should now be able to slide the horn into the horn housing. IMPORTANT:
Position the flat speed nut (provided) so the flat side is visible when placed onto the bracket.
Place the speed nut (provided) onto the horn housing bracket, bottom hole. Position so that
the flat side is facing outward. See Fig. 15.
14. There are two bolts provided that secure the hanging bracket to the horn housing. NOTE: The
bolts have a shoulder washer and they are different lengths. The long bolt should be positioned
in the hanging bracket’s top hole. The short bolt should be positioned in the bottom hole. See
Fig. 16.
15. Align the horn’s bracket with the housing bracket and the hanging bracket, secure with long bolt.
CAUTION: Do not fully tighten until the bottom bolt is in place. See Fig. 17.
16. Align the hanging bracket’s bottom hole with the horn housing bracket and secure with short
bolt. Make sure both bolts are fully tightened. See Fig. 17.
17. Connect the Hideaway Blast’s two black relay wires to motorcycle’s factory horn wires that were
separated from the factory horn in step 4. NOTE: The Hideaway Blast has a male insulated
terminal on the end of each wire. The terminals are exact mates to your motorcycle’s horn wire
terminals. IMPORTANT: It does not make a difference which factory horn wire connects to the
relay wires. See Fig. 18.
MOUNTING THE HORN HOUSING BACK ON THE MOTORCYCLE
18. Place the horn housing back onto the motorcycle’s screw stud and secure with the nut removed
in step number 1.
19. Most installations will require the installer to remove the seat from the motorcycle for routing the
black flexible tubing and to gain access to the battery.
20. Route the black flexible tubing to the left side saddle bag. Position the flexible tubing so that it
is hidden from view. Provided with the kit are black plastic ties to secure the flexible tubing to
the frame of the motorcycle. IMPORTANT: The plastic ties should not be used until the install is
completed.

MOUNTING THE COMPRESSOR IN THE SADDLE BAG
The Hideaway Blast comes with a patented compressor bracket, which secures the compressor in
the saddle bag without drilling any holes.
21. Using the longest black plastic tie provided, insert the strap’s end into the mounting bracket’s
retaining slot located on the base of the mounting bracket. Push the strap through the slot. Insert
the strap into the locking end and pull tight. IMPORTANT: The plastic tie has a push tab on the
locking end. When the tab is pressed, it will allow the installer to release the locking hold of the
plastic tie. See Fig. 19.
22. Select the mounting location in the left side saddle bag for the compressor and mounting
bracket. The recommend position is the front facing wall. See Fig. 20 & 21.
IMPORTANT: For best performance, the compressor’s wire terminals should be facing upward,
and the black plastic compressor cover should be facing downward.
23. Use the compressor’s mounting bracket as a template and outline mounting location with a
marking pen. Remove compressor from the saddle bag
24. Route the black flexible tubing under the seat supports to the left side saddle bag. See Fig. 22.
25. The black wire extending from the side of the black flexible tubing is routed to the battery, do not
make any wire connects at this time.
26. A 25/32” hole needs to be drilled into the saddle bag to route the black air hose and black wire to
the compressor. The hole should be drilled from the inside of the saddle bag. See Fig. 23.
IMPORTANT: BEFORE DRILLING THE SADDLE BAG CAREFULLY FOLLOW
STEPS BELOW.
27A. The hole to be drilled should be as close as possible to the location selected for mounting of the
compressor.
27B. Before drilling the access hole into the saddle bag, measure the length of air hose and wire
extending from the black flexible tubing to make sure that they are long enough to connect to the
compressor from the location that the hole will be drilled.
27C. Make sure that hole location selected will be hidden from view.
27D. Make sure that the black flexible tubing and its end connector do not have any sharp bends or
kinks which could restrict the flow air from the compressor to the horn.
CAUTION: Sharp bends in the black air hose can decrease the sound output of the horn.
28. Before the hole is drilled into the saddle bag, carefully inspect the opposite side of the saddle
bag to make sure that there are no wires, cables, hose lines and or component parts that can be
damaged when drilling the hole.
29. It is recommended that the access hole drilled into the saddle bag be deburred so the connector
can provide a watertight fit.
30. Remove the nut from the plastic connector by turning it counterclockwise.
31. Route the black air hose and black wire through the drilled access hole until the connector’s
thread end is extending into the inside of the saddle bag. IMPORTANT: Make sure the rubber
gasket is positioned between the connector and the saddle bag to ensure a watertight fit. See
Fig. 24.
32. Thread the nut back onto the connector, do not tighten.
33. Inspect the black flexible tubing to ensure that there are no sharp bends or kinks.
34. Tighten the nut that secures the nut to the saddle bag.
IMPORTANT: If there is excess black flexible tubing that is causing a kink, or a sharp bend follow the
corrective steps below.
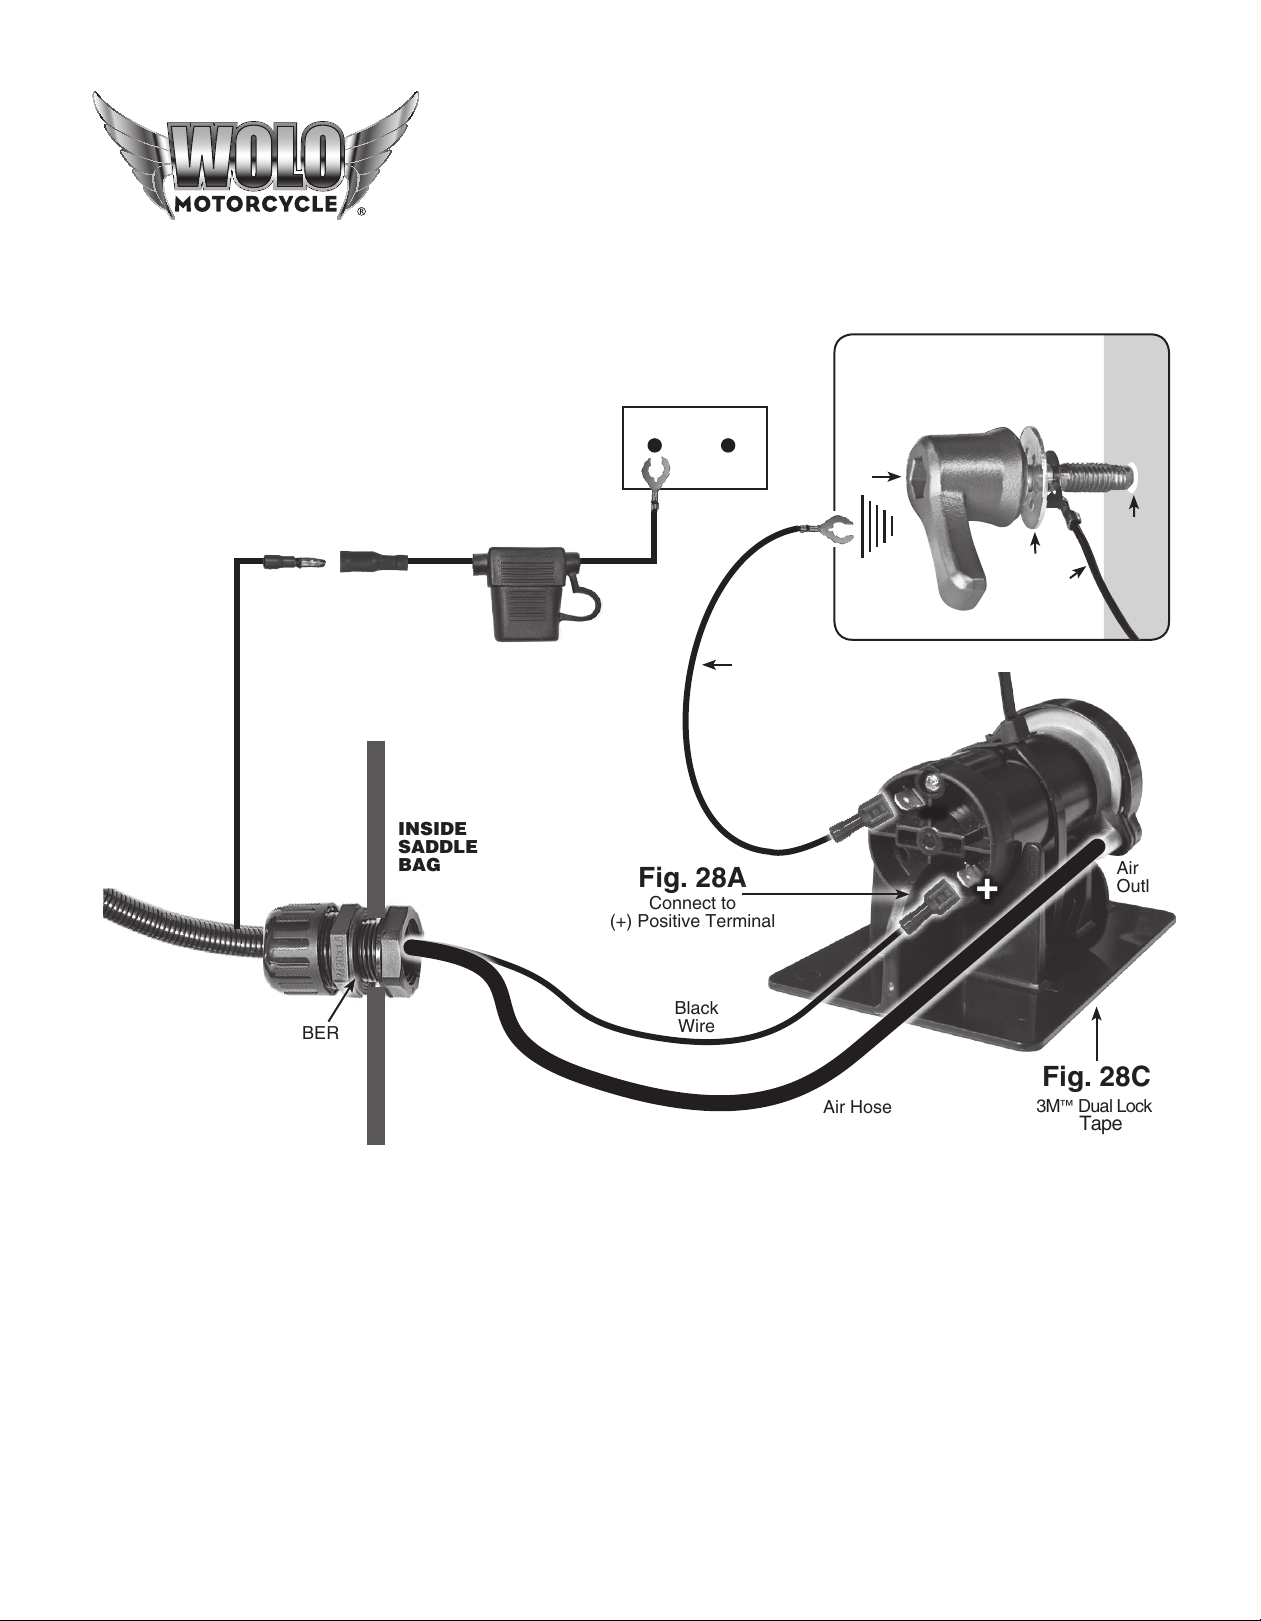
35A. Remove the nut that is securing the hanger bracket of the horn housing. See Fig. 1.
35B. Loosen the nut that is securing the connector to the saddle bag.
35C. Using a thin bladed sharp scissors, carefully insert the blade to cut only the black flexible tubing
at the horn’s end. Cut and remove enough of the flexible tubing to eliminate any kink or bend.
CAUTION: Use care to ensure the scissors do not cut the wires or air hose. See Fig. 25.

35D. Pull the black flexible tubing toward the horn housing while holding onto the black air hose and
black wires. If there is still a kink or bend repeat procedure.
35E. Secure the horn housing back onto the motorcycle.
35F. Insert the black hose and black wire back through the access hole into the saddle bag. Tighten
the nut that secures the connector to the saddle bag.
MOUNTING COMPRESSOR AND WIRING
The compressor’s mounting bracket will be secured to the inside of the saddle bag using 3M™ Dual
Lock™ tape™, which allows the motorcycle owner to remove the compressor and mounting bracket
from the saddle bag and re-secure compressor back into position in seconds without any tools.
36. Using a water based cleaner, clean the mounting surface inside the saddle bag, so it is free of
oil, dirt or dust. Dry the mounting surface with a clean shop towel.
37. Using a water based cleaner, clean the bottom of the compressor’s mounting bracket so it is free
of oil, dirt or dust. Dry with a clean shop towel.
38. The 3M™ Dual Lock™ tape has strong adhesive on each side that will keep the compressor
bracket secured in place even under high vibration. The 3M™ Dual Lock™ tape comes with the
front and back locked together. For best alignment we recommend you don’t separate them.
39. Wash your hands to ensure that oil or dirt does not come in contact with the adhesive on the
3M™ Dual Lock™ tape.
40. Peel the paper covering one side of the 3M™ Dual Lock™ tape. Make sure you do not
touch the exposed tape. Secure the tape to the bottom of the compressor mounting bracket.
CAUTION: Do not place the tape over the hex nut that secures the compressor to the bracket.
IMPORTANT: Do not secure compressor bracket to the saddle bag until the air hose and wiring
have been completed. See Fig. 26.
41. The air hose that was routed into the saddle bag will be connected to the compressor’s air outlet.
Hand hold the compressor in the marked mounting location and push the air hose onto the
compressor’s outlet tube. If necessary, cut the air hose to the proper length. IMPORTANT: Make
sure there are no sharp bends or kinks in the air hose that can restrict the air flow preventing the
horn from sounding. See Fig. 27.
42. The black wire routed into the saddle bag will be connected to the compressor’s (+) terminal.
Cut the black wire to proper length and crimp the 1/4” female insulated terminal (provided) to
the wire. Test crimp connection by holding the wire while lightly pulling on terminal. Connect the
terminal to the compressor’s (+) terminal. See Fig. 28A.
43. Using the black jumper wire (provided) connect the open-end terminal, to (-) ground such as any
clean unpainted body bolt. The recommend location is the bolt inside the saddle bag securing
the saddle bag to the motorcycle’s frame. See Fig. 28B.
44. The other end of the jumper wire is connected to the compressor’s (-) terminal. Cut the black
wire to proper length and crimp the 1/4” female insulated terminal (provided) to the wire. Test
crimp connection by holding the wire while lightly pulling on terminal. Connect the terminal to the
compressor’s (-) terminal. See Fig. 28B.
45. Peel the paper covering from the 3M™ Dual Lock™ tape. Make sure you do not touch the
exposed tape. The compressor and its mounting bracket are secured to the saddle bag by firmly
pushing in place. IMPORTANT: it takes 24 hours for the adhesive to fully set, do not separate
the compressor and bracket from the saddle bag mounting location until the adhesive is fully set.
See Fig. 28C.
46. Remove the (-) ground cable from the motorcycle’s battery.
47. Loosen the (+) positive battery clamp bolt. The 20-amp inline fuse (provided) has an open ended
terminal that will slide onto the (+) positive battery clamp bolt. CAUTION: Make sure the open-
end terminal is positioned between the head of the bolt and the clamp. Firmly tighten the (+)
positive battery clamp bolt. See Fig. 28D.

48. The black wire extending from the side wall of the black flexible tubing will be connected to the
inline fuse’s other wire that has a female bullet terminal. Cut the black wire to proper length and
crimp the male bullet terminal provided. Test crimp connection by holding the wire while lightly
pulling on terminal to make sure it is securely crimped to the wire. See Fig. 28E.
49. Connect the male bullet terminal to the fuse holder’s female terminal. See Fig. 28E.
50. Reconnect the (-) ground clamp onto the battery and tighten firmly.
51. Secure wiring with the plastic ties provided.
WARNING: It is important to inspect all electrical system wires that may have changed position
during installation to ensure that they are not interfering with operational parts and controls.
Installation is complete.
To test, put the ignition switch to on (if your motorcycle requires such) to sound the horn. Press the
factory horn button switch and the Hideaway Blast horn will sound.
52. Secure the seat back onto the motorcycle.
We hope that find the Wolo’s new Hideaway Blast to be a valuable addition to your motorcycle, while
keeping you safe. Your opinion of the horn and being happy with your purchase is very important to
be answered.
ANY EXPRESSED WARRANTY NOT PROVIDED HEREIN IS EXCLUDED AND DISCLAIMED. THE IMPLIED
WARRANTIES OF MERCHANTABILITY AND OF FITNESS FOR A PARTICULAR PURPOSE ARE EXPRESSLY LIMITED
TO A TERM OF THREE (3) MONTHS. UNDER NO CIRCUMSTANCES SHALL WOLO BE LIABLE TO PURCHASER OR
ANY OTHER PERSON FOR ANY SPECIAL OR CONSEQUENTIAL DAMAGES, WHETHER ARISING OUT OF BREACH
OF WARRANTY OR OTHERWISE.
To obtain warranty service, return the product prepaid, and include the original bill of sale showing the date of purchase.
Provide with the return a brief description of the problem. Also, include with the return a check or money order in the amount
of $20.00 to cover return shipping. Mail to:
Wolo Manufacturing Corp.
One Saxwood Street, Deer Park, NY 11729
Attn: Warranty Service
E-mail: [email protected]
Warranty
Wolo Manufacturing Corporation (“Wolo”) warranties to the original purchaser, for three months from the
date of purchase, that this product is free from defects in workmanship and materials. If there is such a
proven defect, Wolo, at its option, will either repair or replace the item free of charge, if it is returned to Wolo
within three months from the date of purchase together with proof of purchase as described below. Wolo
reserves the right to inspect any defect prior to settling any warranty claim by repair or replacement. This
warranty is limited as above provided and Wolo will not be responsible for fire or other casualty or accident,
due to neglect, abuse, abnormal use, modifications, faulty installation of this product, or natural causes.
© 2020 Wolo Mfg. Corp. All Rights Reserved.
HARLEY-DAVIDSON®motorcycles and HARLEY®are registered trademarks of H-D U.S.A., LLC.
Wolo and its products are not affiliated with or otherwise approved by H-D U.S.A., LLC.
3MTM Dual-LockTM tape is a trademark of 3M.
The Hideaway BlastTM system and/or components are protected by one or more of the following: US D860,850,
CH ZL201830109057.4, ECD 004751436-0001, US D850,887, ECD 004753234-0001, CH ZL20183010955.5,
CH ZL201830674542.6, and other U.S. and international patents pending.

Fig. 1
Fig. 4
Fig. 7
Fig. 2
Fig. 5
Fig. 8
Fig. 3
Fig. 6
Fig. 9
USE MOUNTING BRACKET 1
BRACKET
2
MOUNTING BRACKETS
USE MOUNTING BRACKET 2
TABS
INSERTED
INTO
CHANNEL
REMOVE
NUT TO
CHANGE
BRACKET
BRACKETS
FACE THIS
DIRECTION FLAT SIDE
OF SPEED
NUT ON
MOUNTING
BRACKET
NUT ON
HOUSING
BRACKET
NUT ON
HOUSING
BRACKET
1
2
1
HIDEAWAY BLASTTM MODEL 900
DROP IN REPLACEMENT HORN
INSTALLATION MANUAL

HIDEAWAY BLASTTM MODEL 900
DROP IN REPLACEMENT HORN
INSTALLATION MANUAL
Fig. 18Fig. 17Fig. 16
Fig. 15Fig. 14Fig. 13
Fig. 12Fig. 11Fig. 10
LONG
BOLT
SPEED
NUT
BOTTOM
HOLE
SHORT
BOLT
LONG
BOLT
TOP
HOLE
REMOVE
BOLTS
SPEED
NUT
HIDEAWAY
HORN
WIRES
FACTORY HORN WIRES
SHORT BOLT HORN
HOUSING
BRACKET
HORN
HOUSING
SPEED
NUTS

HIDEAWAY BLASTTM MODEL 900
DROP IN REPLACEMENT HORN
INSTALLATION MANUAL
Fig. 27Fig. 26Fig. 25
Fig. 24Fig. 23Fig. 22
Fig. 21Fig. 20Fig. 19
PUSH
TAB
OUTSIDE
SADDLE
BAG
RUBBER
GASKET
Hex
Nut
25/32”
Access
Hole
INSIDE
SADDLE
BAG
3M™Dual Lock™
Tape
Black
Air
Hose
Air Filter
Black
Wire
AIR OUTLETAIR HOSE
25/32˝
ACCESS
HOLE
FLEXIBLE
TUBING

HIDEAWAY BLASTTM MODEL 900
DROP IN REPLACEMENT HORN
INSTALLATION MANUAL
+
+
–
–
BATTERY
12-Volt
Fig. 28
Fig. 28A
Fig. 28C
Fig. 28D
Fig. 28E
HORN
Connect to
(+) Positive Terminal
Air Hose
Saddle Bag
Wall
Air
Outlet
On Outside
Of Saddle
Bag
Bullet Terminal
Male
Terminal
Black
Wire
Black
Wire
Flexible Tubing
Female
Terminal
Connect to
(+) Battery
Clamp Bolt
Inline Fuse
20-Amp
Fig. 28B
Connect to
(–) Negative Terminal
Connect
to
Ground
3M™Dual Lock™
Tape
OUTSIDE
SADDLE
BAG
RUBBER
GASKET
INSIDE
SADDLE
BAG
© 2020 Wolo Mfg. Corp. All Rights Reserved.
The recommended ground location
is the bolt inside the saddle bag
that secures the saddle bag to the
motorcycle’s frame.
Lock
Washer
Saddle
Bag
Bolt
Inner
Saddle
Bag
Wall
25/32˝
Hole
Black
jumper
wire
HARLEY-DAVIDSON®motorcycles and HARLEY®are registered trademarks of H-D U.S.A., LLC.
Wolo and its products are not affiliated with or otherwise approved by H-D U.S.A., LLC.
3MTM Dual-LockTM tape is a trademark of 3M.
The Hideaway BlastTM system and/or components are protected by one or more of the following: US D860,850,
CH ZL201830109057.4, ECD 004751436-0001, US D850,887, ECD 004753234-0001, CH ZL20183010955.5,
CH ZL201830674542.6, and other U.S. and international patents pending.
Black
jumper
wire
Table of contents
Other Wolo Horn manuals

Wolo
Wolo OCEAN ALERT 170 User manual

Wolo
Wolo BAD BOY 419 User manual

Wolo
Wolo 357 SERIES User manual

Wolo
Wolo OCEAN ALERT 160-24 User manual

Wolo
Wolo 225-2T User manual

Wolo
Wolo OCEAN ALERT 170-24 User manual

Wolo
Wolo 94117 User manual

Wolo
Wolo OCEAN ALERT 160 User manual

Wolo
Wolo EE100 User manual

Wolo
Wolo 320-2T User manual
Popular Horn manuals by other brands

Gemini
Gemini 047 installation manual

Vixen Horns
Vixen Horns VXO8330/4124C installation guide

Vixen Horns
Vixen Horns VXO8315/4114 installation guide

ITC
ITC T-710E owner's manual

Marco
Marco PW2 150 000 12 manual

Federal Signal Corporation
Federal Signal Corporation 350 Installation and maintenance instructions