Woo Audio WES User manual

©2011WOOAUDIOtmInc.Allrightsreserved.www.wooaudio.comRev1.0.June10,2011.1
WOO AUDIO WES
Electrostatic Amplifier
Fully Balanced Class-A Stereo Headphone Amplifier
Owner’s Manual
Please review this manual before operating your WOO AUDIO™ product.

©2011WOOAUDIOtmInc.Allrightsreserved.www.wooaudio.comRev1.0.June10,2011.2
Important Safety Information
CAUTION: These amplifiers are shipped without the vacuum
tubes installed. It is necessary to install the tubes first. The tubes
must be installed correctly or serious damage that is not covered
by the warranty will result.
Turn off immediately in the event of malfunction
Should you notice smoke or an unusual smell coming from the
equipments, turn it off immediately. Continued operation could
result in injury.
Do not disassemble
High voltage circuit. Touching the product’s internal parts could
result in injury. In the event of malfunction, the product should be
repaired only by a qualified technician.
Keep out of children
Failure to observe this precaution could result in injury
WARNING: Failure to follow these instructions could result in
fire, electric shock, or other injury or damage.

©2011WOOAUDIOtmInc.Allrightsreserved.www.wooaudio.comRev1.0.June10,2011.3
Table of Contents
IMPORTANT SAFETY INFORMATION 2
TABLE OF CONTENTS 3
OVERVIEW 4
QUICK INSTALLATION 5
OPERATION 11
COMPATIBLE TUBES 13
FAQ - FREQUENTLY ASKED QUESTIONS 14
WARRANTY AND SERVICE 15
REVIEWS 16
PRODUCT SPECIFICATION 17

©2011WOOAUDIOtmInc.Allrightsreserved.www.wooaudio.comRev1.0.June10,2011.4
Overview
Thank you for choosing a Woo Audio product. The WES is finely hand-crafted amplifier
that delivers uncompromised performance and superior listening experience.
Point-to-Point Wiring
Four EL34 power tubes
Four 6SL7 drive tubes
Two 5AR4 rectifier tube. Direct substitute: 5U4GB
Two 12AU7 phase splitter - unbalanced to balanced input conversion
Two selectable balanced inputs
One selectable unbalanced input
One 5-pin pro bias Stax output
One Sennheiser HE-90 output
DACT CT4 24-way stepped attenuator
Auricap capacitors for inter-stage and output coupling
Telfon tube sockets

©2011WOOAUDIOtmInc.Allrightsreserved.www.wooaudio.comRev1.0.June10,2011.5
Quick Installation
What’s in the box?
①WES Amplifier unit (AMP)
AMP accessories and tubes diagram:
②AluminumPhase splitter tube shields, 2 units

©2011WOOAUDIOtmInc.Allrightsreserved.www.wooaudio.comRev1.0.June10,2011.6
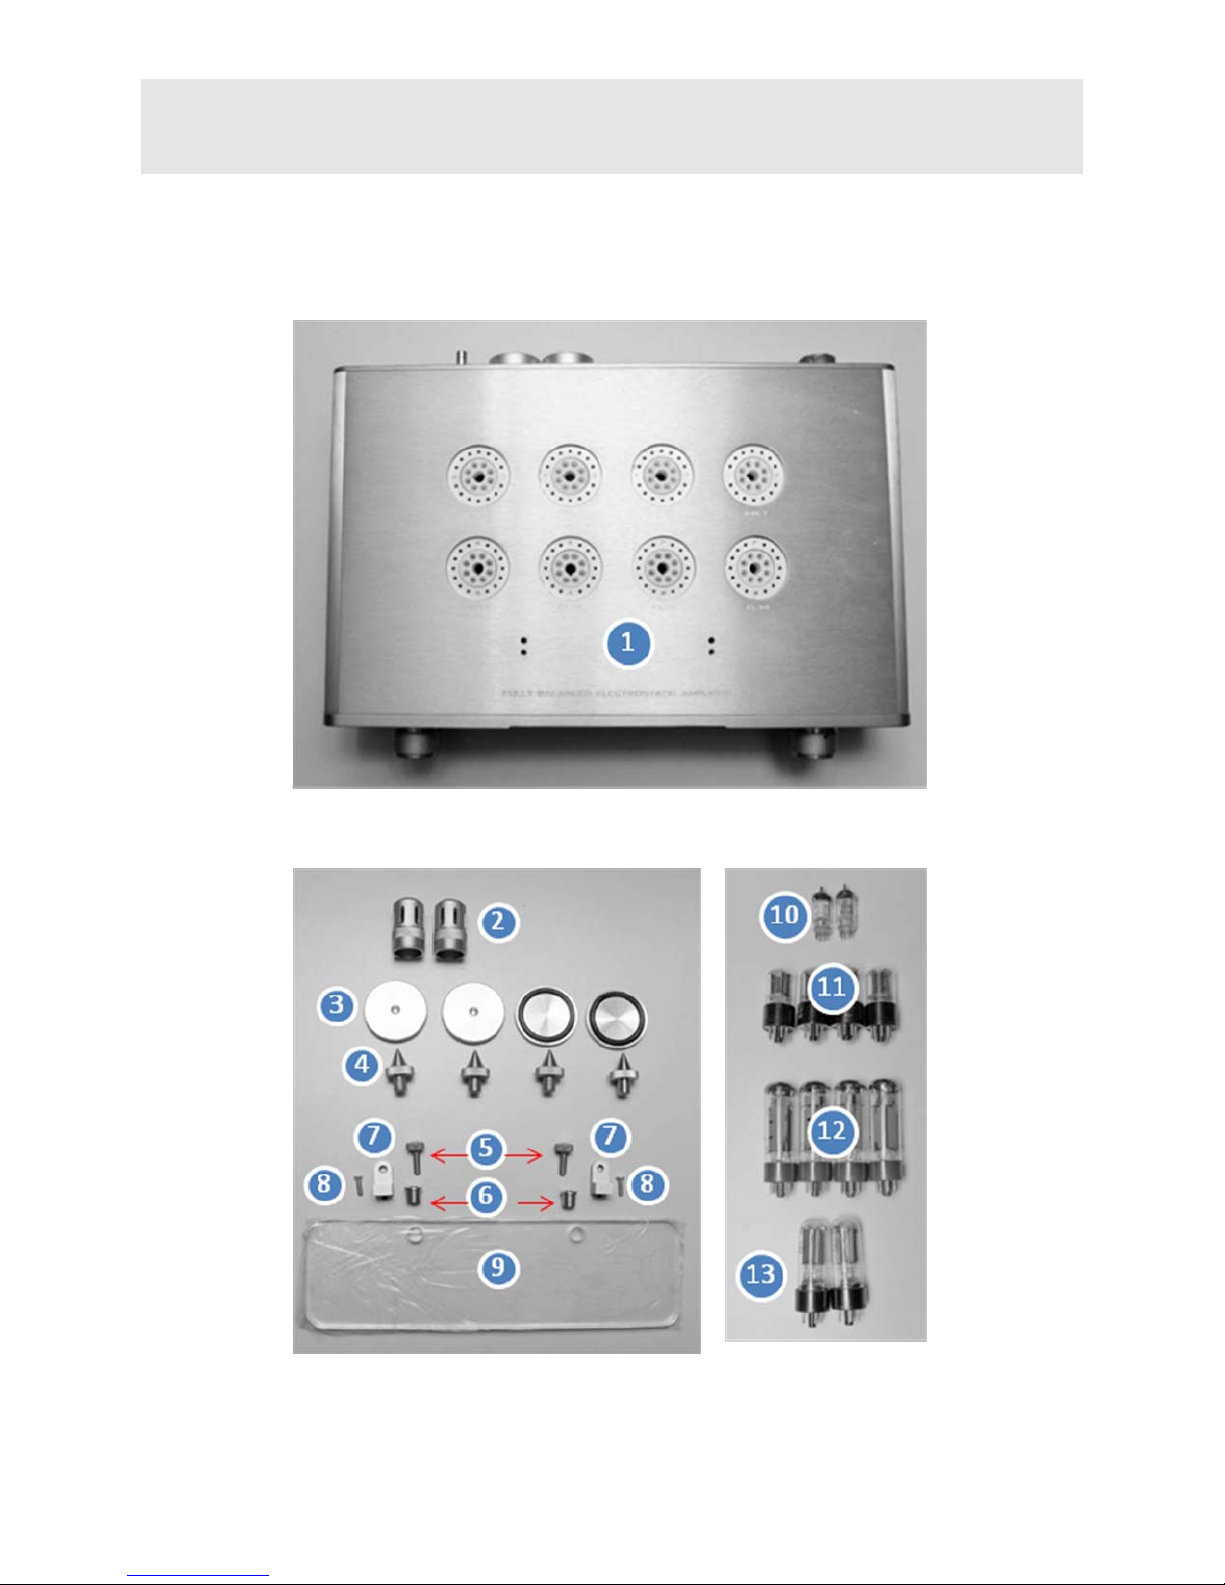
③Aluminum Cone feet dish with rubber pad, 4 units
④Aluminum Cone feet, 4 units
⑤Aluminum Panel screw, 2 units
⑥AluminumPanel screw filler, 2 units
⑦AluminumPanel L-shaped holder, 2 units
⑧Stainlesssteel L-shaped holder screws, 2 units
⑨Acrylic panel (long), 1 unit
⑩12AU7tube(phasesplitter),2units
⑪6SL7tube(driver),4units
⑫EL34tube(power),4units
⑬5AR4tube(rectifier,2units
The actual tubes may look different.
Compatible tubes may be included instead of the ones illustrated above.
Power cord and interconnection cable are not included.
PSU accessories diagram
⑭WESPowerSupplyunit(PSU)
⑮Aluminum Cone feet dish with rubber pad, 4 units
⑯Aluminum Cone feet, 4 units
⑰Aluminum Panel screw, 2 units
⑱AluminumPanel screw filler, 2 units
⑲Acrylic panel (short), 1 unit
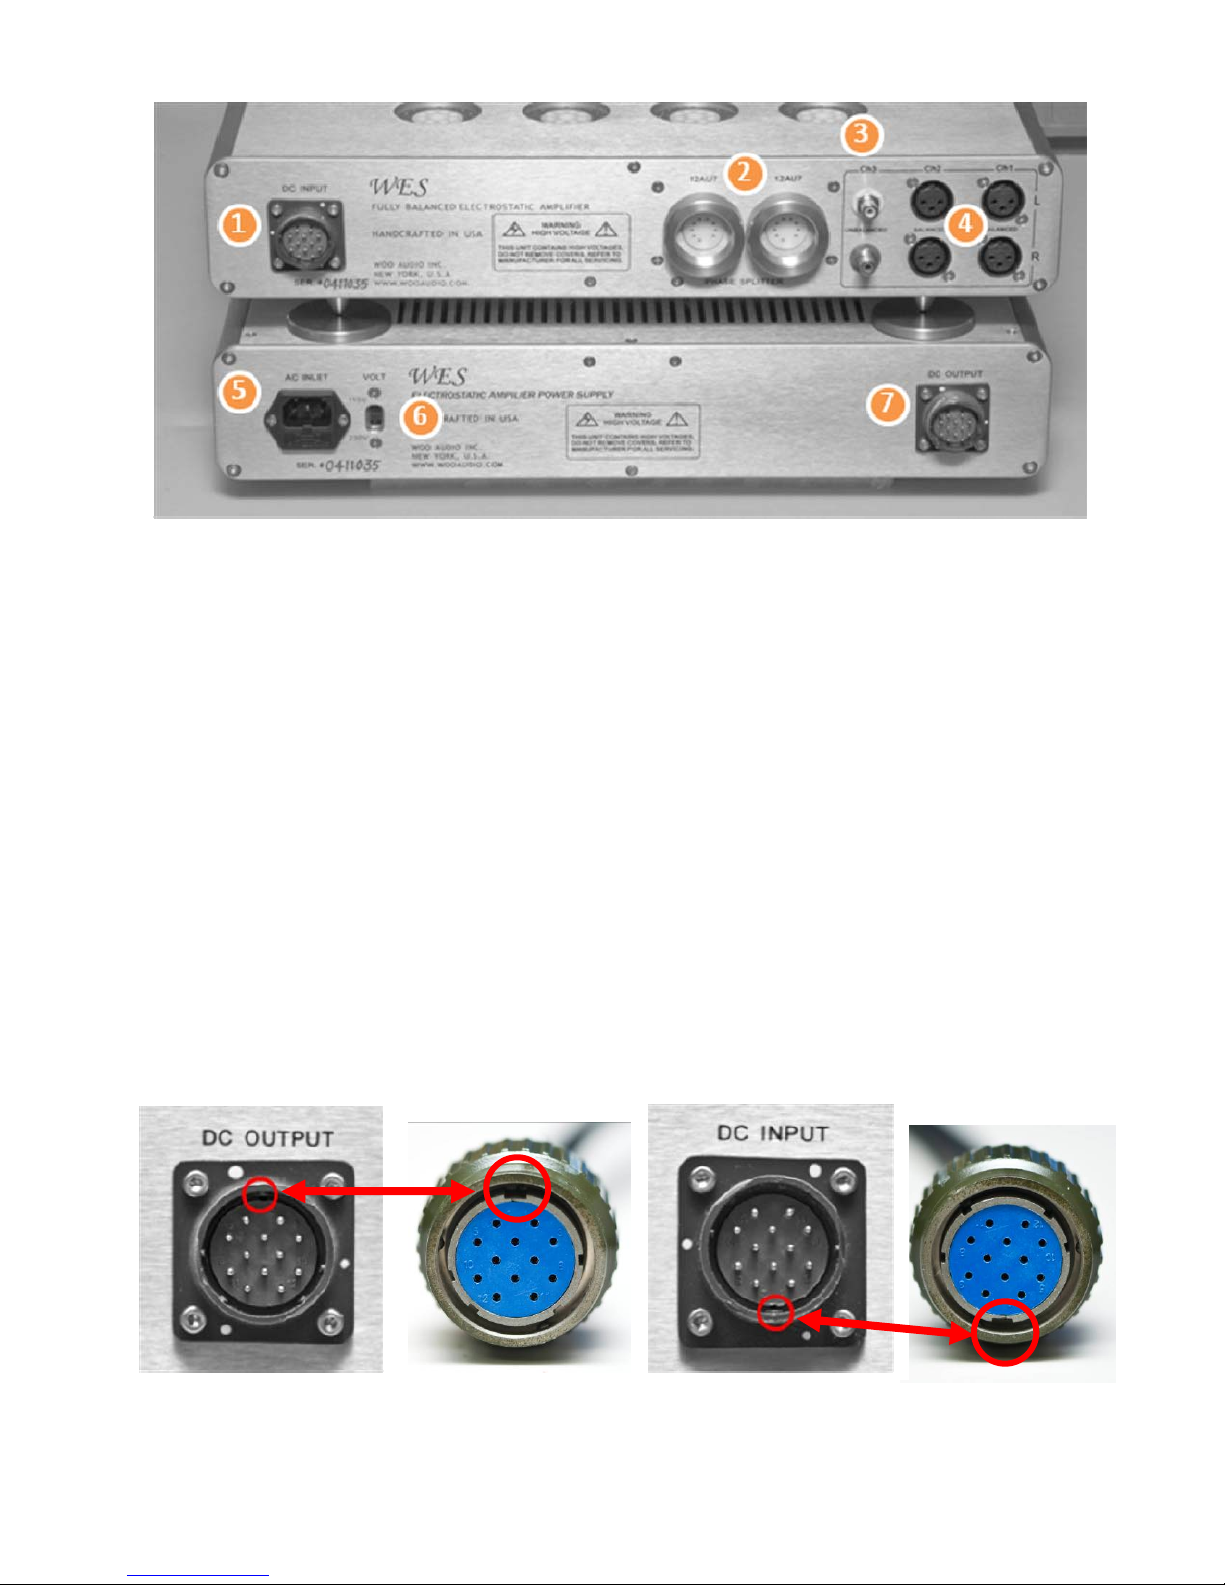
⑳DC power cord - connecting the AMP and PSU
The AMP and PSU have the same aluminum Cone feet dishes, feet, panel screws, and
panel fillers. They are labeling differently for illustration purpose.

©2011WOOAUDIOtmInc.Allrightsreserved.www.wooaudio.comRev1.0.June10,2011.7
Installing the feet and plates:
Installing the tubes:
Install these tubes on the AMP unit: 6SL7, EL34, 12AU7 (optional).
Install these tubes on the PSU unit: 5AR4.
Note: avoid oil or smudge on the tube glass, clean hands before installation.
1. Find the correct tube for the socket. There is a label below each tube socket that
indicates a standard tube for the amplifier. For example, a 6SL7 tube should
install on the “6SL7” labeled socket. You MUST use the compatible tube or
serious damage may occur to the amplifier. See Compatible Tube section for all
the approved direct substitute tubes.
2. Align the tube guide pin to the socket as below.
3. Hold the tube base firmly then squeeze it into the socket slowly. Be sure to apply
force perpendicular to the tube socket; never insert the tube at an angle. Apply
slight rocking motion the tube, which is harder to insert; never apply circular
motion. Apply pressure from the top of the tube if needed.
Tube socket guide pin indicator
Guide pin shows on the
bottom of a tube.
Screw all cone feet
into threaded holes
Put the
AMP and
PSU upside
down on a
soft and
clean
surface
Place the dish under the
feet
Place the dish on PSU
Carefully
place the
AMP on
the PSU

©2011WOOAUDIOtmInc.Allrightsreserved.www.wooaudio.comRev1.0.June10,2011.8
.4. Check installation. The tube pins should be inserted fully into the tube socket
receptacles.
Selecting AC voltage:
WARNING: failure to select the correct voltage will result in damage of the amp.
Installing the power cord:
Plug the power cord into the AC inlet. See ①in the below diagram. The AC inlet socket is a
standard IEC type. You will need to obtain the correct type for your region.
Do not insert a tube at an
angle
Insert a tube perpendicular to
the socket.
Hold base firmly.
U.S.
European
U.K.
Switch to label “115” for
AC100 to 125V voltage.
Switch to label “230” for
AC210 to 240V voltage.

©2011WOOAUDIOtmInc.Allrightsreserved.www.wooaudio.comRev1.0.June10,2011.9
Back panel diagram:
①DC input connector
②Phase splitter tube sockets
③RCA connectors
④XLR connectors
⑤AC input connector
⑥AC voltage switch
⑦DC output connector
Installing the DC cord:
NOTE: Both ends of the cord have the same plug. The plug can be inserted into either
the input or the output.
Align the plug’s orientation mark to the socket. Once aligned, the plug can be inserted
slightly into the socket.

©2011WOOAUDIOtmInc.Allrightsreserved.www.wooaudio.comRev1.0.June10,2011.10
Installing the source input:
Plug the RCA interconnection cable into the RCA connectors; see ③in the above diagram. Or,
plug the XLR interconnection cable into the XLR connectors; see ④in the below diagram.
Installing the phase splitter tube shield:
NOTE: This installation is optional if you do not use the RCA input.
1. Install the 12AU7 tube into the socket ②
2. Screw the tube shield clockwise into the ring of the socket.
Installing the acrylic panel on the AMP:
Installing the acrylic panel on the PSU:
Similar to the last 2 steps above.
Slightly push the plug inward
Turn the ring clockwise
until you hear a click sound
There are 2 holes
near the faceplate on
the top of the AMP
unit. One is threaded
and the other is
clear.
Put the stainless
steel screw on
the threaded
hole.
Secure the
screw.
Put the panel
filler into the
panel
Put the panel
screw through
the filler then
secure it.

©2011WOOAUDIOtmInc.Allrightsreserved.www.wooaudio.comRev1.0.June10,2011.11
Operation
DO NOT
oTurn on the amp before properly installing ALL tubes.
oUse tubes that are not approved by Woo Audio.
oTurn on the equipment without checking the correct AC voltage setting.
oRemove any tubes or the DC cord while the amp is operating
oTouch tubes (extremely hot) after warm-up.
oLeave the amps running unattended. To use the amps safely, please allow it to
cool down for every 8 hours of continuous play time.
DO
oPlace the amp away from any wireless or frequency-emitting devices such as
mobile phones, PDAs and radios, to avoid noise interference.
oKeep away from water or excessive moisture.
oTurn off the amp if its sound is abnormal.
oAllow a minimum of 2 inches of air clearance for heat dissipation.
oAllow approximately 5 minutes of warm-up.
oAllow the tubes to cool down before replacing them.
Turning the amplifier on:
1. Turn the volume knob to the lowest position.
2. Insert a headphone into headphone output
3. Turn the standard-by power switch knob ⑤from left to right until you hear a
clicking sound. The LED ⑦will light.
4. Observe that all tubes light gradually.
5. Let the tubes warm up for at least 1 minute.
6. Turn the power switch knob ⑥from left to right until you hear a clicking sound.
7. The amplifier is now in operation.
NOTE: The amplifier will not function until both power switches are turned on.

©2011WOOAUDIOtmInc.Allrightsreserved.www.wooaudio.comRev1.0.June10,2011.12
Front panel diagram:
①Source input selector.
②Stax 5-pin PRO bias headphone output
③Sennheiser HE-90 headphone output
④Volumecontrol
⑤Stand-by power switch
⑥Powerswitch
⑦Stand-by LED indicator
⑧Power LED indicator
Turning off the amplifier:
Both power switches ⑤⑥must be turned off. You can turn off the power switch in any
order.
Break-in period:
It is recommended to allow the amplifier to operate 150+ hours so that peak performance can be
realized. An effective way to break-in the amp is to run the amp normally with music playing.
Please do not leave the amp running continuously.

©2011WOOAUDIOtmInc.Allrightsreserved.www.wooaudio.comRev1.0.June10,2011.13
Compatible Tubes
ModelAdapter Note
Driver
6SL7 No
6188/6SU7No Tungsolbrandedonly
12AX7YesA9‐pinto8‐pinadapterisneeded.
CV1985No
ECC35No
VT229No
Power
EL34 No
6CA7No
KT88No
Rectifier
5AR4No IndirectlyHeated
5Z4No IndirectlyHeated
GZ30No IndirectlyHeated
GZ32No IndirectlyHeated
GZ33No IndirectlyHeated
GZ34No IndirectlyHeated
GZ37No IndirectlyHeated
U54No IndirectlyHeated
PhaseSplitter
12AU7 No
ECC82No
ECC802SNo
5814No
5963No
6189No
7316No
* The most current chart can be found in this document:
http://tinyurl.com/4wbv5qn

©2011WOOAUDIOtmInc.Allrightsreserved.www.wooaudio.comRev1.0.June10,2011.14
FAQ - Frequently Asked Questions
There is abnormal sound right after turning on the amplifier.
This is normal from a cold start as the tubes are warming up to get into the proper
working state. The noise will disappear gradually.
Can I change headphone while the amplifier is on?
Yes, but you must first minimize the volume.
No sound is coming out of the headphone.
oCheck that all tubes are properly installed.
oCheck that the source is properly installed and is working fine.
oCheck that the source switch is on the correct position.
oCheck headphone connection.
There is noticeable noise coming from the headphone.
oRemove all sources from the amp to check if the noise disappears. If it does, the
noise is coming from the source.
oPlace the amp away from other electronic devices to check whether those were
causing the noise.
oPlace the amp in a different location to check if the noise is coming from the AC
line.
oRemove all tubes, clean tube pins, and then reinstall them again.
oReplace some or all tubes.
The sound is abnormal or distorted.
Replace tubes to see if they have deteriorated.
The LED and the tubes do not light.
Check if the fuse is burnt. See the Quick Installation section on how to replace a fuse.
Insert a small flat
screwdriver into
the fuse door
which located on
the AC inlet.
Release the fuse
door by pulling it
out.
The fuse holder is
released from the
AC inlet.
The fuse is held by
a clip.

©2011WOOAUDIOtmInc.Allrightsreserved.www.wooaudio.comRev1.0.June10,2011.15
Warranty and Service
Woo Audio warrants this product free from defects in materials and workmanship for 1
year from the original date of purchase. The tubes are warranted for 30 days unless
otherwise stated. In the event that your Woo Audio product requires servicing, please
contact us directly to get a return instruction. If the equipment needs to be shipped back,
please use the original packaging and include a copy of the sales purchase along with a
detailed explanation of the problem(s).
Send service inquiry to wooaudio@gmail.com
Any modification not authorized by WOO AUDIO will void this warranty.

©2011WOOAUDIOtmInc.Allrightsreserved.www.wooaudio.comRev1.0.June10,2011.16
Reviews
“The WooAudio WES and Stax SR-007 Mk2 headphones will dazzle your ears with
state of the art sound for a tiny fraction of the cost of a system built around speakers.”
– Home Entertainment
“I don't mean to sound overly dramatic, but the WES is one of those break through
products that leaves you wondering about the future of high-end audio.” – Positive
Feedback, issue 54
“In my 60 years as an audiophile, never have I experienced a more complete and
satisfying experience as I am enjoying with WOO AUDIO’s WES.” – A R

©2011WOOAUDIOtmInc.Allrightsreserved.www.wooaudio.comRev1.0.June10,2011.17
Product Specification
Model: WES
Headphones output voltage swing: 1300 volts p-p
Stax PRO bias 580V
Sennheiser HE90 bia 500V
Signal/Noise: >100 dB
THD: <= 0.3%
Voltage: AC 110/220 - 240V, 50/60 Hz, selectable
Power consumption: 118 watts
External Dimension
PSU:
AMP:
4.5”(H), 16.5”(W), 12”(D)
7.5”(H), 16.5”(W), 12”(D) (with tube guard)
Weight (AMP + PSU): 40 pounds or 18.2 kg
Woo Audio is committed to continuously improve its products. We reserve
the right to improve the design without notice.
Table of contents
Other Woo Audio Amplifier manuals

Woo Audio
Woo Audio WA22 User manual

Woo Audio
Woo Audio WA23 LUNA User manual

Woo Audio
Woo Audio WA11 topaz User manual

Woo Audio
Woo Audio WA5 User manual

Woo Audio
Woo Audio WA5 User manual

Woo Audio
Woo Audio WA-5 300B User manual

Woo Audio
Woo Audio WA7 Fireflies User manual

Woo Audio
Woo Audio WA3 User manual

Woo Audio
Woo Audio WA2 User manual

Woo Audio
Woo Audio WA7d User manual