Woo Audio WA5 User manual

!"#$%&'((&)*+,(-.&,/01&)22&3456-7&3878398:1&
;;;1;<<=>:4<10<.&
?89&$1#1&@>2A&"BC&"#$%&
$&
&
WOO AUDIO WA5 / WA5-LE
300B Headphone and Speaker Amplifier
Single-Ended, Class-A
Owner’s Manual
Please review this manual before operating your WOO AUDIO™ product.

!"#$%&'((&)*+,(-.&,/01&)22&3456-7&3878398:1&
;;;1;<<=>:4<10<.&
?89&$1#1&@>2A&"BC&"#$%&
"&
&
Important Safety Information
CAUTION: These amplifiers are shipped without the vacuum
tubes installed. It is necessary to install the tubes first. It
is essential that the tubes are installed correctly or serious damage
that is not covered by the warranty will result.
Turn off immediately in the event of malfunction
Should you notice smoke or an unusual smell coming from the
equipments, turn it off immediately. Continued operation could
result in injury.
Do not disassemble
High voltage circuit. Touching the product’s internal parts could
result in injury. In the event of malfunction, the product should be
repaired only by a qualified technician.
Keep out of children
Failure to observe this precaution could result in injury
WARNING: Failure to follow these instructions could result in
fire, electric shock, or other injury or damage.

!"#$%&'((&)*+,(-.&,/01&)22&3456-7&3878398:1&
;;;1;<<=>:4<10<.&
?89&$1#1&@>2A&"BC&"#$%&
D&
&
Table of Contents
IMPORTANT SAFETY INFORMATION 2
TABLE OF CONTENTS 3
OVERVIEW 4
QUICK INSTALLATION 5
OPERATION 10
COMPATIBLE TUBES 13
FAQ - FREQUENTLY ASKED QUESTIONS 14
WARRANTY AND SERVICE 16
RECOMMENDED SETTINGS 19
PRODUCT SPECIFICATION 19&

!"#$%&'((&)*+,(-.&,/01&)22&3456-7&3878398:1&
;;;1;<<=>:4<10<.&
?89&$1#1&@>2A&"BC&"#$%&
E&
&
Overview
Thank you for choosing a Woo Audio product. The WA5 / WA5-LE is finely hand-
crafted amplifier that delivers uncompromised performance and superior listening
experience.
!Discrete headphone circuit. Discrete speaker circuit (WA5 only)
!High-end output transformer-coupled design
!Hand-built with point-to-Point wiring
!Soft-start protection circuit
!Audiophile-grade internal parts (WA5 only) available for WA5-LE at extra cost
!Speaker output selection switch knob (WA5 only)
!Hi/Lo headphone POWER output
!Hi/Lo headphone IMPEDANCE
!Hi/Lo headphone output LEVEL
!One 1/4" or 6.3mm for dynamic headphones
!One 4-pin XLR connector for dynamic headphones
!One 3-pin XLR input
!One pair of gold-plate WBT Nextgen speaker binding posts (WA5 only)
!Two RCA inputs, WBT Nextgen (WA5 only)

!"#$%&'((&)*+,(-.&,/01&)22&3456-7&3878398:1&
;;;1;<<=>:4<10<.&
?89&$1#1&@>2A&"BC&"#$%&
%&
&
Quick Installation
What’s in the box?
F&Amplifier unit
G&H<;83&7>II2A&>/4-
J&(/8&.=-068:&I=43&<K&D##L&->M87
N&(/8&.=-068:&I=43&<K&OPQB&->M87
R&(/8&.=-068:&I=43&<K&%*ES&->M87&
T&$K-1&+U&0<3:&0<//80-4/5&M8-;88/&-68&)VH&=/:&HP*&
!The actual look and make of the tubes may be vary.
!Compatible tubes may be included instead of the ones mentioned above.
!AC power cord for your local country and audio cables are not included.

!"#$%&'((&)*+,(-.&,/01&)22&3456-7&3878398:1&
;;;1;<<=>:4<10<.&
?89&$1#1&@>2A&"BC&"#$%&
O&
&
Installing the 6SN7 and 5U4G tubes:
Note: avoid oil or smudge on the tube glass, clean hands before installation.
1. Find the correct tube for the socket. There is a label below each tube socket that
indicates a standard tube for the amplifier. For example, a 6SN7 tube should
install on the “6SN7” labeling socket. You MUST use the compatible tube or
serious damage may occur to the amplifier. See Compatible Tube section for all
the approved direct substitute tubes.
2. Align the tube guide pin to the socket as below.
3. Hold the tube base firmly then squeeze it into the socket slowly. Be sure to apply
force perpendicular to the tube socket, never insert the tube at an angle. Apply
slight rocking motion for harder to insert tube, never apply circular motion.
Apply pressure from top of the tube of the tube if needed.
Tube to tube
Tube socket guide pin indicator
Guide pin shows on the
bottom of a tube.
Do no insert a tube at an angle
Insert a tube perpendicular to
the socket.
Hold base firmly.
"
#

!"#$%&'((&)*+,(-.&,/01&)22&3456-7&3878398:1&
;;;1;<<=>:4<10<.&
?89&$1#1&@>2A&"BC&"#$%&
B&
&
4. Check installation. The tube pins should be inserted fully into the tube socket
receptacles.
Installing the 300B tubes:
Be aware that the large pins should be inserted into the large pin receptacles.
#
"

!"#$%&'((&)*+,(-.&,/01&)22&3456-7&3878398:1&
;;;1;<<=>:4<10<.&
?89&$1#1&@>2A&"BC&"#$%&
W&
&
Selecting AC voltage:
WARNING: failure to select the correct voltage will result in damage of the amp.
Installing the power cord:
Plug the power cord into the AC inlet, see Fin the below diagram. The AC inlet socket is a
standard IEC type. You will need to obtain the correct type for your region.
Installing the DC cord:
The DC cord is non-directional. It can be inserted into either socket.
U.S.
European
U.K.
Switch to label “115” for
AC100 to 125V voltage.
Switch to label “230” for
AC210 to 240V voltage.

!"#$%&'((&)*+,(-.&,/01&)22&3456-7&3878398:1&
;;;1;<<=>:4<10<.&
?89&$1#1&@>2A&"BC&"#$%&
X&
&
Back panel diagram:
F&AC Inlet with fuse box (standard IEC type power cord not supplied)
G&Voltage selection switch (compatible with 100v-220v)
JDC outlet (use included DC cord)
NDC inlet
RSpeaker terminals (WA5 only)
T&?U) and XLR inputs (for source connections e.g. CD player, DAC, Tape, Tuner,
Turntable with Phono-stage, etc.)

!"#$%&'((&)*+,(-.&,/01&)22&3456-7&3878398:1&
;;;1;<<=>:4<10<.&
?89&$1#1&@>2A&"BC&"#$%&
$#&
&
Operation
DO NOT
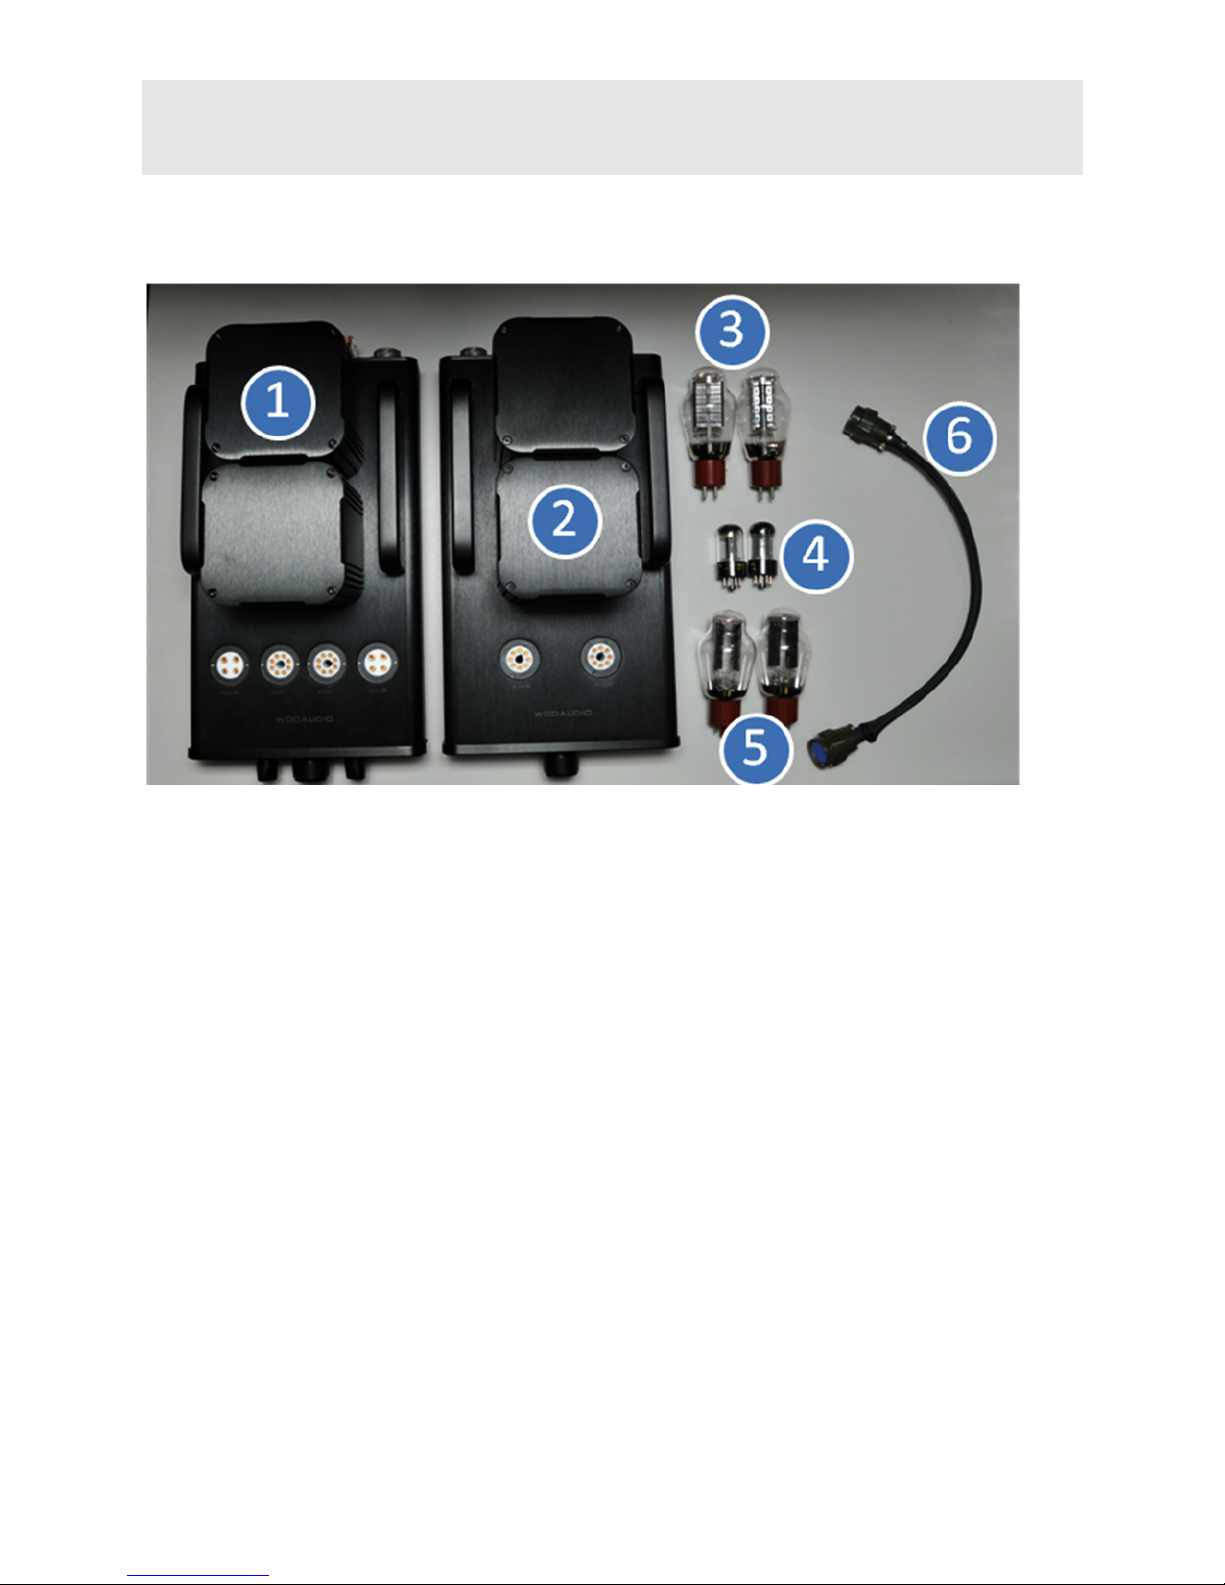
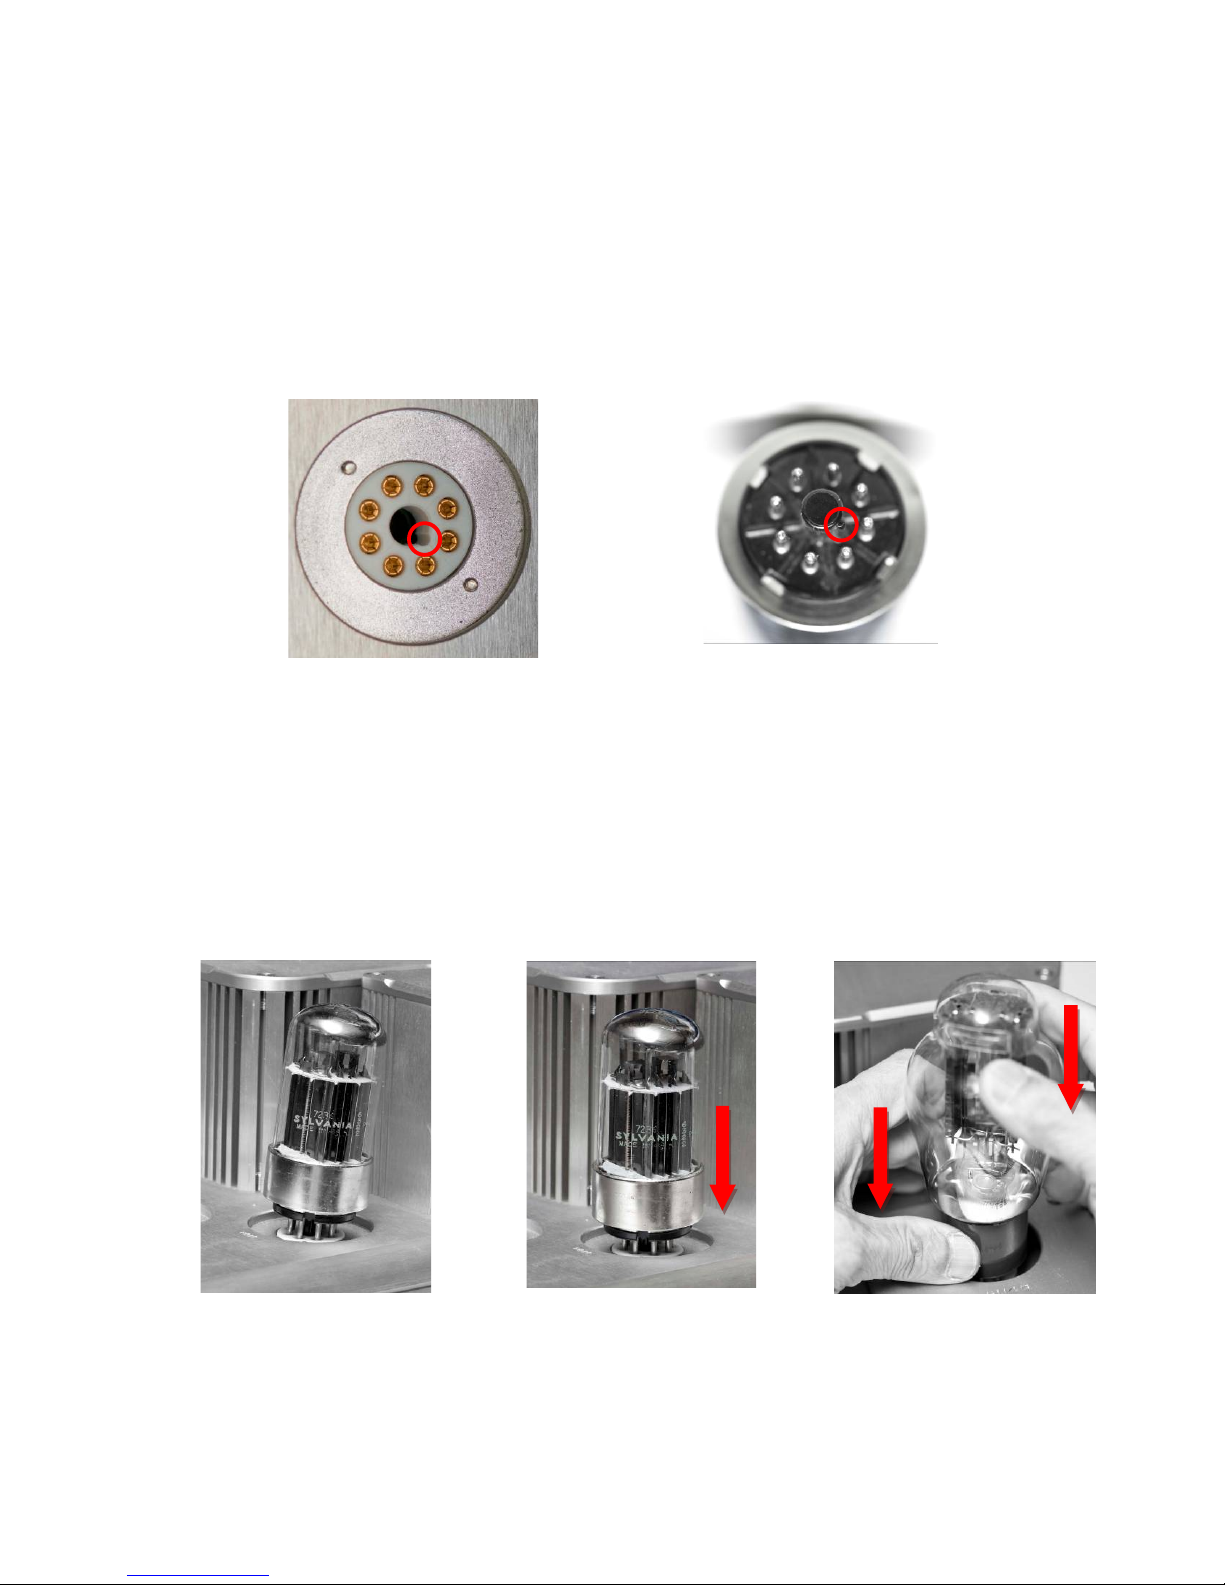
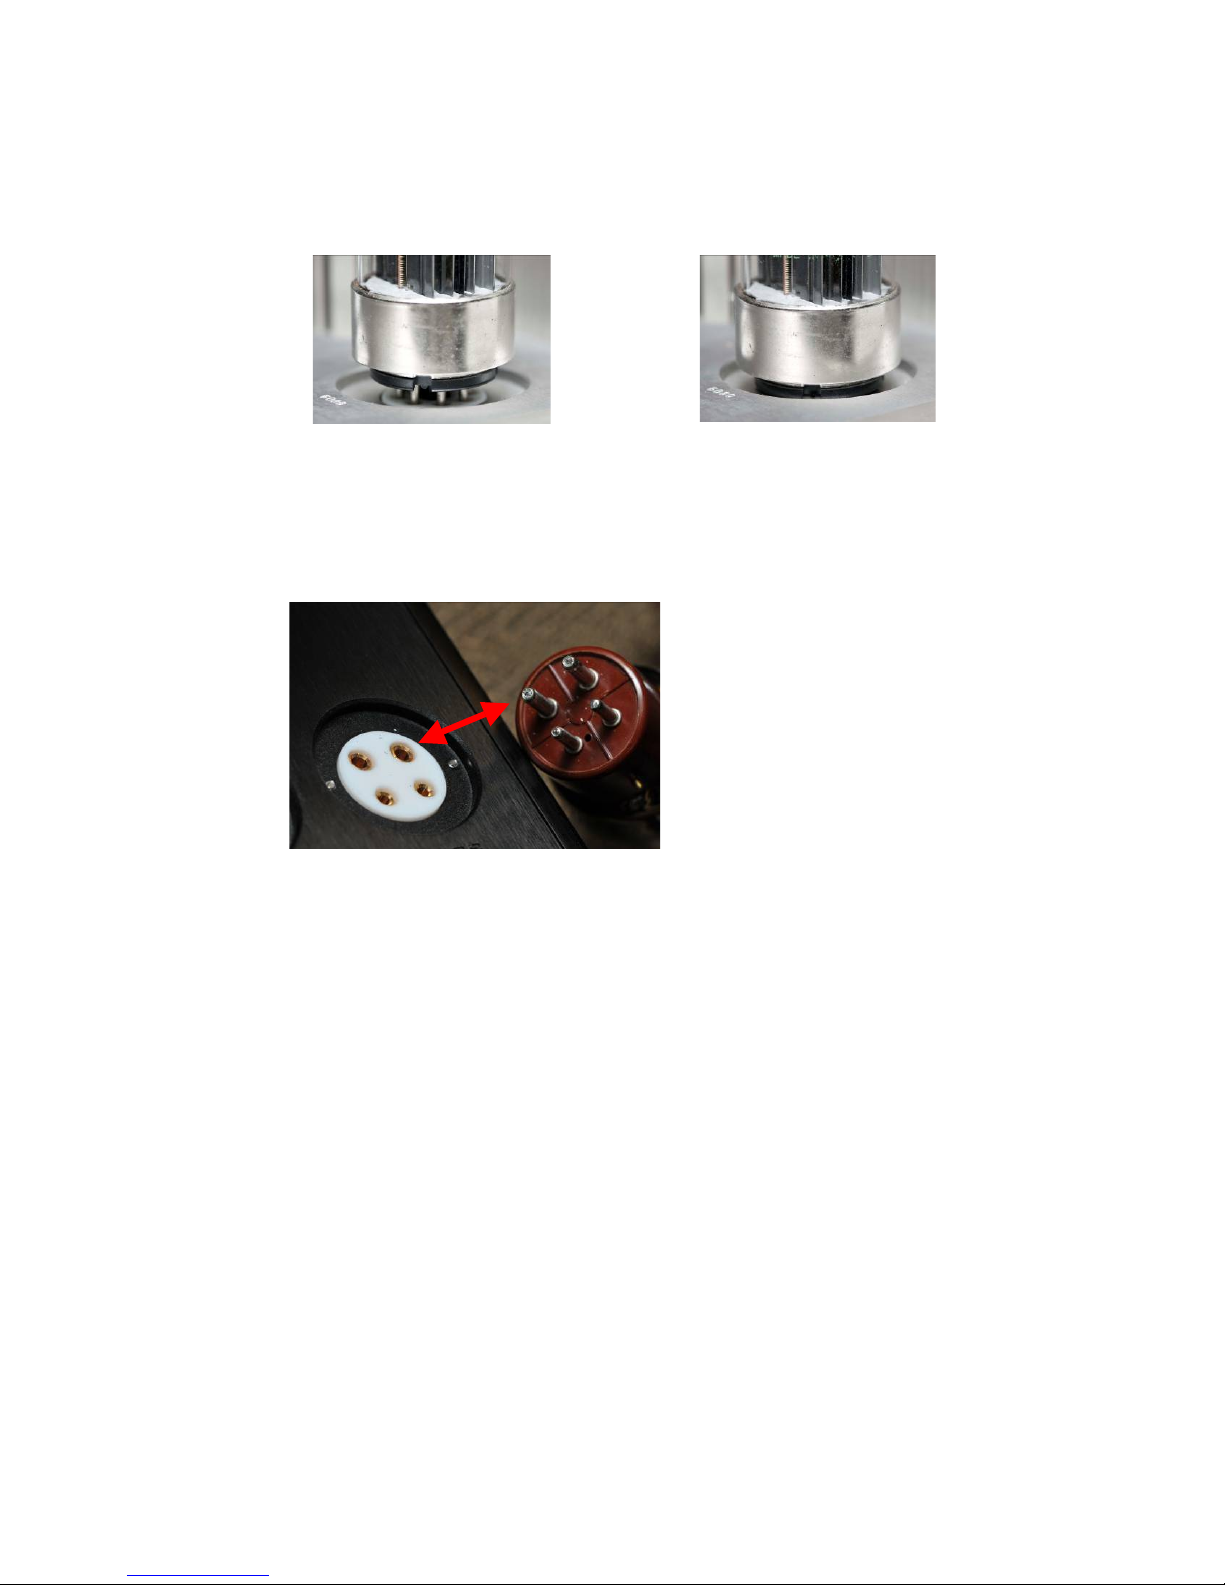
oTurn on the amp before properly installing ALL tubes.
oUse tubes that are not supplied or approved by Woo Audio.
oTurn on the equipment without checking the correct AC voltage setting.
oRemove any tubes or DC cord while the amp is powered ON or in operation
Touch tubes (extremely hot) after warm-up.
oLeave the amps to run unattended. To use the amp safely, please allow the amp to
cool down for every 8 hours of continuous playtime.
oDo NOT set the functional switch to SPK if speakers are disconnected.
oDo NOT Switch to HP (high power) if headphones are disconnected to the 4-pin
XLR on the amp. The amplifier requires a “load” when in high power mode.
oDo NOT place amplifier in direct sunlight. Extended exposure may cause
discoloration to the anodize aluminum.
DO
oTurn off the amp when switching between speaker and headphone. Otherwise,
you will hear a small popping sound, but it will not harm your headphones or
speakers.
oSet volume to minimum (lowest) before changing amplifier settings
oPlace the amp away from any wireless or frequency-emitting devices such as
mobile phones, PDA, radios, etc. to avoid noise interference.
oKeep away from water or excessive moisture.
oTurn off the amp if the amp sounds abnormally.
oAllow minimum 2 inches of air clearance for heat dissipation.
oAllow approximate 5 minute of warm-up.
oAllow the tubes to cool down before removing them or transporting the amplifier.

!"#$%&'((&)*+,(-.&,/01&)22&3456-7&3878398:1&
;;;1;<<=>:4<10<.&
?89&$1#1&@>2A&"BC&"#$%&
$$&
&
Multi-functional output switch diagram
Break-in period:
It is recommended to allow the amplifier to operate 150+ hours so that peak
performance can be realized. An effective way to break-in the amp is to run the amp
normally with music playing.
Please do NOT leave the amplifier ON while away and unattended.
Warning:
The amplifier MUST have a “load” via the headphones or speakers (WA5) when powered
ON. Running the amplifier without a “load” could damage to power transformers.
SPK – Speaker output (WA5 only)*
* MUST have speakers connected at all times while in this setting
HI – High power output setting (headphones)*
* MUST have headphones connected at all times while in this setting
LO – low power output setting (headphones)
Note: Power OFF amplifier prior to changing power output setting to
avoid “POP” sound.

!"#$%&'((&)*+,(-.&,/01&)22&3456-7&3878398:1&
;;;1;<<=>:4<10<.&
?89&$1#1&@>2A&"BC&"#$%&
$"&
&
Turning on the amplifier:
1. Set the functional switch to a proper position (disconnect headphones prior to making
changes with this switch to avoid “POP” through the headphones)
2. Insert a headphone into the headphone jack, or connect speakers to the amp unit. Turn
the volume knob to the lowest position.
3. Turn the power switch knob Tfrom left to right until you hear a click sound. The power
LED on the AMP will light while the LED on the PSU will blink for approx 20 seconds.
LED blinking indicates the amp is starting up.
4. Observe that all tubes light gradually and the PSU’s LED becomes solid.
5. Let the tubes to warm up for at least 1 minute before turning up the volume.
Front panel diagram:
F4-pin XLR HP (high power) headphone output
GMulti-functional switch (SPK position is not selectable on WA5-LE)
J&Volume control
N&P<>308&4/I>-&78280-<3&
R&YZ&7-838<&[?P&\6456&I<;83]&headphone output
T&Power switch
^&LED indicator

!"#$%&'((&)*+,(-.&,/01&)22&3456-7&3878398:1&
;;;1;<<=>:4<10<.&
?89&$1#1&@>2A&"BC&"#$%&
$D&
&
Compatible Tubes
&&
Model#'
Adapter'
Comment'
Driver''
OPQB&_&`S[&`'S[&
Q<&&
&&
%OX"&
Q<&&
&&
OUSB&
a87&
)&XbI4/&-<&WbI4/&=:=I-83&47&/88:8:1&
OcWS&
a87&
)&WbI4/&-<&WbI4/&=:=I-83&;4-6&S34:&;438&47&/88:8:1&
BQB&
a87&
)&WbI4/&-<&WbI4/&2<0-=2&=:=I-83&47&/88:8:1&&
Ud$W$&
Q<&&
&&
Ud$XWW&
Q<&&
&&
eUUD"&
Q<&&
&&
d["D$&
Q<&&
&&
Rectifier'
%*ES&_&`L&
Q<&&
+4380-2A&f8=-8:&
"BE)&
a87&
+4380-2A&f8=-8:C&=&EbI4/&-<&WbI4/&=:=I-83&47&/88:8:1&
"BEL&
Q<&&
+4380-2A&f8=-8:&
%Dg*&
Q<&
+4380-2A&f8=-8:&
%)?E&
Q<&&
,/:4380-2A&f8=-8:&
%)PE&
Q<&&
+4380-2A&f8=-8:&
%hE&
Q<&&
,/:4380-2A&f8=-8:&
%?E&&
Q<&&
+4380-2A&f8=-8:&
%*DU&
Q<&&
+4380-2A&f8=-8:&
%dE&`S&`S)&
Q<&&
+4380-2A&f8=-8:&
%aD&
Q<&&
+4380-2A&f8=-8:&
%hD&
a87&
+4380-2A&f8=-8:C&=&WbI4/&-<&WbI4/&=:=I-83&47&/88:8:1&
WD&
a87&
+4380-2A&f8=-8:C&=&WbI4/&-<&WbI4/&=:=I-83&47&/88:8:1&
ShD#&
Q<&&
,/:4380-2A&f8=-8:&
ShD"&
Q<&&
,/:4380-2A&f8=-8:&
ShDD&
Q<&&
,/:4380-2A&f8=-8:&
ShDE&
Q<&&
,/:4380-2A&f8=-8:&
ShDB&
Q<&&
,/:4380-2A&f8=-8:&
UdDBW&
Q<&
,/:4380-2A&f8=-8:&
*%"&
Q<&&
,/:4380-2A&f8=-8:&
*%E&
Q<&&
+4380-2A&f8=-8:&
Power'
'e&D##L&_&
Q<&&
&&
eVi&D##L&`&jiP&
Q<&&
&&
[38=7>38&D##L&
Q<&&
&&
P<I64=&D##L&
Q<&&
&&
e)[&D##L&
Q<&&
&&
ef&D##L&
Q<&&
&&
@@&D##L&
Q<&&
&&
P6>5>=/5&D##L&
Q<&&
&&
P98-2=/=&D##L&
Q<&&
&&
[=k=-7>k4&D##L&
Q<&&
&&
* The most current chart can be found in this document:
http://tinyurl.com/4wbv5qn

!"#$%&'((&)*+,(-.&,/01&)22&3456-7&3878398:1&
;;;1;<<=>:4<10<.&
?89&$1#1&@>2A&"BC&"#$%&
$E&
&
FAQ - Frequently Asked Questions
There is abnormal sound right after turning on the amplifier.
This is normal from a cold start as the tubes are warming up to get into the proper
working state. The noise will disappear gradually.
Can I change headphone while the amplifier is on?
Yes, but you must first minimize the volume.
No sound is coming out of the headphone.
oCheck all tubes are properly installed.
oCheck source is properly installed and it is working fine.
oCheck source switch is on the correct position.
oCheck headphone connection.
There is noticeable noise coming from the headphone.
oRemove all sources from the amp to check if the noise disappears. If it does, the
noise comes from the source.
oTest the amp away from other electronic devices which can introduce noise.
oTest the amp in a different location to check if the noise comes from the AC line.
oRemove all tubes, clean tube pins, then reinstall them again.
oReplace some or all tubes.
The sound is abnormal or distorted.
oReplace tubes to see if they are deteriorated.
There is a constant low frequency hum coming from the headphone.
You can adjust the noise adjustment attenuator, which is located under each handle on
the AMP unit. The left attenuator is for the left channel, and right is for the right
channel.

!"#$%&'((&)*+,(-.&,/01&)22&3456-7&3878398:1&
;;;1;<<=>:4<10<.&
?89&$1#1&@>2A&"BC&"#$%&
$%&
&
The LED and the tubes do not light.
First check if the AC cord is installed. Then, check if the fuse is burnt. See the following
instruction on how to replace a fuse. The fuse type is 2-3A, slo-blo.
$
$
Insert a small flat
screwdriver into
the fuse door
which located on
the AC inlet.
Release the fuse
door by pulling it
out.
The fuse holder is
released from the
AC inlet.
The fuse is held by
a clip.
$

!"#$%&'((&)*+,(-.&,/01&)22&3456-7&3878398:1&
;;;1;<<=>:4<10<.&
?89&$1#1&@>2A&"BC&"#$%&
$O&
&
Warranty and Service
Woo Audio warrants this product free from defects in materials and workmanship for 1
year from the original date of purchase. The tubes are warranted for 30 days unless
otherwise stated. In the event that your Woo Audio product requires servicing, please
contact us directly to get a return instruction. If the equipment needs to be shipped back,
please use the original packaging and include a copy of the sales purchase along with
detail explanation of the problem(s).
Send service inquiry to info@wooaudio.com
Any modification not authorized by WOO AUDIO will void this warranty.
User Notes

!"#$%&'((&)*+,(-.&,/01&)22&3456-7&3878398:1&
;;;1;<<=>:4<10<.&
?89&$1#1&@>2A&"BC&"#$%&
$B&
&
Recommended Settings
Headphones
Low
Power
High
Power
Low
Impedance
High
Impedance
Low
Level
High
Level
Abyss AB-1266
O
O
O
AKG K1000
O
O
O
Audeze EL Series
O
O
O
Audeze LCD
Series
O
O
O
Audio Technica
ATH-W5000
O
O
O
Audio Techinca
ATH-AD2000X
O
O
O
Audio Techinca
ATH-W1000
O
O
O
Beyerdynamic
600 Ohm models
O
O
O
Beyerdynamic
250 Ohm Models
O
O
O
Beyerdynamic 32
Ohm Models
O
O
O
Denon
D7000/7100
O
O
O
Denon D5000
O
O
O
Fostex TH-
900/600/500
O
O
O
Focal Sprit Series
O
O
O
Grado
PS1000/GS1000
O
O
O
Grado RS Series
O
O
O
HiFiMan HE-1000
O
O
O
HiFiMan HE-560
O
O
O
MrSpeakers
ETHER + C
O
O
O
Sennheiser
HD800/700
O
O
O
Sennheiser
HD600/650
O
O
O

!"#$%&'((&)*+,(-.&,/01&)22&3456-7&3878398:1&
;;;1;<<=>:4<10<.&
?89&$1#1&@>2A&"BC&"#$%&
$W&
&

!"#$%&'((&)*+,(-.&,/01&)22&3456-7&3878398:1&
;;;1;<<=>:4<10<.&
?89&$1#1&@>2A&"BC&"#$%&
$X&
&
Product Specification
Model:
WA5 / WA5-LE
Headphones Impedance:
8-800 Ohms
Input Impedance:
100 Kilo-Ohms
Frequency Response:
10 Hz - 60 KHz, -2dB
Power Output:
640mW @32!
630mW @60!
1000mW @120!
850mW @300!
580mW @600!
8W @120 !HP (high power) via 4-pin
XLR and ¼” TRS output
SPK 8W @8 !(WA5 only)
Signal/Noise:
95 dB
THD:
<= 0.08%, 1Khz
Voltage:
AC 110/220 - 240V, 50/60 Hz, switchable
External Dimension, end to end
measurement, same for both units:
8.5" (H) x 9 (W) x 17" (D)
Weight (AMP & PSU):
70 pounds
Woo Audio is committed to continuously improve its products. We reserve
the right to improve the design without notice.
Other manuals for WA5
1
This manual suits for next models
1
Table of contents
Other Woo Audio Amplifier manuals

Woo Audio
Woo Audio WA23 LUNA User manual

Woo Audio
Woo Audio WA11 topaz User manual

Woo Audio
Woo Audio WA2 User manual

Woo Audio
Woo Audio WA6-SE User manual

Woo Audio
Woo Audio WA7d User manual

Woo Audio
Woo Audio WA22 User manual

Woo Audio
Woo Audio WA-5 300B User manual

Woo Audio
Woo Audio WES User manual

Woo Audio
Woo Audio WA5 User manual

Woo Audio
Woo Audio WA3 User manual