Woody Valley GTO LIGHT User manual


THANK YOU
We would like to thank you for choosing one of our products. We invite you to read this important document, the harness user manual and to pay special
attention to the two most important paragraphs concerning:
Inserting the reserve parachute
The reserve parachute is a life-saving piece of equipment. It must be inserted so that it works correctly when required whether this happens in two days’
time, or two years from now.
Adjusting the harness
The harness is the connecting point between the pilot and the paraglider, and it is a necessary component for optimising flight performance and pleasure. A
bad harness that is well adjusted may enable you to fly well, but a good harness that is badly adjusted may put you off flying altogether.
We are confident that this harness will give you great comfort, control, performance and enjoyment in flight. We are conscious of the fact that reading an
instruction manual is not an exciting experience. However, please remember that this product is not a citrus juicer or a mobile phone, and that correct use of
the harness helps reduce the risk of flying accidents. This manual contains all the information necessary to assemble, adjust, fly and store your harness.
Thorough knowledge of your equipment will improve your personal safety and your level of flying.
Team Woody Valley
SAFETY NOTE
By the purchase of Woody Valley equipment, you are responsible for being a certified paraglider pilot and you accept all risks inherent with paragliding activities including injury and death.
Improper use or misuse of equipment greatly increases these risks. In no case shall Woody Valley or Woody Valley equipment re
sellers be held liable for personal or third party injuries or
damages under any circumstances. If any aspect of the use of our equipment remains unclear, please contact your local reseller or Woody Valley directly.
We suggested watching the videos at the following links:
FEATURES https://www.youtube.com/watch?time_continue=2&v=FN2R6dANN24
MANUAL https://www.youtube.com/watch?time_continue=1&v=QeXty5e280I
PARACHUTE INSTALLATION https://www.youtube.com/watch?v=H_1csaMYmcI
LEG COVER INSTALLATION https://www.youtube.com/watch?v=bdsVpmqBGvE

1
CONTENTS
1.1-CONCEPT ...................................................................................................................................................................................................................................................................... 4
1.2-GTO LIGHT PROTECTIONS................................................................................................................................................................................................................................................ 4
1.3-SAFETY LOCK SYSTEM...................................................................................................................................................................................................................................................... 5
1.4-S.O.S. LABEL ................................................................................................................................................................................................................................................................. 5
2- BEFORE USING ................................................................................................................................................................................................................................................ 6
2.1-HOW TO WEAR IT ........................................................................................................................................................................................................................................................... 6
2.2-RESERVE PARACHUTE ...................................................................................................................................................................................................................................................... 7
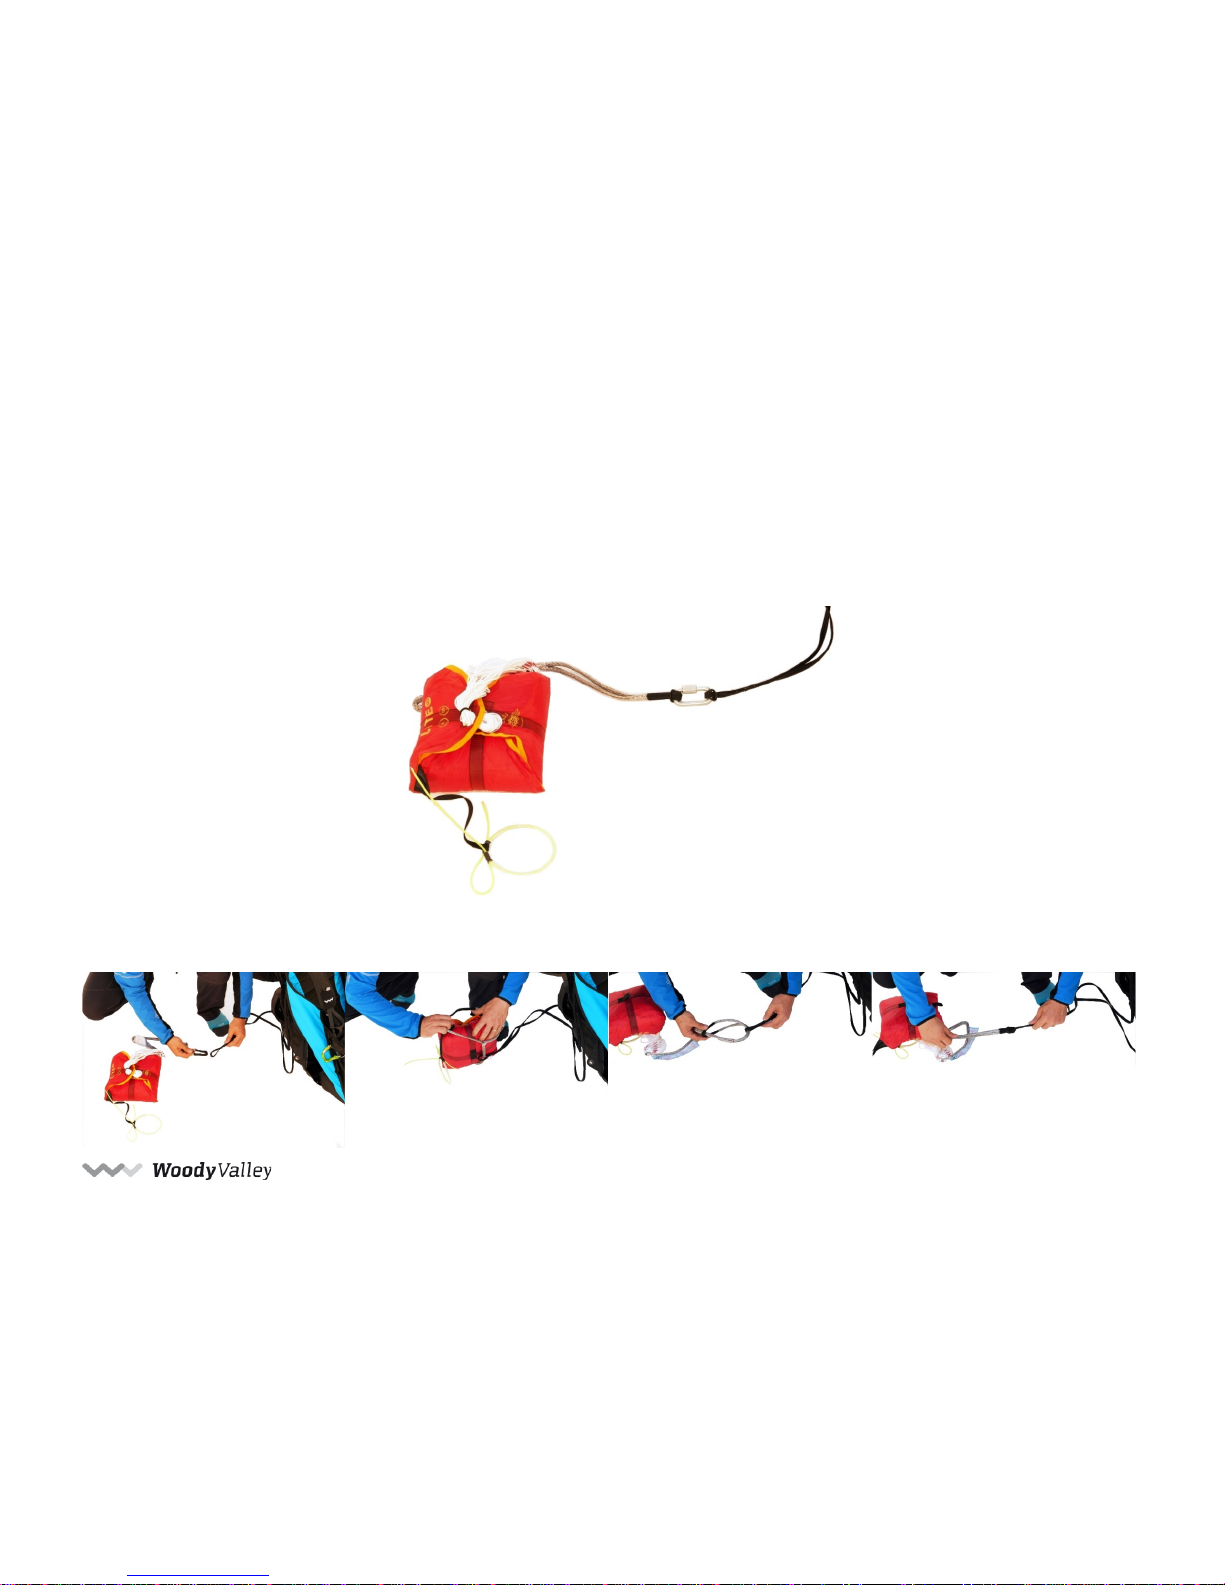
2.2.1- Handle with deployment bag............................................................................................................................................................................................................................. 7
2.2.2- Connecting the reserve parachute to the harness ............................................................................................................................................................................................. 8
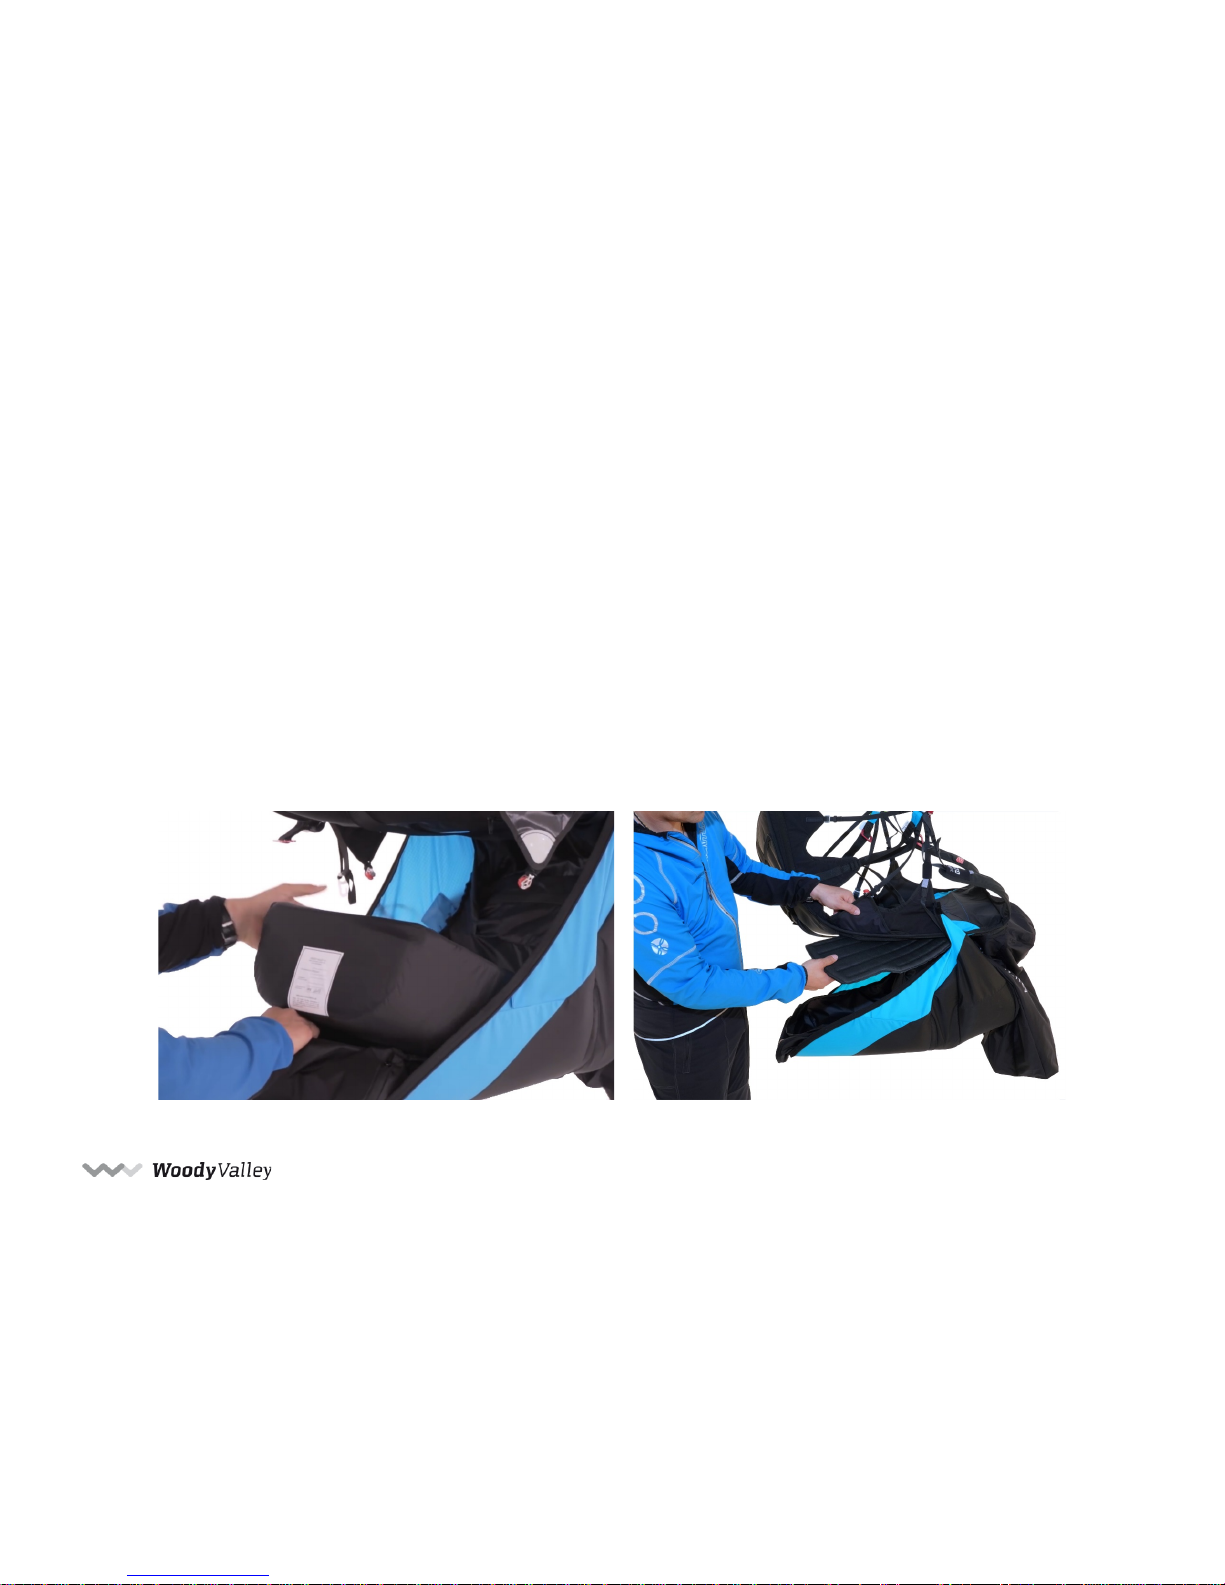
2.2.3- Inserting the reserve parachute....................................................................................................................................................................................................................... 10
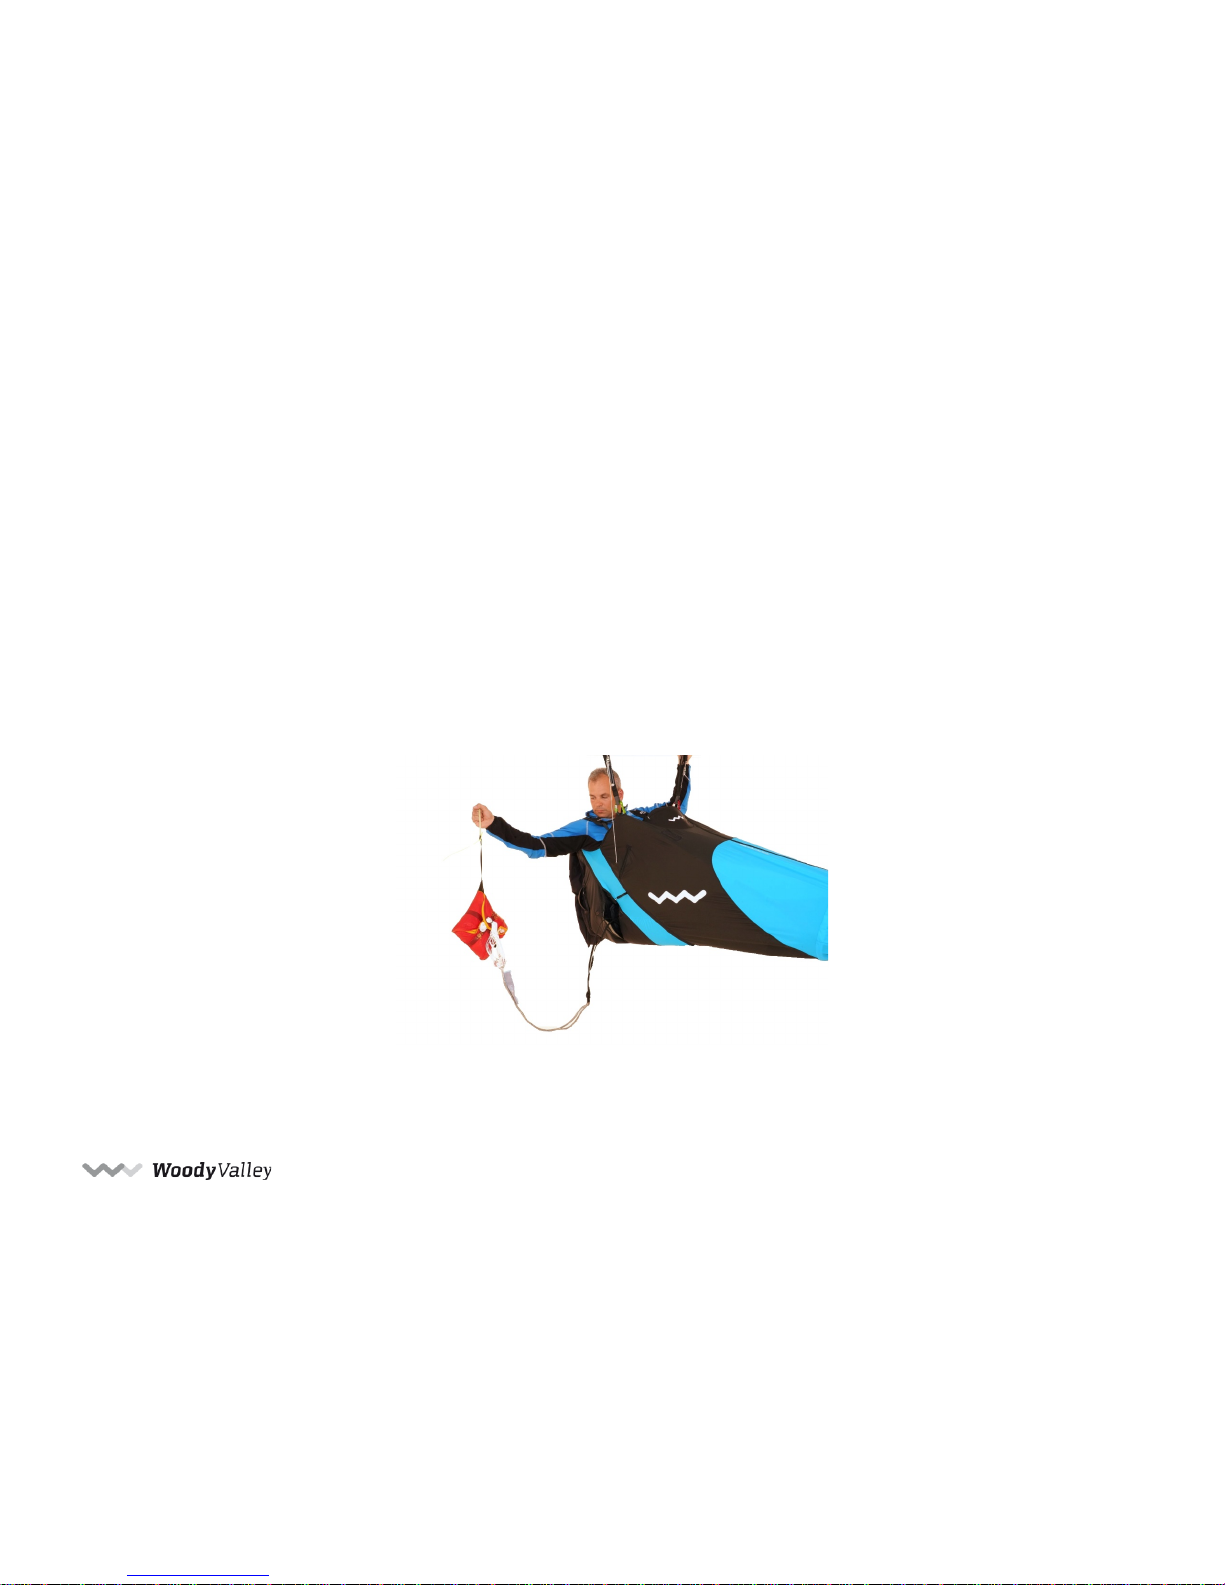
2.2.4- Extracting the reserve parachute..................................................................................................................................................................................................................... 12
2.2.5- Back pocket...................................................................................................................................................................................................................................................... 13
2.3-HARNESS ADJUSTMENTS ................................................................................................................................................................................................................................................ 14
2.3.1- Seating position and back adjustment............................................................................................................................................................................................................. 16
2.3.2- Shoulder-pad adjustment ................................................................................................................................................................................................................................ 17
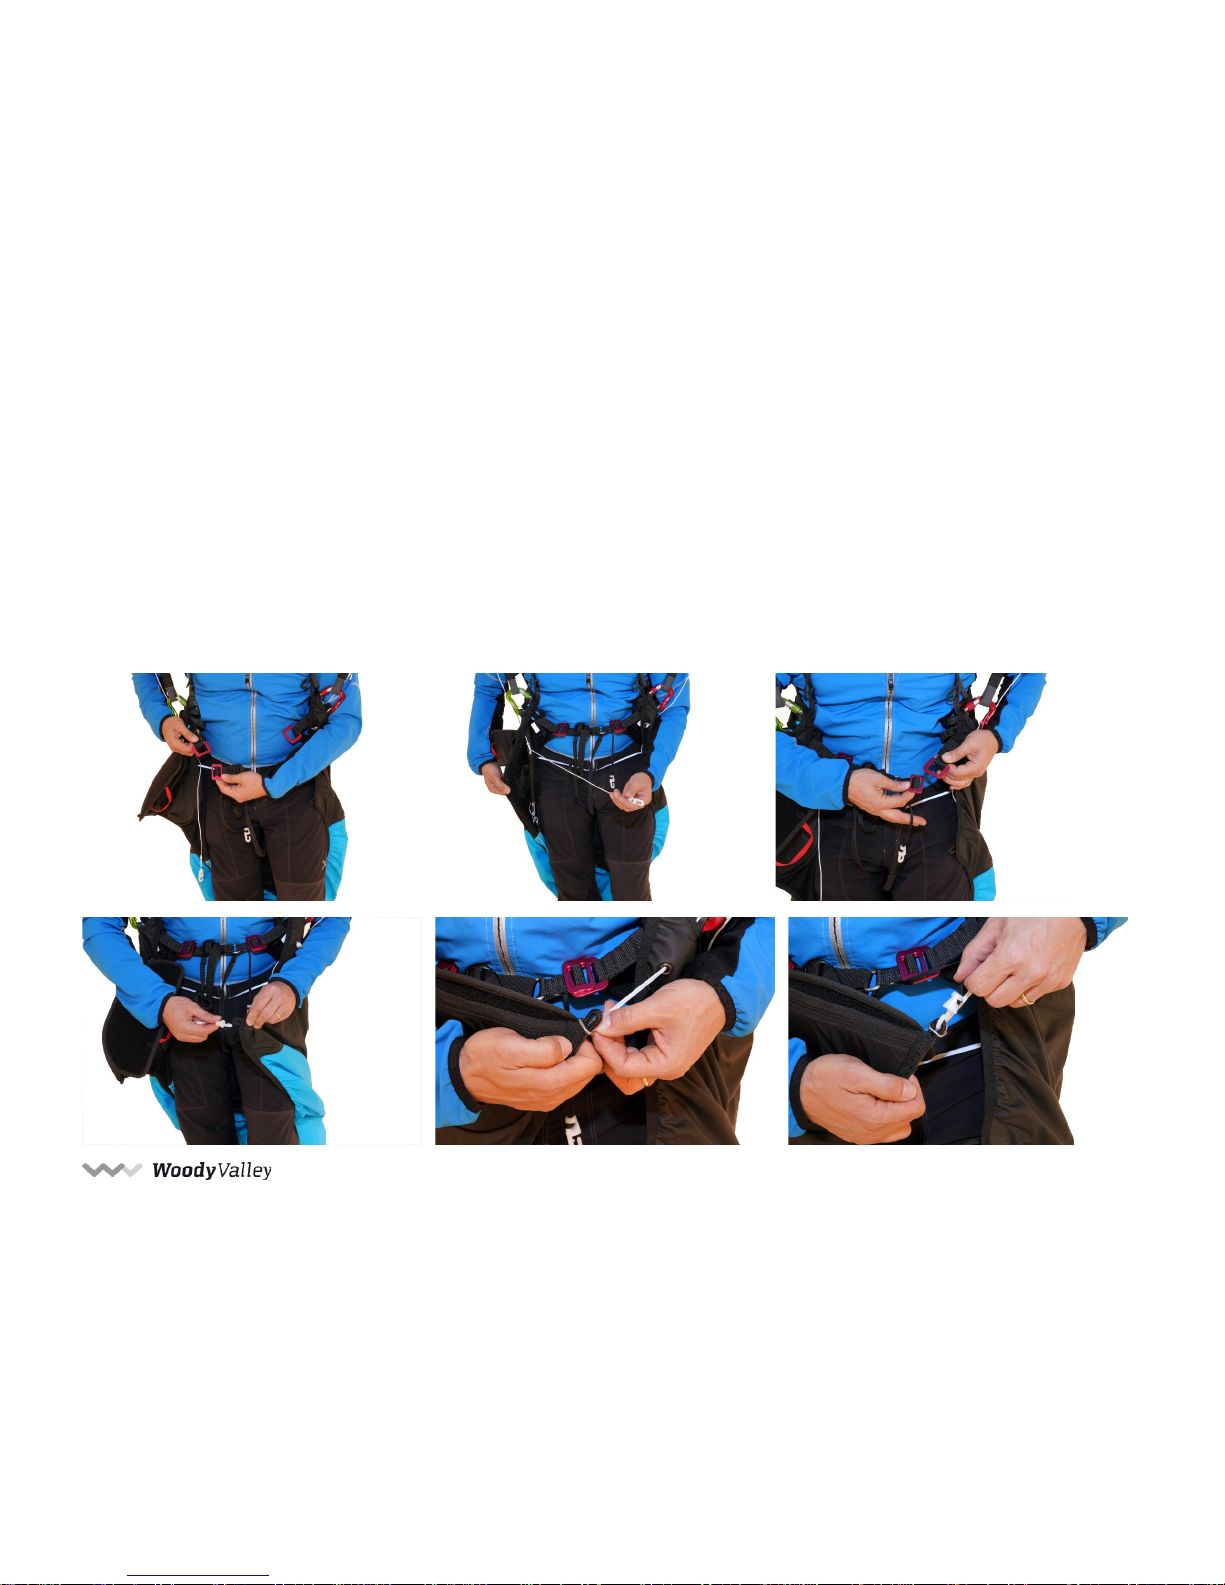
2.3.3- Chest-strap adjustment ................................................................................................................................................................................................................................... 18
2.3.4- Leg-cover.......................................................................................................................................................................................................................................................... 19
2.3.5– Speed-bar adjustment..................................................................................................................................................................................................................................... 19
2.3.6- Pee Tube .......................................................................................................................................................................................................................................................... 20
3- FLYING WITH GTO LIGHT ............................................................................................................................................................................................................................... 21
3.1-PREFLIGHT CHECKS........................................................................................................................................................................................................................................................ 21
3.2-POCKETS..................................................................................................................................................................................................................................................................... 21
3.3-CAMEL-BAG ................................................................................................................................................................................................................................................................ 22
3.4-USING THE COCKPIT ...................................................................................................................................................................................................................................................... 23

2
3.5- LOWER TENT OR BALLAST HOLDER POCKET ......................................................................................................................................................................................................................... 24
3.6-ANTI-G DRAG PARACHUTE ............................................................................................................................................................................................................................................. 24
3.7 –DORSAL PROTECTION ................................................................................................................................................................................................................................................... 26
3.8-FLYING OVER WATER ..................................................................................................................................................................................................................................................... 27
3.9-ASSISTED TAKE-OFF HOOK .............................................................................................................................................................................................................................................. 28
3.10-LANDING WITH GTO LIGHT ........................................................................................................................................................................................................................................ 28
3.11-DISPOSING OF THE HARNESS ......................................................................................................................................................................................................................................... 28
3.12-REGULATIONS FOR BEHAVIOUR IN NATURAL ENVIRONMENTS............................................................................................................................................................................................... 28
3.13-TANDEM FLYING......................................................................................................................................................................................................................................................... 28
4- PACKING THE HARNESS................................................................................................................................................................................................................................. 28
5- CHARACTERISTICS AND INSTALLATION OF OPTIONAL EQUIPMENT ................................................................................................................................................................ 30
5.1-BALLAST BAG ............................................................................................................................................................................................................................................................... 30
5.2-CONCERTINA LIGHT....................................................................................................................................................................................................................................................... 31
5.3-RUCKSACK................................................................................................................................................................................................................................................................... 32
6- MAINTENANCE AND REPAIR ......................................................................................................................................................................................................................... 33
6.1- REPLACING SIDE SLATS................................................................................................................................................................................................................................................... 34
6.2-REPLACING AIR INLET REINFORCEMENTS ............................................................................................................................................................................................................................ 35
6.2-PERIODIC DORSAL PROTECTION CHECKS............................................................................................................................................................................................................................. 35
6.3-REPLACING THE LEG COVER............................................................................................................................................................................................................................................. 36
7- TECHNICAL DATA .......................................................................................................................................................................................................................................... 37

3
1- GENERAL INFORMATION
This equipment must contain:
Harness
Footrest board in carbon
Snap-hook
Handle with built-in deployment bag for reserve parachute deployment
2 reserve elastic loops for closing the reserve parachute
Three-step light speed-bar
Lightshield protection
Dorsal protection
Leg cover with zip closure
2 mylars for air inlets
The main options available are:
Rucksack
Concertina light
Bag for front ballast equipped with transport handles, tube and valve
Anti-G drag parachute

4
1.1- Concept
GTO Light is designed to be used as a harness for sport paragliding flying with a maximum weight of 120 kg.
The GTO Light is the most extreme example of Woody Valley’s many years of experience in cross-country harnesses. It has been designed to meet the needs
of all pilots who have high demands for lightness without sacrificing comfort, piloting and aerodynamics.
GTO Light is equipped with a pocket for an optional “Anti-G” drag parachute and a safety system to help prevent you from forgetting to fasten the leg
straps.
1.2- GTO Light Protections
GTO Light is equipped with two protections:
•One protection in LTF regulation foam under the seat, with a thickness of 16 cm
•One category 2 TÜV/GS certified lightshield in accordance with EU standard 89/686/ECC for protecting the top part of the pilot’s back. This does not
affect the results of the certification tests, so it is therefore removable by accessing the zipper behind the back which is between the base and the
pocket.

5
1.3- Safety Lock System
To address the issue of forgetting to fasten the chest and leg straps on the harness, the Woody Valley team has developed a leg-cover closure system,
through which the pilot is required to grasp the leg strap and is thus reminded to close it. This system cannot replace a failure to hook the leg straps.
1.4- S.O.S. label
This red with white lettering label is clearly visible in a pocket on the right shoulder padding and is easily removable.
On the back of this label, you can write information that you think should be given to rescue workers in case of accident.

6
2- BEFORE USING
GTO Light is supplied with dorsal protection and also with a lightshield that has already been pre-assembled by the manufacturer. Reserve parachute
installation must be carried out with the utmost care and attention by a qualified professional operator, for example your instructor. Only then should the
pilot adjust the harness for comfort.
2.1- How to wear it
Put the arms in the shoulder straps, take the leg straps and insert the red buckles into the ones of the left and right chest piece. Take the right hand white
hook and attach it to the black loop which is attached to the Lycra on the left hand side.
Take the black loop next to the instrument panel and insert it through the metal rectangle next to the left karabiner, then hold the rectangle in place by
inserting the white hook (connected near the left buckle of the leg strap) into the black loop.

7
2.2- Reserve parachute
GTO Light has a parachute container located under the seat at the back just after the dorsal protection.
The reserve parachute must be attached to the harness before being inserted in the built-in container. The connection takes the form of a dual bridle and is
fixed in two points at shoulder height to provide better load distribution and to ensure a correct landing position in case the parachute is deployed. This
helps to minimise the risk of injury. The built-in harness bridle has a central loop to which the parachute connects.
2.2.1- Handle with deployment bag
GTO Light is supplied complete with a handle built into the deployment bag. Do not use other deployment bags or handles adapted for this purpose. The
connection triangle between the handle and the deployment bag (with respect to the parachute pocket) must be positioned upward and outward.

8
2.2.2- Connecting the reserve parachute to the harness
There are three different methods of attaching the reserve parachute bridle to the harness bridle.
First system (for non-pilot-controlled parachutes):
Use a screw-lock karabiner with a breaking strength of at least 2,400 kg. In this case, the bridles should be held in position within the karabiner using elastic
bands, to prevent the karabiner from rotating and taking the strain laterally instead of vertically. The karabiner’s screw-lock should be tightly screwed shut
to avoid any possibility of it opening accidentally. This type of connection can absorb a higher opening shock than the second system, and for this reason
this is without doubt the recommended system.
Second system (for non-pilot-controlled parachutes):
The emergency bridle should pass through the harness bridle loop. Next, the emergency parachute should be passed through the large loop of the
emergency parachute bridle. The result is a connection that should be tightened as much as possible so as to prevent dangerous friction between the two
cables during emergency opening shock.

9
Third system (for pilot-controlled or non-pilot-controlled parachutes with double bridle):
If you are using a reserve parachute with a dual bridle, it can be connected to the harness using the two loops positioned at the base of the harness bridle,
near the padded shoulder straps.
In this case, the harness’s reserve parachute bridle will not be used, and so it should be folded, fastened using two elastic bands, and positioned under the
cover behind the pilot’s neck.
The two connections should be made using screw-lock karabiners with a breaking strength of at least 1,400 kg. It is important to verify that the length of the
bridle is sufficient to position the reserve parachute inside the harness pocket, and that there is sufficient play to enable the parachute to be taken out of
the pocket without causing the reserve parachute deployment bag itself to open during extraction.
CAUTION:
- To prevent abnormal side loads, the cable is hooked to both loops on their respective shoulder-straps. Not only to one of the two.

10
2.2.3- Inserting the reserve parachute
Bring the bridle passage zipper slider to its Lycra pocket, which is located at the top of the harness behind the neck.
Open the zipper starting from the closing flap so as to achieve free passage of the bridle between the loop and the parachute. After having connected the
reserve to the harness with one of the previously described systems.
Introduce a thin rope (paragliding line type) into each elastic loop which you will use to help close the container.
Insert the elastic loops in the corresponding pockets and through the small eyelets. Insert the parachute in the harness container with rescue handle facing
upwards and rescue parachute lines facing the harness tail. Complete the process by inserting the handle into the corresponding housing.
Close the large black plastic flap using the cord and block the elastic loop using the longest pin, having it pass first through the hole just under the handle
insertion, then in the elastic loop and finally in the hole located after the elastic strap. Then remove the thin cord.

11
Move the zipper slider (on the part covering the bridle) to the limit near the handle. Then close the zipper about 10 cm and, using the second thin cord
inserted in the other white elastic strap, close the smaller flap, inserting the shorter pin. Then insert the remaining part of the short pin in the nearby hole.
Then remove the thin cord.

12
The cord must be removed at the end of this phase and must be extracted slowly in order to avoid damaging the elastic loops due to excessive friction
between the parts.
CAUTION:
- Each new combination of reserve parachute and harness or external container that is assembled for the first time must be inspected by an official reseller of the harness or the
reserve chute or a flight instructor to verify that it can be effectively deployed. Deployment of the emergency chute must be perfectly possible from the normal flying
position.
The paraglider harness and the emergency parachute opening system are not suitable for use in free falls and in strong shocks.
Its bearing structure has been designed, tested and certified to withstand emergency parachute opening shock in accordance with the standard
requirements for paragliding.
This does not mean that the other parts of the harness will not become damaged due to emergency parachute opening shock. This is true whether it occurs
due to actual need in the event of an accident or if it occurs voluntarily, for example during a safety course.
2.2.4- Extracting the reserve parachute
It is very important to periodically feel for the position of the reserve parachute deployment handle during normal flight, so that the action for reaching for
the reserve parachute handle becomes instinctive in an emergency. The deployment procedure is as follows in emergency situations:
•Look for the reserve parachute handle and grasp it firmly with one hand.
•Pull the handle outwards in order to extract the reserve parachute from the harness container.
•Look for a clear area and, in a continuous motion, throw the reserve parachute away from yourself and the glider.
•After opening, keep the paraglider from interfering with the reserve parachute as follows:
- If the connecting edge is turned upward, grip straps "D" or the brakes and break down your paraglider.
- If instead the connecting edge of the glider is turned downward, pull back strap "D" or a brake and have the glider rotate with the
connecting edge
upward and then pull both brakes or straps to help break down your paraglider.
•On landing, adopt an upright body position and ensure that you perform a “parachute landing fall” to minimise the risk of injury.

13
2.2.5- Back pocket
To access the back pocket, you must first fully open the zipper on the rear aerodynamic side of the harness and turn it for easier access to the pocket.
This compartment has been carefully designed and sized to hold the transport and clothing rucksack or a sleeping bag. Inside are two pockets, one to hold a
camel-bak and one to hold trekking poles. To close the pocket and the rear aerodynamic part, simply close the zippers.
CAUTION:
- Overfilling the back pocket could compromise correct inflation of the aerodynamic part of the harness.
- Evenly distribute all the objects inside the volume of the back pocket so as not to deform the shape of the container.
- Be sure to completely close the zipper of the aerodynamic back part for correct inflation.

14
2.3- Harness adjustments

15
KEY:
1. Load-bearing strap………………………………………………………………………………………………………………
2. Back adjustment strap …………………………………………………………………………………………… paragraph 2.3.1
3. Seating depth adjustment strap ………………………………………………………………………….. paragraph 2.3.1
4. Leg angle adjustment strap ………………………………………………………………………….. paragraph 2.3.1
5. Shoulder adjustment strap ………………………………………………………………………………………paragraph 2.3.2
6. Chest adjustment strap ……………………………………………………………………………………………paragraph 2.3.3
7. Leg strap ……………………………………………………………………………………………………………….
8. Abs strap……………………………………………………………………………………………………………………..
9. Front cover cords ………………………………………………………………………………………………paragraph 2.3.4
10. Safety System ……………………………………………………………………………………………………… paragraph 1.3
11. Footrest adjustment strap ………………………………………………………………………….. paragraph 2.3.4
GTO Light is supplied already adjusted to a standard ergonomic setting, apart from adjustments required for pilot height. Therefore, for the first flight we
recommend adjusting the harness for height alone, leaving the other settings unchanged, because they have proved to be satisfactory for the vast majority
of pilots. If you wish to change the other settings, remember that you can always return to the factory settings by making reference to the red marks on all
adjustment straps.

16
Please remember that the size of your GTO Light must be chosen according to your height and not according to the width of the seat.
Unlike a "sitting" harness, where the height of the back support is not essential for comfort, the height of the back support is decisive in a harness that
requires "lying" piloting for obtaining comfort and a correct flight position. It is therefore important to choose the right size, paying more attention to the
height of the back without worrying about the width of the seat.
To find the optimum position we recommend hanging with the harness, simulating flight position and conditions. Therefore, it is best to place all the
material which you normally take into flight with you in the back pocket.
CAUTION:
- Before carrying out any adjustment the reserve parachute must be inserted.
- Each adjustment must be carried out symmetrically on both sides.
- Each adjustment strap must be tensioned.
2.3.1- Seating position and back adjustment
In this photo, you can see how the "lateral" adjustments are arranged and how many points actually go to support the pilot, from the upper part of the back
to the lumbar part. All these adjustments offer the great advantage of supporting the pilot and, moreover, allow for adaptation to every type of back.

17
In detail, adjustment No. 1 varies the angle between the legs and the back (seating depth), distributing the loads between the seat and the lumbar area,
thereby providing the pilot with greater comfort. The main adjustment that allows you to select the inclination of the torso with respect to the vertical flight
axis is n°2 for back adjustment. Adjustment 3 varies the angle of the legs. If you want to change the adjustments, you must loosen the first strap and then
subsequently adjust it to the most comfortable point. Once these adjustments have been made, re-tighten the overlying strap to secure the new set point.
2.3.2- Shoulder-pad adjustment
Adjustment of the shoulder pads compensates for the variation in pilot height and the adjustment buckle is located at the apex of the same. The shoulder
pads also bear part of the weight of the torso for improved comfort. We recommend adjusting the shoulder pads so that they fit against your shoulders
without being too slack or too tight.

18
2.3.3- Chest-strap adjustment
The chest strap which controls the distance between the two karabiners has a maximum opening of 50 centimetres. For the first flight with GTO Light, we
suggest setting the chest strap to the halfway point and then locating the preferred length in flight by means of gradual adjustment. When the chest strap
is shorter and tighter, stability is greater. An excessive distance between karabiners does not improve glider performance and tightening the chest strap
excessively may exacerbate the ‘‘twist’’ effect that may follow an asymmetric collapse of the wing.
Table of contents
Other Woody Valley Accessories manuals

Woody Valley
Woody Valley exense User manual

Woody Valley
Woody Valley Wani light 2 User manual

Woody Valley
Woody Valley Voyager Plus User manual

Woody Valley
Woody Valley Passenger User manual

Woody Valley
Woody Valley Wani 3 User manual

Woody Valley
Woody Valley Wani User manual

Woody Valley
Woody Valley Transalp User manual

Woody Valley
Woody Valley QUADRO115 User manual

Woody Valley
Woody Valley Xpression User manual

Woody Valley
Woody Valley X-Rated 7 User manual