WorkPro SPS 8 User manual

Paging Station
SPS 8 sept 2016

Content
1 Overview
2 Connections
3 Basic use and configuration
4 Use and advanced settings
Overview 1
SPS 8 overview
The SPS-8 is a paging station designed specifically for the BlueLine system and is
compatible with DigiLine. This guide describes the features of the SPS 8 as well as
its functionality..
Dimensions: 210 x 40 x 135 mm
Weight: 620g

CONNECTIONS 2
SPS 8 connection ports:

Ethernet port, for the connection of SPS 8 to the local network. It is compatible
with PoE, therefore it can be supplied through the Ethernet port, avoiding the
need of connecting it to an external power supply. It must be taken under
consideration that for the direct conection to a PC it is necessary to use a cross
network cable (it is not necessary unless your System is compatible with Auto-
MDIX).
Euroblock A connection, to connect the external power supply source
(+5VDC)and the alarm System. It is usually an open contact. It can be
programmed with one or several OSC commands that can be assigned to the
alarm event.
Euroblock B connection, to connect to the the monitor audio output. The
signal provided by this connection is the same that the one of the Ethernet. It is
an unbalanced audio output.
RCA connection, to connect the audio source of the auxiliary input.
XLR-3 base, to connect a dynamic microphone to the SPS 8. If other type of
microphone is used, it could damage the paging station.

USING & BASIC SETUP
3
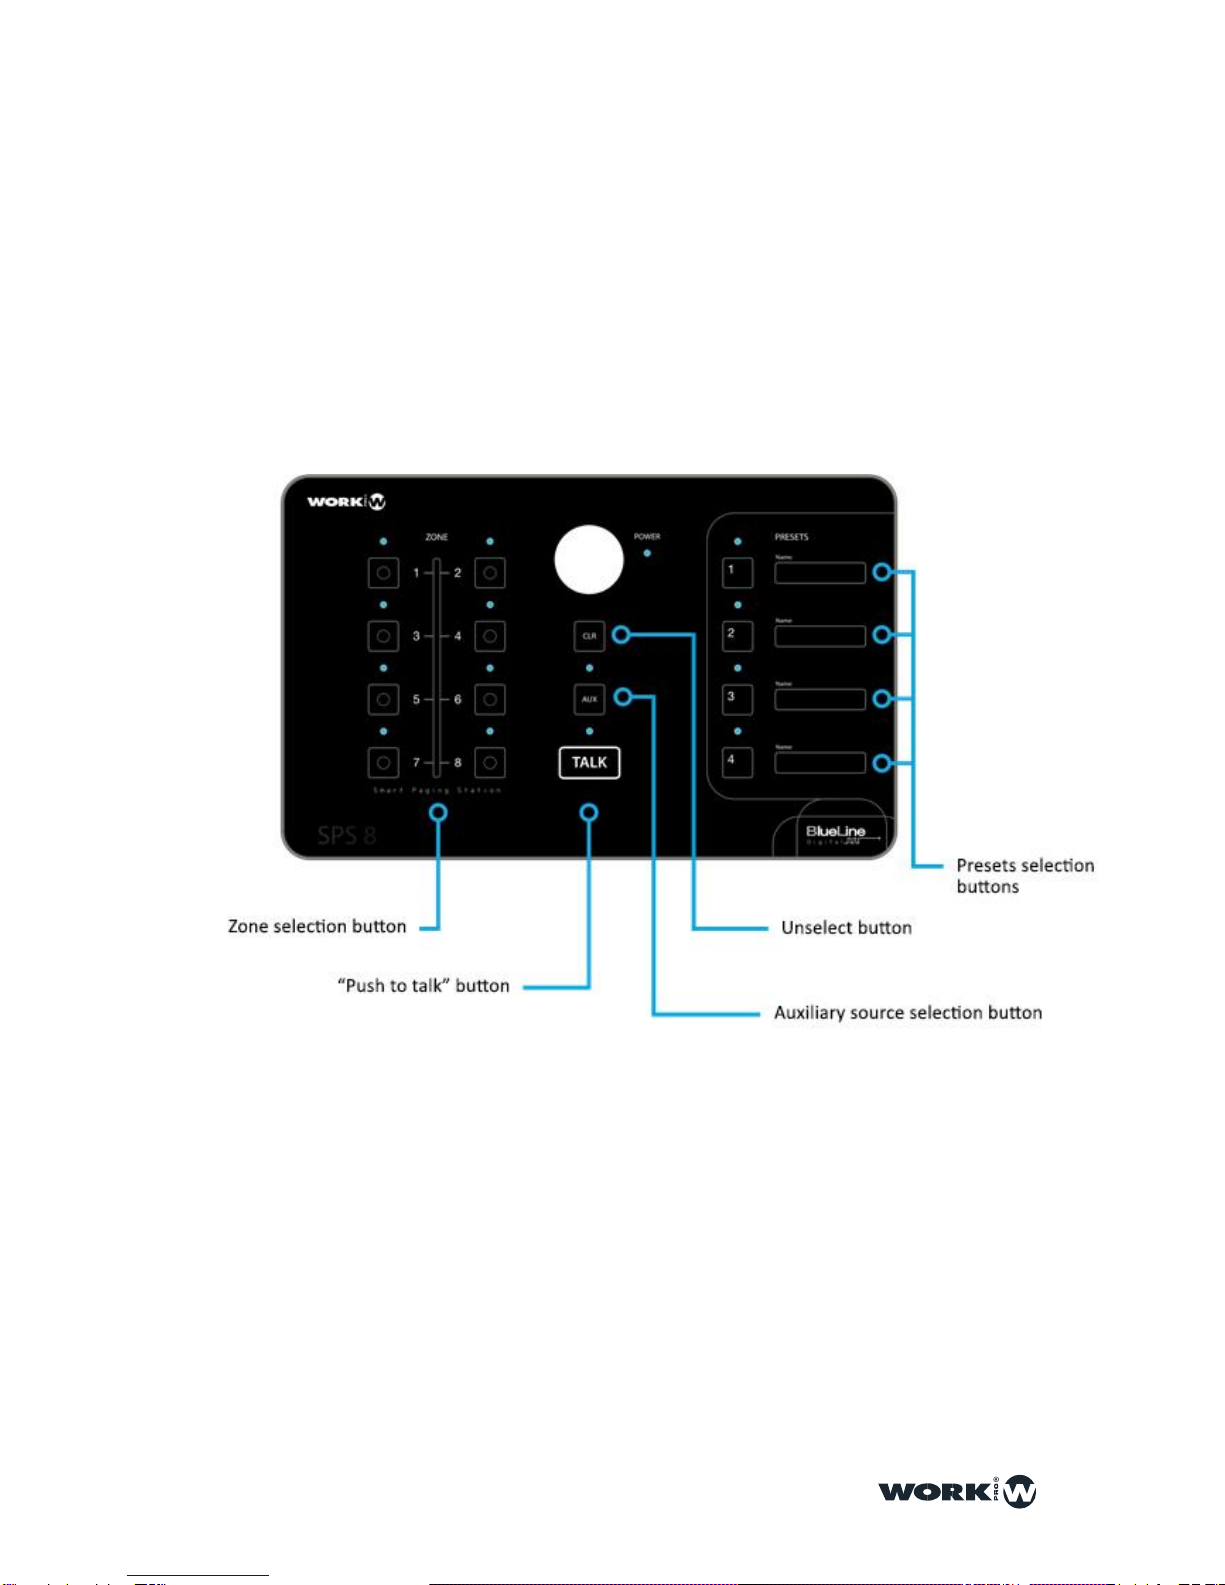
Buttons
All basic control functions are made through physic buttons placed in frontal
panel of SPS 8.
Botones de selección de zona
These 8 multi-function programmable buttons are placed at the left hand of the control
board. By default, each button is preset to work with a specific zone (from 1 to 8).
It is possible to program and assign the diferent advanced functions to each button
through WorkCAD software:
1-It is possible to assign an OSC command or series of OSC to each
one of the buttons in order to program one or several actions.
2-it is possible to assign one or several zones to a zone selection
button, thus it can work as a multi-zone selection button.
Any action or command assigned to the zone selection button can be triggered when
“TALK” is pressed.
Push to Talk button
Placed on the low part of the central zone of the control board, when pressed every
device which has been previously selected through the zone selection buttons, stop
their emission to give preference to SPS 8 microphone. It is mandatory to keep it
pressed when talking. Once the button is not pressed, every device go back to its
previous state.
Botón de selección de entrada de audio auxiliar
It is placed in the central area of the board. When pressed, it activates the auxiliary
audio input in order to be able to select whether ot use the microphone or the auxiliary
audio. When the button is pressed for more than 5 seconds, the Station starts working
in “AUX” mode, as a streamer which broadcasts seamless (no need to press the
“TALK” button) the auxiliary audio input source connected to the RCA of the rear panel.
In this mode, if the “TALK” button is pressed, the microphone will have priority over
the auxiliar audio input, being capable of stoping the broadcast and activating the

microphone until the button is released. When released, the Station goes back to its
previous mode, which in this example is “AUX-IN”.
In the case of a reset or shut down, its working mode keeps saved.
Unselection button
It is placed in the central area of the board, the “CLR” button, when pressed, any
other activated zone button will be automatically deactivated.
Preset selection button
It is placed in the righ hand of the board and is composed of 4 multi-function buttons
that can be programmed. One of these buttons is set by default to actívate the
8 zone selection buttons.
The program and function assignment for each button can be made in two different
ways depending on the requirements:
1-Basic: To program a preset button to select several zones. For this,
users have to select the zone that they want to use through the
zone selection buttons from 1 to 8.
Once the zones have been selected, users have to keep pressed the “Clear” button
while pressing the preset button (from 1 to 4) in which we want to save the
configuration. SPS 8 will indicate us that the preset has been correctly recorded by
turning off every state LED.

2-Advanced: It is made through WorkCAD Software. It is possible to assign an OSC
command or series of commands to each one of the buttons available in order to
program one or more actions.
In the following updates, it will be possible to configure the buttons as “Push” (to work
as a push button) or “Toggle” (to work as a switch). SPS 8’s preset buttons can be
configured to interact with different components of an installation, from turning on and
off the lighting to start an alarm or open a door.

ADVANCED CONFIGURATION 4
ADVANCED
Using WorkCAD
All advanced control functions must be made using WorkCAD software. It can be
downloaded from Workpro website.
SPS 8 detection with WorkCAD
Start WorkCAD and select the “Network” tab to see the devices which are connected
to the network.
When users place the mouse over “SPS 8”, they can see up to 3 different icons:
^: It indicates that the devices is not updated.
+: Clicking on this icon, users will add the device to the Project. It has to be
taken under consideration that if the device is not updated, it can’t be added to
the Project.
i: When users place the mouse over this icon, it will be shown information
about the device (fixed IP, dynamic IP, name, versión, etc.)
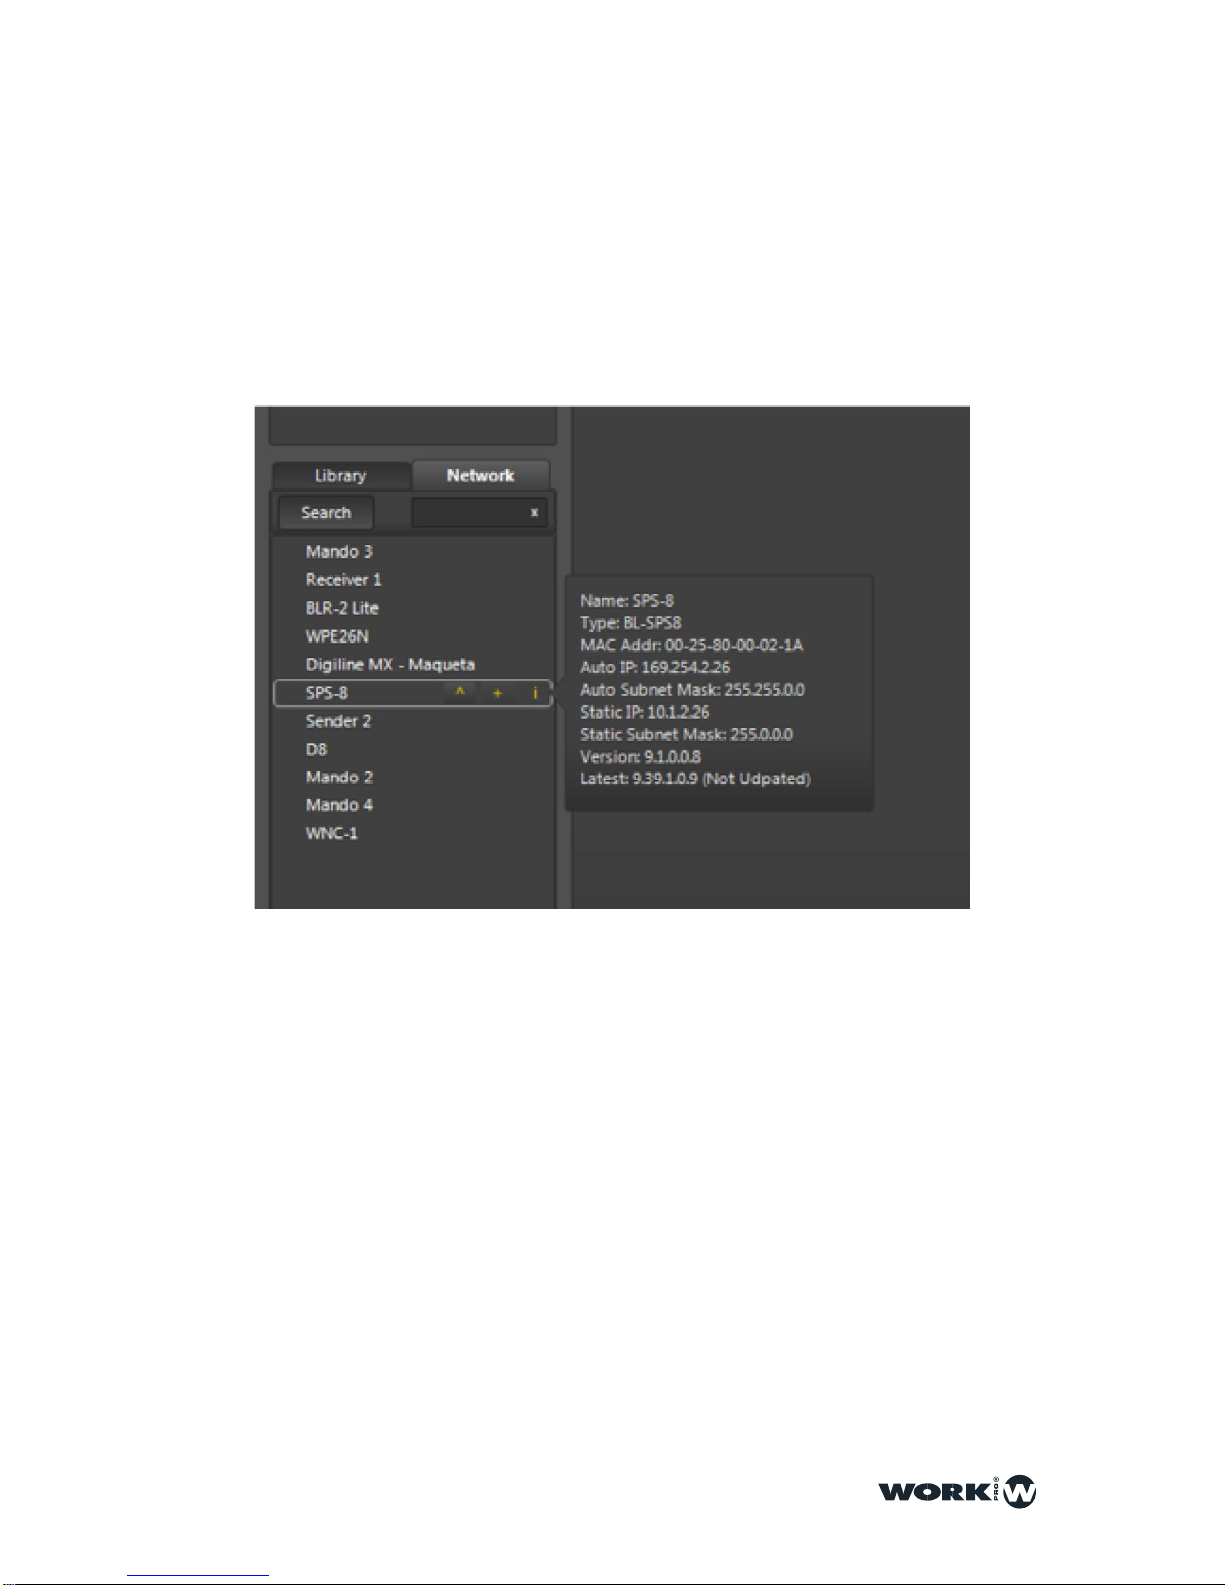
Getting SPS-8 information in WorkCAD
If you want to obtain information about a device, place the mouse over “i” icon of
desired device.
Update of a SPS 8 in WorkCAD
After the instalation of the BlueLine devices, it is recommended to update all of them
to the latest version, with bug-fix and new functionalities. The steps to take in the
update of a devices are:
1.Start WorkCAD and go to the “Network” tab, where we will find every BlueLine
devices available on the network.
2.When moving the mouse over the name of the device, if the icon “^” is shown, we
should update the device.
Table of contents
Other WorkPro Microphone manuals


