manuals.online logo
Brands
  1. Home
  2. •
  3. Brands
  4. •
  5. World Dryer
  6. •
  7. Dryer
  8. •
  9. World Dryer GX1-BG User manual

World Dryer GX1-BG User manual

Global GX
Series Hand Dryer
Owner’s Manual
Instructions apply to the following models:
GX1, GX1-M, GX1-BG, GX1-C
GX3, GX3-M, GX3-BG, GX3-C
5-5/8
(143mm)
Global
Series Surface Mount
RECOMMENDED MOUNTING HEIGHTS
FROM BOTTOM OF DRYER TO FINISHED FLOOR
Men Women Children Disabled
All Hand Dryers (Standard) 44” 42” 32”- 42” 36”
(Metric) 112cm 107cm 81-107cm 91cm
Parts List
ITEM PART NO. DESCRIPTION
1 GXT202 COVER, WHITE ABS*
2 GXT202-M COVER, WHITE STEEL*
3 GXT202-C COVER, CHROME PLATED STEEL*
4 GX212 VENT ASS’Y W/LENS AND FOAM GASKET
5 GX216 MOTOR, 110-120V INCLUDES BLOWER WHEEL (GX1)
6 GX217 MOTOR, 208-240V INCLUDES BLOWER WHEEL (GX3)
7 GX218 HEATING ELEMENT 110-120V (GX1)
8 GX220 HEATING ELEMENT 208-240V (GX3)
9 GX228 BLOWER WHEEL
10 GX239 SENSOR COMPLETE 110-240 VOLT
11 GB232 TAMPER-PROOF SCREWS & SECURITY WRENCH
* Must specify complete model number
Exploded View
Installation Instructions
1. Remove cover by removing (2) tamper-proof screws using security wrench
supplied. Pull cover directly toward you. IMPORTANT: Save Security Wrench.
2. Dryers should be placed at least 2 feet (61cm) apart and at least 12” (30cm)
from washbasin. Do not install dryer over washbasin. Dryers should be at
least 18” (46cm) above any projection which may interfere with the operation
of the automatic sensor.
Hold the backplate to the wall at the suggested MAXIMUM mounting height.
Measure from bottom edge of the backplate to the floor.
3. Mark the locations of the four mounting holes and the conduit entrance
location on the wall. (The conduit entrance is the proper hole diameter for
1/2 inch (13mm) conduit.)
4. Fasten the backplate to the wall where previously marked.
RECOMMENDATION:
Wood wall – No. 14 (M6) wood screws, 2-3/4” (70mm) long
Cement or brick – 1/4” (M6) stud expansion bolts, 3” (76mm) long
Hollow wall – 1/4” (M6) toggle bolts, length depends on wall thickness
5. Run a single phase 120V or 230V 50/60Hz electrical service wire to the dryer
location using either the in-wall or bottom surface 1/2”conduit entrance and
connect to the lead wires as shown on the dryer schematic. The ground wire
must be connected to the dryer ground screw. IMPORTANT: All units must
be supplied with 3 wire service. Use No. 12 or 14 wire as required by local
electrical rules. Unit must be installed with separate disconnect means by a
qualified licensed electrician.
CONNECT TO A DEDICATED CIRCUIT NOT TO EXCEED 20 AMPS.
Dryers located in shower rooms or other wet locations should be equipped
with ground fault interrupter(s).
6. Carefully replace the cover using (2) tamper-proof screws supplied. Apply a
bead of caulk around edges of cover to wall.
WARNING: Disconnect Power Before Servicing
WARNING: For Indoor Use Only.
WARNING: Do NOT modify the product in ANY way
Modifications including cutting holes may cause damage to the unit and will VOID the warranty
WARNING: Installation Shall be Performed by a Qualified Licensed Electrician
5
6
7
8
1
2
3
9
10
4
11
10 1
8
"
258mm
Max.
93
8
"
238mm
Max.
7
8
"
22mm
Conduit Entrance
83
16
"
208mm
9
16
"
15mm
Max.
9
16
"
15mm
Max.
815
16
"
228mm
11
2
"
38mm
15
16
"
24mm
Mounting Holes for
1/4" [M6] screws
Template is for all
American Dryer
EXTREMEAIR, ADVANTAGE
AND GLOBAL Series dryers
Outer perimeter
of ABS Cover
Revised 10/06/2014
Mounting Diagram
GENERAL OPERATION
This dryer is activated by an infrared sensor. The dryer operates as long as hands are below nozzle. There is a maximum 35-second running time with a safety
override feature, if hands are not removed. Each component used in your dryer has been designed to provide years of trouble-free service. However, if trouble
should develop, it can normally be located by visual examination. Removal or replacement of most parts is simple and can be done without special tools.
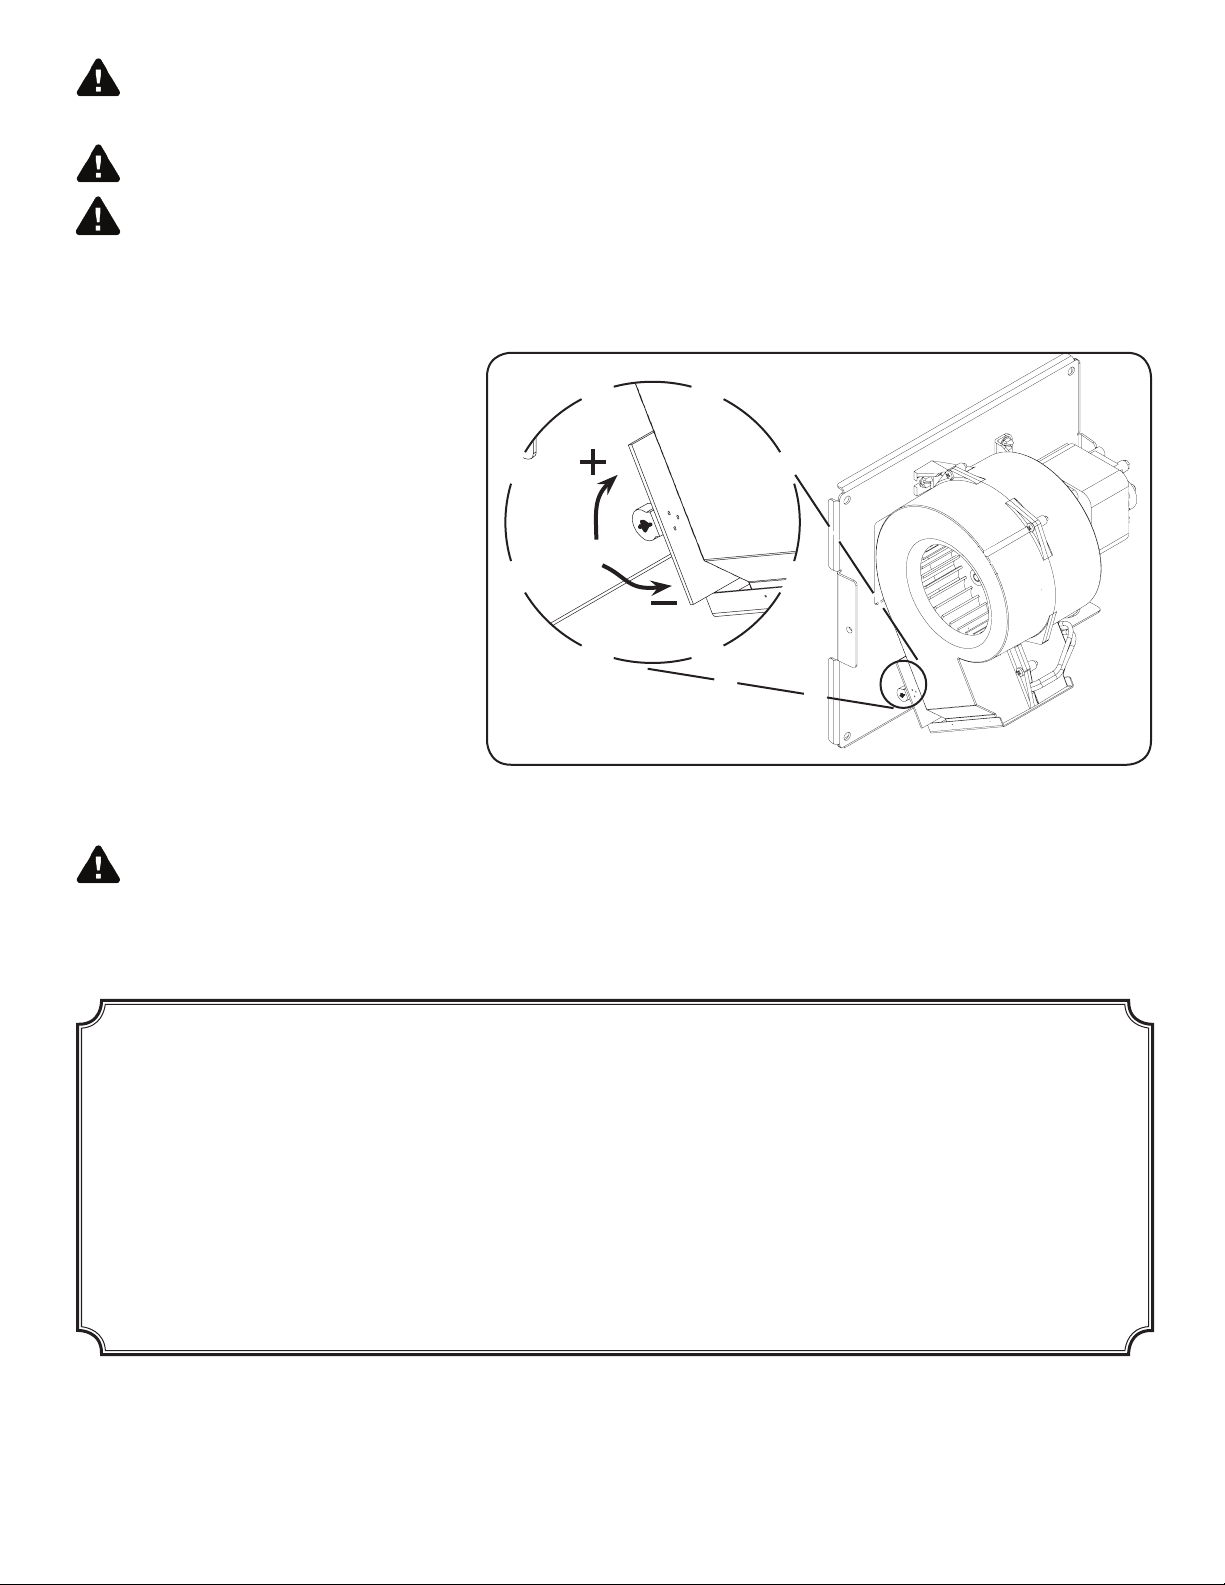
Figure 1 SenSitiVity AdjuStment
GLOBAL DRYER LIMITED WARRANTY
All parts are warranted to the original consumer purchaser to be free from defects in material and workmanship for a period of two (2) years from the
date of purchase from manufacturer. All models outside of the U.S.A., one (1) year. We will replace FREE OF CHARGE, during the warranty period,
any warranted part which proves defective in material and/or workmanship under normal installation, use, and service, excluding normal wear.
Replacement parts can be obtained by returning the part, TRANSPORTATION CHARGES PREPAID. You must notify factory prior to returning part
or dryer. Any damage to this dryer as a result of misuse, abuse, neglect, accident, improper installation, unauthorized repairs, or any other use vio-
lative of instructions furnished by us, WILL VOID THIS WARRANTY. THIS LIMITED WARRANTY IS THE SOLE WARRANTY ON OUR PRODUCTS,
AND WE DISCLAIM AND EXCLUDE ANY AND ALL OTHER WARRANTIES, EXPRESS OR IMPLIED, INCLUDING ANY IMPLIED WARRANTIES
OF MERCHANTABILITY OR FITNESS FOR A PARTICULAR PURPOSE. OUR LIABILITY SHALL NOT EXCEED IN ANY EVENT THE REPLACEMENT
OR SALE PRICE OF THE ALLEGEDLY NONCONFORMING PRODUCT AND SHALL EXCLUDE LABOR CHARGES. TO THE EXTENT PERMITTED
BY LAW WE SHALL NOT BE LIABLE FOR ANY LOSS, COST, EXPENSE, OR INCIDENTAL OR CONSEQUENTIAL DAMAGES OF ANY KIND,
WHETHER BASED UPON WARRANTY (EXPRESS OR IMPLIED), CONTRACT, NEGLIGENCE OR STRICT LIABILITY AND ARISING IN ANY WAY IN
CONNECTION WITH THE DESIGN, MANUFACTURE, SALE, USE OR REPAIR OF THE PRODUCT.
SERVICE AND MAINTENANCE OF YOUR DRYER
IF THE DRYER WON’T TURN ON:
Check electrical service, circuit breaker. Make sure proper
voltage is being supplied to the dryer. Check for loose or
disconnected terminal to sensor. INCREASE sensitivity
(Figure 1) by using a flat-blade screwdriver and CAREFULLY
turning the adjustment pot located on the sensor
CLOCKWISE 1/3 Turn MAX. If necessary, replace sensor.
IF DRYER WILL NOT SHUT OFF:
Make certain black foam is attached to lens and lens is clean.
If damaged, replace. DECREASE sensitivity (Figure 1) by
using a small flat-blade screwdriver and CAREFULLY turning
the adjustment pot COUNTER-CLOCKWISE 1/3 Turn MAX.
If necessary, replace sensor.
IF COLD AIR IS COMING FROM THE NOZZLE:
Turn off breaker for 30 seconds to reset thermostat. If
required, remove the cover and vent, check the heating
element. If the element is broken or burned out, replace it.
IF NO AIR IS COMING FROM THE NOZZLE AND HEATING
ELEMENT GLOWS:
FOR ANY OTHER PROBLEM, CONTACT FACTORY FOR ASSISTANCE.
CLEANING - DO NOT spray cleaning solvents through dryer vents. DO NOT use abrasive,
chlorinated, or highly alkaline cleaners. DO NOT use oil-based cleaners.
SEMI-ANNUALLY remove the cover and clean all lint and dust from the mechanism, inside of cover, and plastic window.
Clean cover with a mild soap or detergent and warm water, using a soft cloth or sponge.
Global GX
SERIES
MFD by AMERICAN DRYER, INC.
340 County Line Road, Bensenville, IL 60106 U.S.A.
Telephone (734) 421-2400 • Fax (734) 421-5580
www.americandryer.com • Email: sales@americandryer.com
Revised June 2018
For installation or service assistance please call (734) 421-2400 or Email sales@americandryer.com
Failure to disconnect the power source before installation or servicing can result in serious injury or death
from electrical shock.
DANGER: Disconnect Power Before Servicing
Risk of re, personal injury or property damage may result from improper installation or service.
WARNING:
WARNING:
Cancer and reproductive harm – www.p65warnings.ca.gov
Remove the cover and check to see that the fan revolves freely. Check and replace motor, if required.

This manual suits for next models

8

Other World Dryer Dryer manuals

World Dryer smartdri K4 series User manual

World Dryer

World Dryer smartdri K4 series User manual

World Dryer SMARTdri K48 Series User manual

World Dryer

World Dryer SMARTdri K48 Series User manual

World Dryer LN Series User manual

World Dryer

World Dryer LN Series User manual

World Dryer NOVA 2 User manual

World Dryer

World Dryer NOVA 2 User manual

World Dryer VMax V2 User manual

World Dryer

World Dryer VMax V2 User manual

World Dryer VMax V Series User manual

World Dryer

World Dryer VMax V Series User manual

World Dryer VERDEdri Q A2 Series User manual

World Dryer

World Dryer VERDEdri Q A2 Series User manual

World Dryer SLIMdri L48 Series User manual

World Dryer

World Dryer SLIMdri L48 Series User manual

World Dryer Global GX Series User manual

World Dryer

World Dryer Global GX Series User manual

World Dryer AIRFORCE User manual

World Dryer

World Dryer AIRFORCE User manual

World Dryer SLIMdri L-Series User manual

World Dryer

World Dryer SLIMdri L-Series User manual

World Dryer VMax V2 User manual

World Dryer

World Dryer VMax V2 User manual

World Dryer Advantage Series User manual

World Dryer

World Dryer Advantage Series User manual

World Dryer AirMax RM Series User manual

World Dryer

World Dryer AirMax RM Series User manual

World Dryer Q-Series VERDEdri User manual

World Dryer

World Dryer Q-Series VERDEdri User manual

World Dryer smartdri K4 series User manual

World Dryer

World Dryer smartdri K4 series User manual

World Dryer XA5 User manual

World Dryer

World Dryer XA5 User manual

World Dryer AirMax DXM Series User manual

World Dryer

World Dryer AirMax DXM Series User manual

World Dryer AirMax D M5-972A User manual

World Dryer

World Dryer AirMax D M5-972A User manual

World Dryer XRA Series User manual

World Dryer

World Dryer XRA Series User manual

World Dryer Q-Series VERDEdri User manual

World Dryer

World Dryer Q-Series VERDEdri User manual

Popular Dryer manuals by other brands

Sanitaire SC6055A owner's guide

Sanitaire

Sanitaire SC6055A owner's guide

Siemens WT47XM01CS User manual and installation instructions

Siemens

Siemens WT47XM01CS User manual and installation instructions

Zanussi TDE 4224 Instruction booklet

Zanussi

Zanussi TDE 4224 Instruction booklet

Andrew Barton SALON PRO-DRY 5568ABBU manual

Andrew Barton

Andrew Barton SALON PRO-DRY 5568ABBU manual

Bosch WTW85439GR Installation and operating instructions

Bosch

Bosch WTW85439GR Installation and operating instructions

Kenmore 41798076701 installation instructions

Kenmore

Kenmore 41798076701 installation instructions

LG DLEX3370 series owner's manual

LG

LG DLEX3370 series owner's manual

THOMSON THOM C8 manual

THOMSON

THOMSON THOM C8 manual

LG DLEX3250 Series owner's manual

LG

LG DLEX3250 Series owner's manual

arcelik 800KM user manual

arcelik

arcelik 800KM user manual

GE Spacemaker DSXH43D owner's manual

GE

GE Spacemaker DSXH43D owner's manual

Alliance Laundry Systems DR7000WE user guide

Alliance Laundry Systems

Alliance Laundry Systems DR7000WE user guide

Beko DCX 83120W user manual

Beko

Beko DCX 83120W user manual

Estate 3HLER5437JQ0 Use & care guide

Estate

Estate 3HLER5437JQ0 Use & care guide

CorroVenta K5 ES HP PX user manual

CorroVenta

CorroVenta K5 ES HP PX user manual

Whirlpool LE6800XS Use & care guide

Whirlpool

Whirlpool LE6800XS Use & care guide

Bosch WTW85460AU Installation and operating instructions

Bosch

Bosch WTW85460AU Installation and operating instructions

Electrolux LAVATHERM 58840R user manual

Electrolux

Electrolux LAVATHERM 58840R user manual

manuals.online logo
manuals.online logoBrands
  • About & Mission
  • Contact us
  • Privacy Policy
  • Terms and Conditions

Copyright 2025 Manuals.Online. All Rights Reserved.