Worx Landroid M User manual

Installation


Installation
Монтаж
Paigaldamine
Uzstādīšana
Įrengimas
P04
P16
P28
P40
P52
EN
RU
ET
LV
LT
EN
RU
ET
LV
LT
Original Instructions
Перевод оригинальной инструкции
Tõlge algse juhiseid
Sākotnējā apraksta tulkojums
Vertimas originali instrukcija

4
EN
WARNING: Read all safety warnings and all instructions. Failure to follow the warnings and instructions
may result in electric shock, re and/or serious injury.
Carefully read the instructions for the safe operation of the machine.
Save all warnings and instructions for future reference.
1. HOW LANDROID WORKS
In the following section, we would like to help you better understand how Landroid works.
Landroid is an autonomous machine, capable of operating on its own. It knows when it needs to go to its charging base, can sense
when it is raining, can stop itself if it senses a problem and knows to stop, draw back, and turn around when it bumps into something
blocking its path. To prevent an accident, Landroid will also automatically stop its blade disc from rotating if it is lifted off the ground.
1.1 Charges itself
When your Landroid needs to recharge, it will stop mowing and follow the boundary wire in an anti-clockwise direction back to its
charging base. Once charging is complete, Landroid will automatically resume mowing or stay in the charging base according to its
mowing schedule.
1.2 Border management
Landroid is programmed to mow the grass along the perimeter of your lawn twice a week on Monday and Friday. If you want to change
this pre-set,
you can modify it via your smartphone or by using the control panel in “Work time-Customize Work time” menus.See
detailed instructions at the end of this manual.
1.3 Rain sensor
Landroid is 100% weather proof and happy to be outside. But mowing wet grass does not give you the best finish or result. Landroid
is equipped with a rain sensor which detects rain and tells Landroid to stop mowing and go back to its charging base.
1.4 Rain delay time
After a rainfall, Landroid re-starts when the grass is no longer wet. The default Rain Delay time is 180 minutes. You can change the
Rain Delay time setting via Landroid App

5
EN
1.6 No more grass clippings to collect
Landroid’s daily mowing produces very short clippings that don’t need to be raked. These clippings are a perfect organic nutrient for
your lawn. Frequent mowing boosts the density of grass blades and effectively prevents the propagation of weeds.
1.7 Cut to edge
Landroid M and L models have a cut to edge feature. The special offset blade gets as close as possible to the border of your lawn,
leaving you little or no trimming to do.
1.8 Cutting Height
Before starting your Landroid for the first time, make sure your grass is no longer than 10cm. If longer, use a regular mower to cut it
before operating Landroid. If you want to drastically shorten the height of your grass, it is recommended that you do so progressively,
by adjusting the cutting height in steps.
1.9 Security & PIN Protection
To prevent unauthorised people from being able to use it, Landroid is protected by a PIN code that you can easily set up.
1.5 In more extreme weather
In case of a lightning storm, protect Landroid by unplugging the charging base, disconnecting the boundary wire, and making sure
Landroid is not allowed to charge. In the Winter and especially in case of very cold weather and snow, we recommend you store your
Landroid inside. In some countries we offer a Winter servicing of your Landroid so it’s ready for the Spring growing season. Contact
your dealer or check online for more details.

6
EN
Worx Landroid
Wire repair connectors
Spare blades kits
Hex key
Charging base
Screws
Wire pegs
Power supply
Boundary wire
20V battery
Boundary wire distance gauges
Bertelsen ruler
Manuals
A
B
C
D
E
F
G
H
I
J
K
L
M
WHAT’S IN THE BOX
26 cm
10 cm
10,2 inch.
4 cm
A B C D
E
F
G
H
I
JK
L
M
The picture is only for reference

7
EN
2. INSTALLATION
Installing your Worx Landroid is easier if you carefully follow these instructions. In the end, it is a matter of installing the charging sta-
tion and laying the boundary wire all around your lawn. In addition to this manual, you can use the Get Started guide that’s inside the
box and watch the comprehensive video tutorials on our YouTube channel*.
* This information is provided for your convenience but does not replace the instruction manual and the safety instructions that needs
to be read and understood.
2.1 EVERY MINUTE SPENT IN PLANNING SAVES YOU 10 MINUTES IN EXECUTION
Installing Landroid is even easier if you have made a clear idea of what you need to do. Proper planning will also help you avoid
mistakes or having to rework the installation once it’s done.
2.1.1 On the surface or buried?
Landroid’s boundary wire is designed to stay on the surface of your lawn. Nearly invisible from the first day, it will be engulfed in
the soil in a few weeks. If you will want to bury the wire, it is recommended to first peg it down and test the installation is succes-
sful by running Landroid over the perimeter. This allows you to easily check everything and, if necessary, change the layout before
burying the wire. Bury the wire no more than a few centimetres below ground level, so that the wire ensures good signal.
2.1.2 Plan for the charging station
The charging station is where your Landroid goes to have its battery recharged. It’s also the parking lot where it rests in between
one mowing session and the next.
Locate a proper position for it, bearing in mind:
A. It needs to be powered, so it should be no more than 10m away from an AC mains outlet
B. If possible, choose a shaded position as batteries and chargers don’t like over-heating
C. The base needs to sit on flat land to ensure effective docking
D. Avoid places close to irrigation sprinklers
Patrol your
lawn to plan
installation
Lay the
boundary
wire
Power up
Landroid.
Test and
get ready to
mow
Connect
charging
station to
AC
Install the
charging
station

8
EN
You can place the charging station on your lawn or on a hard surface like a walkway, provided that the lawn and the hard surface are at
the same height (no steps).
To enter the station, Landroid needs at least 80cm straight path in front. On the exit side, it needs at least 30cm straight path before a left
turn (fig. 1). If the turn is to the right, there is no need for a straight path (fig. 2).
2.1.3. Charging station checklist:
A . within reach of AC mains
B. in shade
C. straight path on entrance; straight path on exit if necessary
D. flat land
E. no irrigation sprinklers nearby
2.1.4 .Placement of boundary wire on slopes
The upper boundary wire should NOT be placed on slopes steeper than 35% (20°). The lower boundary wire should NOT be
placed on slopes steeper than 17% (10°), and it should be placed at least 40cm away from any obstacle when positioned on a
slope that is 17%.
80cm30cm
1
80cm
2
Upper boundary wire
Lower boundary
Wire
Lower boundary
Wire
26cm
17%-35% <17%
40cm
34
0°
0°

9
EN
2.1.5 Plan for the boundary wire
The wire has to be placed at a certain distance from the edge of the lawn. This distance changes depending on what’s on the other
side of the edge. Different parts of your lawn may border different scenarios:
A. If the edge of the lawn borders a step: keep the wire 26cm from the edge. (figure 1)
B. If the edge of the lawn borders a path at the same height: keep the wire 10cm from the edge. (figure 2)
C. If the edge of the lawn borders a pool: keep the wire at least 30cm from the edge. (figure 3)
If a side of your lawn borders a neighbor’s lawn with a robotic mower in use, lay your wire at least 1m apart from your neighbor’s
wire to avoid possible interference.
2
1
0cm
2.2.2 Identify obstacles
Landroid’s bump sensor can manage solid obstacles such as trees, furniture and the like, which don’t need to be surrounded by wire. If your
lawn has several obstacles and trees close to each other, we recommend you to purchase the Landroid ACS option, an intelligent ultrasonic
auto-pilot that makes your Landroid steer around obstacles instead of bouncing into them.
boundary wire
digital fence
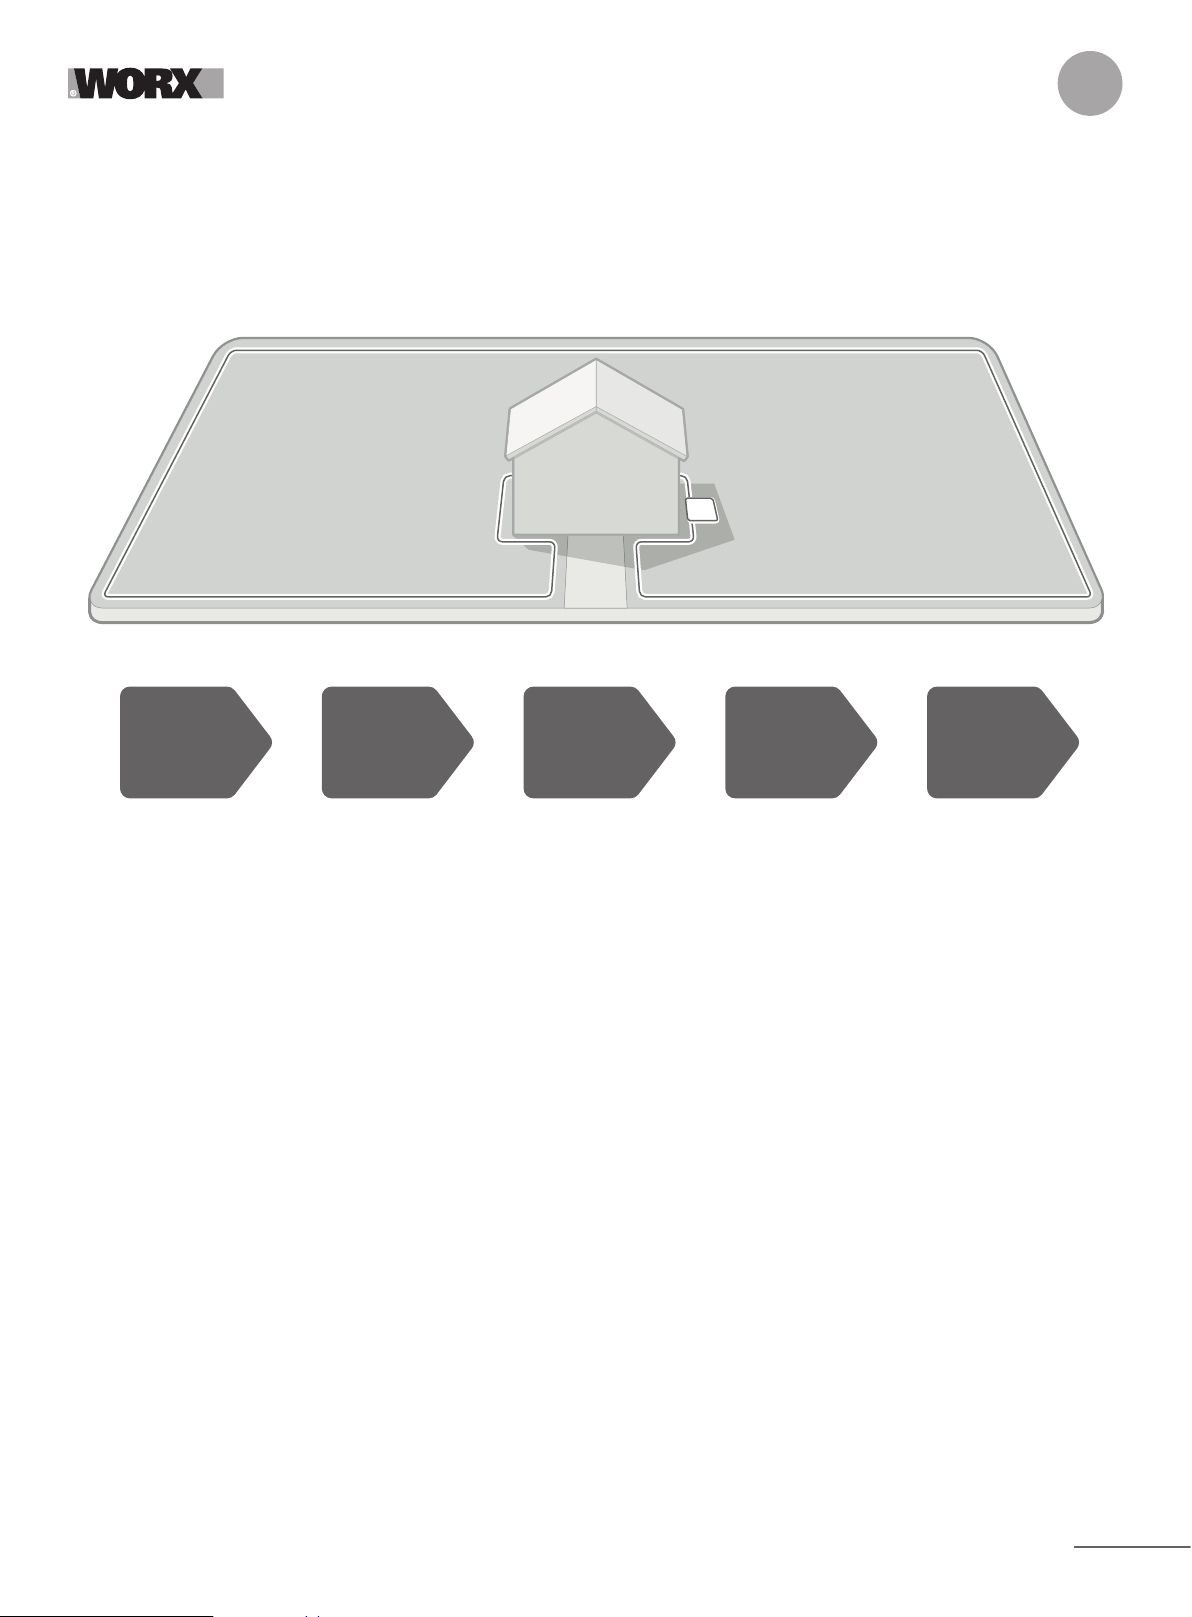
2.2 PATROL YOUR LAWN
Landroid is designed to manage the most complex of lawns. Carry out a visual inspection of your lawn so you are prepared for a
trouble-free installation of the boundary wire.
2.2.1 Identify forbidden areas
You don’t want your robot mower to mow flowers, dive into a water feature, or shred tree roots that emerge from the ground. Locate
these areas and surround them with boundary wire to prevent Landroid from accessing them.
The boundary wire is a single loop connected on both ends to the charging station, so you will have to depart with the wire from the
border, surround the area you want to protect, then take the wire back to the border as illustrated here in fig. 1.
If areas to be surrounded are far away from the border of your lawn, or if you have several areas and tree roofs to protect, this
traditional method is time consuming.
A great alternative is to purchase Landroid’s Off-Limits option. With this, you simply surround forbidden areas with the Off-Limits
digital fence, which does not need to be connected to the boundary loop (fig. 2). The Off-Limits digital fence is also great to protect
seasonal equipment (e.g. a trampoline) or for protecting new changes to the layout of your lawn without having to rework the
boundary wire.
26cm 10cm 30cm
1 2 3

10
EN
2.3 NOW ROLL YOUR SLEEVES UP. WHEN IT’S DONE IT’S DONE!
Now that you have planned the installation in every detail, you are ready to take action. Before starting, you may want to use your old mower
for the last time to clean up your lawn and make the installation easier.
2.3.1 Fix the charging station in the selected location
A, Secure the base to the ground by means of the supplied screws, using the supplied hex key (fig.1)
B. If you position the base on hard surface, fix it with plug and screw fixings (not supplied)
2.3.2 Connect one end of the boundary wire to the charging station
A. Strip the end of the wire with a pair of scissors (fig. 2)
B. Open the plastic door and insert the stripped end into the red left clamp (fig. 3)
C. Pass the wire through the guide of the base, as shown in fig. 3
2.3.3 Lay the boundary wire around your lawn
A. Use the supplied gauge to set the distance wire to edge
B. If there is a step at the edge of your lawn, keep the wire at 26cm from it (fig. 4)
C. If there is no step, keep the wire at 10cm from the edge (fig. 5)
1
OUT
3
2
26cm
26 cm
10 cm
10,2 inch.
4 cm
4
10cm
26 cm
10 cm
10,2 inch.
4 cm
5

11
EN
2.3.4.Secure the wire to the ground using pegs
A. Place pegs at approximately 80cm to each other (fig. 6)
B. Make sure the wire is always in close touch with the ground (fig. 7)
2.3.5 Lay perimeter islands, if needed
A. Protect flower beds, ponds, tree roots and other areas by surrounding them with the boundary wire
B. Depart the edge at a right angle to reach the area to be protected
C. Surround the area with the wire, keeping 26cm distance, until you close the island
D. Always lay the wire clockwise. Failing to do so will make the mower drive into the island
E. Return to the edge of the lawn following the same path
2.3.6 Bertelsen method: how to make perfect 90° angles with corners facing the lawn
If there are 90 degree corners that face the inside of your lawn, use the Bertensen ruler to help Landroid make perfect turns (and
remove the risk that Landroid hits an obstacle on the border of the lawn whilst doing this maneuver).
80cm
80cm 80cm
67
8
1m
26cm
26cm
26cm
26cm
9
2.3.7 Close the loop
Once you have completed laying the wire on the perimeter of your lawn, you will arrive back to the charging base.
A. Pass the wire through the guide in the base, up to the clamp (fig.10)
B. Cut the exceeding wire and strip the end with a pair of scissors
C. Insert the stripped end into the black right clamp
2.3.8 Final steps
There are only a few more steps to go:
A .Connect the charging station to the AC mains socket (fig. 11)
B .If everything is fine, the LED will light green
C. If there’s a trouble in the loop, such as broken wire or wire ends not properly clamped, the LED will turn red. Check that
everything is fine and see the FAQ session if the problem persists

12
EN
D. Open the rear of Landroid and insert the PowerShare battery into the slot until it clicks (fig.12)
E .Place Landroid on charge by making sure a deep contact is established with the base (fig. 13). The LED will blink green; once the
battery is fully charged, the LED will turn solid green.
IN
10 11
CLICK!
12
Landroid box includes two small, waterproof boundary wire connectors. They can be used for the following:
A. When your lawn has a very long perimeter and you need extra boundary wire to complete the installation. Please do not exceed
300m of boundary wire: this is the maximum length of the boundary wire perimeter
B. When the boundary wire is cut by accident and you need to fix it
C. When you decide to rework your garden in the future and need to modify the original boundary wire installation
The connectors are waterproof and provide optimal electric connection.
D. Insert both ends of the wire into any two of the three holes of the connector; no need to strip the wires
E. Insert the wires fully until both wire ends are visible on the other side of the connector
F. Press the connector firmly by using a pair of pliers
Attention: it is not recommended to simply splice the boundary wire with insulating tape or use a screw terminal block for connection.
A broken circuit may occur after a period of time as soil moisture can oxidize the wire.
2.3.9 Joining up the boundary wire
F.Let Landroid charge the battery for a while. Whilst it is charging you may want to take a well-deserved break: get familiar with the
following instructions, and connect Landroid to your Wi-Fi network.
13

13
EN
Get familiar with the control panel
Landroid’s control panel provides the key functions in a minimalistic design.
For advanced functions, the free Landroid app provides further options in a richer interface: your smartphone.
3. NOW FOR THE EXCITING BIT!
START LANDROID FOR THE FIRST TIME.
3.1 Start Landroid
A. Place Landroid inside the boundary wire
B. Press On/Off button until the screen lights up
C. Input the default PIN AAAA by pressing the↑(A) key four times. The screen will display”PIN code OK”
D. Press the START button, then press OK. Landroid will start mowing
E. You can stop Landroid at any time by pressing the STOP button
F. To send Landroid to the charging station, press the Home key, then press OK
4. LANDROID CONTROL PANEL
Advanced functions via the built-in interface
Despite its minimalistic design, you can set several advanced functions through the built-in control panel.
However, for the best user experience we recommend you use the free Landroid app to do this, given its much richer and intuitive interface.
4.1 Setting
*For after-sales service only
START OK
A
BC D
Mon 11/07 00:00
Work done today
Charging 50%
Selects up/down/left/right
Inputs PIN code
POWER On/Off
Turns Landroid on and off
OK: Confirms any setting /
Enters Wi-Fi connection mode
START: Starts mowing /
Corrects the problem
RETURN:
Back to proceeding menu
HOME:
Sends Landroid to its charging
base during operation and
activates charging
General settings
Working time
Security
Navigation Page
Language
Time format
Date format
Set date & time
Rain start delay
Setup WIFI
Diagnose *
Auto Work Time
Customize work time
Define zones
Customize work zone
Change PIN code
STOP

14
EN
Why connect Landroid
Landroid is an IoT (Internet of Things) device. To get full functionality out of your
Landroid and keep it always updated to the latestsoftware, it must be connected to the
internet via your Wi-Fi network.
5.1 BEFORE YOU START
5.1.1 Download the app
Download the free Landroid app first. Get it from Android or Apple app stores
5.1.2. Ensure you have:
A. Your WiFi network password
B. Landroid Serial Number: it can be found in the label under the rear bonnet of the
machine.
If you don’t want to type the 20-digit Serial Number, input it by scanning the QR code
with your smartphone’s camera.
5.1.3. Check your Wi-Fi settings
A Landroid works with 2.4GHz Wi-Fi signal
B Make sure your Lasndroid is in the same router environment as your smartphone
C Make sure the distance between your Landroid, smartphone and your router is as close as possible during connection
Tip: when Landroid moves to an area of your lawn with poor or no Wi-Fi signal, instructions sent from the app will only be
executed when Landroid returns to an area with good signal.
5. CONNECTING LANDROID TO THE INTERNET
Label and
QR code
6. HOW TO CONNECT LANDROID TO THE INTERNET
Launch the app and follow these instructions.
Register your account by typing
your username and password, or
logging in through Facebook or
Google.
1. Register your account 2. Input Landroid Serial Number 3. Choose your connection
Register your Landroid by inputting
the Serial Number manually or by
scanning the QR code.
Select your Wi-Fi network or you
can connect Landroid via Find My
Landroid or RadioLink Options
If your WiFi does not cover the entire lawn you may consider the purchase of the Landroid Radio Link option, which extends the
signal up to 300m in range.
As an alternative, you can purchase the Find My Landroid option that besides connecting Landroid to the internet via its build in
SIMcard, also allows you to track it in the unfortunate event it gets stolen.

15
EN
7. LANDROID APP
NOT A SIMPLE REMOTE CONTROL
Don’t think at it as a remote control. The app is an integral part of the Worx Landroid advanced ecosystem based on cloud
computing and artificial intelligence.
Thanks to the app’s augmented reality feature, you can measure the exact area of your lawn. It’s as easy as taking a walk along its border.
Once connected, Landroid can access its unique auto scheduling instructions from the cloud and is able to download the latest
software to optimise its performance.

16
RU
ВНИМАНИЕ: Изучите все предупреждения, относящиеся к безопасности и все указания.
Игнорирование предупреждений и несоблюдение указания может привести к поражению электрическим током, к
пожару и/или к тяжелой травме..
Внимательно изучите инструкции по безопасной эксплуатации машины.
Сохраните все материалы с предупреждениями и указаниями для последующих справок.
1. КАК РАБОТАЕТ LANDROID
В следующем разделе мы хотели бы помочь вам лучше понять, как работает Landroid.
Landroid — это автономная машина, способная работать самостоятельно. Она знает, когда ей нужно отправляться
на зарядную базу, может распознавать дождь, самостоятельно выполнять остановку при выявлении проблем и умеет
останавливаться, сдавать назад и разворачиваться, наткнувшись на преграду на своем пути. В целях предотвращения
происшествий Landroid также автоматически останавливает вращение ножевого диска в случае его подъема с земли.
1.1 Самостоятельная зарядка
Когда Landroid требует зарядки, он прекращает покос и, идя по граничному проводу против часовой стрелки,
возвращается на зарядную станцию. По завершении зарядки Landroid автоматически возобновляет покос или остается
на зарядной базе согласно графику покоса.
1.2 Управление границами
Landroid запрограммирован, чтобы косить траву по периметру газона два раза в неделю в понедельник и пятницу. Если вы
хотите изменить предварительно заданную настройку, вы можете сделать это с помощью смартфона или панели управления
в меню Work time-Customise Work time.
См. подробные инструкции в конце настоящего руководства.
1.3 Датчик дождя
Landroid полностью защищен от атмосферных воздействий и легко переносит условия вне помещений. Но покос влажной
травы дает не лучшие результаты. Landroid оборудован датчиком дождя, который обнаруживает дождь и сообщает
Landroid, что нужно прекратить покос и вернуться на зарядную базу.
1.4 Время задержки после дождя
После дождя Landroid вновь запускается, когда трава высыхает. Время задержки после дождя по умолчанию 180 минут.
Настройку времени задержки после дождя можно изменить через приложение Landroid.

17
RU
1.6 Больше не нужно собирать
свежескошенную траву
В ходе повседневного покоса Landroid создает очень короткие обрезки, которые не нужно собирать. Эти обрезки
являются идеальным органическим удобрением для газона. Частый покос повышает плотность травы и эффективно
предотвращает развитие сорняков.
1.7 Покос по краю
Модели Landroid M и L имеют функцию покоса по краю. Специальный смещенный нож располагается максимально
близко к границе газона, практически полностью устраняя потребность в дополнительном подрезании.
1.8 Высота резания
Перед первым запуском Landroid, убедитесь, что высота травы составляет не более 10см. Если она имеет большую
высоту, подрежьте ее обычной косилкой, прежде чем использовать Landroid. Если вы хотите значительно уменьшить
высоту травы, рекомендуем делать это постепенно, пошагово регулируя высоту срезания.
1.9 Безопасность и защита
ПИН-кодом
В целях предотвращения использования Landroid другими лицами без разрешения, система защищена ПИН-кодом,
который можно легко настроить.
1.5 В более экстремальных
погодных условиях
В случае грозы примите меры по защите Landroid, вынув из розетки зарядную базу, отключив граничный провод и
удостоверившись, что Landroid не может заряжаться. Зимой, особенно в условиях очень холодной погоды и обильного
снегопада, рекомендуем хранить Landroid в помещении. В некоторых странах мы предлагаем зимнее обслуживание
Landroid, чтобы подготовить его к весеннему вегетационному периоду. Для получения более подробной информации
обратитесь к вашему дилеру или посетите страницу в интернете.

18
RU
КОМПЛЕКТ ПОСТАВКИ
Worx Landroid
Соединителя для ремонта проводов
Запасных комплекта ножей
Торцевой шестигранный ключ
Зарядная база
Винтов
Колышки для проводов
Блок питания
Граничный провод
Батарея 20В
Дальномера для граничного провода
Угольни
Руководства
A
B
C
D
E
F
G
H
I
J
K
L
M
26 cm
10 cm
10,2 inch.
4 cm
A B C D
E
F
G
H
I
JK
L
M
Это изображение приведено только для справки

19
RU
2. МОНТАЖ
Установить Worx Landroid будет проще, если внимательно следовать данным инструкциям. В конечном счете, все
сводится к установке зарядной станции и прокладке граничного провода вокруг газона. В дополнение к настоящему
руководству вы можете ознакомиться с руководством по началу работы, которое входит в комплект поставки, и
посмотреть подробные обучающие видео на нашем канале YouTube*.
* Данная информация предоставляется для вашего удобства, но не заменяет руководство и указания по безопасности,
которые необходимо прочитать и понять.
2.1 КАЖДАЯ МИНУТА, ПОТРАЧЕННАЯ НА ПЛАНИРОВАНИЕ, ЭКОНОМИТ 10 МИНУТ ПРИ
ВЫПОЛНЕНИИ РАБОТ
Устанавливать Landroid проще, если вы имеете ясное представление о том, что нужно сделать. Кроме того, должное
планирование помогает избегать ошибок и вынужденной корректировки установки после ее завершения.
2.1.1 На поверхности или под землей?
Граничный провод Landroid предназначен для размещения на поверхности газона. Практически незаметный с
самого первого дня, по прошествии нескольких недель он будет покрыт почвой. Если вы хотите закопать провод,
рекомендуется сначала закрепить его колышками и протестировать установку, прогнав Landroid по периметру. Это
поможет вам легко все проверить и, при необходимости, изменить схему расположения провода, прежде чем его
закапывать. Закапывать провод следует не более чем на несколько сантиметров, чтобы он обеспечивал надежный
сигнал.
2.1.2 Планирование установки зарядной станции
Зарядная станция — это место, куда отправляется Landroid для зарядки батареи. Кроме того, это место парковки, где
он остается в промежутках между сеансами покоса.
Подберите для нее нужное положение, учитывая следующее:
A. Ее необходимо подключить к источнику питания, поэтому ее следует располагать не более чем в 10 м от розетки
сети переменного тока
B. По возможности выберите место в тени, так как батареи и зарядные устройства «не любят» перегрев
C. Для обеспечения эффективной стыковки база должна находиться на плоской поверхности
D. Избегайте мест вблизи поливочных спринклеров
Осмотрите
газон и
спланируйте
установку
Установите
зарядную
станцию
Подключите
зарядную
станцию к
источнику
переменного
Включите
питание Landroid.
Выполните
тестирование и
подготовку к
покосу
Проложите
граничный
провод

20
RU
26cm
17%-35% <17%
40cm
Зарядную станцию можно разместить на газоне или на твердой поверхности, такой как дорожка, при условии того, что
газон и твердая поверхность имеют одинаковую высоту (без ступенек).
Для въезда на станцию Landroid необходимо, чтобы перед ним было по меньшей мере 80 см прямого пути. На стороне
выезда ему требуется по меньшей мере 30см прямого пути перед левым поворотом (рис. 1). Если поворот уходит
вправо, прямой путь не требуется (рис. 2).
2.1.3 Контрольный список для установки зарядной станции:
A. в пределах досягаемости сети переменного тока
B. в тени
C. прямой путь на въезде; прямой путь на выезде (при необходимости)
D. плоская поверхность
E. поблизости нет поливочных спринклеров
2.1.4 Размещение граничного провода на склонах
НЕЛЬЗЯ прокладывать верхний граничный провод на склоне, если его крутизна превышает 35% (20°). НЕЛЬЗЯ
прокладывать нижний граничный провод на склоне, если его крутизна превышает 17% (10°), а также ближе, чем на
расстоянии 40 см от любого препятствия на склоне крутизной 17%.
80cm30cm
1
80cm
2
34
0°
0°
верхний граничный
провод
нижний
граничный
провод
нижний
граничный
провод
Other manuals for Landroid M
7
This manual suits for next models
1
Table of contents
Languages:
Other Worx Lawn Mower manuals

Worx
Worx Landroid WR142E User manual

Worx
Worx Landroid WR130E User manual

Worx
Worx WG705E User manual

Worx
Worx Landroid User manual

Worx
Worx WG770E Installation manual

Worx
Worx LANDROID WG791 User manual

Worx
Worx WG754E User manual

Worx
Worx WG784E Installation manual

Worx
Worx WG707E User manual

Worx
Worx WG753 User manual

Worx
Worx WG776E User manual

Worx
Worx Landroid Specification sheet

Worx
Worx Landroid User manual

Worx
Worx Landroid WR142E User manual

Worx
Worx Landroid M User manual

Worx
Worx WG711E User manual

Worx
Worx WG787 User manual

Worx
Worx WG761E Operation instructions

Worx
Worx NITRO WG749E User manual

Worx
Worx WG717E User manual