X-Crafts Embraer EJets Series User manual


2

CONTENTS
1.0 INTRODUCTION
1.1 INSTALLATION
1.2 COPYRIGHT
1.3 THE TEAM
1.4 DEMO FLIGHT
1.5 TUTORIAL VIDEOS
1.6 VIEWING OPTIONS
2.0 GENERAL
2.1 BACKGROUND
2.2 SPECIFICATIONS
2.3 DIMENSIONS
3.0 COCKPIT
3.1 GENERAL
3.2 DARK AND QUIET COCKPIT
3.3 GUIDANCE PANEL
3.3.1 LATERAL MODE GUIDANCE
3.3.2 HDG KNOB
3.3.3 ALT KNOB
3.3.4 VERTICAL MODE GUIDANCE
3.3.5 DISPLAY CONTROLLER PANEL
3.3.6 BAROMETER READOUT SWITCH
3.3.7 ENGAGING THE AUTOPILOT
3.4 OVERHEAD PANEL
3.4.1 ELECTRICAL
3.4.2 COCKPIT LIGHTS & HUD PANEL
3.4.3 FIRE PROTECTION
3.4.5 AUXILIARY POWER UNIT (APU)
3.4.4 FUEL
3.4.6 EXTERNAL LIGHTS
3.4.7 HYDRAULICS
3.4.8 ICE AND RAIN PROTECTION
3.4.9 AIR CONDITIONING
3.4.10 PRESSURIZATION
3.5 PEDESTAL
3.5.1 OVERVIEW
3.5.2 SLAT / FLAP
3.5.3 SPEEDBRAKE LEVER
3.5.4 TRANSPONDER
3.5.5 NAV/COM/ADF RECEIVER
3.5.6 TRIM PANEL
3.5.7 COCKPIT DOOR CONTROL
3.5.8 T/O BUTTON
3.5.9 STARTERS
3.5.10 AUDIO SELECTOR
3.5.11 RAM AIR TURBINE
3.6 MAIN PANEL
3.6.1 PFD - Primary flight display
3.6.2 MFD - Multi function display
3.6.2.0 MENU
3.6.2.1 NAVIGATION PAGE
3

3.6.2.2 STATUS SYNOPTIC PAGE
3.6.2.3 FLIGHT CONTROL SYNOPTIC PAGE
3.6.2.4 HYDRAULICS SYNOPTIC PAGE
3.6.2.5 FUEL SYNOPTIC PAGE
3.6.2.6 ELECTRICAL SYNOPTIC PAGE
3.6.2.7 ECS SYNOPTIC PAGE
3.6.2.8 ANTI-ICE SYNOPTIC PAGE
3.6.2.9 OPTIONAL TERRAIN MAP
3.6.3 EICAS (ENGINE INDICATION AND CREW ALERTING SYSTEM)
3.6.4 AUTOBRAKES
3.6.5 CLOCK AND CHRONOMETER
3.6.6 POP-UP PANELS
3.6.7 ENLARGING THE MAIN PANEL DISPLAYS
3.6.7 REVERSIONARY PANEL
3.7 SPECIAL COCKPIT CLICKABLE AREAS
3.7.1 HANDLES AND MANIPULATORS
3.7.2 HIDE YOKE FUNCTION
3.7.3 COCKPIT DOOR
3.7.4 DISABLING WINDSHIELD AND SCREEN REFLECTIONS
3.8 SIDE PANEL - COCKPIT LIGHTING
4.0 FLIGHT CONTROLS
4.1 OVERVIEW
5.0 ADDITIONAL PLUG-INS
5.1 PLUG-IN MENU
5.2 PUSHBACK PLUGIN
5.2.1 PUSHBACK MENU
5.2.2 THE PUSHBACK PROCEDURE
5.3 WINGLET AND GROUND SUPPORT EQUIPMENT OPTIONS
5.4 LOAD PLANNING
6.0 START-UP PROCEDURE
6.1 CHECKLIST USE
6.1.1 POWER ON
6.2 APU START
6.3 GPU START
7.0 V-SPEEDS
4

1.0 INTRODUCTION
Hello and thank you for purchasing the Embraer E175, E195 or the EJets Set. We hope you have as
much enjoyment flying your new aircraft as we did creating it and improving it to it’s latest version.
This manual is applicable to both aircraft.
After reading and studying this manual, if you have any more questions feel free to ask on the forum!
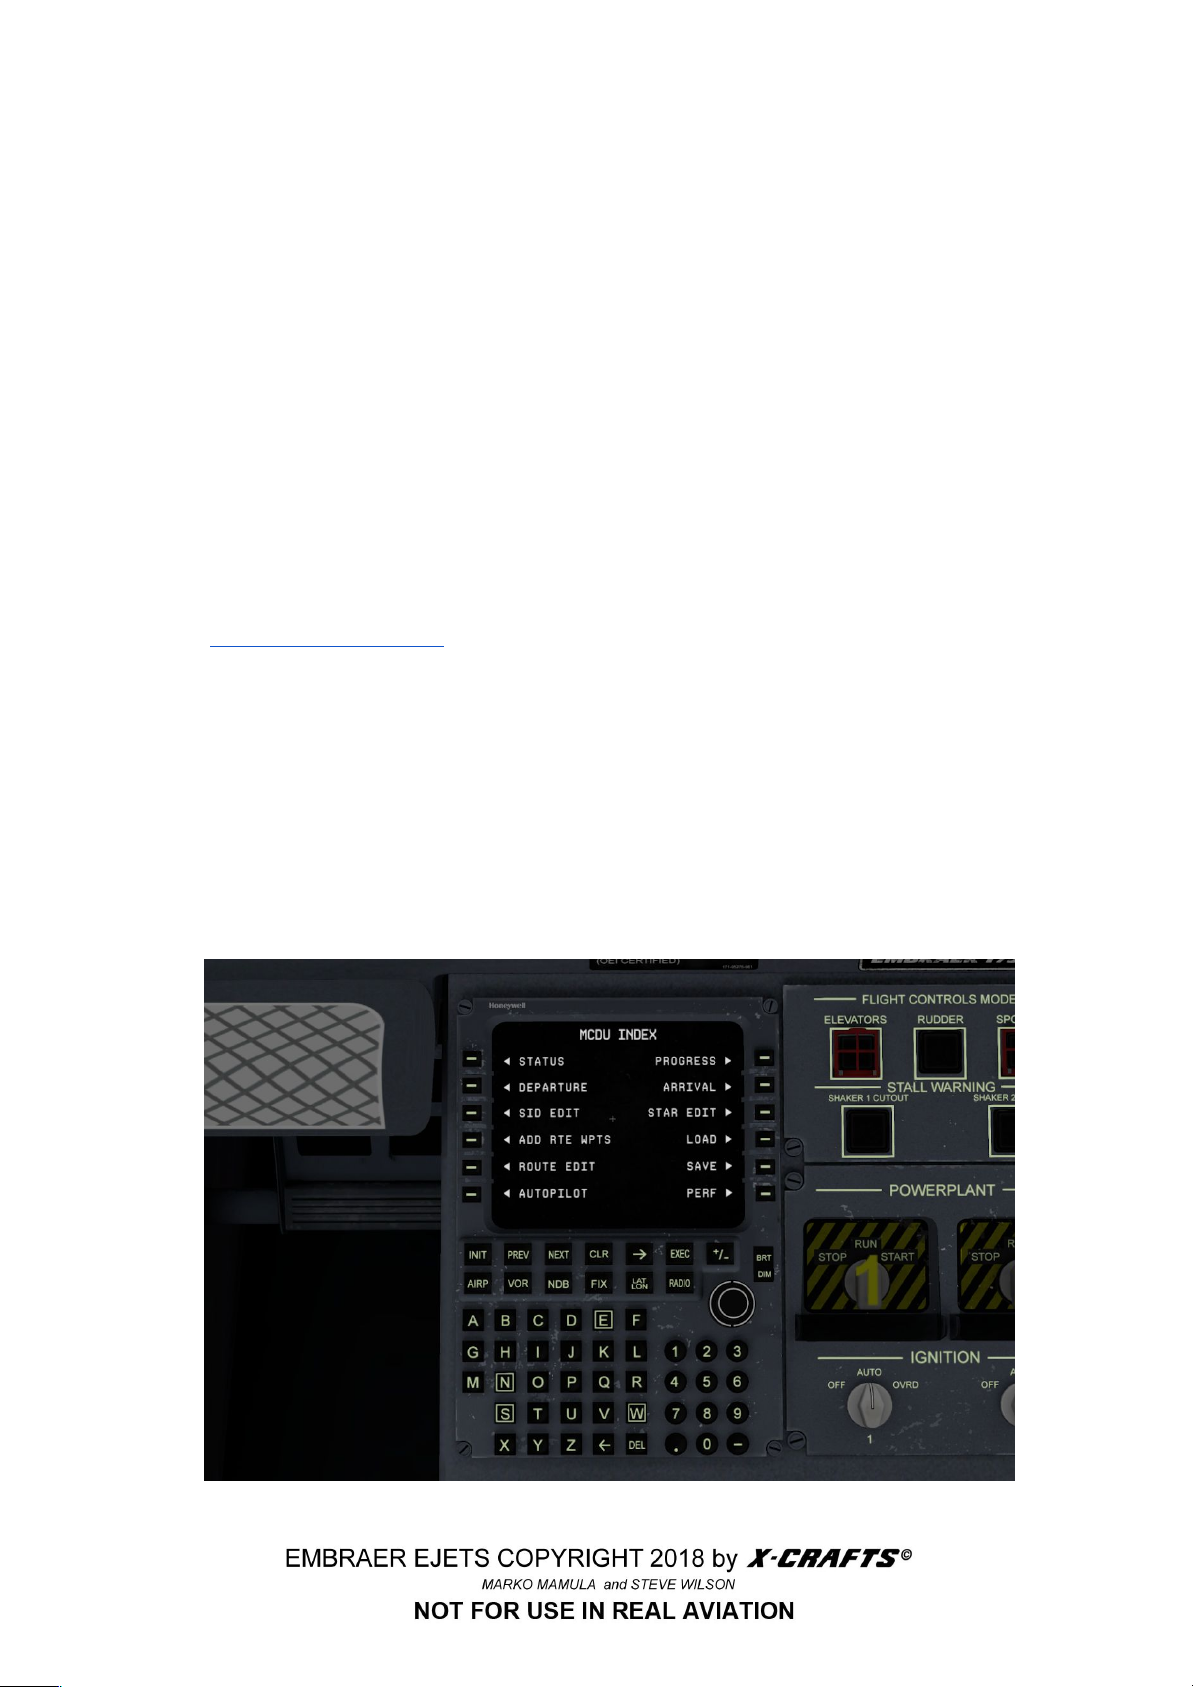
The custom flight management system that’s provided with the product - the Tekton FMS - has its
own manual which you can also find in the Documentation folder. We have also produced a series of
tutorial videos about how to use the Tekton FMS and the aircraft.
Marko: While developing these add-ons is a huge passion and love, please allow me to express my
thanks especially since sales of this add-on have helped me fund my postgraduate studies in the UK.
Steve: Please accept my thanks as well - there’s no satisfaction greater than having a creative idea
and knowing that it lives on many users’ PC’s around the world, providing both entertainment and
satisfying challenges.
1.1 INSTALLATION
To install either of the aircraft, extract the zipped folder(s) into X-Plane/Aircraft/… in a folder of your
choice. We suggest that the folder name contain no non-unicode characters. The folder also must not
be a system folder.
1.2 COPYRIGHT
All the material contained in this package is exclusive copyright of the author and no part of any of the
models contained in this package, or any other files within, in part or in whole, may be copied,
re-distributed, disassembled, re-packaged or exploited in any way for any commercial purpose
without the express permission of the author.
The package and its derivatives may be used for non-commercial purposes only. ACF file, 3D files,
textures, engine and system sounds, cockpit and documentation and plugins:
Copyright © 2016-2018 Marko Mamula, Steve Wilson and Todd Fleck
1.3 THE TEAM
Marko Mamula (X-Crafts on the forum) - 3D model, flight model, textures, project manager
Steve Wilson (Steve.Wilson on the forum) - Tekton FMS
and SASL plugin programmer
Todd Fleck - FMOD sounds, sound design, lighting enhancements and liveries
Alex Dydula - Chief Beta Tester and general all around expert QA analyst
5

Our Beta Testers - We would also like to thank our legion of beta testers whom have helped make
this product what it is and to verify the functionality, catching many bugs along the way so that you
don’t have to. You fine flight simulation enthusiasts know who you are! And we also thank our many
users that have provided constructive criticism, thoughtful suggestions and bug reports of their own
over the years.
1.4 DEMO FLIGHT
See the ‘../Embraer E1xx vX.X XP11/Documents/Demo flight’ folder for a sample flight that will give
you the experience of a complete flight, taking off and landing at Tucson International Airport.
Something of a "once around the pattern" flight with just enough waypoints to do the job. Please see
chapter 6 for details on operating the aircraft, and the companion FMS manual for instructions on use
of the MCDU functions.
1.5 TUTORIAL VIDEOS
Go to the X-Crafts Youtube Channel for many tutorial videos explaining how to use the the aircraft
feature as well as the FMS and its functions.
https://www.youtube.com/channel/UCF0S2b-RA156Br5oMtrCF9A/feed?gl=US
1.6 VIEWING OPTIONS
Recommended field of view is 65-70 degrees. Change this in X-Plane under Settings > Rendering
Options > Special Viewing Options > Lateral field of view
An X-Plane “QuickLook” is set up under numpad ‘0’ for the FMS MCDU.
6

You can also set a custom QuickLook. The steps are as follows:
1. In the 3D cockpit view, set the desired view. Or even an exterior view ...
2. Now press Ctrl 1 (or any other digit from 0 to 9). The number must be on the number pad on the
keyboard.
3. Thus stored, you now can see this view by pressing the 1 (without ctrl) on the number pad.
4. Pressing the 1 again, the previous view is restored.
5. These 10 QL's you can now place on different joystick buttons. This can be done as usual in the
menu "joystick, keyboard and devices" - "Extra Buttons".
6. The saved views are aircraft specific. They are saved directly in the appropriate directory of the
Aircraft, stored as "Aircraft Name_prefs.txt".
7

2.0 GENERAL
2.1 BACKGROUND
Based in São José dos Campos, Brazil, Embraer (Empresa Brasileira de Aeronáutica, S. A.; Brazilian
Aeronautics Company, Inc.) was founded in 1969 as a government enterprise; and became a
privately owned business December 7, 1994.
Announced during the 1999 Paris Air Show, the Embraer series of E-jets are designed to be larger
than regional aircraft (50 seats or less) and smaller than larger mainline jets (110 or more seats). Jets
in this size range specifically designed for growing airlines wishing to expand their market, or larger
carriers wanting to right-size their fleet to fit routes inefficiently served by larger aircraft. Embraer calls
this 'The Rule of 70 to 110'.
The E-jets are a new design from nose to tail and wingtip to wingtip, and a significant departure from
their successful predecessor aircraft, the ERJs. Operations are 30% more efficient than the previous
generation of jets. Two full authority digital engine controlled (FADEC) CF34 General Electric engines
hang below the winglet fitted wings. Flight surfaces, excluding the ailerons, are fly-by-wire controlled.
Honeywell's Primus Epic Electronic Flight and Information System (EFIS) with five liquid crystal color
displays conducts fully automated flight, including both LNAV and VNAV control, and autoland
capability. The 170 and 175, as do the 190 and 195, have 95% component commonality to reduce
operator costs. The full range of E-jets have 89% commonality. Cockpit commonality allows for pilot
cross-certification. Embraer retained their distinctive ram's horn yoke design.
All E-jets feature a single aisle cabin with a two-by-two seat arrangement. The cabin has a greater
diameter and length than regional aircraft allowing for larger overhead bins, wider seats and an
optional two-cabin layout.
The launch customer was Crossair. First flight of an E-jet was February 2002. After an extended
certification process the first aircraft delivery occurred in March 2004 to LOT Polish Airlines (an E170).
The launch customer of the E-190 was JetBlue. The first flight of the E-190 was in March 2004, with
the first flight of the E-195 in December 2004. Flybe launched the E-195. Over 600 aircraft have been
built, and are based in 35 countries and over 50 airlines.
8

2.2 SPECIFICATIONS
E175:
Flight deck crew
2 pilots
Passengers
72
Powerplants
2× GE CF34-8E turbofans
61.4 kN (13,800 lbf) thrust each
Range
3,889 km (2,100 nmi)
Maximum speed
890 km/h (481 kn, Mach 0.82)
Service ceiling
12,500 m (41,000 ft)
Empty weight
21,810 kg (48,080 lb)
Maximum takeoff weight
38,790 kg (85,517 lb)
Maximum fuel load
9,428 kg (20,785 lb)
Max payload weight
10,200 kg (22,487 lb)
9

2.2 SPECIFICATIONS (Continued)
E195:
Flight deck crew
2 pilots
Passengers
100
Powerplants
2× GE CF3410E turbofans
82.3 kN (18,500 lbf) thrust each
Range
3,334 km (1,800 nmi)
Maximum speed
890 km/h (481 kn, Mach 0.82)
Service ceiling
12,500 m (41,000 ft)
Empty weight
28,970 kg (63,870 lb)
Maximum takeoff weight
50,790 kg (111,970 lb)
Maximum fuel load
12,971 kg (28,596 lb)
Max payload weight
13,650 kg (30,090 lb)
10

2.3 DIMENSIONS
E175:
Wing span
26.00 m (85 ft 4 in)
Length
31.68 m (103 ft 11 in)
Height
9.67 m (32 ft 4 in)
E195:
Wing span
28.72 m (94 ft 3 in)
Length
38.65 m (126 ft 10 in)
Height
10.28 m (34 ft 7 in)
11

3.0 COCKPIT
3.1 GENERAL
This X-Plane add-on includes an advanced and complete 3D virtual cockpit to emulate the real
aircraft’s cockpit as closely as possible in the X-Plane flight simulator. While not all aircraft systems
are simulated, the controls and indicators are located in their proper places with respect to the real
aircraft.
Every attempt was used to make the add-on as easy to use as possible. For example, all clickable
areas in the cockpit were made bigger in order to make it easier to click on any button, knob or key on
the monitor.
3.2 DARK AND QUIET COCKPIT
Embraer uses a “Dark and quiet” cockpit principle. This means that under normal operations, there
are no illuminated buttons, knobs are in the 12-o'clock position, and there are no aural notifications.
12

3.3 GUIDANCE PANEL
Along the top of the panel glareshield is the flight guidance control panel (FGCP). The many autopilot
modes and functions are engaged using this panel's many buttons and knobs. You must take the time
to fully understand how each control effects the E-jet during each phase of flight.
Be sure to engage any autopilot mode, if you want it to do anything! Basically if there is a yellow light
above the button, it is armed. If there is a green light, it is engaged. You can also see what modes
are engaged on the top part of the PFD (check section 3.6.1)
3.3.1 LATERAL MODE GUIDANCE
●FD - Flight director (This engages the flight director, but NOT
the autopilot!)
●AP - Engage autopilot servos (This engages the autopilot, if it
is not engaged, you are flying manually and the plane will not
follow any selected autopilot mode)
●APP - Autopilot approach mode (This will engage the NAV
and at the same time GS)
●NAV - Autopilot engage VOR/localizer (Engage this if you want the plane to follow the flight plan
loaded from the FMS or fly an ILS)
●BANK - Lock the bank to max 15 degrees
●HDG - Autopilot engage heading
●YD - Yaw damper
●SRC - HSI nav source selector (This switches between pilot/copilot’s FMS source. It does not
have any effect in this release version)
NOTE: for some reason MSTR WARNING will light up when you engage FD, this is an X-Plane bug,
so just turn it off by clicking on it)
3.3.2 HDG KNOB
There are two different clickable areas to set the
heading. This picture demonstrates how the
manipulators work.
The heading can also be altered using the
AUTOPILOT page of the FMS.
13

3.3.3 ALT KNOB
The ALT knob has 2 options, the inner circle changes the value by 10ft on click and by 100ft on hold.
The outer circle changes the value by 1000ft/click. I find this super useful because you can go from 0
to FL300 in no time. The altitude setting can also be adjusted using the FMS AUTOPILOT page.
3.3.4 VERTICAL MODE GUIDANCE
●ATHR - Autopilot engage auto-throttle (Push Speed knob to select between knots/mach)
●VNAV - Autopilot engage FMS VNAV
●FLCH - Flight level change
VERY IMPORTANT : be sure to engage ATHR before hitting FLCH! If you don’t it will result in
wild porpoising after the plane reaches the desired altitude !
●G/S - Glide slope
●V/S - Vertical speed
●ALT - Altitude select (If you click on the ALT button twice, it will turn green and it will hold the
current altitude)
14

3.3.5 DISPLAY CONTROLLER PANEL
●FMS - Selects FMS as the primary navigation
source for both PFDs
●Radio Altimeter (RA) minimums selector knob
(sets the radio altimeter decision height)
●V/L - VOR/LOC button (Selects the VOR or
NAV for the display)
●BARO SET - Barometric correction selector knob, sets barometric correction factor
●BRG bearing sources button: Selects VOR, NAV sources
○ CIRCLE (O): indicates VOR1, NAV1
○ DIAMOND (◊): indicates VOR2, NAV2
3.3.6 BAROMETER READOUT SWITCH
By clicking on the hidden click-spot above the BARO knob, you can switch between In/hPa.
3.3.7 ENGAGING THE AUTOPILOT
● Choose a source at the Display controller Panel (BRG O/ BRG ◊/FMS)
● Engage the FD and also AP. If the light turns green, the autopilot servos are on.
● Once AP is on and the flight plan is loaded, press NAV to engage the Localizer to follow the flight
plan loaded in the FMS. For ILS press APP. This will automatically engage NAV and GS
(Glideslope).
IMPORTANT! Before selecting FLCH, you first have to set the speed and hit ATHR, otherwise the
plane will start porpoising once it reaches the desired altitude!
Please visit this website (http://xplane.wikia.com/wiki/Autopilot) for a detailed explanation of all autopilot
modes and functions in X-Plane.
15

3.4 OVERHEAD PANEL
3.4.1 ELECTRICAL
The E-Jet electrical system is fully automated and under normal
operations, no pilot action is required. Two electrical networks
work independently from one another for electrical fault isolation
purposes. In the event of a power source fault, bus ties
automatically connect between the networks with no significant
operational or workload needed. Battery 2, specifically has an
"off/auto" indication on the knob because only BAT 2 connects to the
APU start bus. So when the APU is selected to run, BAT 2 is taken
offline to start the apu.
The Alternating Current (AC) system is composed of:
● 2 Integrated Drive Generators (IDGs)
● 1 Auxiliary Power Unit (APU) generator
● 1 Ram Air Turbine (RAT)
● 1 AC external power unit or Ground Power Unit (This will
light up when the GPU is on)
The Direct Current (DC) system is composed of:
● 2 Nickel Cadmium (NiCd) batteries
● 3 Transformer Rectifier Units (TRUs)
16

● 1 DC external power unit (not simulated in this release version)
● Avionics displays are turned on with turning BATT1 ON, as in the real aircraft.
● After selecting GPU on the Options menu, it means the GPU is only connected but not providing
power to the aircraft. GPU gen on the overhead panel will go to AVAIL. After clicking on it it will
go to ‘IN USE’. After this the GPU is providing AC power
to the aircraft.
3.4.2 COCKPIT LIGHTS & HUD PANEL
● CABIN FLOOD changes the flood light in the entire
cockpit
● INSTR BRT changes the brightness of the instruments,
including the MCDU screen.
● PNL lights changes the brightness of the panel lights
● HUD switch (ON/OFF)
● HUD BRT knob changes HUD brightness
3.4.3 FIRE PROTECTION
In case of engine fire an annunciator will show up on the EICAS and the fire extinguisher levers will
light up.
17

● Pull down (click on) the fire extinguisher handle should an engine catch fire.
18

3.4.5 AUXILIARY POWER UNIT (APU)
The APU is a gas turbine engine located in the airplane tail cone. It provides electrical and pneumatic
power while the engines are not operating. It consumes around 310 pounds of fuel per hour and
draws from the LEFT fuel tank. The APU can be started in flight up to 30,000 feet.
The APU master knob has the following functions:
● STOP: turns the APU off.
● ON: keeps the APU running.
● START: starts the APU operation.
NOTE: You can observe the APU activation on synoptic electrical page or EICAS APU indicator.
For a detailed description of APU go HERE
(http://www.smartcockpit.com/aircraft-ressources/Embraer_190-APU.html)
3.4.4 FUEL
Crossfeed (XFEED) selector knob:
If one fuel tank gets low, turn the xfeed valve to that side, to draw fuel from the opposite wing.
●DC PUMP (Primer) fuel pump selector knob
●AC PUMP turns the AC fuel pumps on
19

3.4.6 EXTERNAL LIGHTS
3.4.7 HYDRAULICS
A pump provides static pressure for the hydraulic systems. When
running, engines provide the pressure necessary to drive the
hydraulic systems.
The real aircraft operates three independent hydraulic systems and
any hydraulic pump can provide sufficient pressure for all aircraft
systems that require it.
3.4.8 ICE AND RAIN PROTECTION
Windshield heating button:
● Push IN: Both 1 and 2 buttons activate the windshield heating
system for the whole windshield. They do not work separately.
● Push OUT: deactivates the windshield heating system.
Wing ice protection button
● Push IN: allows automatic operation of the associated wing
anti-ice system
● Push OUT: deactivates the associated wing anti-ice system.
20
This manual suits for next models
2
Table of contents
Popular Aircraft manuals by other brands

Piper Aircraft Corporation
Piper Aircraft Corporation Cherokee PA-28R-200 operating instructions

Daher
Daher TBM 900 Pilot's information manual

SUP’AIR
SUP’AIR SAVAGE user manual

Textron
Textron Cessna Citation Excel 5355 Operation manual

Magni Gyro
Magni Gyro M-24C Orion Flight manual

Piper
Piper PA-28-181 Archer II manual