X-GLOO 4x4 User manual

WINDECKSTR. 4 | 83250 MARQUARTSTEIN - GERMANY
EN
USERS MANUAL

Skywalk GmbH & Co. KG - Windeckstraße 4 - 83250 MARQUARTSTEIN | GERMANY
2
THANK YOU FOR YOUR TRUST
Skywalk GmbH & Co. KG congratulates
you on the purchase of your X-Gloo,
the modular lightweight tent system
without compressors and poles.
In order to guarantee the perfect
operation, optimal function, long
product life and your personal safety
and the safety of your guests, please
note the following:
Before you use your X-Gloo for the first
time, read these operating instructions
carefully and follow the safety
indications.
All functions, maintenance and repairs
should only be carried out to the
degree described in these operating
instructions.
Please contact your X-GLOO Team for
repairs exceeding these instructions!
If you loan your X-Gloo Event Tent to
another person, please pass on these
instructions and make sure that the
person is fully advised regarding the
technical aspects of the X-Gloo Event
Tent, in order to avoid faulty operation.
If you have any further questions,
we are always happy to assist you:
Service Hotline
+49 (0)8641-6948-60

TABLE OF CONTENTS
TECHNICAL DATA 4
STANDARD DELIVERY 5
SPECIAL INSTRUCTIONS 6
SETUP 8
1. Lay out the Matrix ..........................8
2. Test the Valves.................................8
3. Inflate............................................8-9
Inflation with the Hand Pump..........8
Inflation with the Electric Pump
Bravo OV10/Bravo 2000 ....................8
Inflation with the Bravo
Turbo Max 12 V for car battery.........8
Setup using the Protection Foil ........9
STABILISATION 10
Stabilisation with Water Ballasts .. 10
Stabilisation with Sand Ballasts.... 11
Stabilisation with
Water Ballast Barrels........................ 12
Stabilisation with the
Anchoring Set .................................... 13
ELEMENTS 14
Side Walls ........................................... 14
Tunnel Part ......................................... 16
Canopy and Canopy Banner............. 16
LED Lighting Kit................................ 17
BLOCK-BUILDING SYSTEM /
X-GLOO MATRIX 18
TAKEDOWN 20
CLEANING 20
REPAIR 21
Bladder Repair................................... 21
Replacement of the
Protection Strip................................. 21
Bladder Replacement ....................... 22
X-RELAX 25

Skywalk GmbH & Co. KG - Windeckstraße 4 - 83250 MARQUARTSTEIN | GERMANY
4 m
ca. 3,0 m
ca. 13,3 kg
ca. 22,5 kg
ca. 16,27 m2
ca. 11,3 m2
ca. 35,7 m2
ca. 51,34 m2
ca. 7,23 m2
ca. 23 m2
ca. 31 cm
ca. 3,57 m
6 m
5 m
ca. 2,0 m
ca. 2,38 m
ca. 2,5 m
ca. 3 m
ca. 25 cm
ca. 37 cm
ca. 18,8 kg
ca. 3,94 m
ca. 30,3 m2
ca. 4,8 m
ca. 7,85 m
ca. 43 cm
ca. 42 kg
Exterior side length.......ca. 4 m
Entrance height..........ca. 2,0 m
Total height ............... ca. 2,3 m
Covered area
without Side Walls........... 7,23 m2
with 4 Canopies............ca. 23 m2
Tube diameter............ca. 25 cm
Weight without Wallsca. 13,3 kg
Setup ........
Hand Pump .....................15 min
Electric Pump.................3-5 min
Operating pressure*0,2 bar/3 PSI
Exterior side length.......ca. 6 m
Entrance height..........ca. 3,0 m
Total height ............. ca. 3,57 m
Covered area
without Side Walls......... 16,27 m2
with 4 Canopies....... ca. 51,34 m2
Tube diameter............ca. 37 cm
Weight without Walls. ca. 22,5 kg
Setup ........
Hand Pump .....................30 min
Electric Pump............. 10-15 min
Operating
pressure ........ *0,18 bar/2,6 PSI
Exterior side length.. ca. 7,85 m
Entrance height........ ca. 3,94 m
Total height ............... ca. 4,8 m
Covered area ........... ca. 30,3 m2
Tube diameter............ca. 43 cm
Weight without Walls.. ca. 42 kg
Setup with Electric Pump.. 25 min
Operating
pressure*............ 0,35 bar/5 PSI
Exterior side length.......ca. 5 m
Entrance height..........ca. 2,5 m
Total height ..................ca. 3 m
Covered area
without Side Walls...... ca. 11,3 m2
with 4 Canopies......... ca. 35,7 m2
Tube diameter............ca. 31 cm
Weight without Walls ca. 18,8 kg
Setup ........
Hand Pump .....................23 min
Electric Pump............... 7-10 min
Operating pressure*0,2 bar/3 PSI
*This data serves primarily as information, since the operation of the Overpressure Valves is automatic.
4
TECHNICAL DATA
4 m
ca. 3,0 m
ca. 13,3 kg
ca. 22,5 kg
ca. 16,27 m2
ca. 11,3 m2
ca. 35,7 m2
ca. 51,34 m2
ca. 7,23 m2
ca. 23 m2
ca. 31 cm
ca. 3,57 m
6 m
5 m
ca. 2,0 m
ca. 2,38 m
ca. 2,5 m
ca. 3 m
ca. 25 cm
ca. 37 cm
ca. 18,8 kg
ca. 3,94 m
ca. 30,3 m2
ca. 4,8 m
ca. 7,85 m
ca. 43 cm
ca. 42 kg
4 m
ca. 3,0 m
ca. 13,3 kg
ca. 22,5 kg
ca. 16,27 m2
ca. 11,3 m2
ca. 35,7 m2
ca. 51,34 m2
ca. 7,23 m2
ca. 23 m2
ca. 31 cm
ca. 3,57 m
6 m
5 m
ca. 2,0 m
ca. 2,38 m ca. 2,5 m
ca. 3 m
ca. 25 cm
ca. 37 cm
ca. 18,8 kg
ca. 3,94 m
ca. 30,3 m2
ca. 4,8 m
ca. 7,85 m
ca. 43 cm
ca. 42 kg
4 m
ca. 3,0 m
ca. 13,3 kg
ca. 22,5 kg
ca. 16,27 m2
ca. 11,3 m2
ca. 35,7 m2
ca. 51,34 m2
ca. 7,23 m2
ca. 23 m2
ca. 31 cm
ca. 3,57 m
6 m
5 m
ca. 2,0 m
ca. 2,38 m ca. 2,5 m
ca. 3 m
ca. 25 cm
ca. 37 cm
ca. 18,8 kg
ca. 3,94 m
ca. 30,3 m2
ca. 4,8 m
ca. 7,85 m
ca. 43 cm
ca. 42 kg
4x4
6x6
5x5
8x8

X-GLOO MATRIX WITH ACCESSORIES
4x4, 5x5 AND 6x6 MODELS
1x - X-Gloo Multifunction Transport Bag (1)
1x - Hand Pump (2)
1x - Side Wall Bag (3)
1x - Anchoring Line Set (4)
1x - Manual and Quick User Guide (5)
1x - Closing Rod for X-Gloo 5x5/6x6 (6)
1x - X-Gloo Repair Kit (contents below)
X-GLOO MATRIX WITH ACCESSORIES
8x8 MODEL
1x - Quick Pack Sack (7)
1x - Hand Pump (2)
3x - Side Wall Bag (3)
1x - Anchoring Webbing Set (8)
1x - Manual and
Quick User Guide (5)
1x - Closing Rod (6)
1x - Setup Support Bar (9)
1x - X-GLOO Repair Kit
(contents below)
STANDARD DELIVERY
X-GLOO REPAIR KIT
1x - Replacement Bladder (10)
1x - Replacement Protection Strip (11)
1x - Replacement Overpressure Valve (12)
1x - Adhesive Repair Patches (13)
1x - Fixing Element Tool (14)
1x - Allen Wrench (15)
1
2
3
4
5
6
7
8
9
11
15
14
10
12
13

Skywalk GmbH & Co. KG - Windeckstraße 4 - 83250 MARQUARTSTEIN | GERMANY
GRAPHICS/DESIGN
• A transparent effect can occur (especially with background
light) with different tent color combinations (e.g. light Roof
color and dark Tubes). This should be taken into consideration
by customers when designing the X-Gloo. If in doubt, please
consult your X-GLOO professional.
• With sewn application on different cloths, there is an area of
overlap of ca. 5-10 mm where the cloth is sewn together. This
results in a color change in the area of the overlap.
SET-UP
• Do not exceed the specified maximum air pressure.
• The X-Gloo is not intended for long-term outdoor use and should
be inspected for wear or damage after every event.
• If small folds form inside the Tubes when inflating, it is helpful
with the larger tents to gently shake the Tube during the
inflation process. This will help keep the inner Bladder in the
correct position assuring proper inflation.
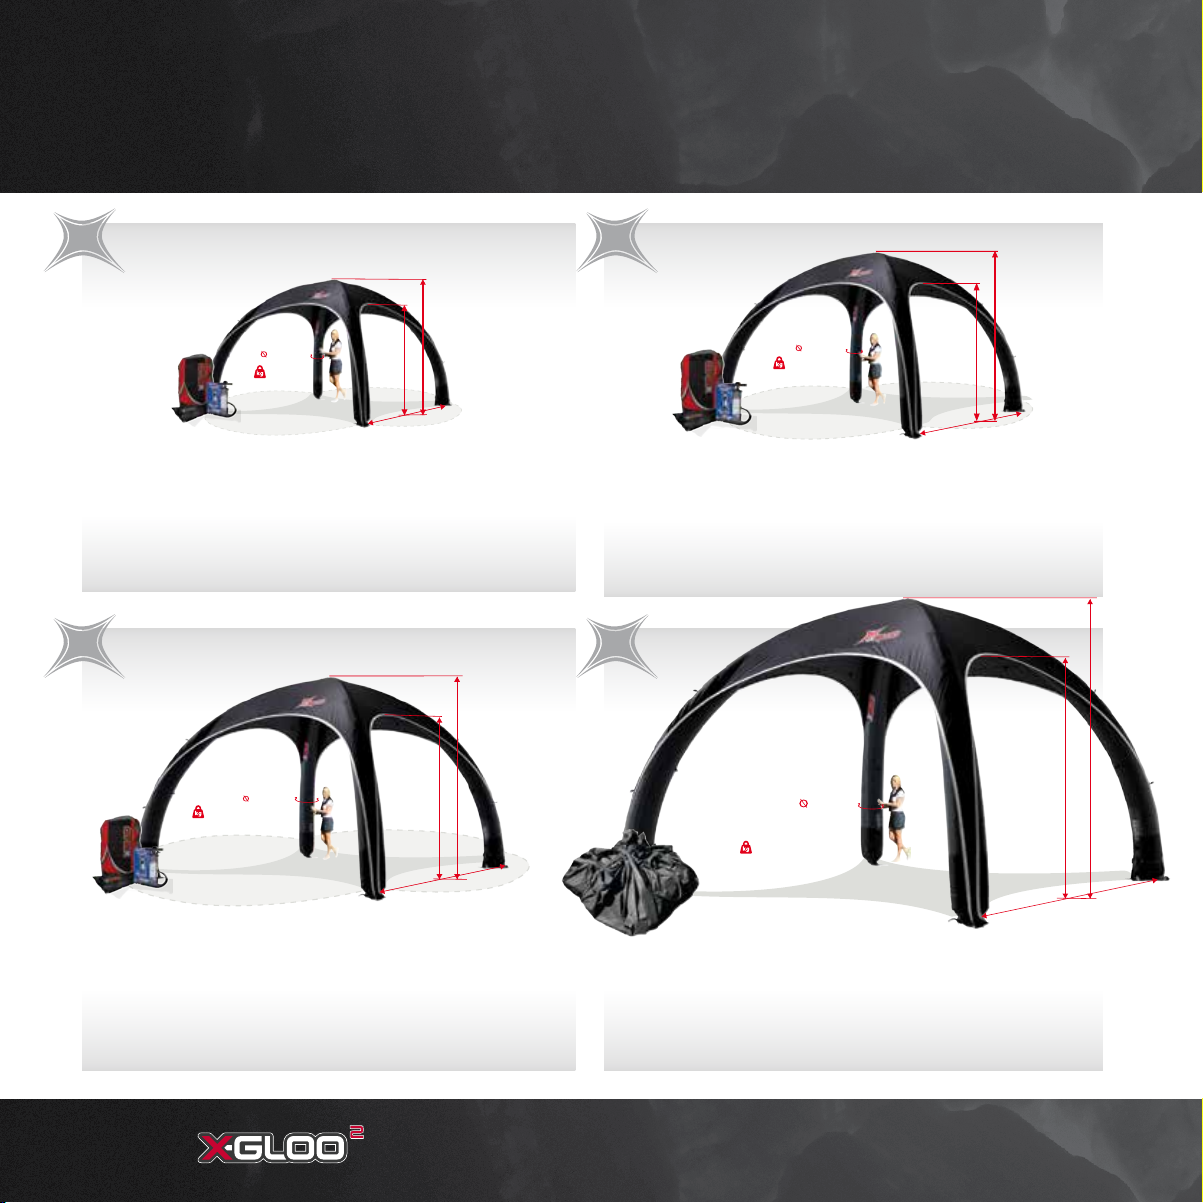
• The X-Gloo should be deflated in winds exceeding 60 km/h (The
first sign of overload is when the Roof begins to compress).
When high wind force is expected (gusts of more than 50-60
km/h for the 4x4, 5x5, or 6x6; and more than 40 km/h for the
8x8) the tent must be secured and anchored.
PLEASE NOTE: If Side Walls are completely zipped in to a 6x6
tent, a force of almost 500 kg is the result. For this reason,
please pay special attention to the following points:
- According to the ground surface, you may require longer or
additional stabilisation materials.
- Additionally, you must attach Anchoring Lines to all Shoulder
Loops (found on the outside of each Tube)!
- Our smaller Water Ballasts (ideal for use on hard ground
surfaces) may not be sufficient for securing your tent against
strong wind gusts. Refer to our Wind Resistance Certificate to
determine whether Water Ballast Barrels are required.
- Winds stronger than 60 km/h can lead to structural damage of
the tent and this damage is no longer covered by the warranty.
- If weather conditions deteriorate dramatically, all Overpressure
Valves should be opened immediately and the tent deflated.
Additionally, the deflated tent should be weighted down.
- In general, the Protective Strips on the bottom of the Tubes
are exposed to more wear and tear on rough surfaces due to
the movement of the tent from wind.
OPERATION
Keep open fires and heat sources away from the X-Gloo.
FIRE PROTECTION CLASSIFICATION:
• Description of Norms:
- DIN 4102-B1 (Abb.: B1) Controls testing and requirements on
the reaction to fire of building materials. German norm, used
in most European countries.
- CPAI 84-95, Section 6 Specification of the American
Association of Sailcloth Materials for the assessment of flame-
retardant materials used in (event-) tents. Due to the fact
that the the X-Gloo is in use worldwide at tradeshows as an
innovative event tent, we reserve the right not to certify the
tent according to the national norms of each country. The
certification according to CPAI 84 fulfills the international
requirements for flame resistance in tent products and
includes similar test criteria like DIN 4102-B1 or NFP 92501-
7M2.
• When the tent is used in sandy terrain, avoid getting sand grains
in the Tubes or in the Pump
• Keep the Valves free of sand and dirt particles and clean them if
necessary, since this can cause faulty operation and pressure loss.
• The tent can be damaged by the penetration of sharp objects
(e.g. knives, tools) in the Tubes causing leakage and loss of
pressure. Handle the X-Gloo with appropriate care.
• Avoid extreme variations in temperature (day and night) or
long-term use. This can lead to loss of air pressure, requiring
reinflation of the tent.
6
SPECIAL INSTRUCTIONS
!

Procedure in the case of pressure loss:
• FIRST close all Valves TIGHTLY!
• If pressure loss continues, blow out the Overpressure Valves to
remove all dust or dirt particles.
• If pressure loss still continues, the quickest solution is to remove
the Bladder and replace it, as a damaged Bladder is likely the cause.
- If the damage is visible on the Bladder and the damaged
area is smaller than 1 cm -> Apply the Adhesive Repair Patch
included in the Repair Kit.
- If the damaged area cannot be found, spray some soap suds
onto the inflated Bladder surface so that the escaping air
bubbles are visible and the damage can be located. Then
apply the Adhesive Repair Patch to repair the Bladder.
STORAGE
• Avoid pressure spots (e.g. do not lean on the tent with your
knees while folding the tent up).
• Store the X-Gloo in a dry location and at temperatures not
exceeding 40° celsius.
• Do not pack or store the X-Gloo when damp or wet, since this
can cause the formation of mold spots and discoloration.
• At temperatures lower than 0° celsius, folding can lead to
damage of the components. Take special care with the Window
Walls in low temperatures and pack them carefully.
• Never store the X-Gloo in an automobile in direct sunlight.
The intense heat can cause the Window Walls to stick together
irreversibly, or may cause permanent damage to the cloth.
Important information for digitally-printed parts!
Digital printed elements must be stored in dry condition!
CAUTION: If the elements are stored while still damp, the
ink from the printed material can bleed and the printing can
become permanently damaged! We are unable to accept liability.
MAINTENANCE, CLEANING, REPAIR
All kinds of repairs can be done in our workshop in Marquartstein
or in the Service Center in Las Vegas, Nevada. We can also take
care of special requests (additional straps, velcro strips, etc.) at
our facility.
• Maintenance and repair should be carried out only by X-GLOO or
by an authorized Service Center.
• The X-Gloo should be periodically inspected for chafe marks and
damage and promptly repaired.
• In order to avoid damage of the material coating, first attempt
to remove dirt and stains using a soft, dry brush or microfiber
cloth. Only if necessary use a small amount of mild alkaline
solution mixed with water. Avoid the use of solvents, washing
machines or steam cleaning.
• Re-waterproofing is not possible.
MATERIALS
• Bleaching of the material is possible with extended UV
exposure (e.g. at high altitude or extended setup time). White
wall material tends to yellow from UV exposure, and is easily
stained when contacted with dust and dirt. All of the materials
currently implemented in the X-Gloo have been subjected to
extensive material testing. It is practically impossible to state
when exactly a color change could become visible, since the
influencing factors vary strongly. However: All cloths change
in color with extensive UV exposure! According to expert
knowledge, with proper care the X-Gloo will show only minimal
color change after many years of use. The range of use will not
be limited.
• The materials used (and therefore, the entire tent) are
waterproof.
7
!

Skywalk GmbH & Co. KG - Windeckstraße 4 - 83250 MARQUARTSTEIN | GERMANY
1. LAY OUT THE MATRIX
Spread the X-Gloo Matrix out in the area intended for setup. Try to
make sure that the tube endings of the X-Gloo are positioned
approximately where you want them once the tent is inflated. This
way you can avoid having to reposition or handle the tent again.
8x8 ONLY: Zip in the Middle Wall
Since the entrance height of an assembled X-Gloo 8x8 is very high,
we recommend zipping in the Middle Wall before inflating the tent.
PLEASE NOTE: Only the outer side of the Middle Walls are
equipped with a Zipper Rain Protector. If you should choose to
attach the Middle Wall with the outer side facing inwards (so
that a logo printed on the outside is be visible from the inside of
the tent for example), the waterproof quality of the tent in the
area of the zipper can not be guaranteed.
2. TEST THE VALVES
INFLATION VALVE: The Inflation Valves are air-tight and perma-
nently welded to the Bladder inside each Tube. Each Inflation Valve
consists of a rubber check valve and a threaded valve cover (1).
The check valve inside the housing prevents air from escaping. In
order to prevent dirt from entering, the valve cover is screwed onto
the housing after inflation is complete.
OVERPRESSURE/DEFLATION
VALVE: Beside the Inflation
Valve you will find a red Over-
pressure Valve (2) which opens
automatically as soon as the
Bladder is properly pressurized.
To deflate the Tubes, unscrew
the housing of each Overpressure
Valve by turning it counter-
clockwise (3).
The function of each Overpressure Valve should be tested before
inflation. To do this, unscrew the housing and make sure that the
spring can be pushed in. Tightly close each valve after testing.
PLEASE NOTE: Sand and dirt can clog the spring inside the
Overpressure Valve so that the function is negatively influenced.
8
SETUP
!
!
Inflation with the Hand Pump
The standard Hand Pump included in
delivery is equipped with different valve
sockets and an air hose. Do not kink or
press down on the air hose, to avoid air
leakage or damage!
PLEASE NOTE:See the notation on the
hose connection:
Inflate | Deflate
Inflation with the Electric Pump Bravo
0V10* and Bravo 2000*
Screw the hose (included in delivery) to the
correct opening on the pump.
PLEASE NOTE:See the notation on the
hose connection:
IN = Inflate | OUT = Deflate
Stick the plug into the outlet. Please note
that the Bravo 2000 has a booster, which can
be turned on with the switch. Please read and
folllow the operating instructions included
with the Bravo OV10 and Bravo 2000.
*120V and 230V models available.
Inflation with the Bravo Turbo Max
for 12V automobile battery
The Bravo Turbo Max can be connected to a
12V automobile battery. To avoid draining
your battery, make sure that it is fully
charged or that the vehicle is running while
operating the pump. Please read and follow
the operating instructions included with
the Bravo Turbo Max.
Connect the cable clamps to the respective
connections of the battery (red = +, black = -)
and adjust the pressure control to 3 PSI.
!
!
1 2
3
!

Step 4: Inflate two Tubes opposite one another. Step 5: Inflate the third Tube so the tent will begin to rise. Step 6: Using the Setup Support Bar to raise an 8x8 X-Gloo.
SETUP USING THE PROTECTION FOIL
Follow these setup instructions if using our
optional Protection Foil to help prevent
soiling or damaging your X-Gloo during setup.
Step 1: Lay out the Protection Foil where
you want to set up the tent and roll
the Matrix out on top of it (1).
Step 2: Position two Tubes opposite one
another in a half-circle and then
inflate with air (2). Inflate the
remaining two Tubes as described
in the regular setup process.
Step 3: Position the Tube ends at the edges
of the Foil so that grommets on the
inside of the Tube ends rest exactly
over the grommets of the
Protection Foil (3).
Step 4: Remove the Protection Foil and
anchor the tent using one or more
of the methods described on pages
10-13.
3. INFLATE
Step 1: Make sure that the pump hose is equipped with the correct
adapter for the Valve.
Step 2: Connect the hose to the pump and then connect the hose end
with the adapter to the Inflation Valve on the X-Gloo Tube.
Step 3: Now start the pump by turning the switch to ON.
Step 4: First inflate two Tubes opposite one another to form a
180° semicircle.
Step 5: Next inflate the Tube between those inflated in Step 4.
The tent will begin to rise off of the ground.
Step 6: Now you can inflate the final Tube. With the 8x8 it is
recommended to work with two people. One person lifts
the Tube intersection at the middle of the Roof and sets
the fork of the Setup Support Bar directly under one of
the Tubes in the area of the Tube intersection. The second
person operates the pump, moving it as necessary with the
Tubes as they are inflated.
Step 7: Close the Inflation Valves after inflating the Tubes.
Step 8: If the Tubes have been inflated correctly, the X-Gloo will
stand in a stable and wrinkle-free position. All four Tubes
can now moved by hand to the final position.
321
For more information, watch our how-to video at:
www.x-gloo.com/en/experience/videos/

Skywalk GmbH & Co. KG - Windeckstraße 4 - 83250 MARQUARTSTEIN | GERMANY
10
STABILISATION
STABILISATION WITH WATER BALLASTS
One Water Ballast Set consists of 8 parts in two different sizes —
4 small ballasts for the inside of the Tubes and 4 large ballasts
for the outside of the Tubes. A Water Bladder is located inside
the outer cover, to be filled with water. A Fill Set with different
adapters is included in delivery for this purpose.
Step 1: Attach the hose with correct adapter to the faucet (1).
Step 2: Open the ballast cover and pull the inner Water Bladder out
until the Fill Valve is visible (2).
Step 3: Open the Fill Valve, insert the other end of the hose and fill
with water.
Step 4: Remove the hose, and then close the Fill Valve and the
cover.
Step 5: Now connect the Water Ballasts to the clips on the Tube
endings (3). The smaller Water Ballasts are attached
on the inside of the Tube endings, and the larger Water
Ballasts are attached to the outside of the Tube endings.
The underside of each Water Ballast is recognisable by the
rubber coating. Depending upon the wind conditions, the
lighter, inner ballasts may be adequate for securing the
tent.
Step 6: Tighten the straps on the clips so that the Water Ballasts
prevent the tent from rising. Thus, optimal stability is
achieved.
1
3
2

STABILISATION WITH SAND BALLASTS
One Sand Ballast Set consists of two different sizes — 4 small for
the inside of the Tubes and 4 large for the outside of the Tubes.
PLEASE NOTE: If you have ordered Water Ballasts, you can also
fill them with sand or gravel by removing the Water Bladder
(inner tube) from the Cover (4).
Step 1: Fill the Sand Ballasts with sand or gravel (not water since
the Sand Ballasts are not water-tight) (5).
Step 2: Now connect the Sand Ballasts to the clips on the Tube
endings. The smaller Sand Ballasts are attached on the
inside of the Tube endings and the larger Sand Ballast
Sacks are attached on the outside of the Tube endings.
The underside is recognisable by the rubber coating.
Depending upon the wind conditions, the lighter, inner
sacks may be adequate for securing the tent (6).
Step 3: Tighten the straps on the clips so that the Sand Ballasts
prevent the tent from rising. Thus, optimal stability is
achieved.
!
4
6
5

Skywalk GmbH & Co. KG - Windeckstraße 4 - 83250 MARQUARTSTEIN | GERMANY
12
STABILISATION
STABILIZATION WITH WATER BALLAST BARRELS
The Water Ballast Barrels can be used as anchors for your X-Gloo,
as seating, or as both.
Step 1: Open the two valve covers on the Ballast Barrel. Make sure
that the check valve at the bottom of the barrel is closed
so that no water or air can escape when filling (1). Push
open the check valve at the top of the barrel so that air
can escape.
Step 2: Connect the included hose to the valve at the base of the
Barrel and fill with the desired amount of water (up to
80L).To give the barrel a cleaner appearance, the remaining
space in the Barrel can be then filled with air using one
of our Electric Pumps. The hose provided with the Ballast
Barrels is connected to the Pump in place of the Pump‘s
yellow hose.
Step 3: Disconnect the hose from the Barrel and make sure that
both valves are tightly closed.
Step 4: With the help of an assistant, carry the Ballast Barrel to
your tent location by lifting it by the handles. Or, if you
are on your own, tip the barrel onto its edge and roll it.
Connecting to your X-Gloo
Ballast Barrels are connected to the X-Gloo by use of an included
shackel. When connecting one or two Ballast Barrels to each Tube,
use the shackle to attach the eyelet at the base of each Ballast
Barrel directly to the large gromet at the base of the Tube (2).
When using three Ballast Barrels on each Tube, the No-Rub Mat
should be used. Connect the center eyelet on the No-Rub Mat
to the Tube grommet. Then set the three barrels on the mat and
connect each barrel to one of the three eyelets on the mat.
Digitally-Printed Cover (3)
The Ballast Barrels can be uniquely branded through the use of the
Digitally-Printed Cover. Simply slip the Cover over the barrel and
close the zipper.
To Empty
To empty the Ballast Barrel, simply unscrew the
lower valve cover and push open the check valve.
For more information, watch our how-to video at:
www.x-gloo.com/en/experience/videos/
1 2 3

ANCHORING WITH TENT PEGS
The Anchoring Set consists of: Anchoring Lines (Anchoring Webbing
for the 8x8 X-Gloo), Line Tensioner, Tent Peg Puller (8x8 X-Gloo
only), and assorted tent pegs packed in a Peg Bag.
Using the Anchoring Lines/Webbing and Line Tensioners, firmly
secure the tent by connecting the Shoulder Loops to tent pegs
positioned approximately 2 meters from the base of the Tubes (4).
With the Tent Peg Puller you can easily extract tent pegs that are
stuck in hard or frozen ground.
Roof
Anchoring
Line/Webbing
Zipper Rain Cover
Wall
Shoulder Loops
KEY TO TENT PEG PLACEMENT
: Anchoring Lines/Webbing
: inner Tube
: outer Tube
: Walls
ANCHORING SET 1: FOR 4X4 X-GLOO2TENTS
TENT PEG QUANTITY USE
300 mm Long 24 pcs. inner Tubes + Anchoring Lines + Walls
500 mm Long 4 pcs. outer Tube
ANCHORING SET 2: FOR 5X5 AND 6X6 X-GLOO2TENTS
TENT PEG QUANTITY USE
300 mm Long 20 pcs. Walls + inner Tube or
Anchoring Lines
500 mm Long 8 pcs. outer Tube + inner Tube or
Anchoring Lines
ANCHORING SET 3: FOR 8X8 X-GLOO2TENTS
TENT PEG QUANTITY USE
300 mm Long 16 pcs. Walls
500 mm Long;
14 mm Diameter
4 pcs. Anchoring Webbing or Walls
500 mm Long;
19 mm Diameter
8 pcs. inner Tube + Anchoring Webbing
800 mm Long 4 pcs. outer Tube
ANCHORING SET: FOR X-ACT TENTS
until supplies run out
TENT PEG QUANTITY USE
230 mm Steel Peg 20 pcs. Walls
300 mm
Triangular Peg
10 pcs. inner Tube + Anchoring Lines
400 mm Sprial Peg 4 pcs. outer Tube
4

Skywalk GmbH & Co. KG - Windeckstraße 4 - 83250 MARQUARTSTEIN | GERMANY
ELEMENTS
14
SIDE WALLS
The Side Walls are available in four variations: as
Window, Entrance, Standard Walls (completely closed), and Half
Walls (counter height). The zippers attach on the right and left of
the Matrix and meet together at the top.
NOTE: Side Walls can be installed with the side of your choice
facing outward. In this way, it is possible to have the printed side
of the wall facing the outside or inside of the tent (1).
Attaching the Side Walls
On the tube endings of the X-Gloo you will find access to zippers
to attach the side walls. Connect the Side Wall to the X-Gloo Matrix
and close both zippers to the top of the wall (2).
Closing the Side Walls with the Closing Rod
For easier opening and closing of the Side Walls, a Closing Rod is
included in the delivery of the 5x5, 6x6 and 8x8 X-Gloo. The hook
at the end of the Closing Rod is connected to the Slider Puller and
the Side Walls can be opened or closed (3).
1
3
2
4
Standard Wall
Window Wall
Entrance Wall
Half Wall

Opening and securing the Entrance Wall
The Entrance Wall is zipped on as described above in Attaching the
Side Walls. To hold the Entrance Wall Open, open the zipper in the
middle of the Wall and gather each side together. On each side of
the Entrance Wall you will find a toggle button on a length of cord.
Fasten each side by inserting the toggle button through the loop of
cord across from it (4).
Folding over the Side Walls to make Half Walls (5)
In order to secure the Side Wall in a horizontal half-open / folded
position and prevent it from completely opening, the zipper puller
on each side of the wall should be fixed to the small velcro strips
on the inside of the tent roof (6 & 7).
Preventing strain/damage to the Side Wall zippers
If the Side Walls are exposed to high pressure (if the tent is set up
in an area with high winds for example), the zipper will bear the
strain. This is especially true for where the zippers are attached to
the tube ends. To relieve strain to the zippers and to avoid damage
to the X-Gloo or the Side Walls, you will find straps and buckles lo-
cated at the base of each Side Wall. Connect these to the webbing
loops provided on the tube ends (8). Tighten each strap until the
tension on the zipper is relieved (9).
15
5
6
8
7
9

Skywalk GmbH & Co. KG - Windeckstraße 4 - 83250 MARQUARTSTEIN | GERMANY
16
ELEMENTS
TUNNEL PART
The Tunnel Part makes it possible to connect one or more
X-Gloos. It can be used to connect one size tent to a different size
tent, or to connect multiple tents of the same size. The Tunnel Part
is zipped on between the X-Gloos instead of using a Side Wall (1).
CANOPY AND CANOPY BANNER
The covered area of the X-Gloo can be expanded with the help of
the Canopy (2). To attach, first connect the Canopy to the Matrix
using the zippers. Next, inflate the Front Tube and Strut Tube.
Thanks to the One-Pump System, both Tubes can be inflated
simultaneously.
PLEASE NOTE: The Overpressure Valve opens automatically as
soon as maximal pressure is achieved.
Lastly, zip the optional Canopy Banner (if using) into the zipper at
the upper part of the Front Tube (5x5 and 6x6 models only).
Using the One-Pump System to seperate the Front Tube
and Strut Tube
The Front- and Strut Tube of the Canopy are connected with a small
tube/One-Pump System. This allows both Tubes to be inflated
simultaneously.
In the event of pressure loss, it is possible to isolate the cause of
the leak by using the tube clamp to pinch the small connecting
tube on the One-Pump System closed (3). With the Tubes sepeara-
ted from each other in this manner, it is possible to observe which
is leaking air.
When it is not needed for this purpose, the tube clamp should
remain open and tucked away in the included neoprene sleeve.
!
1
2
3

LED LIGHTING KIT
Hanging the LED Lighting Kit in your X-Gloo
Step 1: It is easiest to install the LED Lighting Kit during the setup
of your X-Gloo, just after inflating three of the four tubes.
Take the long end of webbing connected to the LED light
and loop it above the Tube intersection (4). Connect it to
the buckle on the other side of the light. Tighten the strap
so the LED light is held snugly against the Tubes.
Step 2: Next, extend the four toggles on the LED lighting mount
and connect them to the loops on the inside of the X-Gloo
Tubes (5).
Step 3: Tuck the cable underneath the roof so that it follows one
Tube all the way to the ground (6). The fourth Tube can
now be inflated.
Step 4: The transformer and dimmer controller can be safely stored
on the ground.
Remove the LED Lighting Kit from your X-Gloo using the steps
above in reverse order. Ensure that the LED light does not hit the
ground when deflating your X-Gloo!
4 5 6
For more information, watch our how-to video at:
www.x-gloo.com/en/experience/videos/

Skywalk GmbH & Co. KG - Windeckstraße 4 - 83250 MARQUARTSTEIN | GERMANY
BLOCK-BUILDING SYSTEM / X-GLOO MATRIX
The X-Gloo Matrix can be easily disassembled into individual parts
(Roof and Tubes). Thanks to this feature, the individual parts can
be removed for repaired or replacement. Re-attaching the new or
repaired part is just as easy.
DISASSEMBLY
Step 1: Beneath the Roof at each Tube end, you will find two
velcro straps fixing the tent Roof to the Tube. Open both
straps and disconnect them from the plastic buckles (1).
Step 2: Remove the plastic toggle button from the loop which
is located at the end of the zipper connecting the Roof
to the Tube end (2), and then unzip the Roof from the
Tube (3). Repeat Steps 1 and 2 on the remaining three
Tubes. The Roof can now be removed (4).
Step 3: To seperate the Tubes from one another, use an 8mm
Allen key to unscrew the bolt in the aluminum Tube Con-
nector and then remove the bolt and cap (5). The Tubes
can then then be easily removed by sliding them out of
the channels in the Tube Connector (6).
18
1 2
3 4
5 6
For more information, watch our how-to video at:
www.x-gloo.com/en/experience/videos/

ASSEMBLY
To reassemble the X-Gloo Matrix, simply reverse the disassembly
process. Starting near the Tube Connector, attach each zipper on
the roof to one of the four tubes (7). Next, connect each toggle
button on the roof to the corresponding loop on the tube ends (8),
and then reconnect the velcro straps on the roof by first threading
them through the buckles on the tube ends (9).
19
7
For more information, watch our how-to video at:
www.x-gloo.com/en/experience/videos/
8 9

Skywalk GmbH & Co. KG - Windeckstraße 4 - 83250 MARQUARTSTEIN | GERMANY
20
TAKEDOWN / CLEANING
TAKEDOWN
Make sure that all of the Tent Pegs are removed and all Anchoring
Lines are released before deflating the Tubes on your X-Gloo.
Step 1: Remove all elements (e.g. Side Walls, Canopy, etc) which
are attached to the X-Gloo.
Step 2: Next, open the Overpressure Valve on each Tube (1). The
air will completely escape within minutes.
Step 3: Then turn the X-Gloo inside-out, so that the tube
intersection loop is facing outwards (2).
Step 4: Lay the Tubes on top of one another, with the Valves facing
upwards. The Roof should be drawn outwards in large folds (3).
Step 5: After the last of the air has escaped, roll up the X-Gloo
from the Roof to the Tube endings (4).
Step 6: Now the X-Gloo can be packed in the X-GLOO Multifunction
Transport Bag or Trolley. Side Walls can be stored separately
in the protective Side Wall Bag included in delivery.
!
CLEANING
Dirt and stains should be removed without the use of soap or
water whenever possible. We recommend using a soft, dry brush or
microfiber cloth. If the stain cannot be brushed away, then use a
small amount of conventional soap mixed with lots of water.
Important information for digitally-printed parts!
Digitally-printed elements should NEVER be cleaned with soap
and water. Wetting these elements to clean them could result
in the printing becoming permanently damaged. In these cases,
X-GLOO will not accept liability.
CAUTION: Never use solvents, detergent, steam cleaning or
gasoline! This destroys the cloth.
The X-Gloo should be inspected visually and for functionality at
least once a year by an expert. This inspection includes inflating
the X-Gloo Tubes in order to check all pressure-bearing parts for
tears, punctures, debonding, heat- or chemical damage.
All functions, maintenance, and eventual repairs should only
be carried out to the degree described in these operating
instructions. Please contact your X-GLOO Team for repairs
exceeding these instructions!
1 2
3 4
For more information, watch our how-to video at:
www.x-gloo.com/en/experience/videos/
!
!
This manual suits for next models
3
Table of contents
Other X-GLOO Tent manuals
Popular Tent manuals by other brands

carport
carport KDR Series Assembling manual

Bo-Camp
Bo-Camp STREETERVILLE instruction manual

skandika outdoor
skandika outdoor SHOWER Assembly instructions

Absco Industries
Absco Industries SKILLION CPSN2 Assembly & instruction manual

Adventure Kings
Adventure Kings AKTA-RTTALU 03 user manual

Coleman
Coleman FAST PITCH Instructions for use

Coleman
Coleman 2000004407 Setup instructions

mothercare
mothercare kids user guide

Boutique Camping
Boutique Camping ADVENTURE TUCANA TENT instruction manual

Hilleberg
Hilleberg Atlas Pitching & Use Instructions

ShelterLogic
ShelterLogic Greenhouse-in-a-Box Easy Flow manual

Lemeks
Lemeks CP6076 installation manual