X10 AIRPAD User manual

Owner’s Manual
Model Airpad 1
TMTM
X10.com, a Division of
X10 Wireless Technology, Inc.
400 Forge Way, Suite 409-412,
Rockaway, NJ 07866 CM002-9/11

2 3
Introduction......................................................................................4
Getting Started.................................................................................6
Setting the Date and Time................................................................7
How to use WiFi on the AirPad .......................................................9
Installing Apps...............................................................................10
Uninstalling Apps...........................................................................12
Auto-rotating the Screen................................................................14
Transferring files from your PC.....................................................15
How to listen to Music...................................................................17
How to watch Movies and Videos .................................................17
How to install third party (Non-Market) Apps ..............................18
How to connect the AirPad to a TV...............................................19
Managing your AirPad ..................................................................20
How to move Apps to a microSD Card.....................................20
Resetting to Factory Settings.....................................................21
ContentsRead First
FCC Caution
THIS DEVICE COMPLIES WITH PART 15 OF THE FCC RULES.
OPERATION IS SUBJECT TO THE FOLLOWING TWO CONDITIONS:
(1) THIS DEVICE MAY NOT CAUSE HARMFUL INTERFERENCE, AND
(2) THIS DEVICE MUST ACCEPT ANY INTERFERENCE RECEIVED,
INCLUDINGINTERFERENCETHATMAYCAUSEUNDESIREDOPERATION.
NOTE: This equipment has been tested and found to comply with the limits
for a Class B digital device, pursuant to part 15 of the FCC Rules. These limits
are designed to provide reasonable protection against harmful interference in a
residential installation.
This equipment generates, uses and can radiate radio frequency energy and, if
not installed and used in accordance with the instructions, may cause harmful
interference to radio communications. However, there is no guarantee that
interference will not occur in a particular installation. If this equipment does
cause harmful interference to radio or television reception, which can be
determined by turning the equipment off and on, the user is encouraged to try to
correct the interference by one or more of the following measures:
• Reorient or relocate the receiving antenna.
• Increase the separation between the equipment and receiver.
• Connect the equipment into an outlet on a circuit different from that to which
the receiver is connected.
• Consult the dealer or an experienced radio/TV technician for help.
NOTE: Modifications to this product will void the user’s authority to operate this
equipment.
Specifications
CPU: 1.2 GHz Rockchip 2918 Cortex A8 processor + 600 MHz
DSP.
Display: 7” 800x480 resolution TFT LCD screen.
Touch-screen: Capacitive multi-touch, 5 point touch.
OS: Android 2.3 (Gingerbread), with Flash 10.1.
Camera: 2 Megapixel camera with video recording and playback.
Sensors: 3-axis accelerometer.
RAM: 512 MB.
Memory: 4 GB onboard, up to 32 GB with microSD card.
Battery Life: 6 hours movie, 20 hours music, 6 hours WiFi
Internet access.
Network: WiFi (802.11b/g).
Ports: HDMI supporting 1080P output, USB.
Size: 195 mm x 120 mm x 13 mm, Weight 400g (14 oz).
Battery: 4000 mAh rechargeable lithium polymer.

4 5
Congratulations! You’re now the proud owner of the newest
technology in tablets. Powered by Android 2.3, the X10 AirPad
is equipped with a powerful 1.2 GHz Rockchip 2918 Cortex A8
processor, it has a brilliant color screen, 4 GB onboard memory
(plus an additional 32 GB with microSD card, not included), a
built-in camera/video recording device, and access to more than
250,000 Apps in the Android Marketplace. You’ll find your AirPad
to be extremely fast, with a very responsive touch screen.
Your AirPad has all of the features you could want. It’s like you’re
fitting a movie screen, MP3 player, e-book reader, Internet, video
game console and more into your pocket.
Now you don’t have to choose between a Kindle or a Nook, you
can download BOTH Apps FREE from the Android Marketplace.
Here’s some of the many other things your AirPad can do:
Games
There are many free games available on the Google Android
Market and Amazon Market. Just a few examples are Angry Birds,
Sudoku, Fruit Ninja, Dragon Fly. Just go to the Google Android
Market or Amazon Market, search for the name and download
it. You can also use a Google search - just add ANDROID
DOWNLOAD to the name of the App you are looking for.
Productivity
You can get useful Apps like Facebook, Twitter, Skype, DropBox
(file sharing), OpenTable (restaurant reservations), Google Maps,
Wikipedia, Photoshop Mobile – all run very nicely on your AirPad
and make life on the go easy and fun.
Entertainment
You can get Pandora Radio, free from the Google Android Market.
It lets you select different genres of music and stream them to
your AirPad. Just go to Android Market, search for and download
Pandora Internet Radio, then create and sign in to your account.
Shazam – just tap on the screen and Shazam listens to and
identifies any song it hears. It even tells you who sang it, what
album it’s on, and gives you the opportunity to buy it on-line.
Play videos and movies – Download YouTube from Android
Market, watch Flash content with your Browser.
Download the Netflix App and watch streaming videos on
your AirPad (requires a Netflix account). Note this cannot be
downloaded from Android Market. See: How to install Non-
Market Apps on page 18.
Install the RedBox App and rent movies (for $1.00) that you pick
up from any RedBox kiosk.
Transfer movies from your laptop or PC to your AirPad via a mini
USB cable (included with your AirPad).
Or purchase a microSD card that you can plug into your PC,
transfer movies to, then plug into your AirPad.
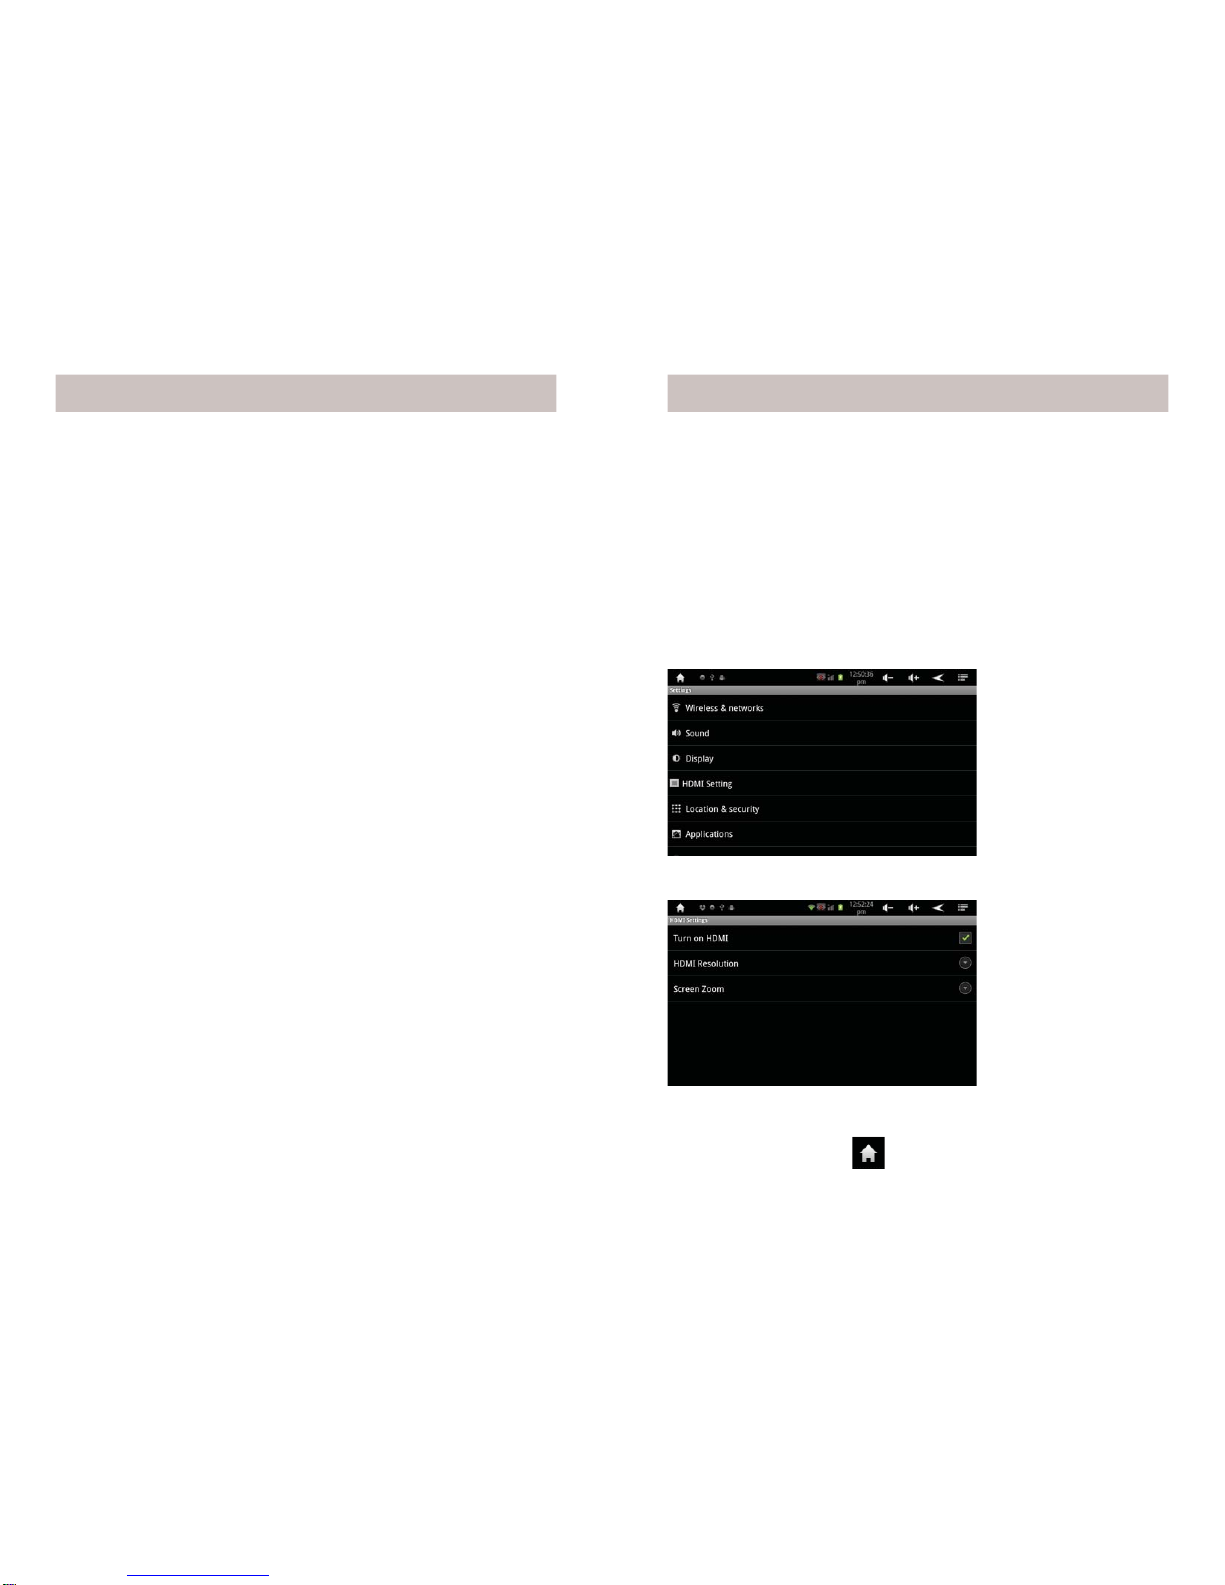
You can connect your AirPad to a TV, via an HDMI cable (not
included) so you can watch video on a big screen.
And of course e-mail. If you don’t already have an account just go
to mail.google.com and sign up for a free Gmail account, or get
other e-mail such as Yahoo or AOL via your browser.
Introduction Introduction, cont.
All trademarks are the property of their respective owners.

6 7
A few things you need to know to get started.
First charge the battery in yourAirPad, connect the included power
supply to the jack on the side of your AirPad (labeled DC 5V) and
plug the power supply into an AC outlet. It may take up to 4 hours
to fully charge the unit.
You can read various sections of this manual at any time to learn
how to accomplish specific tasks. You can also visit X10’s Wiki
on-line at: http://kbase.x10.com/wiki/airpad
Also see ourAirPad Forums at: http://forums.x10.com
The House symbol takes you to your Home screen at any
time. It shows up in a few places but it’s always visible in the top
left hand corner of the screen.
The back symbol at the top right hand corner of the screen
takes you back one screen each time you touch it. (You can also
press the hard key on the top of your AirPad (labeled on the back
of the AirPad as ESC).
Getting Started
You’ll likely want to set the date and time before you go much
further.
To Set the Date and Time
1. On your Home screen, touch on the Settings icon.
2. Scroll down and touch Date & time.
Setting the Date and Time
3. Touch Set time.

8 9
4. Set the correct time and touch Set.
5. Touch Select time zone. Scroll and select your time zone.
6. Touch Set date. Select the correct date and touch Set.
7. Similarly, set other options such as time and date format.
8. Touch the Home icon to exit back to your Home screen.
In order to connect to the Internet, so for example, you can visit
The Google Android Market to get lots of free stuff, you’ll need to
turn on WiFi.
How to Use WiFi on the AirPad
1. On your Home screen, touch on the Settings icon.
2. Touch Wireless & Networks.
Setting the Date and Time, cont. Using WiFi
3. Touch WiFi Turn on WiFi.
4. Touch WiFi Settings.
5. Available networks will be displayed.
6. Touch your network and enter your password.
7. Touch the Home icon to exit back to your Home screen.

10 11
You’ll want to set up an account and register with Google Android
Market so you can download FREE Apps, and purchase other ones
(note: this also give you a Google e-mail account).
Your AirPad makes an excellent e-book reader. You can download
and install FREE readers from the Google Android Market,
including the popular Kindle and Nook, as well as others such as
Reader and Kobo.
How to install a typical App from Google Android Market
We will use the Amazon KindleApp as an example. These basic
procedures work for other Apps too.
Installing Apps
1. In the main menu or on your Home screen, find and
touch the Market icon.
2. Touch the Apps button.
3. Touch the Find icon (a magnifying glass).
4. In the Search Market box, type: KINDLE. As you type, various
matches will be displayed. When you see KINDLE FOR
ANDROID displayed, touch it. A list of similar Apps will be
displayed.
Installing Apps
6. Touch Install (FREE). Then touch OK. You’ll see the App being
downloaded and installed. Then “Kindle successfully installed”
will be displayed.
7. Touch the Home icon to exit back to your Home screen.
8. Touch the Amazon Kindle icon to launch Kindle.
9. Enter your e-mail address and password to log-in or set up an
account (many Apps will not need this).
5. Touch Kindle Amazon Mobile.
Installing Apps, cont.

12 13
Uninstalling Apps
Uninstalling Apps
1. On your Home screen, touch the Menu icon
in the upper right corner.
2. Touch Manage apps.
3. Scroll to and then touch the application you want to uninstall.
Here, we demonstrate the uninstallation of Tap Tap Revenge 4.
Uninstalling Apps, cont.
4. Touch Uninstall.
5. Touch OK.
6. When you see Uninstall Finished, touch OK.
7. Touch the Home icon to exit back to your Home screen.

14 15
After you’ve installed a book reader (for example) you’ll want to
know how to make the screen rotate automatically when you rotate
your AirPad:
How to Set the AirPad to Auto-Rotate
1. On your Home screen, touch on the Settings icon.
2. Scroll to and touch Display (you might need to touch the back
icon to find it).
Auto-rotate Screen
3. Touch the check-box to the right of Auto-rotate screen, make
sure there is a green check-mark there.
4. Note other options here for Brightness, Animation, and Screen
timeout.
5. Touch the Home icon to exit back to your Home screen.
Transferring files from your PC
You will need the included USB Ato Mini-B cable to do this:
1. Connect the cable to your PC and to the AirPad.
2. Hold the AirPad in a horizontal orientation. You will see a
USB symbol in the bar at the top left of your AirPad’s screen.
3. Touch the USB symbol and drag it down to bring up the
notification menu.
4. Tap USB Connected.
5. In the window that appears, touch the Turn On USB storage
button.

16 17
5. Touch OK in the window that appears.
Your AirPad will now appear as two different Removable Storage
Devices in “My Computer” - one for the main device memory, and
one for the MicroSD card.
Transfer files like you would transfer from any drive to another.
Once you are done transferring files, be sure to follow these steps:
1. Click on the Safely Remove Hardware icon in your PC’s System
Tray, next to the clock. Click on Safely Remove USB Mass
Storage Device.
2. On your AirPad, touch Turn off USB storage.
3. Touch the Home icon to exit back to your Home screen.
Transferring files from your PC, cont. How to listen to Music
How to watch Movies or Videos
1. Download music files from the Internet, or transfer them to your
AirPad from your PC or laptop. (See Transferring files from
your PC on page 15).
2. In the main menu or on your Home screen, find and touch the
Music icon.
3. Find and touch the music file you want to play.
1. Download video files from the Internet, or transfer them to your
AirPad from your PC or laptop. (See Transferring files from
your PC on page 15).
2. In the main menu or on your Home screen, find and touch the
Video icon.
3. Find and touch the video file you want to play.

18 19
Installing non-market programs
There are some applications you may wish to use which are not
available on the Google Android Market. You can download
and install applications from anywhere. But be advised that
applications have access to the data on your AirPad so please
do not install any applications if you do not trust the source. For
example, X10 maintains a forum where users may upload free
applications that they have found. Go to: http://forums.x10.com
Look for the Non-Market Apps section in the X10 AirPad Android
Tablet section. There you will find user-uploaded applications and
instructions for installing them. You may wish to judge from the
comments there whether you feel the application is trustworthy.
X10 maintains this forum for user to user communication and does
no editing or reviewing of the content.
To install a non-market file (APK), download the APK file from
the Internet or transfer it from your PC, then follow these steps.
1. On your Home screen, touch the Settings icon.
2. Touch Applications, (you might need to touch the back icon to
find it).
3. Check “Unknown Sources”. This allows you install applications
directly to your AirPad without downloading them from the
Google Android Marketplace.
4. Connect your AirPad to your PC, see page 15.
5. Find the AirPad on your PC. You should be able to find it in
your file browser.
6. Transfer the APK over to the AirPad, the root directory is fine,
eject the AirPad and unplug it from your PC.
7. Install a program called APK installer from the Google Android
Marketplace, if it isn’t already installed on yourAirPad, and
launch it.
8. When the APK Installer launches press the install button, find,
and choose the APK you want to install.
9. Press install.
How to connect the AirPad to a TV
First, make sure your TV has an HDMI input, you will also need a
mini HDMI cable (not included). Connect the AirPad to your TV
with the cable, then follow the instructions in the manual packaged
with your TV to view the correct HDMI video input.
1. On the Home screen, touch on the Settings icon.
2. Touch HDMI setting (you might need to touch the back icon to
find it).
Connecting to a TV
3. Check the box next to Turn on HDMI.
4. Touch HDMI Resolution. Typically set this to 1920 x 1080p
60Hz.
5. Touch the Home icon to exit back to your Home screen.

20 21
How to move Apps to a microSD Card
After you’ve installed a lot of Apps on your AirPad, you might get
a message saying that there’s not enough memory left to install
another App. You can free up some memory by moving some Apps
from the main memory to the microSD card:
1. On your Home screen, touch the Menu icon
in the upper right corner.
2. Touch Manage Applications.
Managing your AirPad
3. Touch the application you want to move.
4. Touch Move to SD card, the button changes to Moving. After
it’s moved, or if the App is already on the SD card, you will see
an option to Move to Device.
5. Touch the Home icon to exit back to your Home screen.
Resetting to Factory Settings
If you play around and install a bunch of Apps to get familiar
with your AirPad you might want to know how to do a factory
reset, that way you can always put your AirPad back to its factory
condition. Follow these instructions to do this:
1. On your Home screen, touch on the Settings icon.
2. Touch Privacy.
3. Touch Factory data reset.
4. Touch Reset device.

22 23
5. If you really want to reset your AirPad, touch Erase everything.
6. Wait a few minutes while your AirPad restarts.
Resetting to Factory Settings, cont. Limited 90 Day Warranty
X10.com,adivisionofX10WirelessTechnology,Inc.(X10)warrants
X10 products to be free from defective material and workmanship
for a period of 90 days from the original date of purchase at retail.
X10 agrees to repair or replace with new or refurbished product, at
its sole discretion, a defective X10 product if returned to X10 within
thewarrantyperiodinlikenewcondition, with all original packaging
and accessories, a proof of purchase, and RMA. If service is required
under this warranty or to request an RMA:
Please call 1-800-442-5065, visit www.x10.com,
This manual suits for next models
1
Table of contents
Other X10 Tablet manuals