X4-TECH ClipStar XXL User manual

Instruction manual
Audio/video player with a 2.8” TFT color display

2
3
Table of contents
5Chapter 1 Intended use
6 Chapter 2 Safety information
10 Chapter 3 General information
10 Features
11 Battery information
12 MP3/WMA music format information
14 Copyright information
18 Chapter 4 The device
20 Chapter 5 Basic operation/Main menu
20 Turning ON/OFF
20 Main menu
21 Operation
22 Chapter 6 Music playback
22 Available functions during playback
23 Volume regulation
24 Fast forward/Fast reverse a music le
24 Pause
24 Displaying lyrics
25 Chapter 7 Video le playback
26 Volume regulation
26 Fast forward/Fast reverse a video le
26 Pause
27 File display in a video mode
28 Chapter 8 Radio
28 Volume regulation
28 Functions
30 Radio recordings
31 Chapter 9 Displaying pictures
32 Chapter 10 E-books
33 Chapter 11 Audio recordings
34 Chapter 12 Explorer
35 Chapter 13 Settings
36 Music
38 Radio
39 Record
39 Display
40 Auto Play Settings
41 System
41 Automatic Power O
42 Setting
43 Chapter 14 USB connection (Data transfer)
44 Chapter 15 SD card
45 Chapter 16 Creating video les
47 Chapter 17 Maintenance and cleaning
48 Chapter 18 Troubleshooting
50 Chapter 19 Product specications
50 Technical data
50 Delivery contents
51 Chapter 20 Service

4
5
Dear customer:
Thank you for deciding on purchasing the ClipStar XXL au-
dio and video player from X4-TECH. This instruction manual
will give you a general idea of how this device operates,
as well as provide you with information on cleaning and
safety procedures. Please read and follow all safety and
operating instructions found in this manual carefully in
order to maintain this products condition and ensure safe
operation. Should you have any questions about this de-
vice or should any suggestions arise, then please contact a
specialized dealer for further information.
We look forward to you recommending us to others and
hope you enjoy using this multiplayer!
Your X4-TECH team
This product is EMV-certied and fulls all European and
National guideline requirements. A declaration of CE con-
formity has been established for this product. Certication
has been documented and entrusted to the manufacturer.
All company and product names mentioned in this docu-
ment are registered trademarks of their respective owners.
All rights reserved.
This product is intended for music and video le playback.
This device features an internal memory of 16 GB that can
be expanded, where required, with a micro SD or micro
SDHC memory card.
Use the USB 2.0 connection to copy music and video les to
your MP3 player; during data transport between two com-
puters you will also be able to le other data in memory
as well.
The labels found on the device should never be removed
or damaged in any way. Misuse or operating the device in
any other way than described in this manual could lead or
cause damage to the device. Furthermore, there is the risk
of short circuiting, re, electric shock etc.
2
Intended use 1
Chapter 1 Intended use

6
7
The following safety and hazard warnings are not only for
the protection for your device, but also serve as a protec-
tion against potential health hazards. Please take time to
read the following instructions carefully.
We assume no liability for personal or property damage
resulting from the failure to comply with the safety instruc-
tions, improper operation and handling. Under such cir-
cumstances, all claims under warranty will become void.
Complying with the essential requirements of the Europe-
an health, safety and environmental protection legislation
(CE), any unauthorized modication and/or change on the
device is prohibited and will void the warranty and all war-
ranty claims.
This device is not a toy and is there not suitable for children.
Small children are unaware of the serious and immediate
dangers involved when exposing themselves to or hand-
ling electronic devices. Furthermore, this product contains
small parts that could be swallowed.
› Never leave packaging material lying around unsupervi-
sed. For children it could become a hazardous toy and lead
to serious injury.
Chapter 2 Safety informationChapter 2 Safety information
› The device should never come in contact with water or
moisture! Condensation can build up suddenly, when this
device is brought from a colder into a warmer area (e.g.
when transporting). Should this happen, allow the device
to warm up to room temperature rst before using.
› Care should be taken that liquids do not come in contact
with the interior, this is why containers containing liquids,
e.g. bucket, vase or plants should never be placed any-
where near this product This can not only damage the de-
vice, but also become a re hazard.
› Never place any sources of re on top of or near the device
(e.g. lighted candle).
› Operate this device in a moderate climate and never ex-
pose to extreme temperatures, such as high humidity.
› Do not bend or place any heavy objects on the cable.
› Your full concentration and attention is required while
driving in trac (as well as in many other surroundings).
Using or listening to your MP3 player with earphones/
headphones can divert one’s attention and be just as dis-
Safety information 2

8
9
Chapter 2 Safety informationChapter 2 Safety information
tracting, as using your cell phone while driving. In case of
an accident, insurance coverage might be denied and you
could be partially blamed for the accident respectively!
If your car radio has an audio input connection (Line le-
vel), then you can also connect and play this MP3 player
through your radio. Appropriate cables are available at
your local dealer. Please refer to your car radios user manu-
al for more information.
For safety reasons as mentioned above, only operate (tur-
ning the power on, starting playback, etc.) this device while
your car is parked!
Attention!
Only format this device in a FAT le system! Not in FAT32!
Player software takes up a small portion of the memory for
internal calculations and may be less than the player’s total
internal memory capacity.
You can directly store up to 170 les in the„ROOT“ folder. A
new folder has to be created for les exceeding the amount
of 170. In this new folder you have the opportunity to store
170 more les.
Precautions!
› Do not use this device in places that are extremely hot,
cold, dusty or humid.
› Avoid dropping the device or subjecting it to strong im-
pact. This could damage the surface of the device, batteries
or other hardware.
› Do not disconnect the player from your PC during format-
ting or data transfer. Neglecting to do so could result in
software damage or lead to errors.
› For maintenance or repairs contact your local dealer.

10
11
Chapter 3 General informationChapter 3 General information
General information 3
The player’s memory is empty when delivered. This means
there are no existing music les found on the player that
can be played back.
In case you do not have any MP3 les, you can use any
available audio CD with one of the various programs
available to create your own MP3 les. It’s also possible to
record radio or television programs with the appropriate
programs.
Never disconnect the MP3 player from a computer during
data transmission! Damage or a loss in data during trans-
mission could occur, requiring the process to be repeated
again.
Features
› 2.8”, 320 x 240 pixel display
› Plays music les in a MP3 & WMA format
› Plays AVI format video clips (software for converting to
video les is included in delivery)
› Supports JPEG, BMP and GIF images
› Integrated FM radio with recording function, stores up to
20 stations
› Various equalizer settings
› Built-in loudspeaker
› Supports Windows 98/SE/ME/2000/XP/Vista
› USB 2.0 with 4.5 MB/second
› E-book function (.txt and .lrc)
› Reads micro SD and micro SDHC memory cards with a
size of up to 4 GB
› Multilingual menu
› Audio recordings via integrated microphone
Battery information
Only use this device with the included power supply to
charge.
The device will not charge when connected to a computer
via USB.
During charging, a battery symbol will be displayed indica-
ting the charging process.

12
13
Chapter 3 General informationChapter 3 General information
A charging process can be identied when the indication
bar inside the battery symbol begins to ll up.
The battery is completely charged when the indication bar
inside the battery symbol has been completely lled with
a color green.
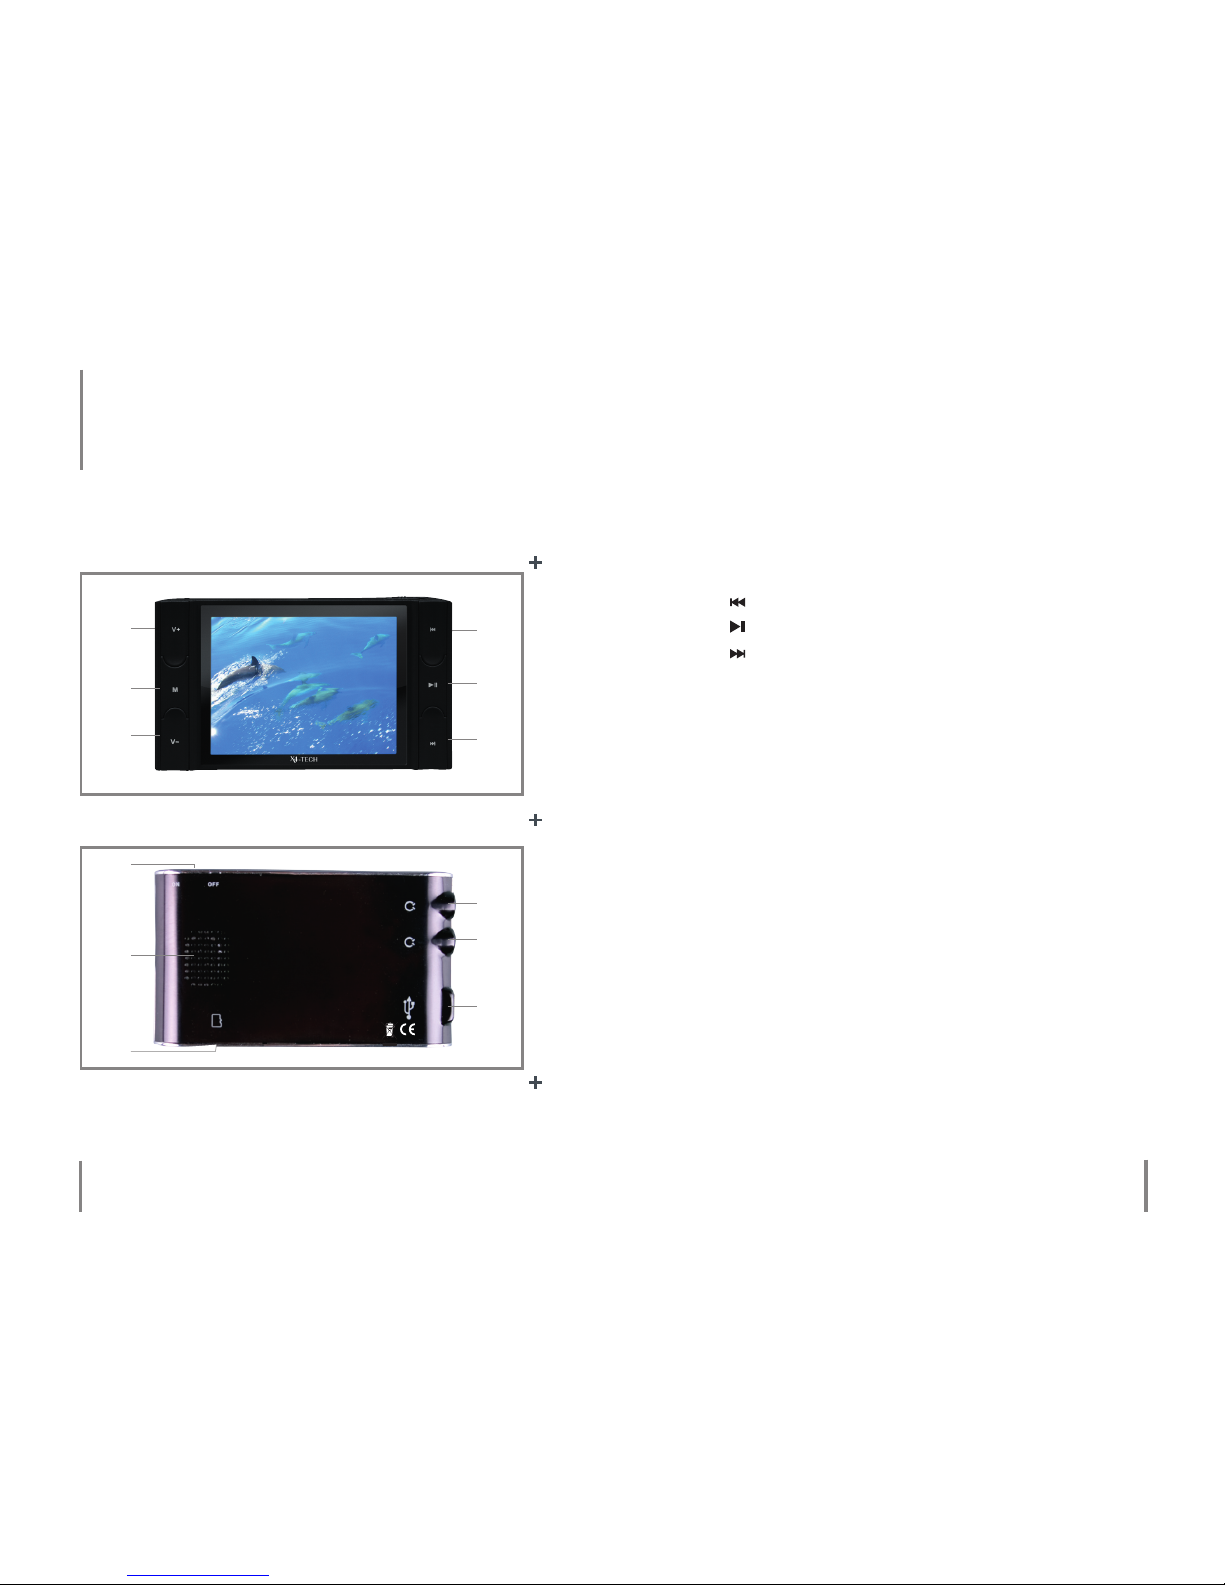
If the MP3 player is not in use, then the POWER switch
should be switched to„OFF“.
The operating time of the battery lies within approx. 7 to 8
hours, while listening to music with the display turned o
and at a fully regulated volume and up to approx. 2 hours,
while playing videos with a fully regulated volume.
MP3/WMA music format information
Music, that we listen to either from a stereo system, kitchen
or car radio, is just actually an analog signal. In the past one
could buy records, music cassettes and tapes with a recor-
ded analog signal. While records were usually damaged
from dust and frequent use, tapes demagnetized them-
selves leading to a dull and mued sound.
Later on, the Compact Disc was developed for storing mu-
sic in digital form. An analog signal is measured at specic
intervals, transferred in numerical value and stored in a
specic form on the CD. A CD player (or amplier) evaluates
the computed value once again into an analog signal.
An audio CD can hold approximately 70 – 80 minutes of
music. Its format is similar to that of a normal computer
CD-ROM, which has an equivalent data volume of approx.
650 – 700 MB.
The early stages of computer technology development,
where 1 MB user memory, 100 MB hard drives and a 28kBit
modem, a standard thing were, usually also brought a lot
of problems along with it. That’s why researchers started
experimenting with new ways of compressing an audio
CDs amount of data. By various compression programs
on computers, such as for instance Windows Media Player
or Winamp, all initial information will be irretrievably lost
when audio compressing.
Normally the dierence between MP3 and audio CD play-
back can not be heard; provided that a „better“ compres-
sion level is used. In this case, the playback quality oered

14
15
Chapter 3 General informationChapter 3 General information
in mobile devices (e.g. the included MP3 player) or in cars
is satisfactory.
The most common known compressed le format is„MP3“,
which oers a variety of quality levels (The principle is: the
better the format, the greater the amount of data).
Later on, other dierent compressed audio le formats
were developed; the second most important after„MP3“ is
the „WMA“ format. Meanwhile, there are both free of char-
ge and/or very expensive programs for almost all opera-
ting systems available on the market that can be used with
any available audio CD (or other source), to help you create
compressed music les.
Copyright information
The reproduction, duplication and copying of copyright
protected material, as well as the distribution, circulation,
public access to or even the rental of these, without explicit
authorization of the copyright holder, is strictly prohibited.
Please note:
A lot of audio CDs are copy protected to prevent cloning.
In some cases, complications could arise when converting
into a compressed music data le.
Hi- CD players will normally not be aected by copy pro-
tected CDs; a lot of computer drives will although refuse
playback.
The industry is tending to gradually change back to CDs
that are not copy protected, due to the many problems
that DVD players, car radios and other portable playback
units are having with this copy protection method.
This copy protection system was developed to prevent CD
cloning and circulation, which is why many record compa-
nies are trying to protect their CDs. Such trends threaten
the existence of artists, musicians and the music industry.
The development of the copy protection system has also
led to an illegal circulation of music in the form of MP3 les
via internet and online exchange.
What it comes down to, is that there are now quite a numb-
er of various internet providers on the market oering

16
17
Chapter 3 General informationChapter 3 General information
compressed music les that can be legally purchased and
downloaded. Being able to listen to dierent samples of
music and having the ability to download directly, one is
only minutes away (granted you have DSL) from desired
songs in either MP3 or WMA format.

18
19
1. „V +“: increase volume
2. „M“: selection/conrmation/main menu
3. „V –“: decrease volume/previous menu
4. „ “: previous/return/fast reverse
5. „ “: turn ON/OFF, Play, Pause, Stop
6. „ “: next/forward/fast forward
7. ON/OFF: main switch
8. Loudspeaker
9. Micro SD memory card slot
10. Earphone jack
11. Earphone jack
12. USB connection
Chapter 4 The deviceChapter 4 The device
The device 4
14
SD
2
3
5
6
8
7
9
10
11
12

20
21
Chapter 5 Basic operation/Main menu Chapter 5 Basic operation/Main menu
Turning ON/OFF
Push the main switch (POWER) to „ON”. Press and hold the
„ “ button to turn the player on. Press and hold the „ “
button to turn the player o. After the player has been tur-
ned o, push the main switch to„OFF“.
Main menu
The player automatically enters the main menu after being
turned on. The main menu allows access to various player
functions. Use the „ “ buttons to navigate and select a
player function. Press the„M“ button to conrm and enter
the selected menu.
The following submenus are a part of the main menu:
1. Music (MP3 and WMA le playback)
2. Video (.avi video le playback)
3. Radio (FM reception)
4. Pictures (displays .jpg, .bmp or .gif image les)
5. E-book (text playback)
6. Audio recordings (recordings via microphone)
7. Explorer (le display and deleting les)
8. Settings
The earphones serve as an antenna for radio operation.The
loudspeaker will turn o, once the earphones have been
connected to the player.
Operation
If the buttons on the player have not been used for a whi-
le, then pressing a button for the rst time again will only
reactivate button functions. Only after a button has been
pressed for the second time will its function be activated.
5
Basic operation/Main menu

22
23
Navigate with the „ “ buttons to „MUSIC“ in the main
menu and press the „M“ button to conrm and enter the
music le playback mode. The player immediately begins
music playback.
This device supports MP3 and WMA le playback.
Available functions during playback
You can use the„ “ buttons to change audio les.
Press the „M“ button down shortly to gain access to a le
Chapter 6 Music playback Chapter 6 Music playback
list for direct selection.
Use the„ “ buttons for le or folder selection. Pressing
the „M“ button down shortly starts playback or provides
access to a folder. Press the „V –“ button to return to the
previous folder.
Press the „M“ button down longer (approx. 2 sec.) to exit
the submenu and to return to the main menu.
Volume regulation
Press the„V –“ button to decrease and„V+“ button to incre-
ase the volume during playback. You can either repeated-
ly press the button down shortly or keep it depressed to
change the volume. You will be able to see the regulated
volume level on the lower right hand side of the display.
Warning: Please note that listening to loud volume levels
with earphones on a continual basis can lead to perma-
nent hearing damage. Always pay special attention to
children using earphones and make sure that a moderate
volume level has been chosen.
6
Music playback

24
25
Fast forward/Fast reverse a music le
Press and hold the „ “ buttons to fast forward or fast
reverse through a music le.
Pause
Press the „ “ button during playback to pause playback.
Press the „ “ button once again to resume playback.
Displaying lyrics
A lyrics le (*.lrc) and a music le must have the same name
and be found in the same folder in order for this mode to
function. The lyrics of a song can then be seen on the dis-
play during playback.
Use the „ “ buttons to navigate to „VIDEO” in the main
menu and press the „M“ button to enter the video mode.
This player supports and plays MPEG-4 (AVI) video les in
a 320 x 240 format. Please convert your les rst, before
transferring them to your player. Refer to chapter 16 for
more information on converting les.
Press the„M“ button down shortly to enter the le selection
mode. Use the „ “ buttons for le or folder selection.
Pressing the „M“ button down shortly starts playback or
provides access to a folder. Press the„V –“ button to return
to the previous folder or press the„M“ button down longer
to return to the main menu.
Chapter 6 Music playback Chapter 7 Video le playback
7
Video le playback

26
27
Volume regulation
You can press the „V –“ button to decrease or the „V+“ but-
ton to increase the volume.
Fast forward/Fast reverse a video le
Press the„ “ buttons down longer to either fast forward
or fast reverse through a video le. Pressing either one of
these buttons down shortly ensures playback of either the
previous or the next video.
Pause
Press the„ “ button during video playback to pause play-
back. Press the„ “ button once again to resume playback.
Chapter 7 Video le playback Chapter 7 Video le playback
File display in a video mode
Press the „M“ button down shortly to enter the le list
selection mode. Use the „ “ buttons for le or folder
selection. Pressing the„M“ button down shortly starts play-
back or provides access to a folder. Press the„V –“ button to
return to the previous folder or press the„M“ button down
longer to return to the main menu.
The above graphic is an example of a menu image that can
be seen on display during video playback.

28
29
8
Radio
Chapter 8 Radio Chapter 8 Radio
Use the„ “ buttons to navigate to„RADIO“ in the main
menu and press the „M“ button to enter this submenu.
Your earphones act as an antenna and need to be plugged
into the earphone jack, otherwise FM reception will not be
possible. Please note that the loudspeaker is principally
shut o when the radio mode has been selected and the
earphones have been plugged in. Therefore, FM radio re-
ception is not possible via the integrated loudspeaker.
Volume regulation
You can press the „V –“ button to decrease or the „V+“ but-
ton to increase the volume.
Functions
Press the„M“ button in a radio mode to display a list of the
subfunctions available. The following functions will appear
on display and can be selected by using either the „V+“ or
the „V –“ button:
Manual
Navigate with the „V+“ or „V –“ button to „Manual“ and
press the„M“ to conrm and enter this mode. Now you can
manually set the radio reception frequency of stations by
using the„ “ buttons.
Preset
Press the „V+“ or „V –“ button to select a station and then
the „M“ button. You can use the „ “ buttons to switch
between stored program locations.
Memory
Navigate with the „V+“ or „V –“ button to „Memory“ and
then press the „M“ button. In the following window that
appears on display you can use the „V+“ and „V –“ button
to select one of the 20 preset memory locations available.
Press the„M“ button and navigate with the„ “ buttons
to „Yes“ to store a station. Select „No“ to cancel. Press the
„M“ button to conrm your selection.
Delete
Navigate with the„V+“ or„V –“ button to„Delete“ and press
the „M“ button. In the following window that appears on
display you can use the„V+“ and „V –“ button to select one

30
31
of the 20 preset memory locations. Press the „M“ button
and navigate with the „ “ buttons to „YES“ to delete a
station or to„NO“ to cancel. Press the„M“ button to conrm
your selection.
Automatic
Navigate with the „V+“ or „V –“ button to „Auto“ and press
the „M“ button to activate this mode. The device will now
begin an automatic station search and will automatically
store stations found.
Radio recordings
You have the opportunity to record from the radio. Press the
„ “ button down shortly to prepare for recording.The device
will then switch over to a recording mode. After activating
this process you can press the„ “ button to begin recording,
to pause or to resume with recording. Press the„M”button to
store a recording. Your radio recording will then be stored in
the FM folder found on your device. You can enter this folder
via„Explorer“ to start playback either from here (see chapter
12 for more information) or you can switch to the„FM“ folder
during music playback to select one of your recordings.
This device supports and displays JPEG, BMP and GIF image
les.
Use the „ “ buttons to navigate to „PICTURES“ in the
main menu and press the „M“ button to enter and display
data found in this mode.
Use the„ “ buttons to select an image le or folder and
press the „M“ button to display your selection. Press the
„ “ button to start an automatic slideshow of your pic-
tures. You can set the display duration of your pictures in
the menu Settings › Auto Play Settings › Text and Pictures ›
„Pictures“. Pressing the„ “button again will deactivate au-
tomatic playback.
Chapter 8 Radio Chapter 9 Displaying pictures
9
Displaying pictures
Pictures

32
33
Chapter 10 E-books Chapter 11 Audio recordings
Navigate with the„ “ buttons to „E-books“ in the main
menu and press the„M“ button to enter this mode. This de-
vice supports and displays LRC and TXT text les. Press the
„M“ button down shortly to display a le list.
Use the„ “ buttons to select a le. Press the„M“ button
down shortly for text display or to enter a folder. Press the
„V–“ to return to the previous folder or press the„M“ button
down longer to return to the main menu. Pressing the„ “
button activates an automatic text playback mode, which
automatically scrolls text. You can set the display duration
of your text in the menu Settings › Auto Play Settings › Text
and Pictures ›„Text“. Pressing the„ “ button again will de-
activate automatic playback. Use the „V+“ button to scroll
upwards and the „V –“ button to scroll downwards or the
„ “ buttons to scroll line by line.
Navigate with the „ “ buttons to „Record“ in the main
menu and press the„M“ button to enter this mode.
Press the „ “ button to start recording. Pressing the „ “
button once again lets you pause or resume playback.
Pressing the„M“ button down longer will stop and store a
recording and return the player to the main menu. Pressing
the„ “ button down longer stores a recording and starts a
new one again. Stored recordings can be found within the
same folder. You can enter this folder via„Explorer“ to start
playback from here (see chapter 12 for more information).
10
E-books
E-books
11
Audio recordings
Record

34
35
Navigate with the„ “ buttons to „Explorer“ in the main
menu and press the „M“ button to enter this mode. This
function allows you to scroll through the directories found
on the player.
Press the „M“ button down shortly to access either the le
or folder list. Navigate with the „ “ buttons to select a
le. Press the„M“ button following this to start playback of
the selected le (music, recording, picture, text or lm).
Pressing the „V –“ button in this mode provides access to
a higher folder level and exits the present folder in which
you are in.
If the „V+“ button is pressed down longer the dialog„Dele-
te“ will appear on display. Use the„ “ buttons to select
either „Yes“ or „No“ and conrm your selection following
this with the„M“ button.
Pressing the „M“ button down shortly activates le play-
back or provides access to a folder.
Press the „M“ button down longer to return to the main
menu.
Navigate with the„ “ buttons to„Settings“ in the main
menu and press the „M“ button to enter this mode. A list
of the following menu options will then appear on display:
A Music
B Radio
C Record
D Display
E Auto Play Settings
F System
G Automatic Power O
H Default settings
Chapter 12 Explorer Chapter 13 Settings
12
Explorer 13
Settings
Settings

36
37
Use the„ “ buttons to select a menu item. Press the„M“
to conrm a selection. Press the „M“ button down longer
to return to the main menu. Press the „V –“ to return to the
previous menu.
Warning: Settings that have been made or changed will only
be permanently stored, , when the player has been turned o
with the „ “ button. Simply turning the player o with the
main power switch will not save any new changes made. The-
se settings will be lost the next time the player is turned on.
Music
In the submenu„Music“ you can select one of the following
menu items:
› Repeat
› Random
› Equalizer
› User Equalizer
Repeat mode
Navigate with the„ “ buttons to„Repeat“ and press the
„M“ button to display the following submenu options:
Chapter 13 Settings Chapter 13 Settings
Selection Action
Once The selected song will be played
back once.
Repeat once The selected song will be repea-
ted continuously.
Folder once The songs found within a folder
will be played back once.
Folder repeat The songs found within a folder
will be repeated continuously.
All once All songs will be played back once.
All repeat All songs will be repeatedly con-
tinuously.
Intro The rst few seconds of each song
will be played back.
Random
To activate the random mode you can use the„ “ but-
tons to select between„O“ and „On“. After a selection has
been made, press the„M“ button to conrm.

38
39
Equalizer settings
In this submenu you have the opportunity to choose one
of the following equalizer modes: Normal, 3D, Rock, Pop,
Classic, Bass, Jazz and User EQ.
User equalizer settings
You can use the „ “ buttons to select which frequency
range an equalizer setting is to be carried out in. You can
change settings with either the „V+“ or „V –“ button. After
a setting has been selected you can choose„Yes“ to accept
or„No“ to refuse.
Radio
In this submenu you can select one of the following radio
settings:
Stereo sound
On/O
On (for playback in stereo)
O (for playback in mono, helps
when there’s interference)
FM region This device has been set to the
region Europe.
Record
This submenu is for recording settings in a .wav format. You
can choose between one of the following menu items:
REC
quality
High quality, 256 kbps (occupies more
storage space)
Normal quality (less memory-intensive)
REC
volume
From +1 to +5 (The higher the level the
more sensitive the player will be and recor-
dings will be recorded louder.)
Display
This submenu is for changing display settings. You have
the opportunity to choose between the following menu
items:
Display
lighting
time
Choose between a backlight time of„5 se-
conds“ to„Always On“. This controls how long
the displays stays lit up.
Chapter 13 Settings Chapter 13 Settings
Table of contents
Popular Media Player manuals by other brands

Philips
Philips NP1100/37B quick start guide

Western Digital
Western Digital WDBABF0000NBK-NESN - TV HD Media Player user manual

Eletech
Eletech EM21D user manual

Philips
Philips GoGear SA060304 quick start guide

Kyocera
Kyocera DA-01 Operation manual

VocoPro
VocoPro MEDIA-JUKEBOX Quick reference & setup guide

Denon
Denon DNP-720AE Network Setup Guide

American Audio
American Audio SDJ-2 User guide and reference manual

Crestron
Crestron CEN-NVS200 Operations & installation guide

KWorld
KWorld 1440 user manual

Jacuzzi Products
Jacuzzi Products AQUATIC AV BLUEWAVE 6500-915 owner's manual

Bose
Bose SoundTouch 535 operating guide