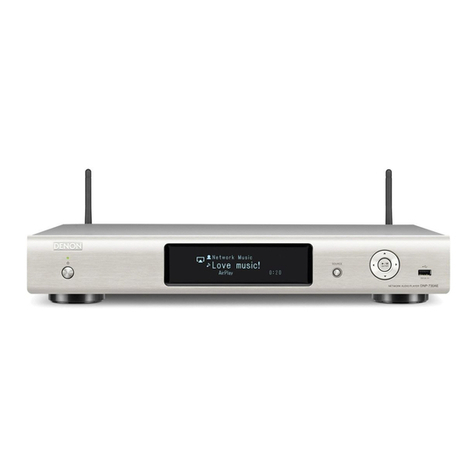
Connecting to a wireless LAN
RL
R
L
L
Connecting the rod
antenna (supplied).
Amplifier
Connecting the
audio device.
Connecting the
power cord.
ENGLISH
Connecting the DNP-720AE to the network Basic operation
ENTER .........................Enter
ui.............................Select
o..................................Return
MENU..........................Menu
ON/STANDBY............Power on
Setting the network standby
Connecting to the access point
Preparation
1
2
3
1Complete Steps – .
2
1Press ON/STANDBY to turn the power on.
Network First Setup
2Check the connection to the network
device, and press ENTER.
Please connect a
[Start First Setup]
:next :cancel
3Select “Wired”, and press ENTER.
Wired
[Select Connection] 2/2
:enter :return
4Select “Connection”, and press ENTER.
Connection
[Setup Wired] 3/4
:enter :return
Connecting...
[Connection]
Succeeded
• Connected to the network.
1Press ON/STANDBY to turn the power on.
Network First Setup
2Check the connection to the network
device, and press ENTER.
Please connect a
[Start First Setup]
:next :cancel
3Select “Wireless”, and press ENTER.
Wireless
[Select Connection] 1/2
:enter :return
4Select “WPS”, and press ENTER.
WPS (Wi-Fi Protec
[Setup Wireless] 2/4
:enter :return
5Select “Push Button”, and press ENTER.
Push Button
[Select WPS Setup] 1/3
:enter :return
6Press the WPS button on the access point.
7Select “Enter”, and press ENTER.
Enter
[Push WPS Button] 2/2
Please push the WPS button of the
Connecting...
[Connection]
Succeeded
• Connected to the network.
1Press ON/STANDBY to turn the power on.
Network First Setup
2Check the connection to the network
device, and press ENTER.
Please connect a
[Start First Setup]
:next :cancel
3Select “Wireless”, and press ENTER.
Wireless
[Select Connection] 1/2
:enter :return
4Select “Search Access Point”, and press
ENTER.
Search Access P
[Setup Wireless] 1/4
:enter :return
Searching
[Search Access Point]
5Select the access point to connect to, and
press ENTER.
[Select SSID/Router] 1/3
55%
:enter :return
SSID #1 (WEP)
6Select “Key”, and press ENTER.
Key
[Setup Wireless] 1/2
:enter :return
7Input the security key, and press ENTER.
• The types of characters that can be input are as shown
below.
GLower case charactersH
abcdefghijklmnopqrstuvwxyz
GUpper case charactersH
ABCDEFGHIJKLMNOPQRSTUVWXYZ
GSymbolsH
! “ # $ % & ‘ ( ) z+ , - . / : ; < = > ? @
[ \ ] ^ _ ` { | }
˜
GNumbersH0123456789 (Space)
[Input Security Key]
: move
ABC
:select
Connecting...
[Connection]
• Connected to the network.
nWPS function compatible access
point
nWPS function not compatible access point
3
nEnabling the network standby
Select “On”, and press ENTER.
Reduces the amount of time until the network connection
is complete.
Network On
[Select Standby Mode] 1/2
Network start time is fas
NOTE
The amount of power consumption during standby mode
increases slightly.
nDisabling the network standby
Select “Off”, and press ENTER.
The amount of power consumption during standby mode
is as low as possible.
Network Off
[Select Standby Mode] 2/2
The lowest power consump
This completes the network connections and settings.
The network settings can also be configured in the “Network” –
“Connection” menu. See the Owner’s Manual for details on setting
using the “Connection” menu.
www.denon.com
D&M Holdings Inc. Printed in China 5411 10746 00AD
Connecting to a wired LAN
RL
R
L
L
Connecting to a home
network (LAN).
Amplifier
Connecting the
audio device.
Connecting the
power cord.
To perform “Network First Setup” again
1Press MENU.
The menu screen is displayed.
2Select “Network”, and press ENTER.
Network
[Menu] 1/3
:enter :return
3Select “Network First Setup”, and press
ENTER.
Network First Setup
[Network] 1/6
:enter :return
or
DNP-720AE Network setup guide
Connexion à un réseau local sans fil
RL
R
L
L
Connexion de l’antenne
en tige (fournie).
Amplificateur
Connexion de
l’appareil audio.
Branchement
du cordon
d’alimentation.
FRANÇAIS
Connexion du DNP-720AE au réseau Utilisation basique
ENTER .........................Entrée
ui.............................Sélectionner
o..................................Retour
MENU..........................Menu
ON/STANDBY............
Mise sous tension
Réglage de la veille réseau
Connexion au point d’accès
Préparation
1
2
3
1Effectuez les étapes – .
2
1Appuyez sur ON/STANDBY pour mettre
l’appareil sous tension.
Network First Setup
2Vérifi ez la connexion à l’appareil en
réseau et appuyez sur ENTER.
Please connect a
[Start First Setup]
:next :cancel
3Sélectionnez “Wired” et appuyez sur
ENTER.
Wired
[Select Connection] 2/2
:enter :return
4Sélectionnez “Connection” et appuyez sur
ENTER.
Connection
[Setup Wired] 3/4
:enter :return
Connecting...
[Connection]
Succeeded
• Connecté au réseau.
1Appuyez sur ON/STANDBY pour mettre
l’appareil sous tension.
Network First Setup
2Vérifi ez la connexion à l’appareil en
réseau et appuyez sur ENTER.
Please connect a
[Start First Setup]
:next :cancel
3Sélectionnez “Wireless” et appuyez sur
ENTER.
Wireless
[Select Connection] 1/2
:enter :return
4Sélectionnez “WPS” et appuyez sur
ENTER.
WPS (Wi-Fi Protec
[Setup Wireless] 2/4
:enter :return
5Sélectionnez “Push Button” et appuyez
sur ENTER.
Push Button
[Select WPS Setup] 1/3
:enter :return
6Appuyez sur le touche WPS sur le point
d’accès.
7
Sélectionnez “
Enter
” et appuyez sur ENTER.
Enter
[Push WPS Button] 2/2
Please push the WPS button of the
Connecting...
[Connection]
Succeeded
• Connecté au réseau.
1Appuyez sur ON/STANDBY pour mettre
l’appareil sous tension.
Network First Setup
2Vérifi ez la connexion à l’appareil en
réseau et appuyez sur ENTER.
Please connect a
[Start First Setup]
:next :cancel
3Sélectionnez “Wireless” et appuyez sur
ENTER.
Wireless
[Select Connection] 1/2
:enter :return
4Sélectionnez “Search Access Point” et
appuyez sur ENTER.
Search Access P
[Setup Wireless] 1/4
:enter :return
Searching
[Search Access Point]
5Sélectionnez le point d’accès auquel
l’appareil doit se connecter, puis appuyez
sur ENTER.
[Select SSID/Router] 1/3
55%
:enter :return
SSID #1 (WEP)
6Sélectionnez “Key” et appuyez sur
ENTER.
Key
[Setup Wireless] 1/2
:enter :return
7Saisissez la clé de sécurité, puis appuyez
sur ENTER.
• Les types de caractères qui peuvent être saisis sont
indiqués ci-dessous.
GMinusculesH
abcdefghijklmnopqrstuvwxyz
GMajusculesH
ABCDEFGHIJKLMNOPQRSTUVWXYZ
GSymbolesH
! “ # $ % & ‘ ( ) z+ , - . / : ; < = > ? @
[ \ ] ^ _ ` { | }
˜
GChiffresH0123456789 (espace)
[Input Security Key]
: move
ABC
:select
Connecting...
[Connection]
• Connecté au réseau.
nPoint d’accès compatible avec la
fonction WPS
nPoint d’accès non compatible avec la fonction WPS
3
nActivation de la veille réseau
Sélectionnez “On” et appuyez sur ENTER.
Réduit le temps nécessaire à l’établissement de la
connexion réseau.
Network On
[Select Standby Mode] 1/2
Network start time is fas
REMARQUE
La consommation électrique en mode veille augmente
légèrement.
nDésactivation de la veille réseau
Sélectionnez “Off” et appuyez sur ENTER.
La consommation électrique en mode veille est réduite au
strict minimum.
Network Off
[Select Standby Mode] 2/2
The lowest power consump
Ceci met fin à la procédure de connexion au réseau et aux réglages.
Il est également possible de configurer les paramètres réseau dans le
menu “Network” – “Connection”. Consultez le manuel de l’utilisateur
pour les détails de la configuration à l’aide du menu “Connection”.
Connexion à un réseau local filaire
RL
R
L
L
Connexion à un réseau
domestique (LAN).
Amplificateur
Connexion de
l’appareil audio.
Branchement
du cordon
d’alimentation.
Pour effectuer à nouveau la “Network First Setup”
1Appuyez sur MENU.
L’écran du menu s’affiche.
2Sélectionnez “Network” et appuyez sur
ENTER.
Network
[Menu] 1/3
:enter :return
3Sélectionnez “Network First Setup” et
appuyez sur ENTER.
Network First Setup
[Network] 1/6
:enter :return
ou
DNP-720AE Guide de configuration réseau
DNP-720AEE3_NSG_ALL_0729.indd 1 2011/08/06 17:38:47
