Camos MMS-1000 User manual

MMS-1000
Mobile Digital Multimedia System
Manual
http://www.camos-multimedia.com
IMC GmbH Nikolaus-Otto-Str.16 22946 Trittau, Germany
Tel. +49(0)4154 / 7093202-0 Fax +49(0)4154 / 7093202-20

2
MMS-1000Contents
Contents
Safety information
Package contents
Connections and buttons
Remote control
Installation
Start-up
Main menu
TV/AV
Copy
Browser
Setup
- TV
- Audio
- Video
- Recording
- Net wok
- System
- Other
Timer
Specications
Produziert von CAMOS Europe GmbH
Copyright © 2010 CAMOS Europe GmbH
Printed in Korea,All rights reserved
Design and specications are subject to change without notice. All product and
brand names are trademarks or registered trademarks of their respective holders. All
rights reserved. Restricted copies, even just parts of them, duplication or
dissemination by means of electronic media is only permitted through written autho-
rization of Camos Europe GmbH.
.......................................................3
......................................................4
..........................................5
............................................................6
....................................................................7
.........................................................................8
...................................................................9
..........................................................................10
...........................................................................11
.......................................................................12
..........................................................................13
.......................................................................13
................................................................14
................................................................15
.........................................................16
............................................................17
...............................................................18
................................................................19
...........................................................................20
.............................................................22

3
MMS-1000 Safety information
Safety information
Please read the safety information carefully before using this product. Follow-
ing of the safety informations prevents users from any damage related with
the misuse of this product.
Do not try to open the product. It can cause an electric•
shock!
Do not put pins or needles into the product or electric•
cord of product.
In case of damage, please switch-off the product and•
contact your dealer or the CAMOS customer service.
This product is only made for 12-24V DC use. Please be•
careful while connecting.
Check for correct polarity.•
Please install the product while it is switched off.•
Prevent the product from inltration of any liquids or ent-•
rapping moisture.
Only clean with dry cloth.•
Do not clean with alcoholic or oily solvent.•
Do not operate this unit while driving.•

4
MMS-1000Package contens
Package contents
MMS-1000
Remote control
2x Batteries Typ AAA
IR - eye Cigarette lighter cable
Cinch-cable Screws

5
MMS-1000 Connectors and control buttons
Connectors and control buttons
Front
Back
1
2 3 4 5 6 7 8 9 10 1112 13 14 15
On / Off1.
DC 12V power2.
LAN(Network connection)3.
Component Out4.
AV-Out5.
AV-IN6.
Digital Audio-out coaxial7.
Digital Audio-out optical8.
2x USB2.0-connection9.
eSATA10.
IR-eye for remote control11.
USB SLAVE (for connection to PC)12.
HDMI-OUT13.
Antenna-Input14.
Antenna-Output15.

6
MMS-1000Remote control
Remote control
Detailed information follows, here are just short explanations.
EPG: Electronical TV-guide
Info: Displays current information
ARC: Picture size
EJECT: Opens DVD- device
POWER: On / Off
SETUP: Setup-Menu
MUTE: Sound off
Keypad:
Directly choosing of tilel or numeral etc.
INS REPLAY: 10 Seconds back
CM SKIP: 30 Seconds forward
FR: Quick forward
SLOW: Slow motion
FF: Quick rewind
PREV: Previus le
REC SCHEDULE: Record schedule
NEXT: Next le
Navigation buttons and OK/Enter:
Navigating through the menu.
RETURN: Back to previus aspect
TIMESHIFT: Watching TV in time shift
HOME: Main menu
Volum: low / high
REC: Record
PAUSE: pauses play back
PLAY: starts play back
STOP: stopps current play back
REPEAT 1/ALL: repeat single / all title
REPEAT A-B: repeat a chapter
GOTO: Go to choosen title
TV/AV-IN: TV/AV-play back
MENU: DVD-Menu
TITLE: Titel menu
ANGLE: Camera angle
MULTIMEDIA: Media-Menu
AUDIO: audio track
SUBTITLE: sub title
ZOOM: Zoom in and out
F.MANAGER: Copy les
TV SYSTEM: Choose TV-System
MEDIA TYPE: Media yp (Music, picture, etc.)
DELETE: delete les
ADD-ON: without fuctions

7
MMS-1000 Installation
Installation
Antenna (DVB-T or
Analogue signal)
Monitor
SAT-Receiver or
other video device
Net work router
IR eye
External hard disk
DC-12V cigar
adaptor

8
MMS-1000Start-up
Start-up
Please ensure that all connections are connected correctly as described.
Switch on the device with the button on the front housing. MMS-1000 starts opera-
ting system. While loading CAMOS logo will be dieplayd. Following the base set-
tings will be required.
Use the navigation buttons (up, down,
left, right) for adjustment. Conrm with
OK/Enter.
Menu language• : Select the language for the menu. You can choose between 9
different languages.
TV-Area• : Select frequency band for your area or all bands for searching in all
bands.
Channel search• : To start channel scanning conrm with OK. Channel scan will
start for analogue and digital channels. Select cancel to do the channel scan-
ning later.
Time• : Select manual or adding date and time manual or Autom. (via DTV) to
adjust it via DVB-T.
LAN• : If you want to connect MMS-1000 to a net work, select DHCP-IP (Auto) to
receive an IP-address automatically via DHCP-Server. Select IP (Manuell) to do
a proper IP-adjustment manuel. If MMS-1000 should not be connected to the
net work select cancel.
The base settings are ready now.
Device restarts and opens main menu.
See detailed information on page 13.

9
MMS-1000 Main menu
Main menu
TV/AV: Displays AV-Mode. This could be TV•
analogue, TV digital, AV-input or DVD.
see page10
Copy: Coyp and past of recordings, music•
les, pictures, etc.
see page11
Browser: Searching for data medium and•
media les.
see page 12
Setup: Adjusting of device conguration, •
Channel scanning, net work adjustment etc.
see page 13
Timer: Time controlled recording of TV pro-•
gramm
see page 20

10
MMS-1000TV/AV
TV/AV
Play back of TV programm
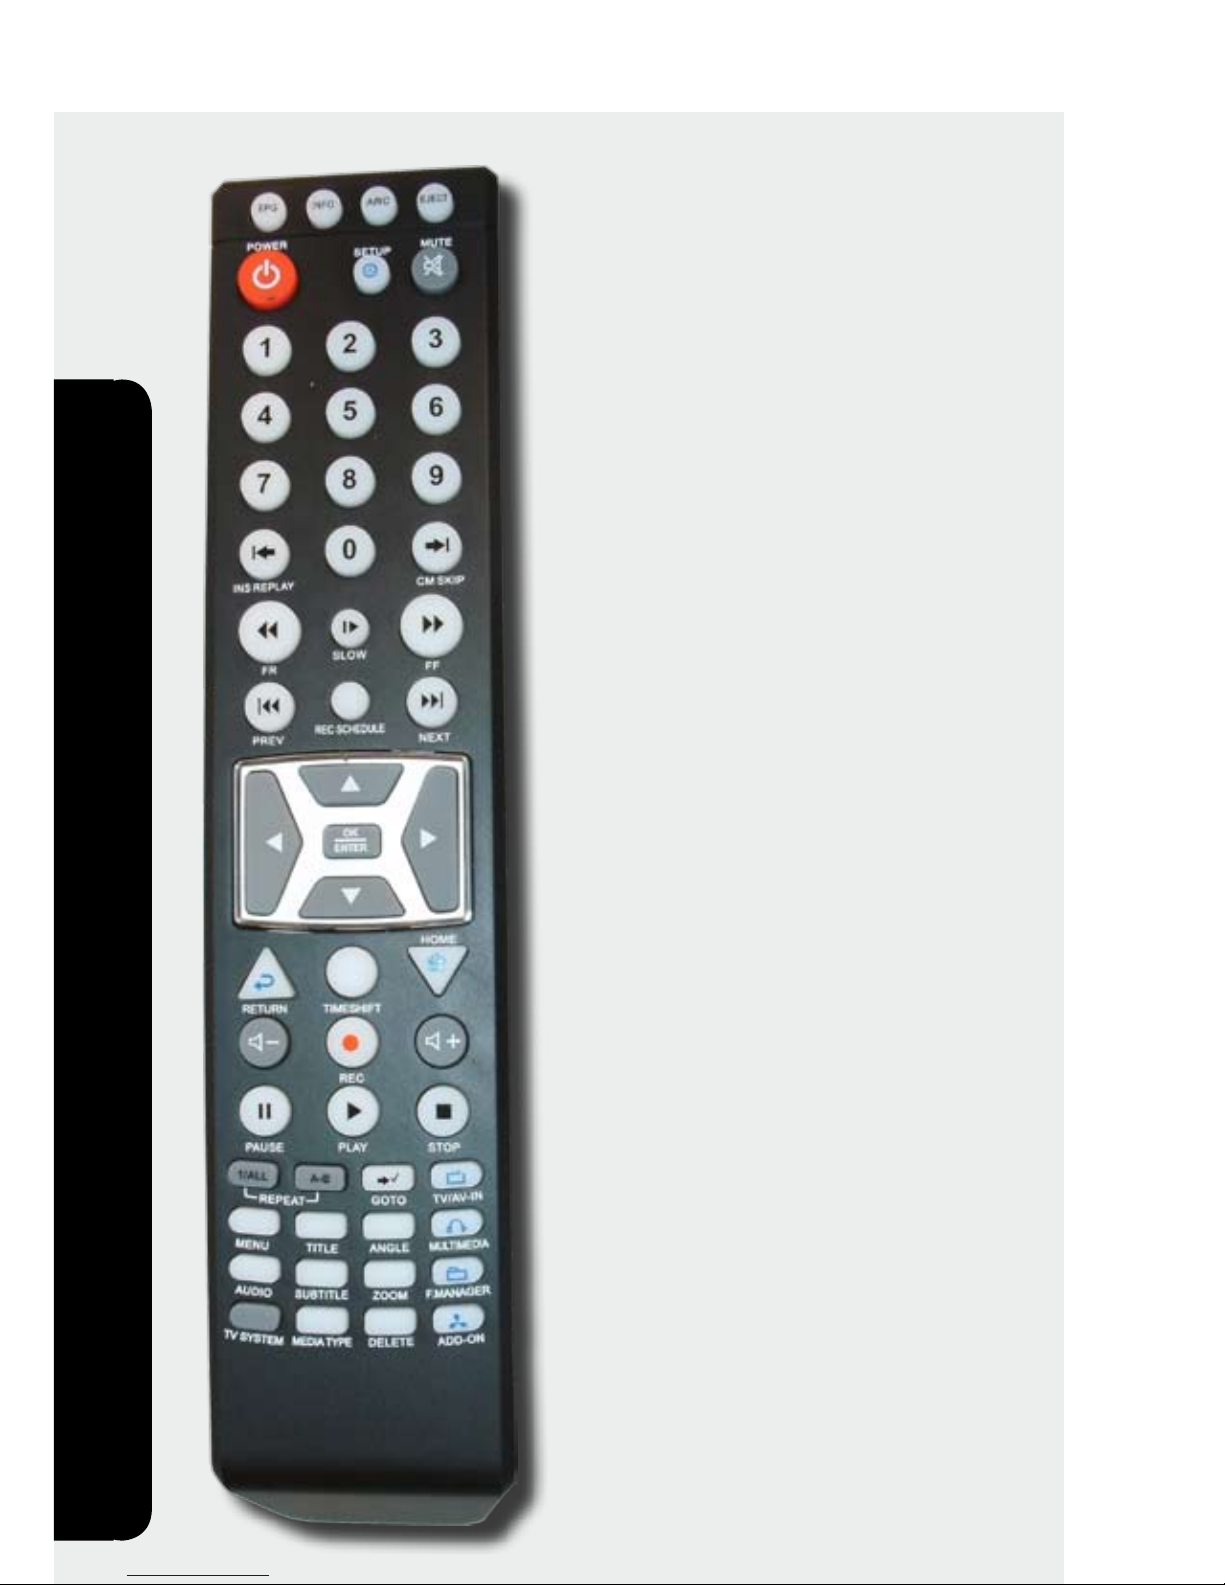
Press TV/AV-IN on your remote control for switching between Analogue-TV,
Digital-TV, AV-In or DVD.
For changing the channel use the key pad or the navigation buttons on your
remote control. Press OK/Enter to open channel list and qick change between
channels.
Press• EPG for electronic TV-guide(EPG=Electronic Program Guide).
For settings use the• Navigation buttons and skimm through the current pro-
gramm and the programm for the next 6 days. Press PREV or NEXT, for
changing the channel.
For prebook a special programm to record, select the programm and press•
OK/Enter. The programm will automatically be carried to the record schedule.
Press• EPG again for closing EPG.
This function is only available if an data carrier (e.g. external data carrier or USB
stick) is connected: To record a current programm, press REC and to stop it press
STOP.
This fuction is only available if a hard disk via eSATA is connected and was forma-
ted with MMS-1000 (page 18): Press TIMESHIFT to interrupt the current programm.
Afterwards press PLAY for watching time shift TV. Use FR, FF, PAUSE, STOP, PLAY to
coordinate the time shift play back.
Play back of DVD
Press EJECT for opening the drive. Put in a DVD and press EJECT again for closing
it. DVD starts automatically.
Use the• Navigation buttons to navigate in the menu.
Press• MENU to go back to the main menu of the DVD.
With• TITLE you open the title menu of the DVD.
If different camera angles are available, you can use• ANGLE for switching.
The• AUDIO button switches between the languages available and the SUBTITLE
button between the available subtiltels.
With• ZOOM you can zoom into a picture detail.
Press• STOP to stop the play back.
Play back of Audio CD
Press EJECT for opening the drive. Put in a CD and press EJECT again for closing it.
CD starts automatically.
Use the• Navigation buttons to switch between the titles
Press• PREV or NEXT to go to the next or previus title.
To rewind or forward use• FR or FF.
With• INS REPLAY or CM SKIP you can go 30 sec. forward or 10 sec. back.
Press• STOP to stop the play back.

11
MMS-1000 Copy
Copy
To copy/move les on data carrier
To copy/move les from one data carrier to another or to delete them select
menu point File copy in the main menu.
Select the data carrier, where the les should be poeid or deleted and press OK/
Enter then select the destination folder and onrm with OK/Enter.
Now use UP/DOWN and OK/Enter to navigate through the different folders of the
rst data cerrier and select REC to mark the les.
Press RIGHT to go to the next step.
Now use UP/DOWN and OK/Enter to navigate through the different folders of the
destination folder.
To creat a new folder select NEW-DIRECTORY.
A key pad will be displayed and with the navi-
gations buttons and OK/Enter you can enter a
name for the new folder. Press OK/Enter to use
the given name.
Press RIGHT to conrm you selection.
Use now UP/DOWN for selcting copy, move or cancel and conrm with OK/Enter.
Now you will see a conrmation that the operation has been done an you can
choose to go back to copy menu (No) or to show the browser (Yes).

12
MMS-1000Browser
Browser
Browser window
Select with• LEFT/RIGHT if you want to see all les or only musique, photo or video
les.
Use the• Navigation buttons to navigate in the menu.
If you selceted one le, you can see information about the le in the window •
on the right, if available also a preview.
To open the le press • OK/Enter. If it is a picture a dia show starts. Press Stop to
close it.
To delete it or give it a new name press• DELETE.
If a DVD is in the drive and Autoplay is off (see page 18), you can select to start
the play back or to open the folder of the DVD. If Autoplay is on play back starts.
If a CD is in the drive, CD play back starts automatically with choosing of DVD.

13
MMS-1000 Setup-TV
Setup-TV
Use LEFT/RIGHT to switch between settings for TV, audio, video, record, net work,
system and other settings.
With UP/DOWN you select a setting. To change ist press OK/Enter.
TV
TV-area• : Select the area in in which you will receive a TV-signal.
Channel scan• : Select Cancel to leave channnel scan. To start channel scann
select Channel scan. To search for channels manually select Manuel scan.
The automatic scan (s.a.) searches at
rst for analogue then for digital
channels Press OK/Enter to stop it.
For manuel scan (r) all settings have to
be done by yourself.
Channel settings• : Select Cancel to leave channel settings. To adjust analogue
channels select TV, for digital DTV.
In the following menu, the order and names of the channels can be changed
or you can delete them.
These settings are are not necessary.

14
MMS-1000Setup-Audio
Setup-Audio
Audio
Night mode• : Select ON/OFF to activate/deactivate night mode. In night mode
the sound will be adjusted automatically, so that the announcment can be
heard easier. The Komfort function is an optimised mode.
Digital output• : Select the digital audio output.
HDMI LPCM: Audio will be transmitted as a decoded signal via HDMI to the
audio output device. Select this adjustment, if you audio output device is con-
nected via HDMI, but can not decode the sinal on it‘s own.
HDMI RAW: Audio will be transmitted as a coded signal (e.g. DolbyDigital or
DTS) via HDMI to the audio output device and has to be decoded by the
device. Select this adjustment, if your audio output device supports digital
decoded signals.
SPDIF LPCM: Audio will be transmitted as a decoded signal via coaxiale or op-
tical SPDIF-interface to the audio output device. Select this adjustment, if your
audio output device supports SPDIF, but can not decode the sinal on it‘s own.
SPDIF RAW: Audio will be transmitted as a coded signal (e.g. DolbyDigital or
DTS) via die coaxiale or optical SPDIF-interface to the audio output device
has to be decoded by the device. Select this adjustment, if your audio output
device supports SPDIF and digital coded signals
The analogue audio output is always available independent of the above
mentiond settings.

15
MMS-1000 Setup-Video
Setup-Video
Video
Aspect ratio• : Select the aspect ratio.
Letterbox 4:3 16:9 pictures can be displayd correctly on 4:3 screens. Hereby
black bars will be displayd over and under the picture.
Panscan 4:3 ts to 4:3. The black bars are off, but the picture can be distorted.
Use 16:9 if you have a wide screen or TV.
Brightness• : Adjust the brightnes of your picture.
Contrast• : Adjust the contrast of your picture.
TV standard• : Select the correct TV standard for you play back device. You
cann nd the information in the manual of you play back device.
Possible settings are:
HDMI Auto•
NTSC•
PAL•
480P•
576P•
720P 50Hz•
720P 60Hz•
1080i 50Hz•
1080i 60Hz•
1080P 50Hz•
1080P 60Hz•
Depending on the play back device, not all settings are available.
1080P 24Hz• : Select ON, if your screen or TV supports 1080p 24Hz . You can nd
this information in the manual of your device. If you are not sure select OFF.

16
MMS-1000Setup-Recording
Setup-Recording
Recording
Quality• : Select the recording quality:
HQ: High Quality•
highest quality, biggest le size, lowest compression•
SP: Standard Play•
LP: Long Play•
EP: Extended Play•
SLP: Super Long Play•
lowest quality, smalest le size, highest compression•
Permanent time shift• : Select ON/OFF, switch on/off time shift.
(This function is only available if an external data carrier with enough capacity
(HDD) is connected)
Recording device• : Select the recording device you want to use.

17
MMS-1000 Setup-Net work
Setup-Net work
Net work
LAN-setting• : Select Cancel to set a net work connection. Select DHCP-IP (Auto)
to receive automatically an IP-address via DHCP. Select IP (Manuell) to enter it
by yourself.
Enter IP-address•
Enter subnet mask•
Enter IP-adress of standard gateway•
Enter IP-address of DNS-Server•
WLAN-setting• : This setting is only available in connection with anUSB-WLAN-
Adaptor with Realtek/Ralink-Chipset.

18
MMS-1000Setup-System
Setup-System
System
Menu language• : Select the language for the main menu. You can select bet-
ween 9 languages.
Text coding• : Select the character coding. It is advisable to use Unicode(UTF8).
System update• : To do a system update do the following steps (ATTENTION: If
you do not stick to the instructions, irreparable damages can be occured):
Download the current system software with your PC on:•
http://www.camos-multimedia.com
Unpack the archive and copy the le with the ending • .upgrade to the root path of a
USB data carrier.
Connect the data carrier to MMS-1000 and select• system update. You will be asked, if
the le is correct. Conrm with OK/Enter.
Device switches off and starts the system update.•
Do not disconnect the device from power!
After the succesful update the device restarts.•
Time• : Select Manuel to set the time and date by hand or Autom. (via DTV) to
do it automatically via DVB-T.
Parental control• : With the pass word 0000 you open a sub menu with several
settings for parental control.
R/RW-Autoplay• : Switch on/off the automatic play back of CD or DVD.
Angle sign• : If more then one camera angle is available, there is a camera
angle sign. This function can be switched on/off.
HDD Format• : Formatting a hard disk which is connceted via eSATA.
Factory default• : Select OK to do a factory default.

19
MMS-1000 Setup-Other
Setup-Other
Other
Resume Play• : Switch this function ON, to start a paused play back on the same
point.
Slide show Timing• : Select the transit time between the pictures during the slide
show.
Transit effekt• : Select a transit effect for the slide show.
Back ground music• : Select if the back ground music will be opened form folder
or a Play listl or switch it Off. The play list has to be in the same folder like the
pictures.
Screen Saver• : Switch it On or Off.
Movie Preview• : Switch the preview on/off.

20
MMS-1000Timer
Timer
Time controlled recording (Timer-recording)
In the timer menu all schedules will be shown.
Change between the functions with LEFT/RIGHT.
If EDIT is selected you can choose with UP/DOWN a schedule and to edit it press
OK/Enter.
With the function „Add a new schedule“ you can creat new schedules.
Change the settings with UP/DOWN. Go to the next setting with RIGHT or go back
with LEFT. Select a source. On the right upper corner the current channel is dis-
played. In the next step you set the date and time, plus the recoring time. In the
next gap Repeat, you can select wether this is only a single, daily or an on certain
days recording. Afterwards you select the device, on which you will record. If you
have a hard disk with USB connection, select USB. You have already set the Qua-
lity in the setup. Select if a Nicam-signal shalll be recorded, when it is available.
Conrm with OK/Enter and select Conrm.
Table of contents
Other Camos Media Player manuals