XCM Xbox 360 Installation guide

Ⅰ. Product function:
The XCM FPS Programmer can work on all FPS games and program specific settings. Not
only is it compati le with popular games like Modern Warfare, Battlefield, Call of Duty, Gears
of War etc., ut on all current X ox 360TMFPS games and the future first person shooter
games. It is the most powerful FPS gaming gear.
- Composed key function: you are a le to map multi-keys (up to 8 keys) to anyone of the
single keys (A, B, X, Y, RT, LT etc, after mapping to this composed key), and those multi-keys
can e worked synchronously, sequence or in time interval y simply clicking the composed
key.
- Auto reloads: Gamers are a le to set the auto reload function after a few shots or when it
runs out of ullets
- Compati le with all versions of X ox 360TMconsoles.
- Plug and play device.
- Supports PS3TMcontroller tilt function.
- Supports X ox 360TMwired controller and PS3TMwired controller.
Ⅱ. Device introduction:

<1>----USB plug
Connect to Xbox 360TMconsole.
<2>----Turbo sw tch.
ON—Turn on Rap d f re
OFF—Turn off Rap d f re

<3>----Mode sw tch
Mode A: Mapped keys work at the same t me.
Mode B: Mapped keys work n a sequence
<4>----Analog st ck LED nd cator
<5>----Memory key- M1 – M5
<6>---- T lt Sw tch
Only works onPlaystat on3™w red controller.
L—Left Analog St ck
R—R ght Analog St ck
OFF—Normal
<7>---- Program LED Ind cator
<8>---- Program Sw tch
<9>---- Mode C LED nd cator.
<10>---- Memory key- Mode C button
<11>---- USB Port
(Playstat on3™ / Xbox 360™ w red controller plugs nto th s port.)
Ⅲ. How to connect:
Plug n the XCM FPS Programmer to the Xbox 360™/Xbox 360™Sl mconsole.
The d agram below shows you how to connect to the console:


Note: theOff c al WIRED Xbox 360 TM
controller must be requ red for us ng on XCM FPS Programmer.
*NO PLAY AND CHARGE USB CABLE.
The work ng step s as below:
F rst, connect the FPS Programmer to the Xbox 360TMconsole and then plug n the WIRED Xbox
360TMcontroller. Wa t unt l the Gu de key stops bl nk ng. Connect on s successful.
Ⅳ. How to use the tilt functionality:
T lt Funct on—Us ng the PS3™ T lt funct on on Xbox 360™ console:
(1) Turn on the TILT sw tch on the FPS Programmer to “L”. The PS3 controllers T lt funct on replaces
the Xbox 360 WIRED controller “Left” analog st ck.
(2) Turn on the TILT sw tch on the FPS Programmer to “R”, the PS3 controllers T lt funct on replaces
the Xbox 360 WIRED controller “R ght” analog st ck.
(3) Turn on the TILT sw tch on FPS Programmer to “OFF”,Thet lt funct on s now turned off.
Ⅴ. Default configuration
The default sett ng for Xbox 360™, PS3™:


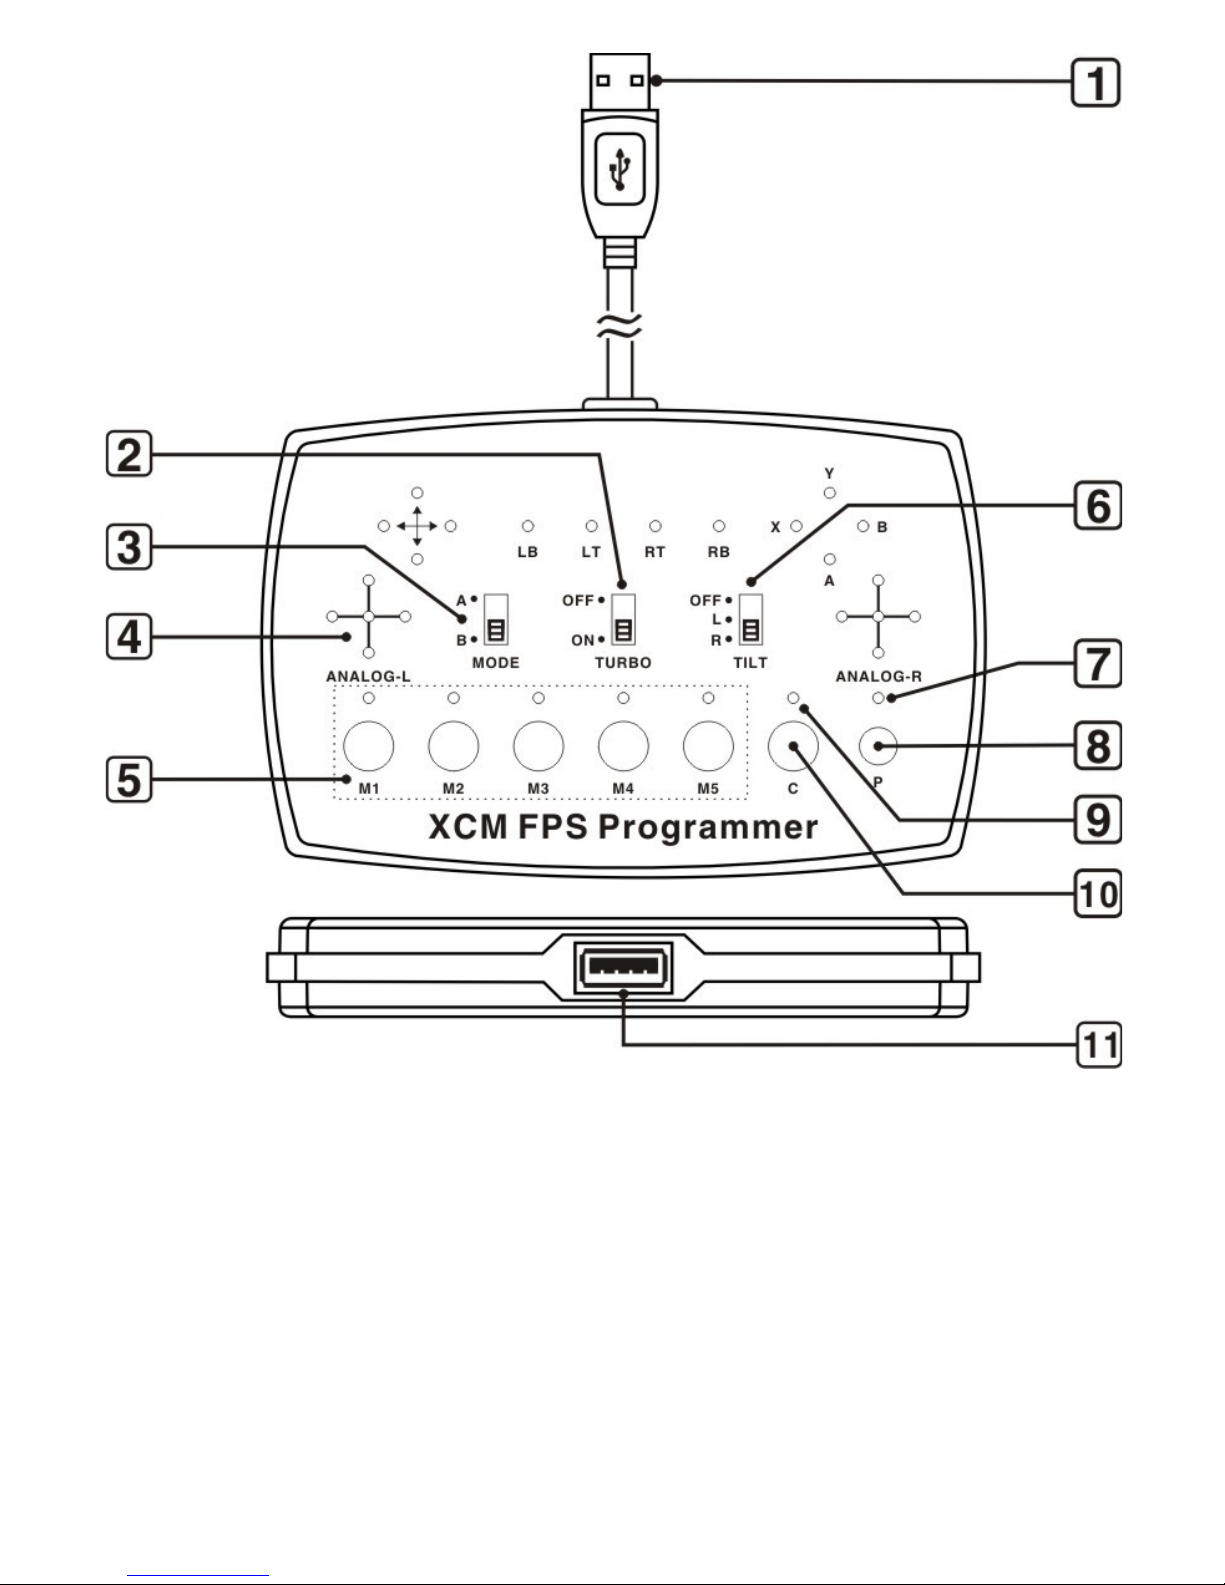
Ⅵ.How to set up the composed key function:
XCM FPS Programmer has 6 bu lt- n Memory keys (M1~M5 and C), each Memory key can store up
to 8 commands for us ng on composed key.
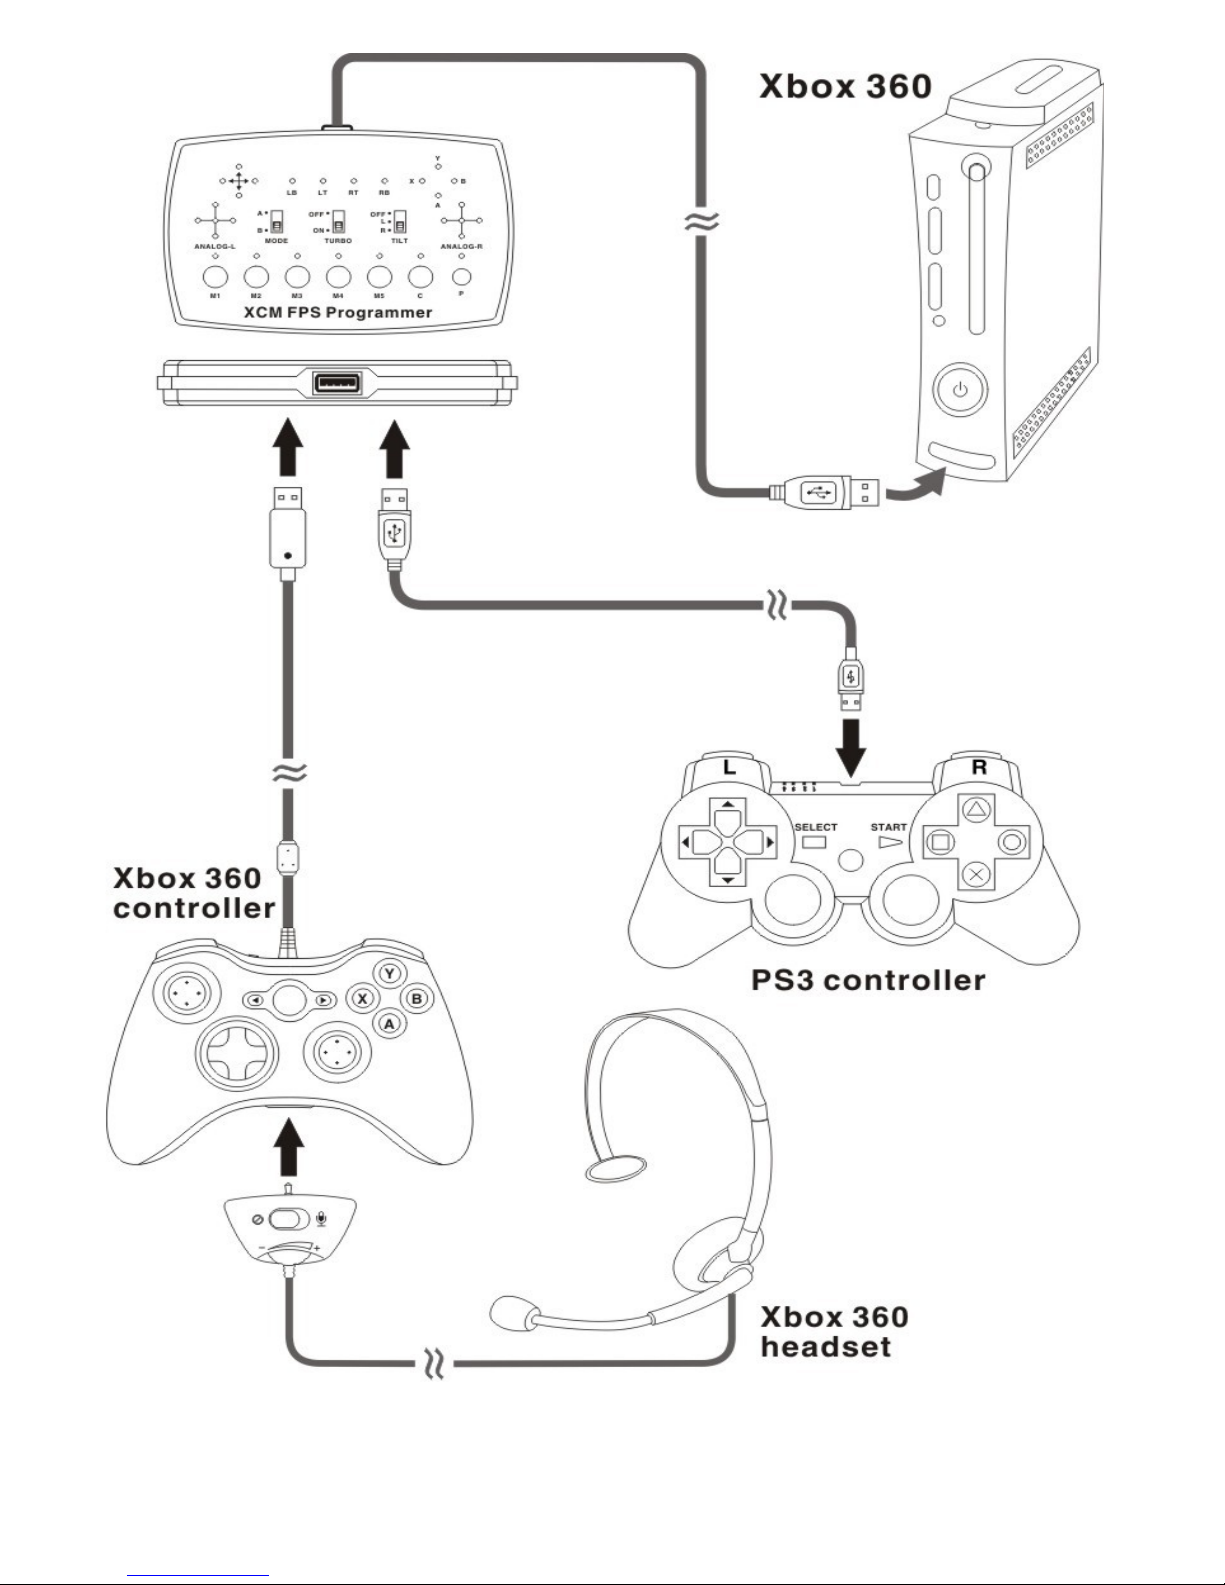
Note: The Memory key sett ng only works on 360 w red controllers, after the sett ngs are saved, you
can connect the PS3TMcontroller to use the Memory key funct ons.
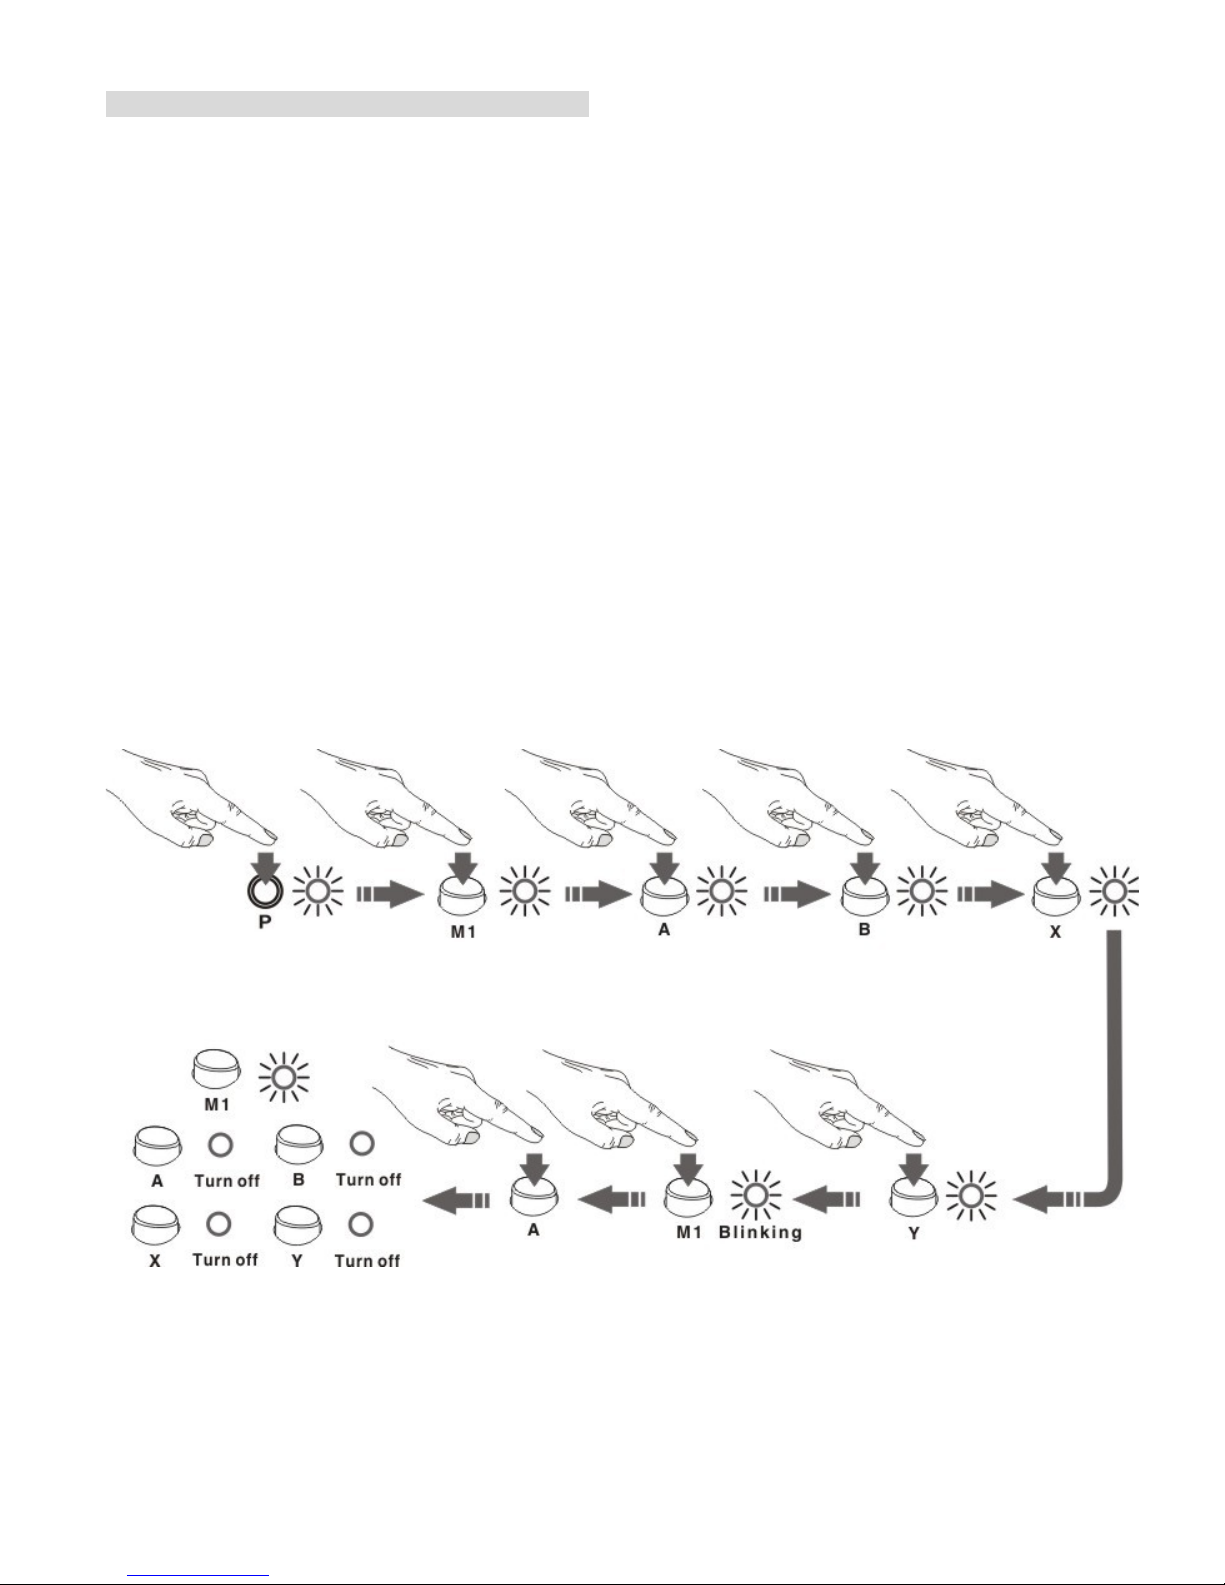
For nstance: If you want to map 4 keys (A, B, X, Y) work ng together on (A) key (as composed key)
the same t me, that means when you press the A key, t w ll operate A, B, X, Y keys at the same t me,
and save th s sett ng nto the M1<5> Memory key, the steps are shown below:
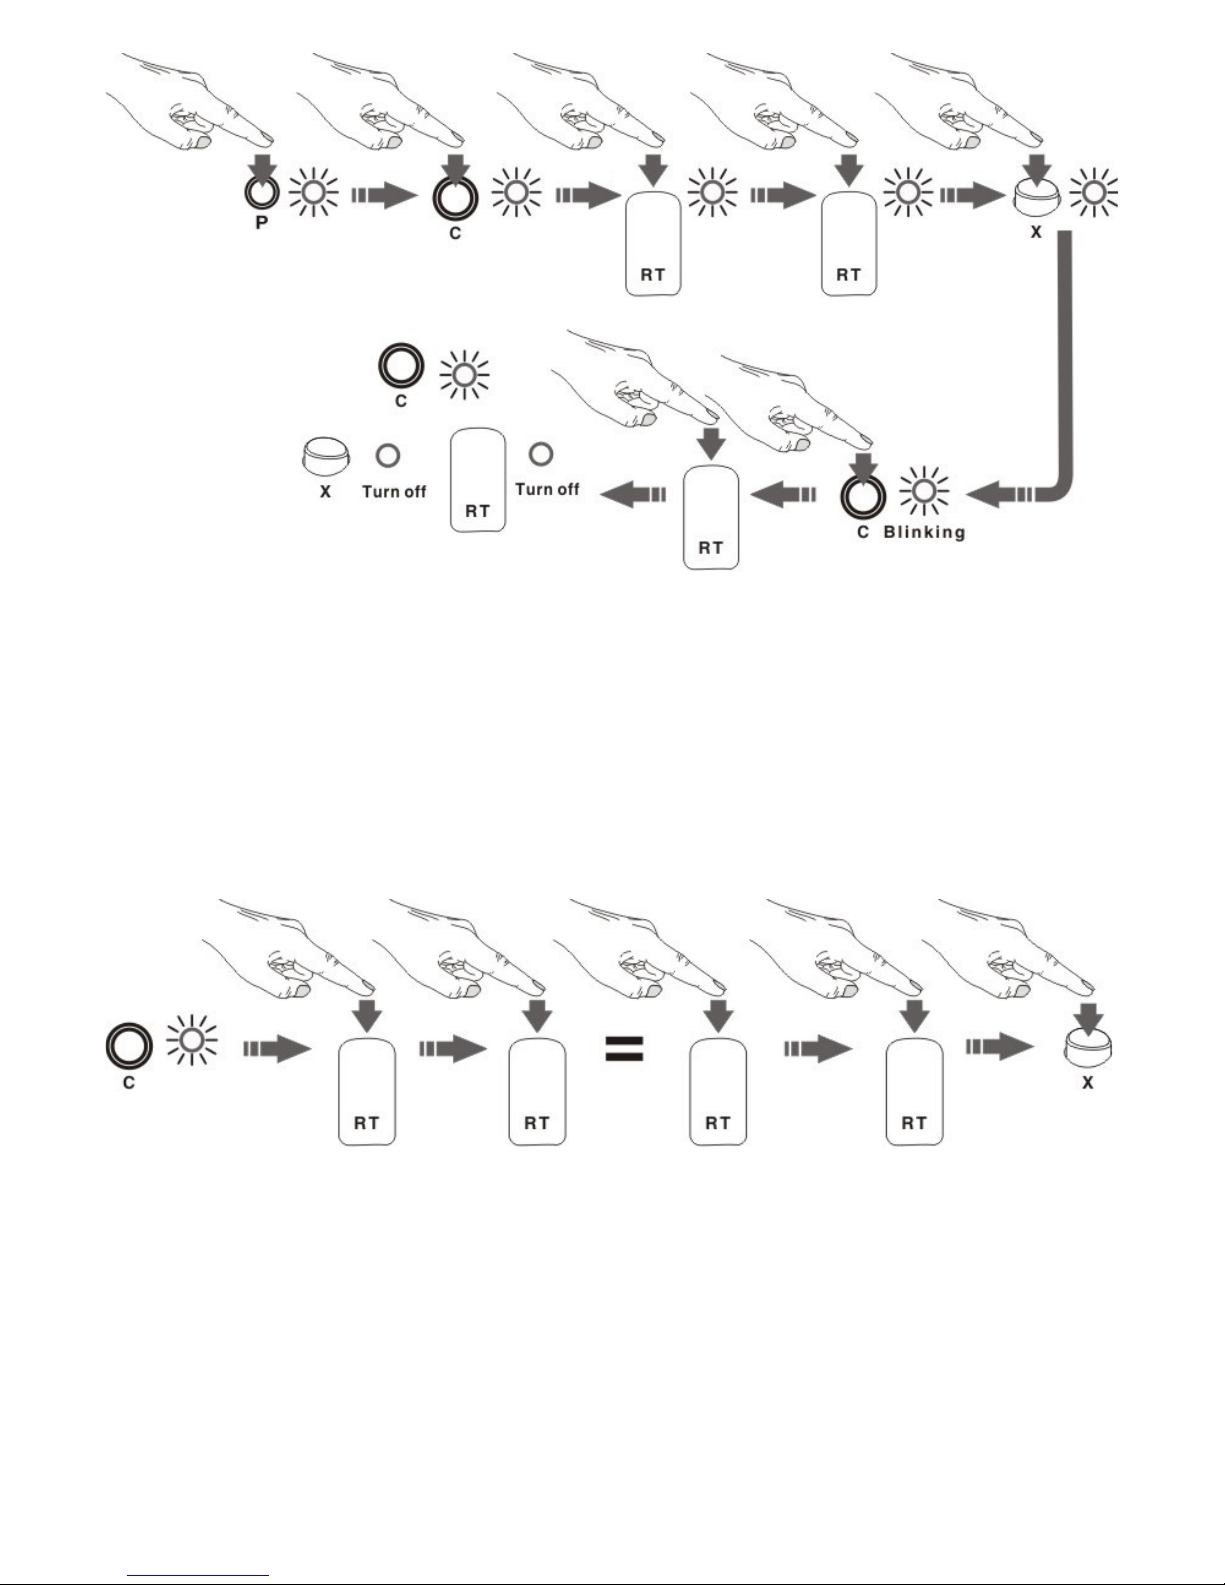
1. Press down the P button on the dev ce, the P LED nd cator <7> l ghts up.
2. Press the M1 button (on the dev ce) ,the M1 LED nd cator l ghts up.
3. Press the A, B, X, Y keys on your controller, the A, B, X, Y keys l ghts up n order; the XCM FPS
Programmer w ll store the sett ng n sequence and the length of press ng t me. (Some act ons may
take 1-2 seconds to complete, n th s case, f B key s acted as prone, t may take 2 seconds, you w ll
need to press the B key for 2 seconds to set th s mot on).
4. Now press the M1 button aga n. The M1 LED nd cator bl nks.
5. F nally press the A key on your controller. The A, B, X, Y LED nd cator l ght turns off. If the M1 LED
nd cator s ON, the sett ng s complete. (A key s now acted as the composed key)
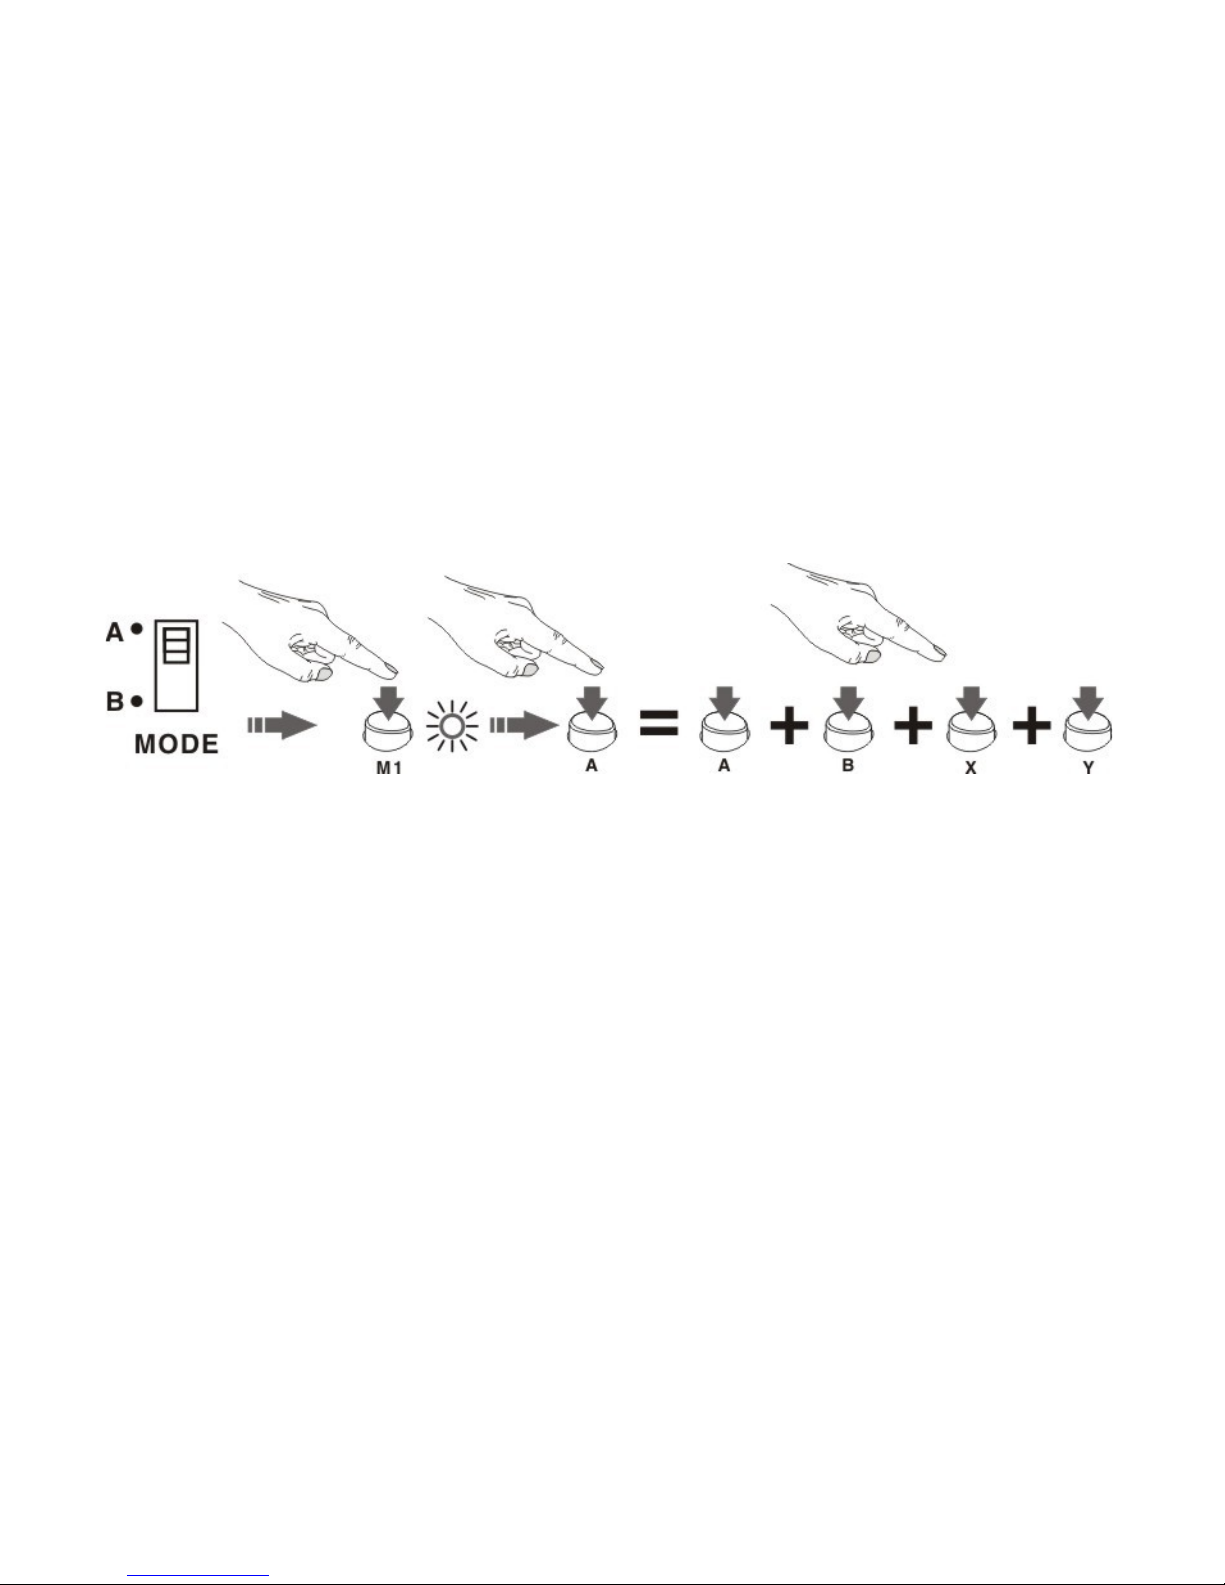
After sett ng the above sett ngs, you can operate th s sett ng w th 2 modes.
Mode A – All mapp ng keys work synchron zed.
Mode B – All mapp ng keys work n sequence accord ng to the length of the press ng t me.
How to use the 2 composed key modes (Mode A and Mode B).

ModeA<3>: Press ng the composed key, w ll act vate all the keys’ funct on wh ch was mapped ns de
the composed mode together.
How to work (after the previous( VI) setting)
The mapp ng steps are shown below:
1.Switch to Mode A <3> (on the XCM FPS Programmer)
2.Press the M1 utton (on the XCM FPS Programmer)
3.The M1 utton LED indicator lights up.
4.Press the A key on your controller
5.TheA, B, X, Y keys worksynchronously.
Mode B <3>: Press ng the composed key, w ll act vate all the keys’ funct on wh ch was mapped ns de
the composed mode n sequence.
How to work (after the previous (VI) setting)
The mapp ng steps are shown below:
1.Sw tch to Mode B <3> (on the XCM FPS programmer)
2.Press the M1 button (on the XCM FPS programmer). The M1 LED nd cator s ON.
3.Press the A key on thexbox360TMcontroller, the A key w ll operate the (A, B, X, Y) key funct on n
order as n the (VI) sett ng.

The funct on of spec al Mode C<10> (Memory key):
For example: If you want to press the RT button tw ce thenreload bulletsby press ng X key, and set
th s sequence of act on on the RT button.
The steps are shown below:
1.Press the “P” button on the XCM FPS Programmer dev ce. The “P” LED nd cator <7> w ll l ght up.
2.Press the Mode C button <10>. The C LED nd cator <9> w ll l ght up.
3.Press the RT button (on your controller) tw ce then press the X key. The RT and X LED nd ctor on
the dev ce are both l t up.
4.Now press the C button (on the dev ce) aga n and the C LED nd cator <9> (on the dev ce) w ll
beg n to bl nk.
5.F nally presses the RT button on the controller and the RT and X key LED nd cator on the dev ce
are both off. The C LED nd cator <9> (on the dev ce) stops bl nk ng and l ghts up. The sett ng s
completed.

How to use the Mode C <10>(Memory key):
S mply press down the Mode C button. The C LED nd cator <9> s ON and you are able to use th s
Memory key funct on by press ng the RT button (on the controller) for tw ce then release the RT
button. The sett ng automat cally executes the X button funct on (reload bullets).
Turn off the composed key funct on.
Press down the (Memory key) M1~M5 or C button (wh ch you want to turn off), unt l the nd cator l ght
turns off. The composed key funct on on that Memory key s temporar ly off; f you want to resume the
funct on, just press that Memory key aga n.
Note: You can only use one Memory key (M1~M5 or C button) at a t me. If you want to change to
another composed sett ng, press the Memory key you want (for nstance, f you are us ng the M1
sett ngs and wants to change to M2 sett ngs, s mply press the M2 button. The M2 LED nd cator turns
ON and the M1 LED nd cator turns off automat cally), and you w ll have the M2 (Memory key) sett ng,
the M1 (Memory key) sett ng should be off.

Ⅶ. Rapid fire (Tur o) function:
Sw tch the Turbo (on the dev ce) to ON, the rap d f re funct on s now enabled, f sw tch to OFF; the
rap d f re funct on w ll be d sabled.
When the Rap d f re/Turbo funct on s sw tched on n ModeA, all the buttons ns de the composed key
has Rap d f re/Turbo funct on.
When the Rap d f re/Turbo funct on s sw tched on n Mode B, the Rap d f re/Turbo funct on w ll
proceed out n order ( n cycle).
The Rap d f re/Turbo funct on doesn’t work on Mode C.
Ⅷ. Remove the M1~M5 and C setting:
Press and hold (Memory key) M1~M5 or C button you want to erase for 3 sec. All the mapped button
LED nd cators on the dev ce w ll l ght up n a sequence cycle, now the composed key sett ngs on that
Memory key s reset to the default sett ngs.
This manual suits for next models
1