Xcube X-501 SR User manual

INSTRUCTION MANUAL
INSTRUCTION MANUAL 4
ИНСТРУКЦИЯ ПО ЭКСПЛУАТАЦИИ 25
X-501 SR
portable multimedia player
501IM.indd 1 30.03.2007 12:26:51

2
501IM.indd 2 30.03.2007 12:26:51

501IM.indd 3 30.03.2007 12:26:52

English
4
Instruction Manual
Portable Multimedia
player X-501SR
Copyright / Trademark
Thanks for your purchasing XCube
X-501SR.
We’re very sure that X-501SR would
sufficiently satisfy you and make
your life more exciting.
This manual will help you safely to
use the product.
Please be sure to check this manual
carefully before the usage.
1. Copyright
XCube is the registered trademark of New
Media Entertainment (NME),Inc in USA.
= This is for home use only and
cannot be used for business
purpose.
= New Media
Entertainment(NME),Inc. has
all the rights of trademarks
and intellectual property of this
manual.
= It is prohibited to distribute this
manual in part or whole parts
illegally.
= All software, audio, video and
game which have an intellectual
property is protected by the
copyright.
= We recommend Users to
register our homepage, www.
xcubedigital.com, which
provides all information of
company, products and other
related technical information.
= All contents included in this
User Manual are subject to
change without any prior
notice for improving features
or according to changing
specification.
Chapter One
Introduction
1. Button, port and connection
Front side
1. Color TFT LCD screen
2. LEFT: Left selection (Single
press or long press on this
button for rewind)
. Equipment working state
indicator (red), battery charging
indicator (blue)
4. UP: Upward selection (A long
press on this button can turn
the volume up. In MP playing
state, a single press on this
button can select the previous
music)
501IM.indd 4 30.03.2007 12:26:52

English
5
5. OK: Enter button
6. RIGHT: Right selection (Single
press or long press on this
button for fast forward)
7. DOWN: Down selection (A
long press on this button can
turn the volume down. In MP
playing state, a single press on
this button can select the next
music)
8. BACK: Return button
9. MENU: Menu button
10. POWER: Press this button and
hold for seconds, PMP will be
turned on. Press this button and
hold for seconds and PMP will
be turned off
12. HOLD button: Used for button
lock control in main body of
PMP
1. Reset button: Used for reset
operation
Top side
14. MIC: Used in digital audio
recording
15. SD storing card slot
Left side
16. Earphone output port: Used for
output of stereo sound
17. USB 2.0 full speed port: Used
to connect PMP with digital
devices.
18. Line in port
2. Introduction to other acces-
sories:
AC adaptor
• Only special charger/adaptor
of XCube accessories shall be
used
• Prior to initial application, the
battery shall be charged for
more than four hours
Mode for PMP may select corre-
sponding cable.
1)When PMP is used as OTG Host
(digital mate): When PMP is used
as main device, USB_Host cable
connects PMP with digital devices
such as U-disc and digital camera.
Upon connection, data in digital de-
vices such as U-disc can be trans-
mitted to PMP flash disc.
Method of operation: Turn on PMP,
enter “Setup” menu through main
menu. Select “System”, and for USB
operation mode select “OTG Host”.
Move cursor to “Enter” button and
then press “OK” button on panel or
remote controller to enter setup.
Connect digital devices such as
501IM.indd 5 30.03.2007 12:26:52

English
6
PMP or U-disc with corresponding
USB port by USB_Host cable. Cor-
responding digital devices can be
identified in “File browsing” menu,
with the name of the file folder being
“usb-disk”. The default USB mode
of operation is OTG Host mode.
2) When PMP is used as card
reader: There is a built-in SD/MMC
card reader in PMP. PMP can be
used as an ordinary SD/MMC card
reader and data transmission be-
tween SD/MMC card inserted in
PMP and PC can be realized.
Method of operation: Turn on PMP,
enter “Setup” menu through main
menu. Select “System”, and for USB
operation mode select “OTG SD
Reader”. Dialogue box “Please in-
sert SD card” will pop up on screen.
Insert SD card as prompt. Move
cursor to “Enter” button, and then
press “OK” button on panel or re-
mote controller to enter setup. Con-
nect PMP with corresponding USB
port on PC by USB_Device cable.
SD card in PMP can be identified in
PC file management interface.
3) When PMP is used as remov-
able drive disc : When PMP is used
as the accessory device of PC,
USB_Device cable connects PMP
with PC. Upon connection, data
transmission between PMP and PC
can be realized.
Method of operation: Turn on PMP,
enter “Setup” menu through main
menu. Select “System”, press direc-
tional key < to select “USB MTD”.
Following instruction from screen,
connect USB_Device cable with port
on PMP. Upon connection, PMP
screen will prompt: “USB application
model, system is locked, remove
USB cable from PC to unlock”. Re-
movable drive disc icon will appear
on screen. When it is connected, it
can serve as removable drive disc. If
the operation system of PC is Mi-
crosoft Window 2000 or above, PMP
can be identified without the need
to install USB driver. For Microsoft
Windo98, USB driver shall be in-
stalled prior to operation.
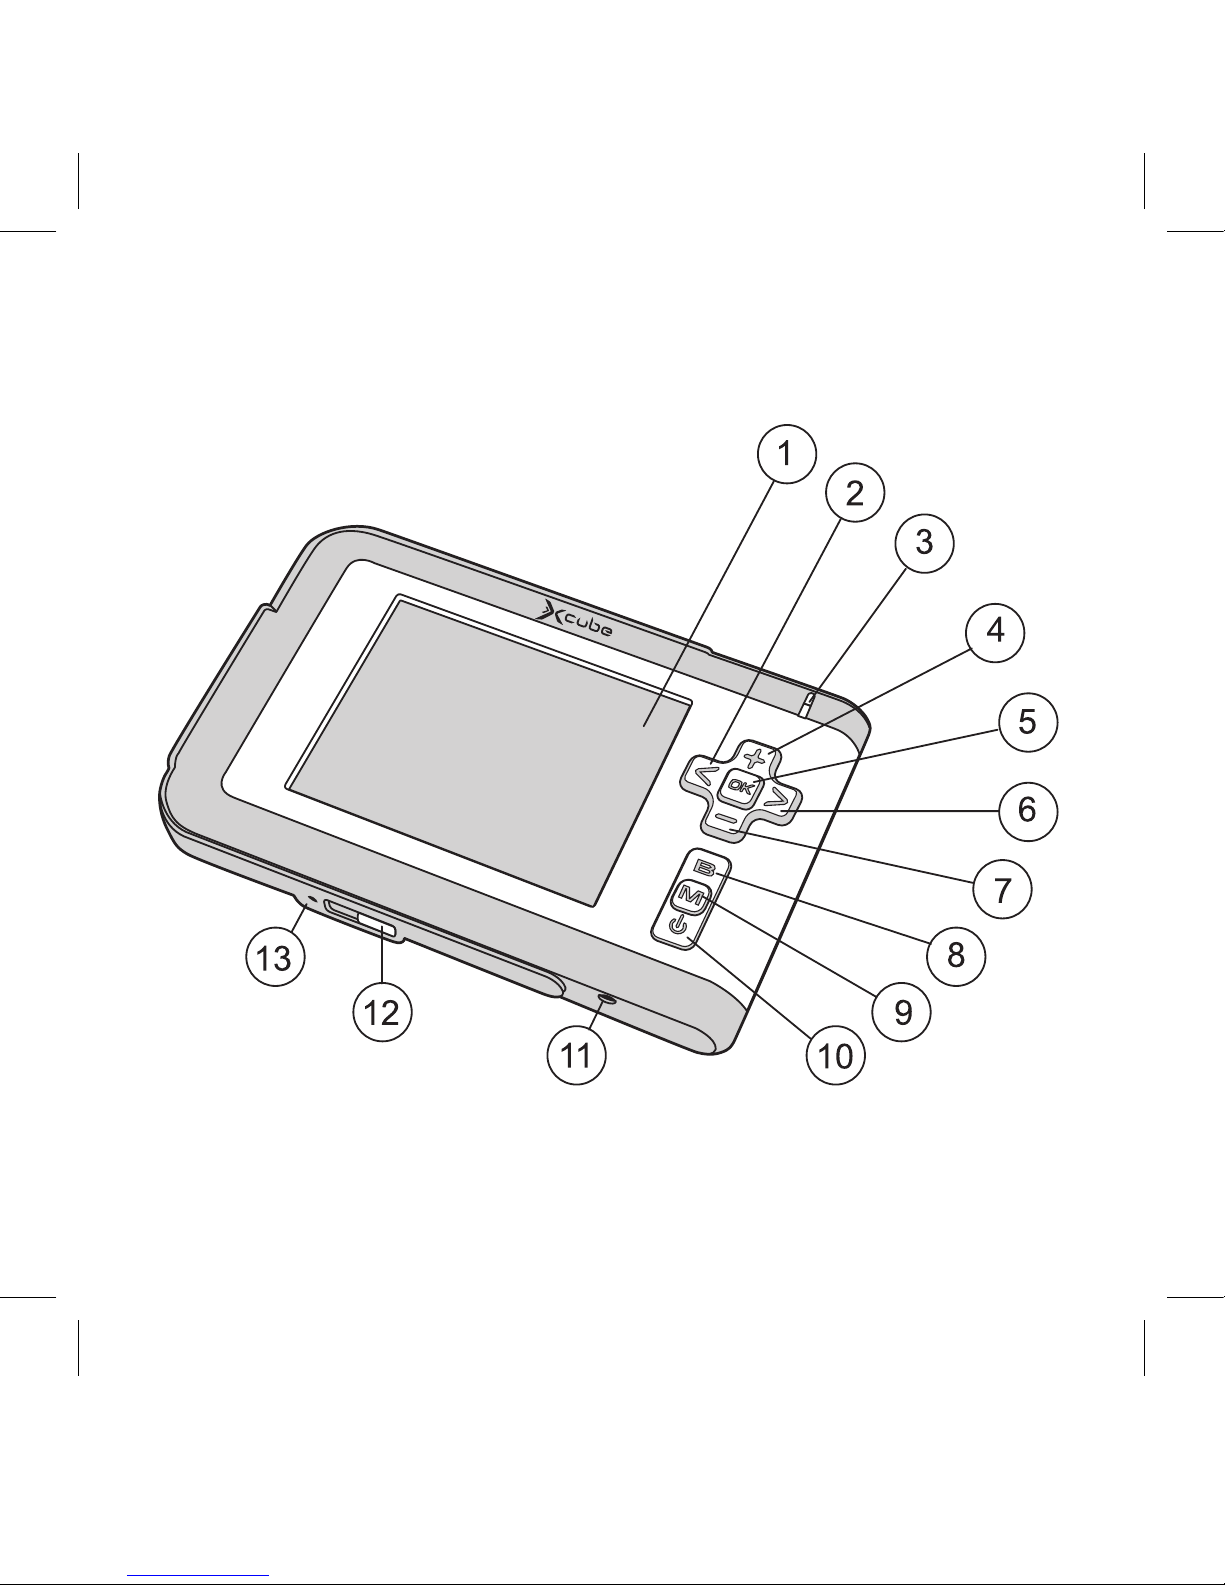
Earphone:
Connect the audio frequency plug of
the earphone to the audio frequency
port on PMP, and you can enjoy high
definition stereo music.
3 .Connect USB cable for data
501IM.indd 6 30.03.2007 12:26:52

English
7
transmission
4.Turn on PMP
When the system is not turned on,
press POWER button and hold for
seconds, the red working state
indicator will be turned on. If the
battery is installed or AC adaptor is
connected, the operation system
will start up. First, you will see a still
start logo, and then will enter sys-
tem main interface.
At this moment, please wait pa-
tiently.
After pressing on POWER button
and hold for several seconds, if PMP
turns off, it indicates that the battery
power is low. In this case, connect
AC adaptor to start charging.
5.Turn off PMP
When the system is turned on, press
POWER button and hold for sec-
onds, and the system will be turned
off. Press POWER button again to
turn on PMP.
Power saving mode
When the system is under standby
state or under playing state without
any operation for certain period of
time, PMP will enter power-saving
mode. Users can set up power sav-
ing contents and time parameters.
In power supply menu “Setup →
“power supply”, there is a setup
column with power supply option
“Battery” or “AC”. For column of
“System idle”, the ex-factory setup
is minutes, indicating that PMP
will be turned off automatically after
being in the idle state for minutes.
The setup varies from 1 to 9 min-
utes, or “NEVER”.
In setup column of “Screen off”,
the ex-factory setup is 20 seconds,
indicating that backlighting of the
screen will be turned off automati-
cally without button touching for 20
seconds. Press any button and the
backlight will be turned on. The
setup varies from 10 seconds to 90
seconds, or “NEVER”.
6. Altering user interface lan-
guage
PMP user interface language set up
as Russian (default setup).
To alter interface language setup,
select “Setup” icon on screen by
using directional buttons and then
press “OK” button.
And then select “Display” icon on
screen by using directional buttons
501IM.indd 7 30.03.2007 12:26:52

English
8
and then press “OK” button.
Select “Language” column by using directional buttons, select the desired
language, move cursor to “Enter” icon and then press “OK” button.
7. Battery charging
Please use special charger/adaptor of XCube PMP. Using other charger or
adaptor may cause damage to PMP. When blue indicator is on, it indicates
that AC charger/adaptor is charging. When the battery is fully charged, the
blue indicator will be off. Fully charged battery can support 16 hours *MP
music playing or 5 hours *AVI/MPEG-4 video playing. (Built-in screen).
* Depending on your method of application (stop/start/recording etc.)
* To ensure safety, consecutive charging time shall not exceed 8 hours. Nor-
mal charging time shall be within 4-8 hours.
8. Maintenance
Avoid shock or impact.
Keep away from heat source, and maintain good ventilation.
Keep away from water source or highly humid area.
Keep away from intensive magnetic field.
Ensure good connection. Avoid damage caused by kid unplugging PMP.
Do not disassemble PMP by yourself. No component inside can be used by
user. Unauthorized disassembling will cause invalidation of warranty.
9. Software upgrading
a) Press UP and POWER button to restart and enter the UPGRADE
operation. Connect PMP with PC via USB cable. Icon of removable disc
will appear on screen. If no icon is found, try again.
b) Copy upgrading document (such as pmp.iamge.0712) to this removable
disc.
501IM.indd 8 30.03.2007 12:26:52

English
9
c) When the document is copied, find the disc icon in computer, right click
the icon and select “Jump” to remove the disc (PMP)
d) After the removable disc PMP is removed, PMP will still display device
on graphic. Do not unplug the USB cable and wait for approximately 10
seconds. Then the power indicator and the screen in PMP will become
dim and finally the device is turned off, indicating successful upgrading
of the system.
e) Through [Main menu -> Setup -> System], you can view information of
“Hardware version”, such as SEP 02 2005 17:05
501IM.indd 9 30.03.2007 12:26:52

English
10
Chapter 2. Product specifications
Main functions and specifications
= Memory: 2048 Mb
= Port type: USB 2.0 full speed,
SD Reader.
= Video playing format: Capable
of playing audio and video files
with the following formats:
MPEG-1/(DAT, MPEG), MPEG-
4/(AVI, DIVX-5.x, Xvid), ASF
and WMV. The breakthrough
about this product is RM/RMVB
format supporting.
= Flash programs: Movies of
*.SWF format can be played.
= Audio playing format:
Compatible with MP (0-
20Kbps), WMA, WAV
(PCM&ADPCM), supports lyrics
synchronizing for MP-ID.
= Audio recording format: Built-
in MIC independent recording
is capable of recording stereo
program of MP, WAV and
ADPCM format.
= Picture browser: Compatible
with formats JPEG, BMP, GIF
and PNG ( with pixels less than
2272X1742)
= Flash games
= Card reading function: Directly
compatible with SD/MMC
memory card, capable of
playing programs stored in
card.
= Text reader: With e-book
function, capable of browsing
files of *.TXT format in PMP
(with size smaller than M)
= Consecutive playing time: 16
hours for MP, and 4.5 hours
for video program (MPEG-4)
= Good compatibility for software
upgrading. Free upgrading
software can be downloaded
from our website
= LCD screen: 2.5 inch color TFT
LCD 20X240 pixels, 262K
color
= Rechargeable lithium battery
pack or external power supply
via adaptor, supporting
charging via external power
supply.
= Dimension: 101 mm X 66 mm X
1 mm
501IM.indd 10 30.03.2007 12:26:52

English
11
= Weight: 96 g
= Operating temperature: 0-450C,
relative humidity below 90%
= System requirement for PC:
Pentium II 266 MHz, Microsoft
R Windows ME/2000/XP, 64MB
RAM or above
Chapter 3. Introduction to func-
tions and application
Main menu shown as below
1. Video playing
Select “Video playing” icon in main
menu by pressing 3456 direc-
tional buttons.
Press enter button to come to file
listing. Select video files which can
be identified by directional buttons
(for video formats compatible with
PMP please refer to introduction in
previous page), press OK button
and start playing.
During the process of playing,
repetitive pressing on MENU but-
ton can open setup menu. Select
desired setup menu by pressing
on 56 directional buttons. Press
56 directional buttons to select
setup item. Press “Back” button
to exit and it is done. Setup can be
adjusted via MENU button, such as
functions including graphic effect,
sound track selection and viewing
parameters of video files.
In play list, press MENU button
to open editing menu. Repetitive
pressing on MENU button or 56
directional buttons can switch to dif-
ferent setup menu. Press OK button
to enter.
501IM.indd 11 30.03.2007 12:26:52

English
12
Specification of the video playing file is shown in chart below:
File format Video
coding
Max.
resolution
Frame Bit rate Audio
coding
Sampling
frequency
AVI Divx ,
4, 5
QVGA 0 fps 1 Mbps MP 8~48KHz
MP4 MPEG 4
SP, ASP
QVGA 0 fps 1 Mbps AAC 8~48KHz
DAT MPEG 1 QVGA 0 fps 1 Mbps MP 8~48KHz
RM/RMVB RV 20, 0,
40
QVGA 25 fps 84
Mbps
RA 10,
20
8~44KHz
2. Audio playing
Select “Audio playing” icon in main menu by pressing 3456 directional
buttons.
Press enter button to come to listing of JUKEBOX. Select desired music
listing mode via 56 directional buttons (All songs/ Play lists /Albums/Art-
ists/Genres). Press OK button to enter corresponding play list, select desired
music via 56 directional buttons, and press OK button to start playing.
Remarks: JUKEBOX is a kind of automatic classification per ID- information
of MP files, so under JUKEBOX model only files of MP format can be iden-
tified. For files of other types which can be played, they can only be listed
501IM.indd 12 30.03.2007 12:26:53

English
1
or viewed by entering folder via
browser. Editing of music files has
to be performed by entering folder
via browser
During the process of music play-
ing, repetitive pressing on MENU
button can switch to different setup
menu. Select desired setup menu
by pressing on 56 directional but-
tons. Press on 56 directional but-
tons to select corresponding setup
item. Press Back button to exit and
it is done. Press MENU button to set
up repetitive playing, screen on or
off and viewing MP ID- parameter.
Singer, album and song: While
creating MP music files, some
information can be added (such
as singer <Emilia>, album <Now>,
song <Big big world>). If the above
information is contained in MP
files, it will be displayed along with
the music playing. If the above in-
formation does not exist, root folder
name, current folder name and song
name will be displayed in sequence
in PMP.
Play list: A play list is the list showing
the songs to be played in PMP in
sequence. For each time, only one
play list can be processed by PMP.
User can create new play list, add
or delete songs to play list or save
play list as file for future application.
There is no restriction on quantity
of play list and they can be stored
in hard drive disc of PMP. Play list is
marked with special icon (shown in
figure below)
Playing one play list
To play a play list, what user has to
do is to select this play list and then
press OK button. The song list will
be added to PMP and displayed in
corresponding panel. All songs will
be played in sequence displayed.
User can also open play list file in
501IM.indd 13 30.03.2007 12:26:53

English
14
computer by using text editor such
as notepad. Then you can see that
play list is just a list of files to be
played, as well as the path in hard
drive disc to locate these files.
If play list is deleted from PMP, what
has been deleted is the play list but
not the music files.
B. Method of saving play list
Each time a play list is created by
user, we recommend that it shall
be stored in a separate play list file
folder. Play lists take up a very small
space in hard drive disc. If properly
named, they can make your access
to your favorite songs very conven-
ient. Select audio playing in main
menu, enter audio playing directory
list/Jukebox. And then enter one
of the directories, select song and
press directional button. You will see
that the screen is divided into left
portion and right portion, with “Add
on bottom” and “Add on top” ap-
pearing in lower part of the screen.
Select song by pressing buttons,
select “Add on bottom” or “Add on
top” via MENU button. Press OK
button, and songs will be added to
play list on the right. Press direc-
tional button again, and you can see
“Play, Up, Down, Remove, Save”
appears in lower portion of screen.
Select “Save” by repetitive pressing
on MENU button. If no other opera-
tion is required, press directional
button to return. Repetitive pressing
on directional button to exit to root
directory of classification list. Press
BACK button again to return to main
menu.
501IM.indd 14 30.03.2007 12:26:53

English
15
3. Flash playing
Select this icon by pressing 3456 directional buttons.
Press Enter button and come to file list. Press directional buttons to select
*.SWF format files to play flash programs.
If there is “PLAY/START/PLAYING” button in flash program, select cor-
responding play button by pressing MENU button or 3456 directional
501IM.indd 15 30.03.2007 12:26:53

English
16
buttons. Press OK button to start
playing.
Flash games can be operated by
pressing 3456 directional but-
tons (only support games with but-
ton functions identical with those
in PMP)
4. Audio recording function
A. Setting up audio recording pa-
rameters: Select “Setup icon” by
pressing 3456 directional but-
tons and OK button in main menu.
Enter recording main menu:
Video bit rate: No need to set up
Audio format: MP and WAV record-
ing format are optional
Audio bit rate: 44KHz or 8KHZ is
optional
Input volume: Volume adjusting is
0-100 level
B. Select “Recording” icon by
pressing 3456 directional but-
tons and OK button in main menu to
start recording.
C. During the process of recording,
you can press OK button to pause
(“Pause” appears on screen). Press
OK button again to go on with re-
cording.
Upon completion of recording,
press BACK button to exit and it will
be saved automatically.
D. Storing recorded files
Recorded files can be stored in Au-
dioRec folder. Select “File browsing”
in main menu, select hd directory
and enter audio recording file folder
(AudioRec). The recorded files will
be listed in sequence of numbers.
File with the biggest number is the
latest recorded file.
5. Picture browsing
A. Select “Picture browsing” icon by
pressing 3456 directional but-
tons and OK button in main menu
B. Picture browsing: Press
3456directional buttons to
select picture and then press OK
button to view the picture. PMP will
501IM.indd 16 30.03.2007 12:26:53

English
17
automatically adjust the picture
size to fit in the built-in screen or TV
screen (if output to TV is selected).
C. Select picture by pressing direc-
tional buttons in file list. On the low-
er right of the selected picture ap-
pears a small preview picture. Press
OK button for full screen viewing.
D. Picture rotating: In full screen
display, press OK button and the
picture will rotate for 90 degrees
clockwise.
E. Picture enlarging: In full screen
display, press directional button to
enlarge picture. Press directional
button to return to original size.
F. Picture horizontal shifting: In pic-
ture enlarged display, press MENU
button to switch to “Pan Mode”
mode. Press OK button to enter,
a four-directional red icon will ap-
pear in the lower right of the screen,
indicating that the picture can be
moved. Press directional buttons to
move the picture in four directions
including up, down, left and right.
G. Display a group of pictures: In full
screen display, press MENU button
to select a group of pictures (4 to 9
pictures). The selected pictures will
be marked with read frame. Press
OK button to display the pictures at
full screen
H. Automatic picture displaying. In
picture displaying status, continu-
ous pressing on MENU button can
switching over to ‘Slide Start’ func-
tion to display pictures in sequence
automatically.
6. Document browsing
501IM.indd 17 30.03.2007 12:26:53

English
18
Select “File browsing” icon by pressing 3456 directional buttons and OK
button in main menu
File browsing can perform function similar to the file management function in
PC. File can be deleted, and media files which can be identified by the sys-
tem can be played or executed in a direct way, such as video, music, picture
and *.txt files.
The e-book function of PMP can be realized in the menu. Locate the stor-
ing directory for *.txt files, and press OK button to open the *.txt files. Press
3456 directional buttons to move the cursor.
Folders created by PMP system and is shown below cannot be deleted.
Folder name and function description are as below:
Folder name Path Related functions Function description
Audio Audio Audio paying Music file/lyric file
directory
Play list Audio\play list Audio paying Play list directory
Lrc Audio\lrc Audio paying Lyric files (*.lrc format)
directory (lyric file can
also be stored in Audio
directory, but the name of
the lyric file must be the
same with MPfile. Onlu
in this way can the lyrics
be displayed while playing
MP)
Audio Rec Audio Re Audio recording Directory storing audio
recording
Photo Photo Photo browsing Directory storing graphics
501IM.indd 18 30.03.2007 12:26:53

English
19
Video Video Video playing Directory storing video
files
Swf swf Flash playing Directory storing flash file
tmp tmp Directory storing
temporary files generated
by system
7. Setup
A. Select “Setup” icon by pressing 3456 directional buttons and OK but-
ton in main menu
B. The setup interface includes:
Display setup: Including user interface language and screen setup
Audio setup: Adjustment on sound track and volume, as well as turning on or
off built-in speaker.
Recording setup: Setting up recording parameters
Clock setup: Built-in real-time clock of PMP, displayed on the upper right of
the screen in 24-hour mode or 12-hour mode.
501IM.indd 19 30.03.2007 12:26:54

English
20
System setup: Setting up USB working mode (OTG Host, USB MTD or OTG
SD Reader), infrared receiving (on or off), and viewing system configuration
of PMP.
Power supply setup: In both modes of power supply (battery, AC), you can
set up power supply parameters in PMP for power-saving.
501IM.indd 20 30.03.2007 12:26:54
Table of contents
Languages:
Other Xcube Portable Multimedia Player manuals