XHDATA D-808 User manual
1
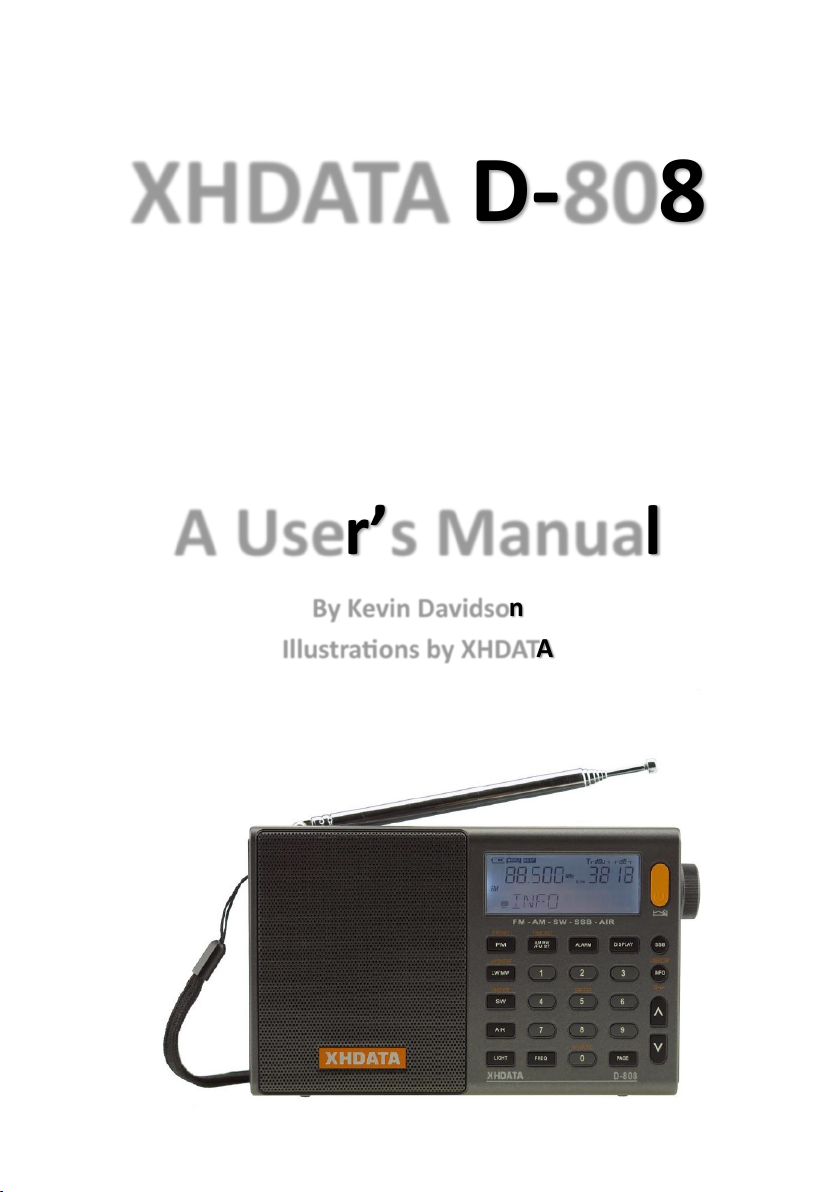
XHDATA D-808
FM Stereo/LW/MW/SW-SSB AIR RDS
Digital Signal Processing Receiver
A User’s Manual
By Kevin Davidson
Illustraons by XHDATA

2
Table of Contents
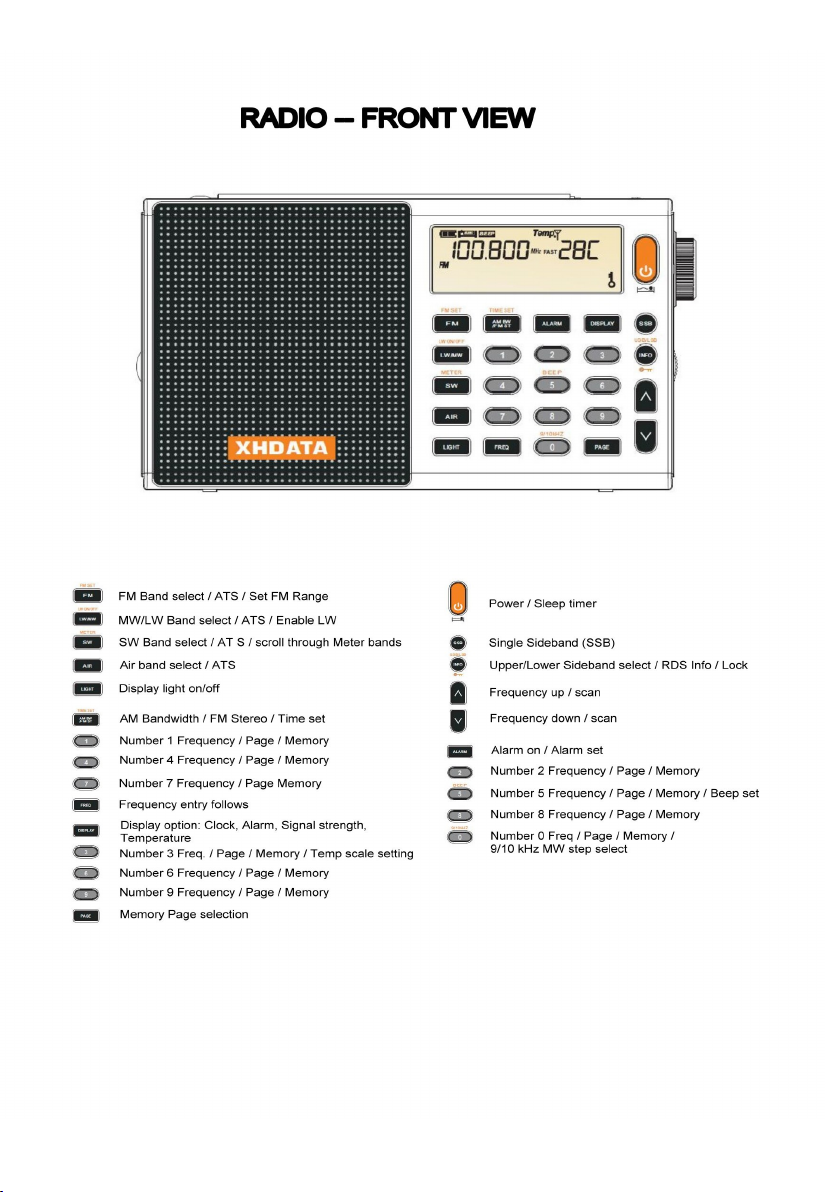
Radio - Front View 3
The Display 4
Side Controls 5
Radio Rear 6
Warnings 7
Quick Start Guide 7
Funcons and Operaon 8
Power and Charging 8
Power on Buon and Sleep Timer 8
Alarms 8
Charging the Radio 9
Operaons and Setup 9
FM Tuning Range 9
Longwave Setup 9
Medium Wave step 9
Beep 9
Temperature 10
Seng the Clock 10
Lock 10
Display Light 10
Memory System 11
Auto Tune Storage (ATS) 11
Antennas 11
Display Mode 12
Bandwidth 12
Tuning Speed 12
FM Recepon 13
FM RDS (radio data system) 13
MW (medium wave) 14
LW (longwave) 14
SW (shortwave) 15
Single Sideband (SSB) 16
AIR Band 16
Squelch 17
Reset 17
Specicaons 18
3
4
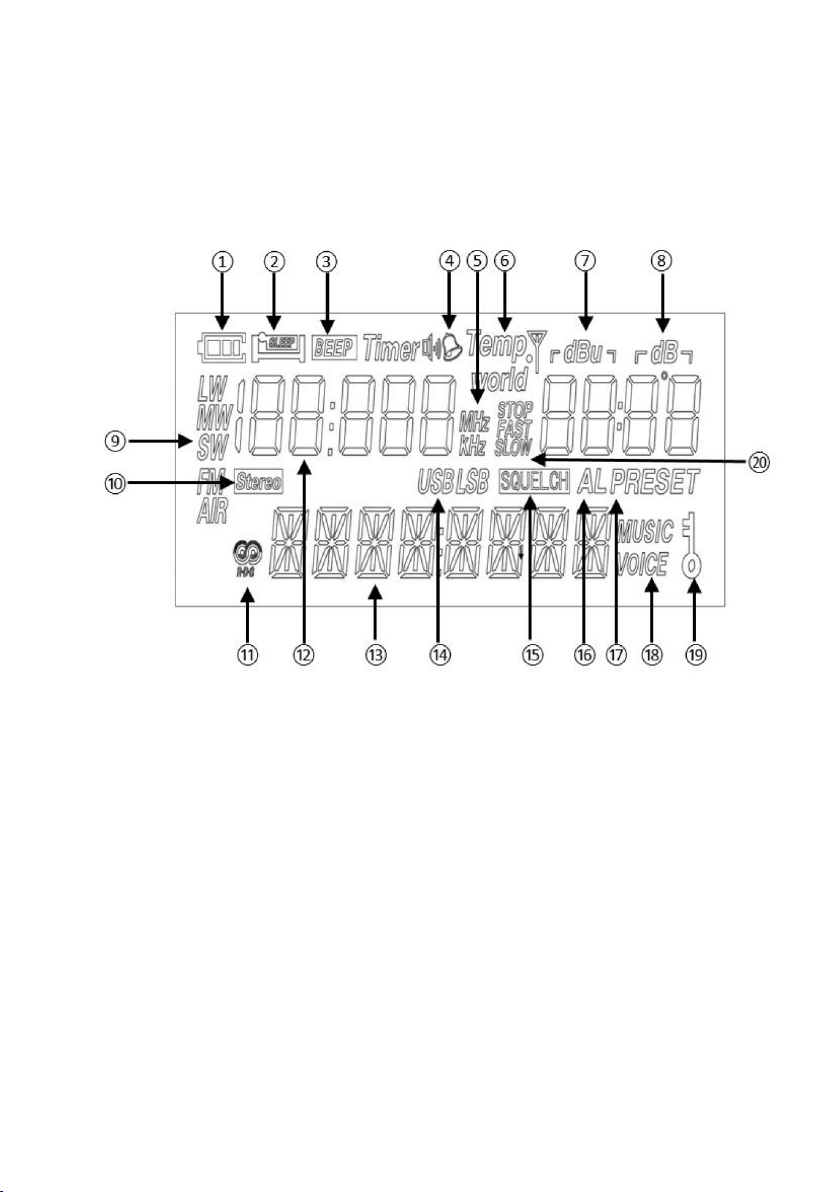
The Display
1. Baery charge indicator
2. Sleep mer acve
3. Key press beep acve
4. Alarm on
5. Frequency Display is kHz or MHz
6. Display temperature mode
7. Signal strength
8. Noise level
9. Band selecon
10. FM Stereo signal
11. FM RDS available
12. Frequency
13. RDS Informaon
14. USB / LSB mode
15. Squelch acve (AIR band only)
16. Alarm acve
17. Display shows Memory locaon
18. Not available on this radio
19. Radio keys locked
20. Tuning knob speed

5
Side Controls
21. External Antenna Jack (3.5mm)
22. Volume control
23. Headphone jack (3.5mm stereo)
24. Main Tuning knob (push in for fast/slow/stop)
25. Fine tuning / clarify control for SSB
26. USB Charging port
27. Radio reset buon access hole
6
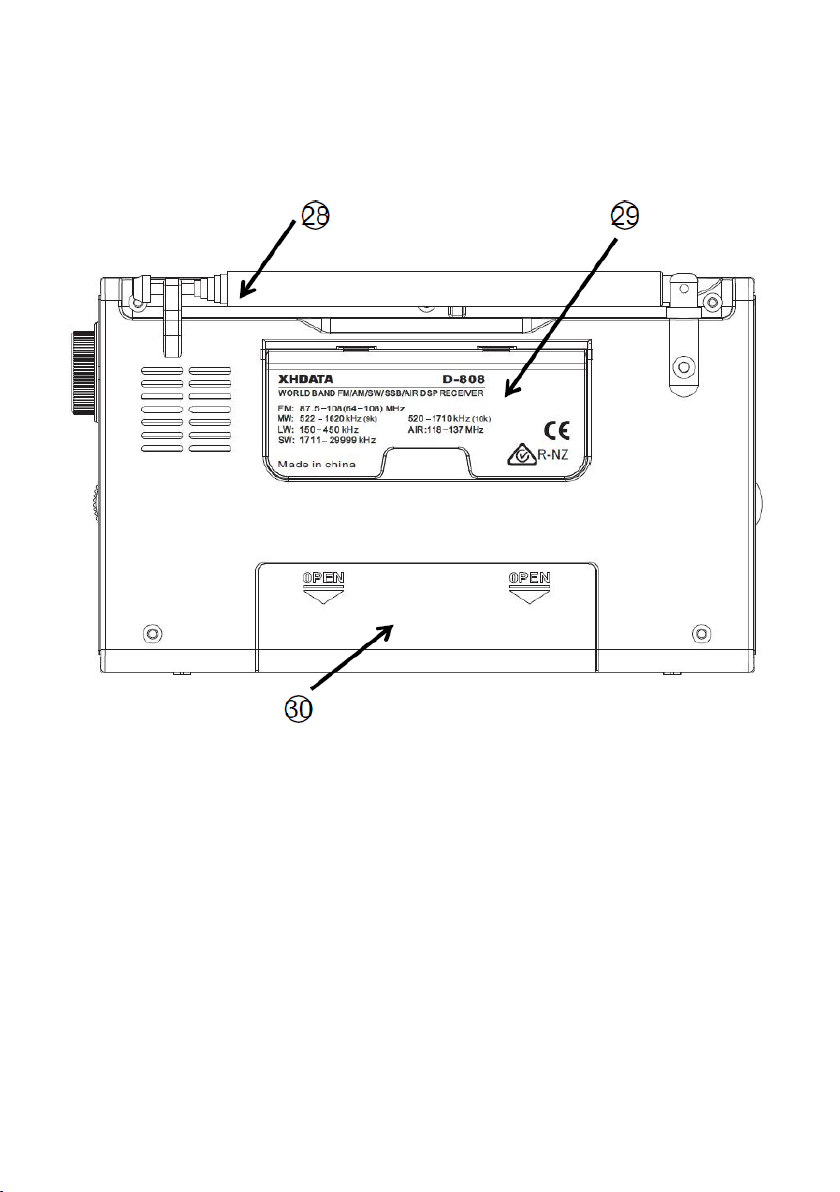
Radio rear
28. Whip antenna used for FM, SW and AIR bands
29. Kickstand
30. Baery door (18650 baery (included)

7
Warnings
• Do not expose the radio to water, moisture or excessive humidity.
• Keep radio out of the freezer. Operang temperature range is 0° - 40° C (32° -
104° F).
• Clean with a dry cloth. Don’t use detergents or chemical solvents.
• Do not aempt to open the unit, unless you are really curious. You might break
something.
• Change the baery within one minute to avoid loss of me and other sengs.
Quick Start Guide
1. The radio is shipped with a protecve tab in the baery compartment that
prevents the baery from contacng the baery terminal. Carefully remove
the baery door (back of radio) and remove the baery and the tab. Replace
the baery taking care to align the polarity of the baery (+/-) to match the
diagram on the back of the radio. Replace the baery door.
2. Turn the radio on by pressing the orange power buon on the upper right cor-
ner of the radio.
3. Select a radio band — FM, MW, SW or AIR — then raise the volume with the
knob on the le side of the radio. Increasing volume is in the upward direcon.
4. Tune the radio by rotang the tuning knob on the upper right side of the radio.
Clockwise is increasing frequency. To tune to a staon directly, press the FREQ
buon, then the frequency. If the radio does not tune to the frequency, press
FREQ again to complete the entry.

8
Funcons and Operaon
Power and charging
Power On Buon and Sleep Timer
In this manual, the terms “press” and “long press” are used. Press means to press
the buon briey. Long press means to press the buon and hold it for 2 seconds.
The orange power on buon turns the radio on. For 5 seconds, the sleep mer icon
appears on the display ashing. While the sleep mer icon is ashing, further press-
es of the Power buon increment through a list of sleep mes from 120 to 15
minutes or “on” indicang the mer is disabled. When the sleep mer is set, the
radio will automacally power o aer the selected number of minutes. The radio
cannot be turned o while the sleep mer icon is ashing — just wait unl it stops.
The sleep mer seng can be disabled by simply turning the radio o.
Alarms
The radio can automacally power on based on the alarm seng. Alarm mode can
be set on or o with the ALARM buon.
To turn the alarm on or o, turn o the radio and press the ALARM buon. Use the
up arrow buon to toggle through the three alarm modes: Wake to radio, wake to
tone and o. The alarm mode is indicated on the display with a ny speaker symbol
to the right of the word “Timer” for wake to radio, a ny bell to indicate wake to
tone, or no symbol when the alarm is o. Alarm to radio uses the most recently
tuned staon.
To set the alarm me, long-press the ALARM buon and key in the me with the
number buons. For example, to set the alarm for 21:30, long press the ALARM
buon and key 2 1 3 0. The alarm is set at the factory for 7:00 AM, turned o. The
radio does not support a 12-hour clock.

9
Charging the radio
To charge the radio, plug a USB-C cable (included) into the USB jack on the right
side of the radio. (Some early versions of the radio use a USB Micro connector.) The
baery icon will cycle while the radio is charging. Charging will stop when the
baery is fully charged or aer 10 hours, whichever is rst. Note: some early ver-
sions of the radio may require long pressing the SSB buon to begin charging.
Opons and setup
FM Tuning range
The radio can be set for dierent tuning ranges that are convenient for FM broad-
casng in dierent regions of the world. With the radio o, long-press the FM
buon. The current seng, showing the lowest frequency of the band, is displayed.
To change the seng, press the FM buon again to cycle through the three op-
ons:
• 64.0 MHz
• 76.0 MHz
• 87.5 MHz
Longwave
The LW band is not enabled by default. To enable it, turn the radio o and long-
press the LW/MW buon. The radio will display the current status of the seng,
“LW ON” or “LW OFF.” To change the seng, press the LW /MW buon. When LW
is on, pressing the LW/MW selects either LW or MW. When it is o, the LW opon
is not available.
Medium Wave Step
The tuning step for medium wave (MW) can be set for 9 kHz or 10 kHz. To change
the seng, turn the radio o and long-press the 9/10 kHz buon (0). The current
seng is displayed. Press the buon again to cycle through the two opons. 10 kHz
us used in the Americas and 9 kHz in the rest of the world.
Beep
The radio as it comes from the factory beeps aer each key press. To disable this,
turn the radio o and long-press the BEEP buon (5). Unlike other opons, mulple

10
presses of the buon do not toggle the opon. Long press the key to change it.
Temperature
The temperature scale for display, Fahrenheit or Cengrade, may be selected. With
the radio o, press the DISPLAY buon unl the temperature is displayed, then long
-press the number 3 to change the seng. Repeatedly press the buon to toggle
between F and C.
Seng the clock
The radio clock only supports 24-hour me display only.
To set the clock, turn the radio o and long press TIME SET. The radio will display
“TIME.” Key in the 4-digit me to set. To set the seconds, wait unl about 7 seconds
before the 00 minute, then acvate the me funcon, quickly key in the me and
then press TIME again. Note that me seng mode automacally exits aer about
4 seconds with no key pressed.
The radio has the opon to automacally set the me from an FM broadcast staon
the provides it (refer to the RDS topic for more on this). To enable automac seng,
press the TIME SET buon with the radio o. Use the up arrow key to toggle be-
tween Auto and Manual modes. Note: many FM staons to not broadcast me, and
those that do may not be accurate. You must tune the staon with that informaon
for the me to be set.
Lock
With the radio on or o, long press the INFO buon to disable the keys on the radio.
Long press again to re-enable them. This feature is useful to prevent the radio from
being turned on accidentally during handling or when packed.
Display light
The display is automacally illuminated for about 10 seconds when you press a key
or turn the tuning knob. Pressing the LIGHT buon turns it on indenitely. When
set, the light stays on even when the radio is turned o.
Other manuals for D-808
1
Table of contents
Other XHDATA Receiver manuals


