Xima L100 User manual

USER MANUAL
XIMA Inverter L100
Version 1.0

1
Table of Contents
Introduction.....................................................................................................................3
Device Accessories............................................................................................................4
Safety Tips ....................................................................................................................... 7
oGeneral Tips ......................................................................................................7
oInput / Output Voltage.......................................................................................7
oMechanical and Safety System............................................................................7
oFire...................................................................................................................7
oFuses and Protective Circuits ..............................................................................7
oOverload range..................................................................................................7
Unique Features of Xima L100 ........................................................................................... 9
Device Installation .......................................................................................................... 13
oInstallation Location......................................................................................... 13
oCharacteristics of Device Installation Location .................................................... 15
oMotor............................................................................................................. 15
oMechanical Installation .................................................................................... 15
Electrical Installation....................................................................................................... 17
oGeneral schematic of Xima ............................................................................... 17
oPower Terminals.............................................................................................. 18
oCommand Terminals ........................................................................................ 19
oWiring Contactors with Enable Feedback in N.C Mode ........................................ 22
oWiring Contactors with Enable Feedback in N.O Mode........................................ 22
oRescue Mode .................................................................................................. 24
Software Setting............................................................................................................. 25
oKeyboard and Screen ....................................................................................... 25
oScreen ............................................................................................................ 26
oParameter Settings .......................................................................................... 26
oMethod of Parameter Settings.......................................................................... 28
oBack to Initial Values and Saving ....................................................................... 28

2
oPassword ........................................................................................................ 28
Parameters .................................................................................................................... 29
oInitial Parameters ............................................................................................ 30
oRated parameters ............................................................................................ 33
oInputs and Outputs .......................................................................................... 34
oSystem Parameters .......................................................................................... 37
oProtection Parameters ..................................................................................... 39
oMonitoring Parameters .................................................................................... 40
oDisplaying Faults History................................................................................... 41
Monitoring Functions...................................................................................................... 42
Parameters of Monitoring Menu...................................................................................... 43
Stop Mode Function ....................................................................................................... 44
Installation with Quick Menu........................................................................................... 46
Possible Problems........................................................................................................... 47
Faults ............................................................................................................................ 49
Warranty and After-Sales Services.................................................................................... 53
oWarranty Voidance Conditions.......................................................................... 53
Options and Customized Parameters................................................................................ 53
Quick Installation of Xima Inverter ................................................................................... 54
oOpen-loop Installation...................................................................................... 54
Quick Access Parameters Table........................................................................................ 55
oInitial Parameters ............................................................................................ 55
oRated Parameters ............................................................................................ 55
oInputs and Outputs Parameters ........................................................................ 56
oSystem Parameters .......................................................................................... 56
oProtection Parameters ..................................................................................... 57
oDigital Inputs/Outputs Monitoring .................................................................... 57
oFaults History .................................................................................................. 57

3
Introduction
Thank you for choosing the Xima inverter device. Please carefully read the contents of this
manual not only to make a quick and safe installation, but also to make the use of our company's
warranty service. In spite of the specialized terminology and concepts used in this manual, it is
useful for those who have minimum information about installing power inverter devices.
The Xima device is designed and optimized based on the hardware and software requirements
of manufacturers. Xima has special attention to some important parameters including
reasonable price, ease of installation, and also cost-effective after-sales services.
Dear consumer! Getting help from you, we hope to improve the quality of our products day by
day. Feel free to make any suggestions and criticisms; we appreciate that.
Our company's after-sales service center is always ready to answer your questions, and our
experts will help you for free, in order to make a faster and easier installation,and also to resolve
your possible problems. For more information, visit our website:
www.Xima.ir

4
Device Accessories
- 4 small bolts (2 spare) for closing the lid of the terminals
- 6 washers and bolts (2 spare) for installation of the device inside the panel
- Specially designed stencil for drilling the installation location
- Small screwdriver for opening and closing the terminals
Table 1: Power input/output characteristics of various models of Xima L100
•The brake power resistance presented in Table 1 is given regarding the coefficient of 10% for
energy reverse, and for systems with a higher reverse, the braking resistance must be
selected proportionally larger, but range of the resistance does not change.
•The input current of device under rated load is defined for the standard 4-pole motor (1500
rpm).
•To reduce the effective input current, you can use the Harmonic Reduction Inductor. For more
information, see the "Options" section.
Technical Characteristics of Xima L100
Output frequency range
0 –600.0 Hz
Frequency resolution
1mHz (0.1Hz display)
PWM frequency
2.0 –10.0KHz
PWM modulation
Space Vector
PWM resolution
> 11bit
ADC resolution
12bit / 4Msps
DSP
32bit Motor Control
Control loop frequency
1KHz
Brake Resistance/
Power
Fuse
Input
current
Rated
current
Voltage
Phase
Motor
power
Size
Model
5~120/1300
40
24
18
3/380
7.5/5.5
B
XIMAL100B075-3

5
Input frequency
47 –63Hz
Input voltage
330 –460(3Φ)
Output voltage
0 –Input Voltage
Efficiency (PF=1, Vout=Vin, Iout=12)
> 98%
Phase short circuit protection
To Phase, Ground, +Bus, -Bus
Maximum starting torque
< 150%
Inrush current
<10A
Brake
DC Brake, Dynamic Brake
Voltage limit threshold
700V
Brake ON voltage
690V
Brake OFF voltage
680V
Over voltage fault
720V
Current limit threshold
Adjustable
Over current threshold
36A
Digital input impedance
9.5KΩ
12V output voltage
12 –14V
12V supply output impedance
5Ω(PTC Protected)
Table 2: Technical characteristics of the device

6
Fig. 1: Geometry of the device
IP
Weight
(gr)
H1
(mm)
W2
(mm)
W1
(mm)
D
(mm)
H
(mm)
W
(mm)
Device
Model
20
2200 >
194.5
115
91.5
160
206
103
XIMA-B
Table 3: Physical characteristics of Xima L100

7
Safety Tips
oGeneral Tips
Observance of safety tips not only will eliminate possible dangers during installation and use,
but also it will result in longer lifetime and more continuous performance for the device. Non-
compliance with these tips, causes potential life-threatening or financial risks.
Note that the installation of this device requires expertise and specialization, and non-specialist
personnel are never allowed to install and set up the device, and corresponding personal injury
and material damage is the responsibility of the consumer.
oInput / Output Voltage
The electrical input and output voltage in the power system is high (380 V) and dangerous for
people. When installing these systems, be sure to disconnect the power of the device and run
all steps in the "Electrical Installation" section of the device guide.
oMechanical and Safety System
Motor speed control system is essentially part of a moving mechanical system that can be
dangerous for employees. Proper design of the mechanical system and other items are all
important in providing safety. Using the safety buttons to cut off the power of the machine in
emergency conditions or installing mechanical brake for the motor is required in some cases.
oFire
The speed control system is a part which is capable to fire and should therefore be placed inside
an appropriate panel with fire standards. Any damage caused by firing of the device is the
responsibility of the consumer, and only damages regarding the speed control system, which
originates from the device itself, will be covered by the warranty service, and even if the fire of
the device (even due to technical problems of the device itself) results in fire and damage to a
system other than the device, it will not be the responsibility of the company.
oFuses and Protective Circuits
The use of fuses and protective circuit in the input of the device is mandatory, and not applying
such parts will invalidate the warranty and increase the risk of personal injuries and material
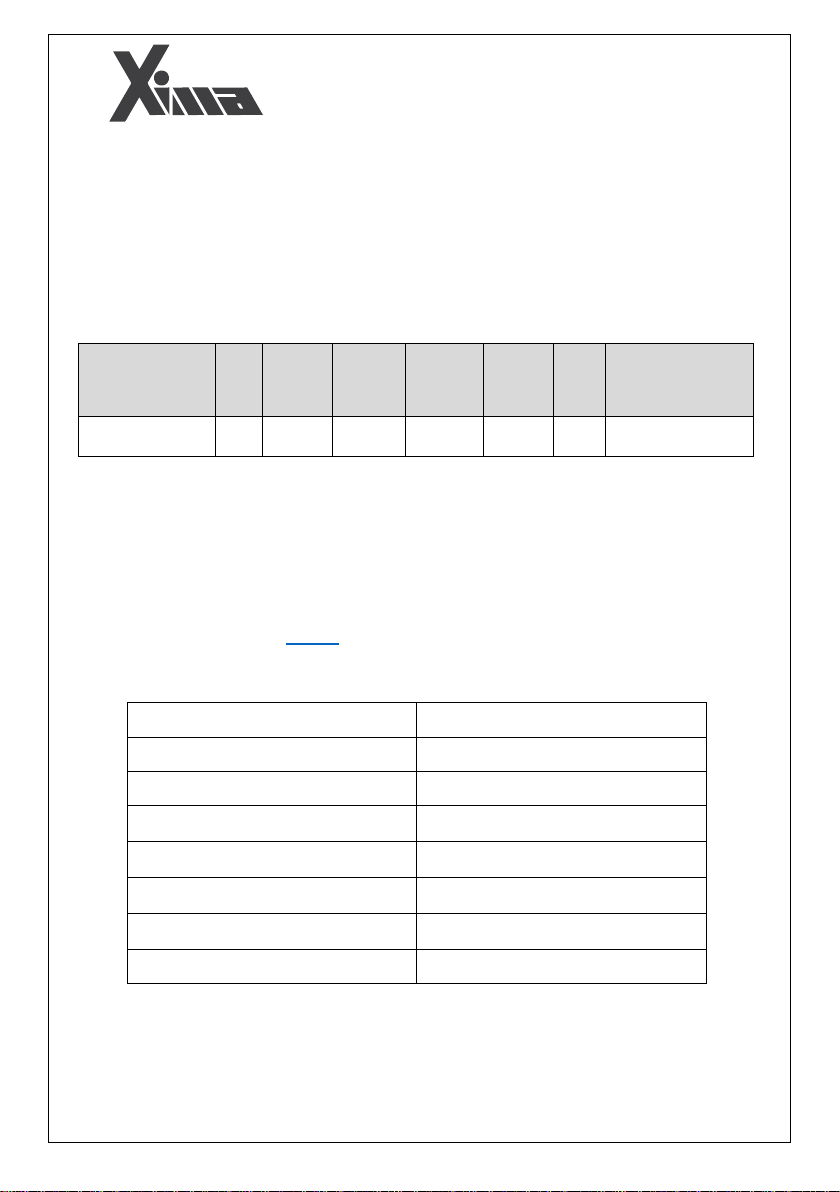
damages. Refer to Table 1 for the right choice of the protective circuit.
oOverload range
In normal condition, the motor current must be less than the rated current of the inverter, and
if this current is more than 110% of the rated current, the device enters the overload phase, and
depending on the amount of overload, a fault will occur after a while and the system will require
to restart .
If the overload occurs when the motor is normally working with a current less than or equal to
the rated current, the duration of overweight fault will be shorter than the case in which the
overload occurs at the beginning of the motor startup. You can see this duration in the following
table.

8
If the current exceeds 200% of the rated current, the device will demonstrate an over-current
fault right away.
Duration of overload
fault from rated load
(seconds)
Duration of overload fault
from cold installation
(seconds)
Overload
output current
to input current
80
190
115%
50
140
120%
30
100
130%
15
60
150%
10
40
170%
Table 4: Durations in which the device can tolerate the overload period
Note:
If the average motor power is larger than the rated power of the device for a long time, it will
demonstrate a low-power fault, which means that an inverter with a larger power should be
replaced. Note that all parameters, including faults, average, and maximum temperature,
current, voltage, etc., are stored in the memory of the device and evaluated for the warranty
validity.

9
Unique Features of Xima L100
Xima is designed based on reduced cost and time of installation and also, increased
lifetime and efficiency.
•Defined inputs: 8 inputs are pre-valued in a way that is suitable for all applications of the elevator
and do not need to be redefined.
•A digital output with 5 settings:
0- Contactor controller: motor contactor command.
1- Brake: brake command.
2- Being enabled in fault mode: Sends feedback to the control panel for fault in the inverter.
3- Enable feedback: When Enable input is activated, this output will act as Enable feedback.
This unique feature eliminates the need for the second motor contactor, and by
serialization of this output with the first contactor coil, the second required
electromechanical element can be emulated.
Xima L100
8 Previously
Defined
Inputs
4 Digital
Outputs
Remove
second
contactor
Feedback
enable
Distance
approach
stop mode
Quick and
easy
installation
Automatic
Learning
Brake
Sequence
Special To
Elevator

10
4- Moving under the intermediate speed: One of the ways to speed up the transport of
passengers with an elevator is by implementing the Advanced Door Open system, in which
the door is opened at a specific time before the elevator reaches the floor level, and when
the elevator stops, the door is completely opened. So the speed of opening and closing of
the door does not affect the motion speed of the elevator. To use this function, circuit 66
must be serialized with this controller, with output or digital relay in the speed mode under
Vm, and with the Door Zone sensor. And safety circuit should be obtained from the end of
this circuit.
•Three programmable relays: Relay-1, Relay-2 and Relay-3 are also programmable for all digital
output scenarios. Programming these three relays is similar to digital output.
•Removing the second contactor:
According to EN-81 standard, one or two inverter output contactors can be removed under
special condition. Xima L100 elevator inverters provide this condition by receiving safety circuit
on Enable (I8) input and sending an Enable (OP2) feedback on the output.
•Motor Parameter Auto-tune: Static and dynamic motor parameters auto-tuning is employed to
extract motor model.
•Distance Approach stop mode:
This method is used to remove leveling time, optimize travel time and precisely level the cabin.
Moreover, for short floors or high-speed projects, this method creates the shortest travel time.
By defining the distance between the low-speed sensor and the floor stop sensor as X3 =
Leveling Distance, and the length of stop sensor as X0 = Landing Zone in the inverter parameters,
the calculations of reducing the travel time determine how the motor moves.
Fig. 2: Variations of speed in Distance Approach mode

11
d1: If the leveling distance is defined short, the inverter can make the proper leveling by limiting
the rated speed.
d2: If the leveling distance is greater than the required distance, the cabin moves at the rated
speed.
Short Floor: If the low-speed sensor is viewed during the acceleration period, the incremental
slope will continue up to a speed that the stop is done at the right place.
•Quick and easy installation:
The Xima inverter is designed in a way that if you properly connect the inputs, and appropriately
link the outputs to the control panel contactor, by pressing ENTER you can make the inverter
ready to work, only with three parameters related to the distance between the magnets, and
the motor rated current.
•Auto Learning:
The inverter has the ability of intelligent Auto Tune or Auto Learning, which means that each
time you start the device, it will get the exact motor parameters and will not be sensitive to
changes in those parameters over time. So, after a while, the device will easily control the start
and stop processes with the highest accuracy by knowing the exact model of the motor. Relying

12
•Lifting Brake Sequence:
The order of brake release in Xima inverter based on various commands is as follows:
Fig. 3: The order of brake release in Xima L100
Brake on Delay
Brake off Delay
Brake Start Delay
Mechanical Brake Enable Speed
Up
Enable
Contactor
PWM
Brake
Start
V3
V0
Speed
V3
V0
<1s
0.1s
Brake
Start
Delay
Brake
on
Delay
Brake off Delay

13
Device Installation
oInstallation Location
One of the most important factors in the failure of the motor speed control system is the non-
observance of the relevant principles at the installation location, which in some cases could
result in warranty voidance.
- The device must be installed inside a standard metal control panel and this panel must
have a suitable ventilation.
- In the case of closure of the control panel or lack of ventilation, not only there is the
possibility of an excessive temperature fault, but also the lifetime of the device is
significantly reduced.
- The panel should be in a covered area.
- There must be at least 10 centimeters gap from bottom, top, and sides between the device
and the panel and also there must be a pathway for fresh air inlet and hot air outlet (From
the bottom of the panel upwards).
Fig. 4: Allowable gap for physical installation

14
-The use of air filter in the air inlet of the control panel, especially in unclean and dusty areas
is mandatory, and the excessive dust inside the device will invalidate the warranty.
- Any direct and dense humidity (such as dew) can cause a lot of damage to the device and this
device will not be subject to warranty of replacement and repair.
The use of heaters inside the panel, especially in the winter, and wet environments, and places
where there is a potential for dew on surfaces, is mandatory, and in long term, it will result in
considerable savings on the maintenance and repair cost of electronic devices.
-The installation location temperature should be within the range -10 to +50 ° C and for the
temperature range of 40 to 50 ° C, the rated power should be reduced by 2% for per centigrade
increase in temperature. Temperatures outside this range will, not only significantly decrease
the lifetime of the device, but also invalidate its warranty.
The lifetime of the device's power capacitors will be halved for every 10 degrees being warmer
(in device's temperature) than the environment. So devices that operate in hot environments
or high-load environments, will be required their capacitor to be replaced in shorter time
intervals .
-The installation location should not be subjected to severe and consistent vibrations. If it is
necessary to install the device in such a place, consult with our company's experts before
installing it.
- Direct sunlight will dramatically decrease the lifetime of the device's box and keyboard, and
will also invalidate the warranty.
-If the altitude of the installation location is more than 1000 meters (above mean sea level),
you should consider 2% reduction in the power capacity of the device for every 100 meters more
height, otherwise there is a possibility of the device heating in the rated load. In this case, it is
required to have a device with larger power .
Note: Higher altitude (above mean sea level) as well as warmer environment, reduces the
lifetime of the power capacitors; because the air concentration decreases and the heat
exchange of the capacitors with the environment decreases in both situations.

15
oCharacteristics of Device Installation Location
The table below shows the minimum characteristics of the installation location for the stable
and reliable operation of the device.
Note that non-observance of the following points will cause the device to function incorrectly
and possible consequences are beyond the responsibility of the company.
Installation
Location
Inside the control panel with suitable ventilation and filter, and in a covered
area
Temperature of
Installation
Location
-10 ~50 C
Above 40 ° C, for every 1 degree of Celsius increase,
consider 2% reduction in the output power
Relative
noncondensing
humidity
h< 85%
If a dew is possible to form, be sure to use a heater
inside the panel
Vibration
a < 0.5g
X, Y, Z Three axes
UV resistant
No
No exposure to sunlight
IP
20
No safety against water; No dust protection
Altitude (above
mean sea level)
A < 2600m
For every 100 meters above 1000 meters, consider
about 2% decrease in the rated power
Table 5: The device's physical installation characteristics
oMotor
Before installing the device, remove the motor from the mechanical system, if possible. This is
especially important where turning the motor in the reverse direction causes damages to the
system.
Connect the motor case to the ground. Otherwise, in the case of a connection of the motor case
to the coil, there is a possibility of extreme electrical injury and even death.
If the metal is used in the entire system and the body of the motor is connected to the system,
you can connect any point of the system to the ground.
The motor power should never be larger than the rated power of the inverter. Otherwise, the
device performance is not optimal and the warranty is invalidated.
oMechanical Installation
To install the remote control device inside the desired control panel, and according to the
conditions described in the installation location section, firstly mark the drilling spot in
alignment by the stencil (which is available with the device) and drill this spot using drill-3. Then,
close the screws of the top of the device (6 screws of diameter 4 are available with the device)

16
and close the screws of the bottom of the device (do not completely close), and then tighten
(completely close) the four screws as is necessary. Note that you should also use the washers
with the screws.
To speed up the installation and to make it easy, it is better to be done by two people.
4 mm drive screw
Washer
Fig. 5: Illustration of the device installation in alignment with the horizontal surface

17
Electrical Installation
oGeneral schematic of Xima
M
B+
R
S
T
W
V
U
B-
PE
12V
I1
I2
I3
I4
I5
I7
I8 Contactor
COM
R
S
T
Input noise filter and
harmonic reduction
inductor
Output noise filter
Brake
resistance
Intermediate Speed
Inspection Speed
Leveling Speed
Down Command
Up Command
12V Output
Enable Input
Normal Speed
Enable
Feedback
I6
Rescue Speed
Brake
Fault Output
TC1TC2
+
-OP2
RJ45
Relay 3
Relay 2
Relay 1
RJ45
P
Fig. 6: General schematic of Xima
The Xima device has a row of 18 command terminals at the upper part and 9 power terminals
at the lower part. Wire the inverter, motor, and other related equipment as shown below. At
the top, power terminals are displayed separately from the control terminals. The external brake
resistance must also be connected to the B+ and B- terminals. 2 RJ45 terminals are provided for
encoder feedback.
Relay1 Relay1 Relay2 Relay2 OP2+ OP2- COM I8 I7 I6 I5 I4 I3 I2 I1 12V
R S T B- B+ U V W
Relay3 Relay3
P
Fig. 7: Schematic of Xima device's terminals

18
oPower Terminals
M
B+
R
S
T
W
V
U
B-
PE
R
S
T
Input noise filter and
harmonic reduction
inductor
Output noise filter
Brake
resistance
P
Fig. 8: Illustration of input and output power terminals
Three Phases (380V)
R, S, T
Power inputs
W, V, U
Power outputs
Cross sections for input wire/output wire (mm2)
KW/V
XIMAE100XYYY-Ph
4 / 5.5
7.5/380V
XIMAL100B075-3
Table 6: Proper cross sections for input/output
Important points
Note that it is not necessary to connect the null to the N input.
1
Connect the ground wire to The PE terminal. In the three-phase model, use a wire
with a maximum cross-section of 1.5 mm2to connect the ground to the device.
2
Connect the brake resistance to the B+ and B- terminals with a 1.5 mm2cable (The
direction of the connection is not important). You can also use a thicker wire in the
single-phase model.
3
Warnings
Avoid connecting the null directly to the ground.
1
Do not use any cable shoe. Using a cable shoe will increase the possibility of
loosening the terminal screws.
2
Strip to a maximum of 8 mm from the tip of the wires, such that the wires in the
adjacent terminals couldn't be connect to each other.
3
Never use a wire with a cross section larger than 4 mm2.
4
Avoid excessive tightening the terminal screws as the cost of replacing damaged
terminals is not covered by the warranty.
5

19
Do not use a miniature or thermal switch on the output of the device.
6
Connect the ground input, if possible, in order to prevent the output noise and the
possibility of electric shock.
7
It is not mandatory to use the harmonic reduction inductance and the input/output
noise filter. (Except special cases)
8
Non-observance of the above points would cause damage to the device and invalidation
of the warranty coverage.
oCommand Terminals
12V
I1
I2
I3
I4
I5
I7
I8 RELAY-1 Contactor
RELAY-3
COM
Intermediate
Speed
Inspection Speed
Leveling Speed
Down Command
Up Command
12V Output
Enable Input
Normal Speed
Enable Feedback
I6
Rescue Speed
OP2
RELAY-2 Brake
Fault Output
+
-
RJ45
RJ45
Fig. 9: Demonstration of digital terminal of command circuits and LAN input
Table of contents