Xinpu P40 User manual

1
Rotary Hammer
Model: P40
HANDLING INSTRUCTIONS
Original Instructions
Before using this XINPU Rotary hammer, please carefully read though these
HANDLING INSTRUCTIONS. Ensure that you know how the machine works, and how it
should be operated. Maintain the machine in accordance with the instructions, and make
certain that the machine work correctly, please store this instriation and other enclosed
documents with the machine together.
Zhejiang Xinpu Industrial & Commercial Co., Ltd.
106, No. 330 National Road, Huajie Industrial Zone, Yongkang City, Zhejiang 321300, P. R. China

2
1 2
3 4
5 6
7 8
9 10

3
(1) Drill bit
(2) Part of SDS max shank
(3) Hammer rod protector
(4) Flex Sheath
(5) Orientation Staff Guage
(6) Papilionaceous Short Bolt
(7) Auxiliary handle
(8) Speed Adjuster Knob
(9) Power -ON Indicator
(10) Service Indicator
(11) Function Knob
(12) Cover
(13) Selector
Iist:
General Power Tool Safety Warnings
Special requirements for rotary hammer
Safety Instructions
Technical Data
Accessories
Applications
Prior to operation
Assembly
Operation
Maintenance And Inspection
Environment
General Power Tool Safety Warnings
WARNING:
Read all safety warnings and all instructions. Failure to follow all warnings and instructions
may result in electric shock, fire and/or serious injury.
Save all warnings and instructions for future reference.
The term “power tool” in the warnings refer to your mains operated (corded) power tool or battery
operated (cordless) power tool.
1) Work area safety
a)Keep work area clean and well lit. Cluttered and dark areas invite accidents.
b) Do not operate power tools in explosive atmospheres, such as in the presence of
flammable liquids, gases or dust. Power tools create sparks which may ignite the dust or
fumes.
c) Keep children and bystanders away while operating a power tool. Distractions can cause
you to lose control.

4
2) Electrical safety
a) Power tool plugs must match the outlet. Never modify the plug in any way. Do not use
any adapter plugs with earthed (grounded) power tools. Unmodified plugs and matching
outlets will reduce risk of electric shock.
b) Avoid body contact with earthed or grounded surfaces such as pipes, radiators, ranges
and refrigerators. There is an increased risk of electric shock if your body is earthed or
grounded.
c) Do not expose power tools to rain or wet conditions. Water entering a power tool will
increase the risk of electric shock.
d) Do not abuse the cord. Never use the cord for carrying, pulling or unplugging the power
tool. Keep cord away from heat, oil, sharp edges or moving parts. Damaged or entangled
cords increase the risk of electric shock.
e) When operating a power tool outdoors, use an extension cord suitable for outdoor use.
Use of a cord suitable for outdoor use reduces the risk of electric shock.
f) If operating a power tools in a damp location is unavoidable, use a residual current
device (RCD) protected supply. Use of an RCD reduces the risk of electric shock.
3) Personal safety
a) Stay alert, watch what you are doing and use common sense when operating a power
tool. Do not use a power tool while you are tired or under the influence of drugs, alcohol
or medication. A moment of inattention while operating power tools may result in serious
personal injury.
b) Use personal protective equipment. Always wear eye protection. Protective equipment
such as dust mask, non-skid safety shoes, hard hat, or hearing protection used for appropriate
conditions will reduce personal injuries.
c) Prevent unintentional starting. Ensure the switch is in the off-position before connecting
to power source, picking up or carrying the tool. Carrying power tools with your finger on
the switch or plugging in power tools that have the switch on invites accidents.
d) Remove any adjusting key or wrench before turning the power tool on. A wrench or a key
left attached to a rotating part of the power tool may result in personal injury.
e) Do not overreach. Keep proper footing and balance at all times. This enables better
control of the power tool in unexpected situations.
f) Dress properly. Do not wear loose clothing or jewellery. Keep your hair, clothing and
gloves away from moving parts. Loose clothes, jewellery or long hair can be caught in
moving parts.
g) If devices are provided for the connection of dust extraction and collection facilities,
ensure these are connected and properly used. Use of these devices can reduce dust related
hazards.

5
4) Power tool use and care
a) Do not force the power tool. Use the correct power tool for your application. The correct
power tool will do the job better and safer at the rate for which it was designed.
b) Do not(use the power tool if the switch does not turn it on and off. Any power tool that
cannot be controlled with the switch is dangerous and must be repaired.
c) Disconnect the plug from the power source before making any adjustments, changing
accessories, or storing power tools. Such preventive safety measures reduce the risk of starting
the power tool accidentally.
d) Store idle power tools out of the reach of children and do not allow persons unfamiliar
with the power tool or these instructions to operate the power tool. Power tools are
dangerous in the hands of untrained users.
e) Maintain power tools. Check for misalignment or binding of moving parts, breakage of
parts and any other condition that may affect the power tool’s operation. If damaged, have
the power tool repaired before use. Many accidents are caused by poorly maintained power
tools.
f) Keep cutting tools sharp and clean. Properly maintained cutting tools with sharp cutting
edges are less likely to bind and are easier to control;
g) Use the power tool, accessories and tool bits etc., in accordance with these instructions,
taking into account the working conditions and the work to be performed. Use of the power
tool for operations different from intended could result in a hazardous situation.
5) Service
a) Have your power tool serviced by a qualified repair person using only identical
replacement parts. This will ensure that the safety of the power tool is maintained.
Special requirements for rotary hammer
1. Wear ear protectors. Exposure to noise can cause hearing loss.
2. Use auxiliary handles, if supplied with the tool. Loss of control can cause personal injury.
3. Hold Power tool by insulated gripping surfaces, when performing an operation where the
cutting accessory may contact hidden wiring or its own cord. Cutting accessory contacting a
“live” wire may make exposed metal parts of the power tool “live” and could give the operator an
electric shock.
4. Wear a dust mask. Do not inhale the harmful dusts generated in drilling or chiseling operation.
The dust can endanger the health of yourself and bystanders.
5. Before beginning work, check the working area (e.g. with a metal detector) to ensure that no
concealed electric cables or gas and water pipes are present. Contact with electric lines can lead
to fire and electric shock. Damaging a gas line can lead to explosion. Penetrating a water line
causes property damage or may cause an electric shock.
6. If the supply cord of this power tool is damaged, it must be replaced by a specially prepared cord
available through the service organization.
7. Do not touch the bit during or immediately after operation. The bit becomes very hot during
operation and could cause serious burns.
8. Do not use the power tool with a damaged cord. Do not touch the damaged cord and pill the
plug from the outlet when the cord is damaged while working. Damaged cords increase the risk
of an electric shock.
Warning: Reduce the working time to avoid risks related with too much vibration.

6
Safety instructions
Double insulation
Read the operating instructions
before use.
General Warning Warning: Electricity
Wear ear and eye protection.
Immediately unplug the plug from
the main electricity in the case that
the cord gets damage and during
maintenance.
SPECIFICATIONS
Model No P40
ID No. 8 8018 015
Rated Voltage 220-240V~
Frequency 50Hz
Rated power 1200W
No load speed 235-514 min-1
Iimpact rate 1350-2950min-1
Impact energy 2-10J
Tool holder type SDS-Max
Max. drilling Capacity Drill bit: Φ40mm
Core bit: Φ105mm
Optimun drilling diameter in concrete Φ18-Φ30mm
Weight (without cord and auxiliary handle) 6.38kg
*Note type designation on the device, differences might depend on area.
STANDARDACCESSORIES
(1) Carbon Brush (6*10*25mm) …… …………………………………………….. 1
(2) Auxiliary handle …………………………………………………………………1
(3) Staff Guage……………………………………….…………………….………...1
Standard accessories are subject to change without notice.

7
OPTIONALACCESSORIES (sold separately)
1. Through-hole drilling (Rotation + Hammering)
(1) Drill bit (SDS max shank)
Outer diameter (mm) Overall length(mm )
8 280
10 280
12 280
14 280
16 400
18 400
20 400
22 400
25 400
28 400
30 400
32 400
35 400
38 400
40 400
2. Tine Chisel (Hammering) : 18*400mm(SDS max )
3. Flat Chisel (Hammering) :18*400mm (SDS max )
4. Big Flat Chisel (Hammering) :18*400mm (SDS max )
5. Goose Chisel (Hammering) :18*400mm (SDS max )
6. Surface Roughing (Hammering)
(1) Bushing Tool (2) Shank
7. Tamping (Hammering)
(1) Rammer (2) Shank (150 x 150 mm)
Optional accessories are subject to change without notice.

8
APPLICATIONS
○Drilling holes in concrete
○Crushing concrete, chipping, digging, and squaring (by applying optional accessories)
PRIOR TO OPERATION
1. Power source check
Ensure that the power source to be utilized conforms to the power requirements specified on the
product nameplate.
2. Switch status check
Ensure that the power switch is in the OFF position. If the plug is connected to a power receptacle
while the power switch is in the ON position, the power tool will start operating immediately, which
could cause a serious accident.
3. Extension cord
When the work area is removed from the power source, use an extension cord of sufficient thickness
and rated capacity. The extension cord should be kept as short as practicable.
Recommended minimum conductor cross section and max. cable lengths:
Nominal cross section
of conductor Max. length
1.0mm240m
1.5mm260m
Assembly
1. Install and Removing the SDS-max bit (Fig.1)
CAUTION:
To prevent accidents, make sure to turn the switch off and disconnect to the plug from the power
receptacle.
NOTE:
When using tools such as Tine chisel, drill bits, etc., make sure to use the genuine parts designated by
our company.
(1) Clean the bit shank and apply grease before inserting the bit.
(2) Insert the bit into the tool. Turn the bit with slight pressure, you can feel a spot where there is a
hitch. At that spot, push it in until engages in.
(3) Pull the bit to make sure it is locked completely.
(4) To remove the bit, fully pull the flex sheath in the direction of the arrow and pull out the tool.
2. Auxiliary handle (Fig.2)
Operate your power tool only with the auxiliary handle .
The auxiliary handle can be set to any position for a secure and low-fatigue working posture.
Turn the bottom part of the auxiliary handle in counterclockwise direction and swivel the auxiliary
handle to the desired position. Then retighten the bottom part of the auxiliary handle by turning in
clockwise direction.
Pay attention that the band of the auxiliary handle is positioned on the front housing as intended for.
3. Install the Orientation Staff Guage (Fig.2)
(1) Loosen the papilionaceous bolt on the auxiliary handle, and insert the staff gauge into the mounting
hole on the side handle.
(2) Adjust the staff gauge position according to the depth of the hole and tighten the papilionaceous
bolt securely.

9
4. Regulating the number of rotations and hammering (Fig. 3)
This Rotary Hammer is equipped with a built-in electronic control circuit that can adjust and regulate
the number of rotations and times of hammering. This Rotary Hammer can be used by adjusting the
speed adjuster knob, depending upon the contents of operation, such as boring holes into fragile
materials, chipping, centering, etc.
The scale’1’ of the speed adjuster knob is designed for a minimum speed with the number of 235
rotations per minute and 1350 times of blow per minute. The scale ‘6’ is designed for a maximum
speed with the number of 514 rotations per minute and 2950 times of blow per minute.
CAUTION:
Do not adjust the speed adjuster knob during operation. Doing so can result in injury because the
Rotary Hammer must be held by only one hand, disabling the steady control of the Rotary Hammer.
5. Indicator LEDS (Fig. 4)
The green power-ON indicator LED lights up when the tool is plugged. If indicator led does not light
up, the mains cord or the controller may be detective. The red service indicator LED lights up when the
carbon brushes are worn out to indicate that the tool needs servicing.
Operation
CAUTION:
To prevent accidents, make sure to turn the switch off and disconnect the plug from the receptacle
when the drill bits and other various parts are installed or removed. The power switch should also be
turned off during a work break and after work.
1. Switch operation
Switch on Press the switch towards ①direction
Switch off Release the switch towards ②direction
2. When drilling at “rotation + hammering”:
If you switch the function knob during motor rotation, the tool can start to rotate abruptly, resulting
in unexpected accidents. Be sure to switch the function knob when the motor is at a complete stop.
(1) Switching to “rotation + hammering”
Turn the function knob clockwise. Align ▲of the function knob and of the cover as illustrated
in Fig.5.
(2) Mount the drill bit.
(3) Pull the trigger switch after applying the drill bit tip to the drilling position Fig.6
(4) Pushing the rotary hammer forcibly is not necessary at all. Pushing slightly so that drill dust comes
out gradually is sufficient.
CAUTION:
Although this machine is equipped with a safety clutch, if the drill bit becomes bound in concrete or
other material, the resultant stoppage of the drill bit could cause the machine body to turn in
reaction. Ensure that the main handle and side handle are gripped firmly during operation.
3. When chipping and chiseling at “hammering”:
CAUTION:
○If the function knob is switched during motor rotation, the tool can start to rotate abruptly, resulting
in unexpected accidents. Make sure to switch the function knob when the motor is at a complete stop.

10
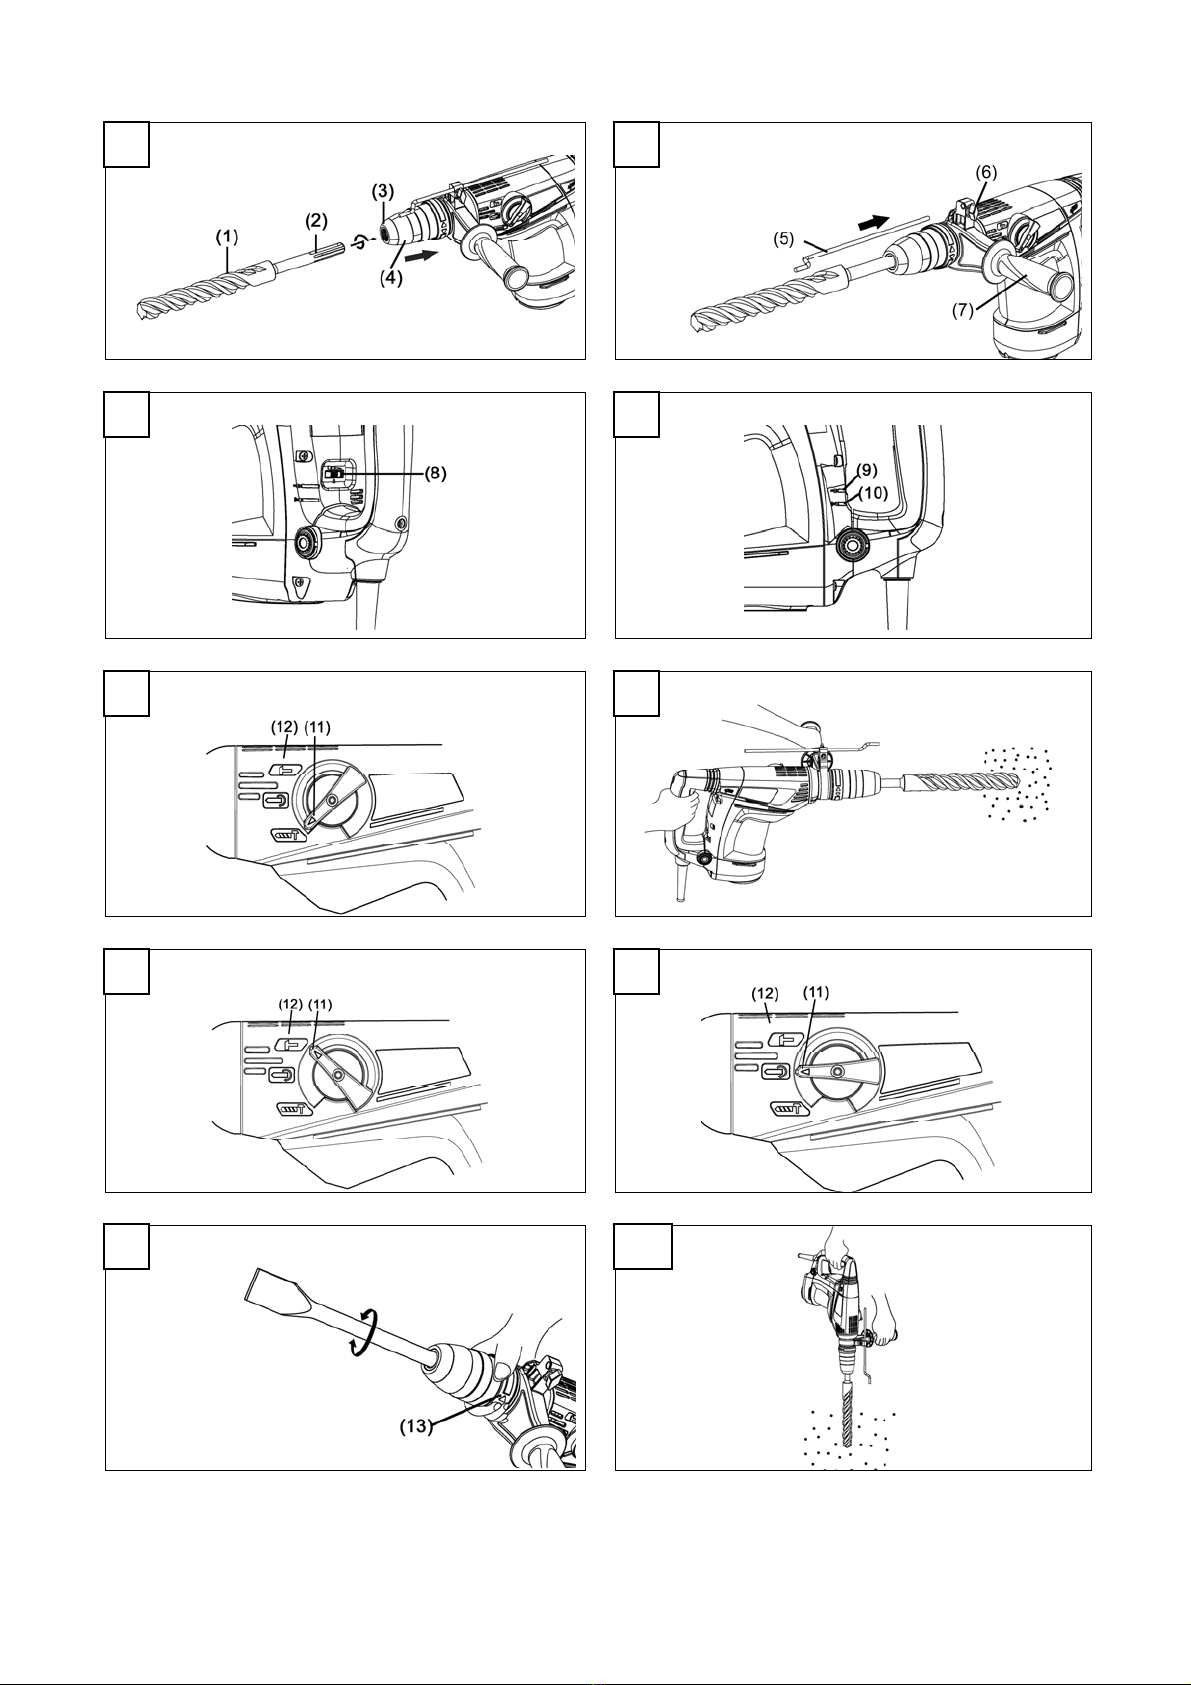
○If the tine chisel or flat chisel is used at the position of “rotation hammering”, the tool can start to
rotate, resulting in unexpected accidents. Make sure that they are used at the position of
“hammering”.
(1) Switching to “hammering”
Turn the function knob counterclockwise. Align ▲of the function knob and of the cover as
illustrated in Fig. 7.
(2)When fixing working positions of flat chisel such as cold chisel, etc.,
(a) Turn the function knob, Align ▲of the function knob and of the cover as illustrated in Fig. 8.
(b) Turn the selector as illustrated in Fig. 9 and fix the flat chisel to the desired working direction.
(c) Switch the selector lever to “hammering” according to the procedures mentioned in the above item
(1) and secure the position of the tool.
5. Warming up (Fig.10)
The grease lubrication system in this unit may require warming up in cold regions.
Position the end of the bit so makes contact with the concrete, turn on the switch and perform the
warming up operation. Make sure that a hitting sound is produced and then use the unit.
CAUTION:
When the warming up operation is performed, hold the side handle and the main body
securely with both hands to maintain a secure grip and be careful not to twist your body by the
jammed drill bit.
MAINTENANCE AND INSPECTION
1. Inspecting the tool
Since use of a dull tool will degrade efficiency and cause possible motor malfunction, sharpen or
replace the tool as soon as abrasion is noted.
2. Inspecting the mounting screws
Regularly inspect all mounting screws and ensure that they are properly tightened. Should any of the
screws be loose, retighten them immediately. Failure to do so could result in serious hazard.
3. Maintenance of the motor
The motor unit winding is the very “heart” of the power tool. Exercise due care to ensure the
winding does not become damaged and/or wet with oil or water.
4. Inspecting the carbon brushes
The Motor employs carbon brushes which are consumable parts. When they become worn to or near
the “wear limit”, it could result in motor trouble. The red service indicator LED lights up when the
carbon brushes are worn out to indicate that the tool needs servicing. The power tool must then be
sent to an after-sales service agent.
When you have to replacement the carbon brushes by yourself, please following the order:
(1) Loosen the four set screws and remove the fan cover.
(2) Remove the helical spring and carbon brushes.
(3) After replacing the carbon brushes, install the helical spring and fan cover, with securely
tightening four set screws.
CAUTION:
Repair, modification and inspection of XINPU Power tools must be must be carried out by a XINPU
Authorized Service Center.
In the operation and maintenance of power tools, the safety regulations and standards prescribed in
each country must be observed.
MODIFICATIONS:
XINPU Power Tools are constantly being improved and modified to incorporate the latest
technological advancements.
Accordingly, some parts (i.e. code numbers and/or design) may be changed without prior notice.

11
NOTE:
Due XINPU’s continuing program of research and development, the specifications herein are subject to
change without prior notice.
Disposal
Do not dispose of electric tools together with household waste material!
In observance of European Directive on waste electrical and electronic equipment and its
implementation in accordance with national law, electric tools that have reached the end of
their life must be collected separately and returned to an environmentally compatible
recycling facility.
Table of contents
Other Xinpu Rotary Hammer manuals