XM XMP3 User manual

Car Kit Installation Guide
TM

2
Introduction ..................3
Welcome to XM .........................3
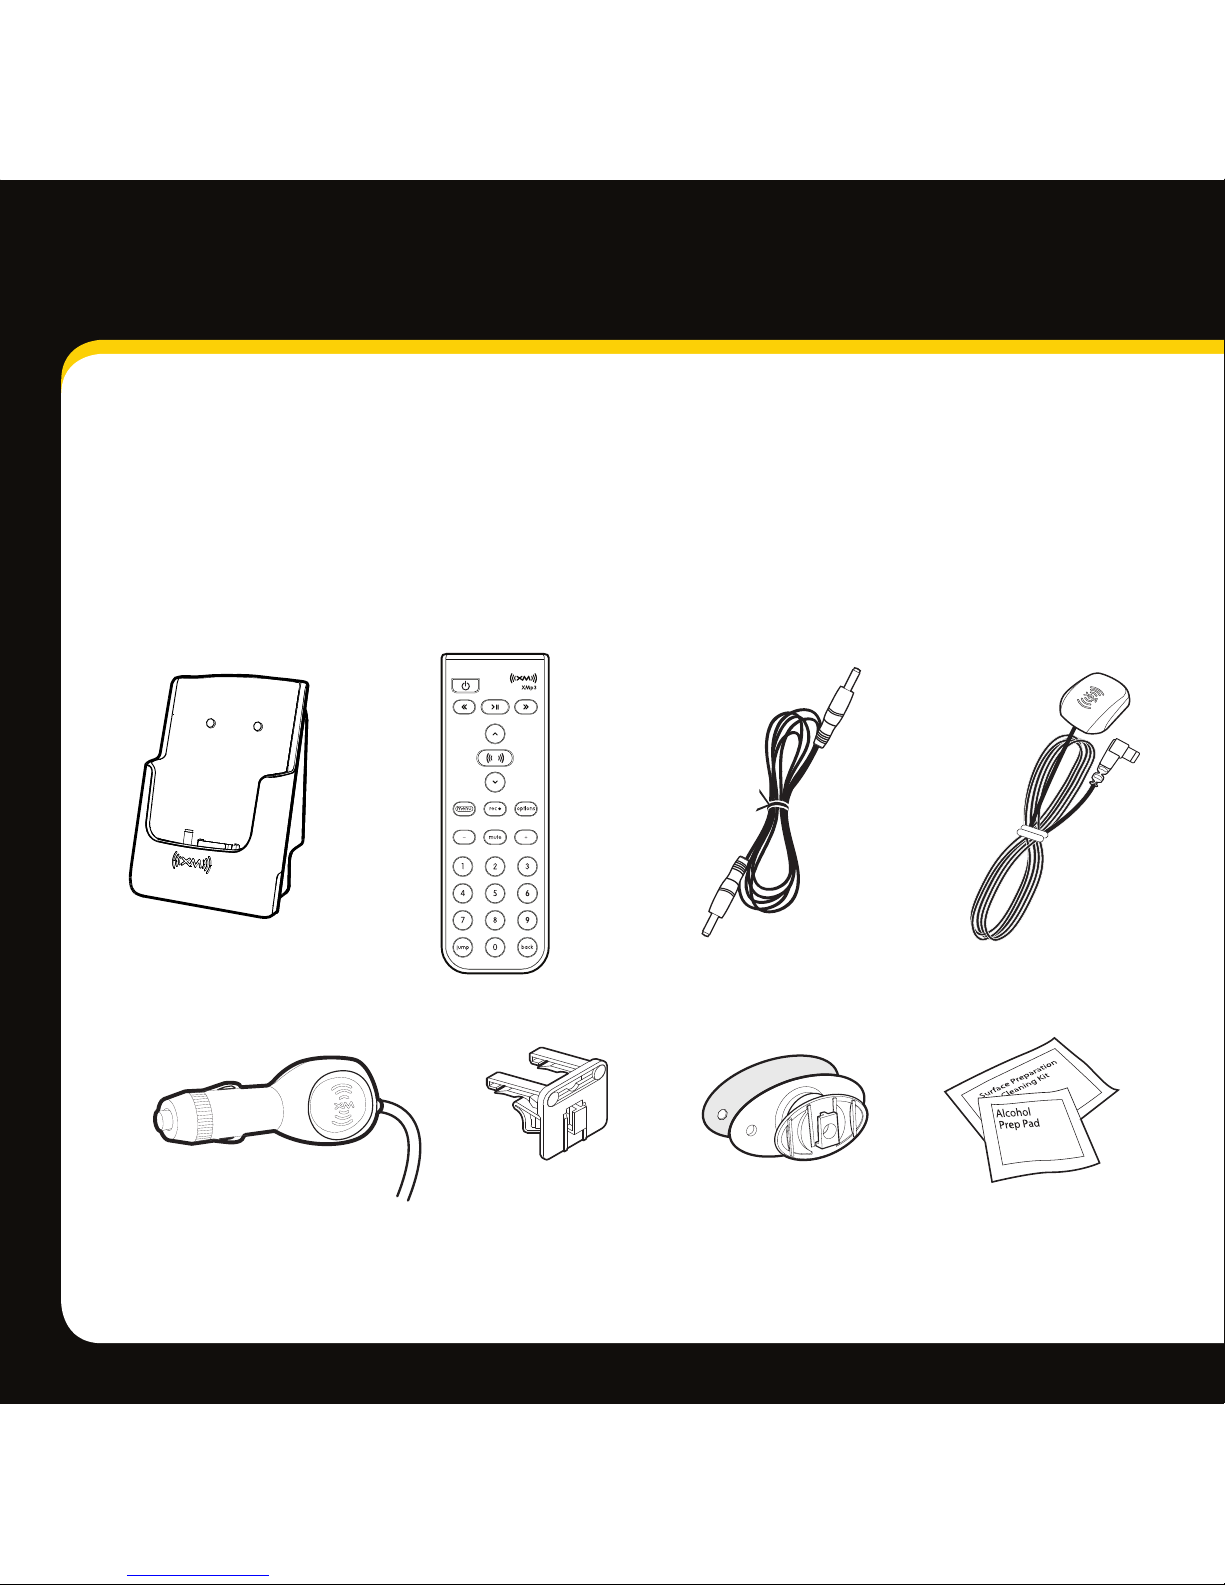
What’s in the Box?.......................3
Remote Control Functions...............4
Vehicle Installation ........... 5
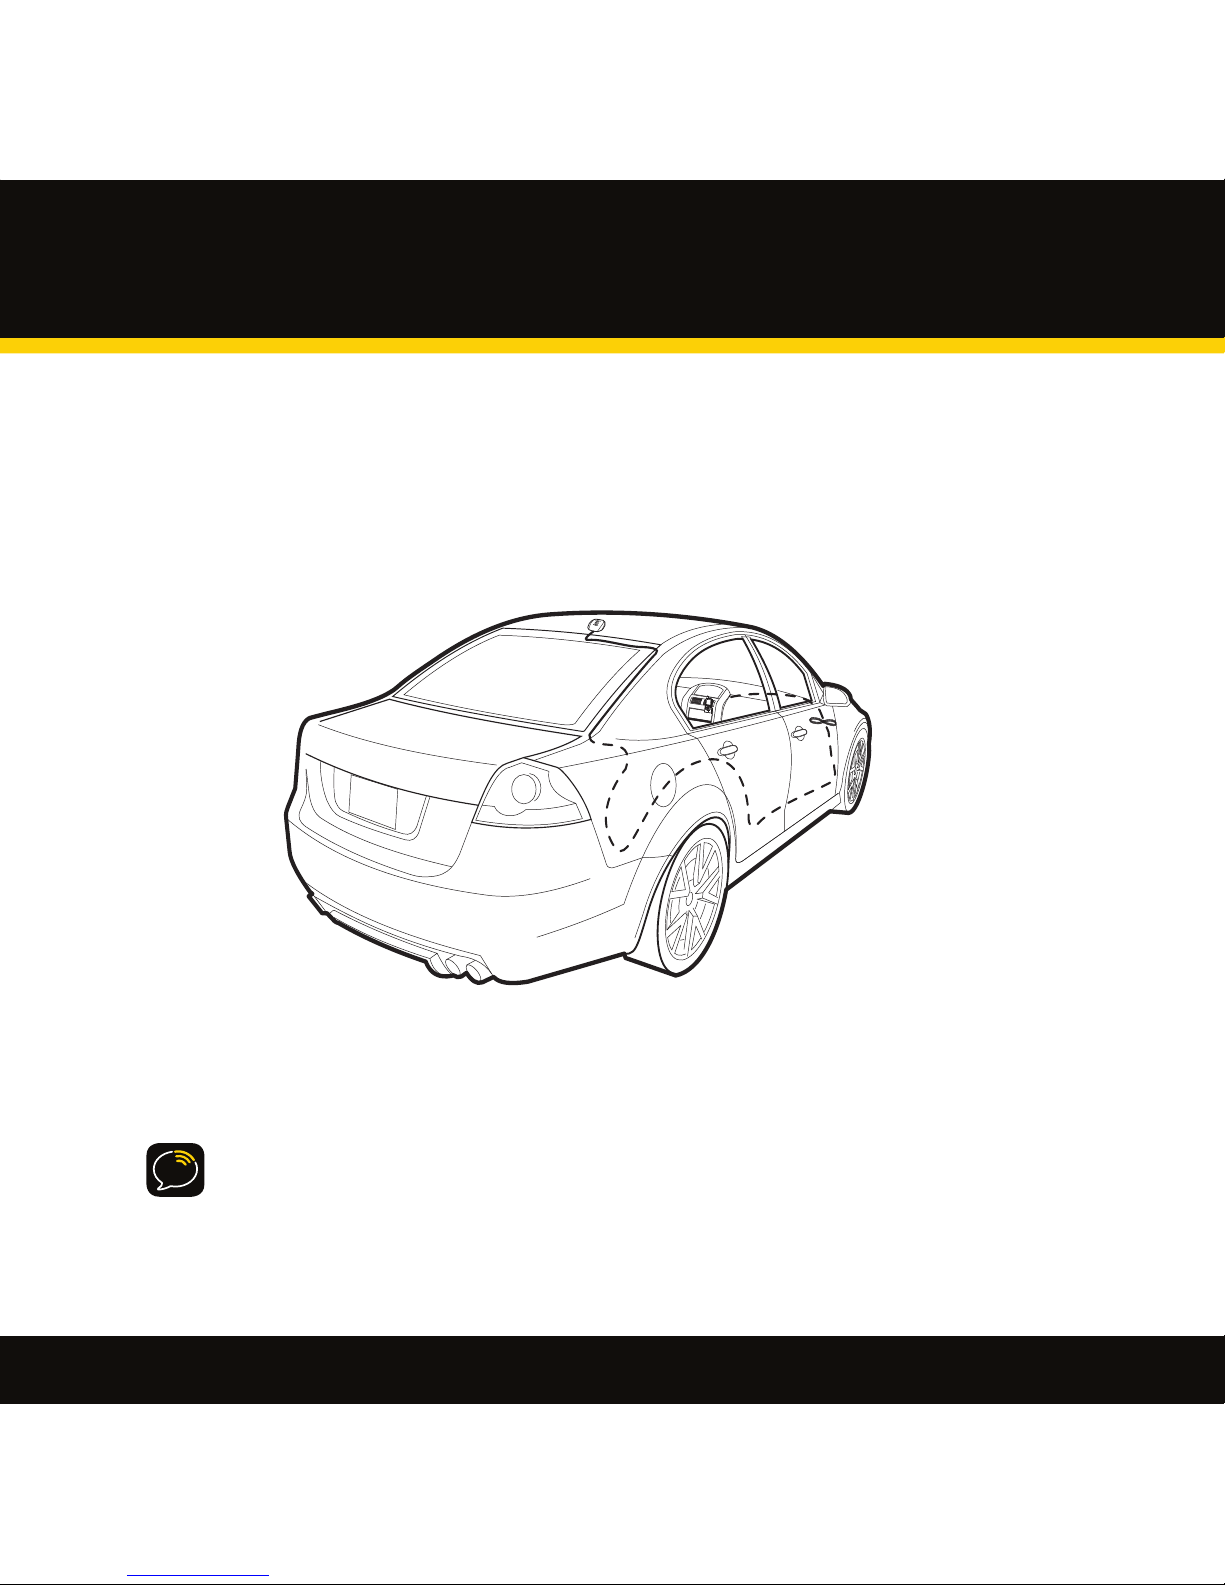
Step 1: Plan the Installation............. 6
Step 2: Mount the XM Car Antenna ..... 7
Step 3: Install the Swivel or Vent Mount . 10
Step 4: Connect your XMp3 Radio. ......12
Step 5: Turning On your XMp3 Radio. ...14
Find an FM Frequency. .................15
Set the Line Out Level. .................17
Aim Antenna for Best Reception. .......18
Automatic Power. ......................19
Power O. .............................20
Troubleshooting ..............21
Product Specs, FCC and IC Info,
Warranty ....................25
Product Specications..................26
FCC and IC Statement ..................27
Warranty...............................28
Owner’s Record ........................31
Patent Information .....................32
Environmental Information.............32
Notes..................................33
Table of Contents

3
Welcome to XM
Thank you for purchasing the XMp3™ Radio Car Kit. This guide walks you through the
installation of your new car kit and helps get you set up and listening fast.
What’s in the Box?
Car Cradle
Power Adapter Swivel MountVent Mount Swivel Mount
Preparation Kit
Remote Control
Audio Cable Car Antenna
Introduction

4
Remote Control Functions
30-Minute Replay Buttons
Pause and replay up to 30
minutes of live XM broadcast.
Power Button
Record
Record a song or channel.
Arrow Buttons
Select menu entries,
change channels.
Options
TuneSelect, bookmarks,
favorites, auto recording,
and view programs for
channel.
Select/XM Button
Press to confirm selections.
Back
Return to previous screen.
Press and hold to return
to the previous channel.
Jump
Switches between current
channel and previous channel.
Menu
Go to My Music Library,
access advanced features
and configuration options
or info extras information.
Number Keys
Enter a channel directly or
select your favorite channels. + and -
Change channels or control
volume for audio system
(sold separately).
Mute
Silences live, saved songs,
and replayed XM content.
Introduction

5
Vehicle Installation

66
Step 1: Plan the Installation
Select an area on the dashboard you want to place the car cradle. This is where1
you will install the swivel or vent mount.
TIP! An adhesive pad is used to mount the swivel mount to the dashboard. The adhesive
requires 24 hours to cure. Make sure you provide yourself the proper amount of time to
install your car kit. See Step 3: Install the Swivel or Vent Mount for more information.
Determine which connection method you plan to use in order to receive the2
XM signal:
Audio Cable (included).•
XM SureConnect (sold separately).•
Cassette Adapter (sold separately).•
FM Direct Adapter (sold separately).•
WARNINGS!
When using this product, it is always important to keep your eyes on the road and hands•
on the wheel. Not doing so could result in personal injury, death, and/or damage to your
XMp3 radio, accessories, and/or to your vehicle or other property.
Your XMp3 radio should be placed in your vehicle where it will not interfere with•
the function of safety features, e.g., deployment of airbags. Failure to correctly place
your XMp3 radio may result in injury to you or others, if the unit becomes detached
during an accident and/or obstructs the deployment of an airbag.
Vehicle Installation

7
Step 2: Mount the XM Car Antenna
Place the car cradle on the dashboard. You will connect it to the swivel or vent1
mount later on.
Select a suitable location on the outside of your car for the XM car antenna.2
For example, on the roof near the windshield or rear window.
TIP! When selecting a location, consider any accessories that your car has, such as a
luggage rack, and how often you use the accessories. Select a location where the XM car
antenna won’t be covered or blocked as this could interfere with signal reception.
Gently place the XM car antenna in the location3
you selected. The antenna has a strong magnet
that sticks to any metallic surface.
TIP! Make sure the door does not pinch the cable when closed.
TIP! Always cross the weather seals at the lowest point possible to reduce water leaks.
TIP! Always hand wash or use brushless or touch-free car washes.
Magnet

8
4 Route the cable:
• IfyouplacedtheXMcarantennaonthe front of the vehicle,
route the cable across the top of the windshield. Gently pry up
the rubber weather seal and tuck the cable underneath. Follow
the weather seal down the side of the windshield to the door jam.
Tuck the cable into the door jam and then under the oormat to
the car cradle.
•IfyouplacedtheXMcarantennaontherearofthevehicle,
route the cable under the weather seal of the rear window.
Tuck the antenna cable around and down the window to
the lowest point, just above the trunk.
Vehicle Installation

9
Next, route the cable from the rear window molding into the weather•
stripping around the trunk opening. Run the cable into the trunk and
then into the rear passenger compartment. Route the cable through
the main compartment by tucking it under the door jam trim or under
the carpet and up to the radio.
5Make sure any excess cable does not interfere with vehicle operations.
TIP! Always be careful to include enough slack in your cable to accommodate open
doors or trunk lids. Use things typically found around the home, like electrical tape,
to secure cables in areas so that hinges do not pinch the cable with the door. Hide
any excess cable in the trim.

10
Step 3: Install the Swivel or Vent Mount
You can use either the included swivel mount or vent mount for your XMp3 radio depending
on your vehicle interior.
Installing the Swivel Mount
CAUTION! The adhesive used with the swivel mount may make it dicult to remove.
Do not install this mount on leather surfaces and make sure the air temperature is at least
60°F (15°C) during installation.
Locate a flat surface for the mount. Make sure there is ample room for the XM1
cradle and radio when installed.
Clean the surface with the preparation kit and let it dry thoroughly.2
Peel off the adhesive liner. Position, press, and hold the swivel mount in place3
for 30 seconds.
IMPORTANT! Let the adhesive cure for 24 hours before attaching the XM cradle and
radio to the mount.
Turn the swivel to accommodate the XM cradle and radio. Adjust the tension4
via the center screw.
You can adjust this screw
to adjust the tension of the
mount with a screwdriver.
Vehicle Installation

11
To remove, carefully lift the adhesive pad with your ngers or a spoon. Warming the pad with a
hair dryer for several minutes will help soften the adhesive.
You can reinstall the swivel mount using the extra adhesive pad.
Installing the Vent Mount
Locate a vent with horizontal slats1
sturdy enough to hold your XM cradle and radio.
Adjust the clamps to fit your vent.2
Snap the mount onto the vent.3
To remove, push the mount into the vent, then lift up.

12
Step 4: Connect your XMp3 Radio
Plug the antenna jack into1 antenna on the cradle.
Plug the power adapter jack into2 5V DC on the cradle.
NOTE! Some car CLAs remain powered even when the car is turned o. To avoid battery
drain, it is recommended to unplug the power adapter or remove the XMp3 from the
dock if leaving the car unattended for an extended period.
Plug the audio adapter jack into3 line out on the cradle.
• Usetheaudio cable (included) if your vehicle has an audio input jack.
• Usethecassette adapter (sold separately) if your vehicle has a built in
cassette player.
4 Insert mount into the cradle then slide it up until it feels tightly in place.
5 Insert your XMp3 radio into the cradle.
NOTE! If your car does not contain a cassette player or an audio input, you will need to
use either the XM SureConnect (sold separately) or the FM Direct (sold separately).
line o ut 5V D C
ante nn a
Vehicle Installation

13
lin e out 5V DC
ante nn a
lin e out5V D C
ante nn a
XM Car Antenna
Audio Cable or
Cassette Adapter
Configuration
SureConnect Configuration
XM Car Antenna
Power Adapter
Power Adapter
XMp3 Car Cradle
XMp3 Car Cradle
Audio Cable
(included)
Cassette Adapter
(sold separately)
XM SureConnect
(sold separately)
or

14
• XM SureConnect (sold separately): You can listen to your XMp3 radio through your
car stereo by using the XMp3 car cradle’s built-in FM modulator and the XM
SureConnect. Simply nd an unused FM frequency on the stereo and set your XMp3
radio to transmit on that same frequency. Refer to Find an FM Frequency in your user
guide for more information.
• FM Direct (sold separately): This option directly connects the XMp3 car
cradle to your car’s audio system and antenna. A professional installation is
recommended if you choose to use this method. Professional installation can help
improve your XMp3 radio’s reception and signicantly reduce the visibility of wires. To
learn more, check with the retailer where you bought your radio or go to
xmradio.com/accessories.
Step 5: Turning On your XMp3 Radio
Turn on your car radio.1
Plug in the audio cable or insert the cassette adapter into your car stereo if2
applicable.
Turn on your XMp3 radio.3
NOTE! You may experience a brief delay while your XMp3 radio powers up. If you press
the power button during this time, you will see a “Please Wait” message.
Vehicle Installation

15
Find an FM Frequency
(When using the XM SureConnect or FM Direct.)
If you are using the SureConnect or FM Direct to transmit audio, you must set the FM
frequency on both your XMp3 radio and your car radio.
Select1 menu gSettings gVehicle Settings gFrequency Finder.
Your XMp3 radio automatically scans for all available FM frequencies.2

16
3 You’ll see a list of all the frequencies. Turn the control wheel to highlight a
frequency, then press the XM button to select it.
4 Set your car radio to the frequency selected.
TIP! The best FM frequency to use is displayed at the top of the list. It is recommended
to choose that frequency. However, if you are not satised with the sound quality,
select a dierent FM frequency within the list (or select View All Frequencies to see 100
frequencies), press the XM button on your XMp3 radio, and tune your car stereo to that
frequency.
Vehicle Installation

17
Set the Line Out Level
To connect the line out on the XMp3 car cradle directly to your car’s stereo to transmit
audio, you can:
• Useyourcarstereo’saudioinputcalled“AuxIn”(cableincluded).
• Useacassetteadapter(soldseparately).
Either of these methods will give you the best audio quality. When using either of these
methods to transmit audio through your car’s stereo, you can adjust the XMp3 radio’s
audio level to match other audio sources.
Press1 menu gSettings gLine Out Level.
Spin the wheel to increase or decrease the level.2
Press the3 XM button.
Do not use the Line Out Level menu item as a volume control; use the volume control on
your car stereo instead. Line Out Level is used to adjust the volume level to match other
audio sources (your CD player, other FM stations, or MP3 player).

18
Aim Antenna for Best Reception
For best reception, your XM car antenna should have an unobstructed view of the XM
satellites in the southern sky. In large cities, XM has a network of ground repeaters to
help increase the signal coverage.
Your XMp3 radio can help you Aim Antenna for Best
Reception.
1 Select menu gSettings gAntenna Aiming.
2 The Satellite and Terrestrial bars show the
level of your current signal.
3 Move around your antenna if you are having
trouble getting a signal.
Vehicle Installation

19
Automatic Power
Usually, your XMp3 radio turns on automatically when it is plugged in and receiving
power. You can change this so you must manually turn the radio on/o each time.
Press1 menu gSettings gVehicle Settings gAutomatic Power.
Press the2 XM button to toggle On or Off.
TIP! With your XMp3 radio in the car cradle, the remote will not be able to
turn it on.

20
Power Off
This option is available if you are using the car cradle and the cigarette lighter is always
powered.
1 Press menu gSettings gVehicle Settings gPower O.
2 Press the XM button to adjust the setting.
• Choosetheamountoftime(60,90,120,or180minutesorO)that
should pass before the radio turns o automatically.
3 Press the XM button.
Vehicle Installation
Other manuals for XMP3
5
Table of contents
Other XM Car Receiver manuals
Popular Car Receiver manuals by other brands

ZENEC
ZENEC ZE-MU703 instruction manual

Kia
Kia K101T instruction manual

Clarion
Clarion FZ501 Owner's manual & installation manual

Blaupunkt
Blaupunkt Pasadena DJ operating instructions

SKYPINE ELECTRONICS
SKYPINE ELECTRONICS VX400 Owner's manual & installation manual

Sony
Sony GT620U - CDX Radio / CD Installation/connections