XM SkyDock User manual

SkyDock™
Installation and User Guide

2
Table of Contents

3
FM Settings . . . . . . . . . . . . . . . . . . . . 47
Alert Options . . . . . . . . . . . . . . . . . . . 50
Ticker Options . . . . . . . . . . . . . . . . . . 50
Sports . . . . . . . . . . . . . . . . . . . . . . . . . . 51
Stocks . . . . . . . . . . . . . . . . . . . . . . . . . 53
Traffic & Weather. . . . . . . . . . . . . . . . 55
Preview Cards . . . . . . . . . . . . . . . . . . 56
Parental Controls. . . . . . . . . . . . . . . . 57
Sounds. . . . . . . . . . . . . . . . . . . . . . . . . 60
Disable Auto-Lock . . . . . . . . . . . . . . . 6 1
Appendix. . . . . . . . . . . . . . . . . . . . 62
Miscellaneous Pop-Up Alerts. . . . . . 63
Incoming Phone Cal Behavior . . . . . 64
Specifications. . . . . . . . . . . . . . . . . . . 65
Patent Information . . . . . . . . . . . . . . 66
Environmental Information . . . . . . . 66
FCC Statement. . . . . . . . . . . . . . . . . . 67
Copyrights and Trademarks . . . . . . . 68
Owner’s Record . . . . . . . . . . . . . . . . . 69
Introduction . . . . . . . . . . . . . . . . . . .4
Features . . . . . . . . . . . . . . . . . . . . . . . . .5
About XM Radio . . . . . . . . . . . . . . . . . . .6
Safety and Care information . . . . . . . . 7
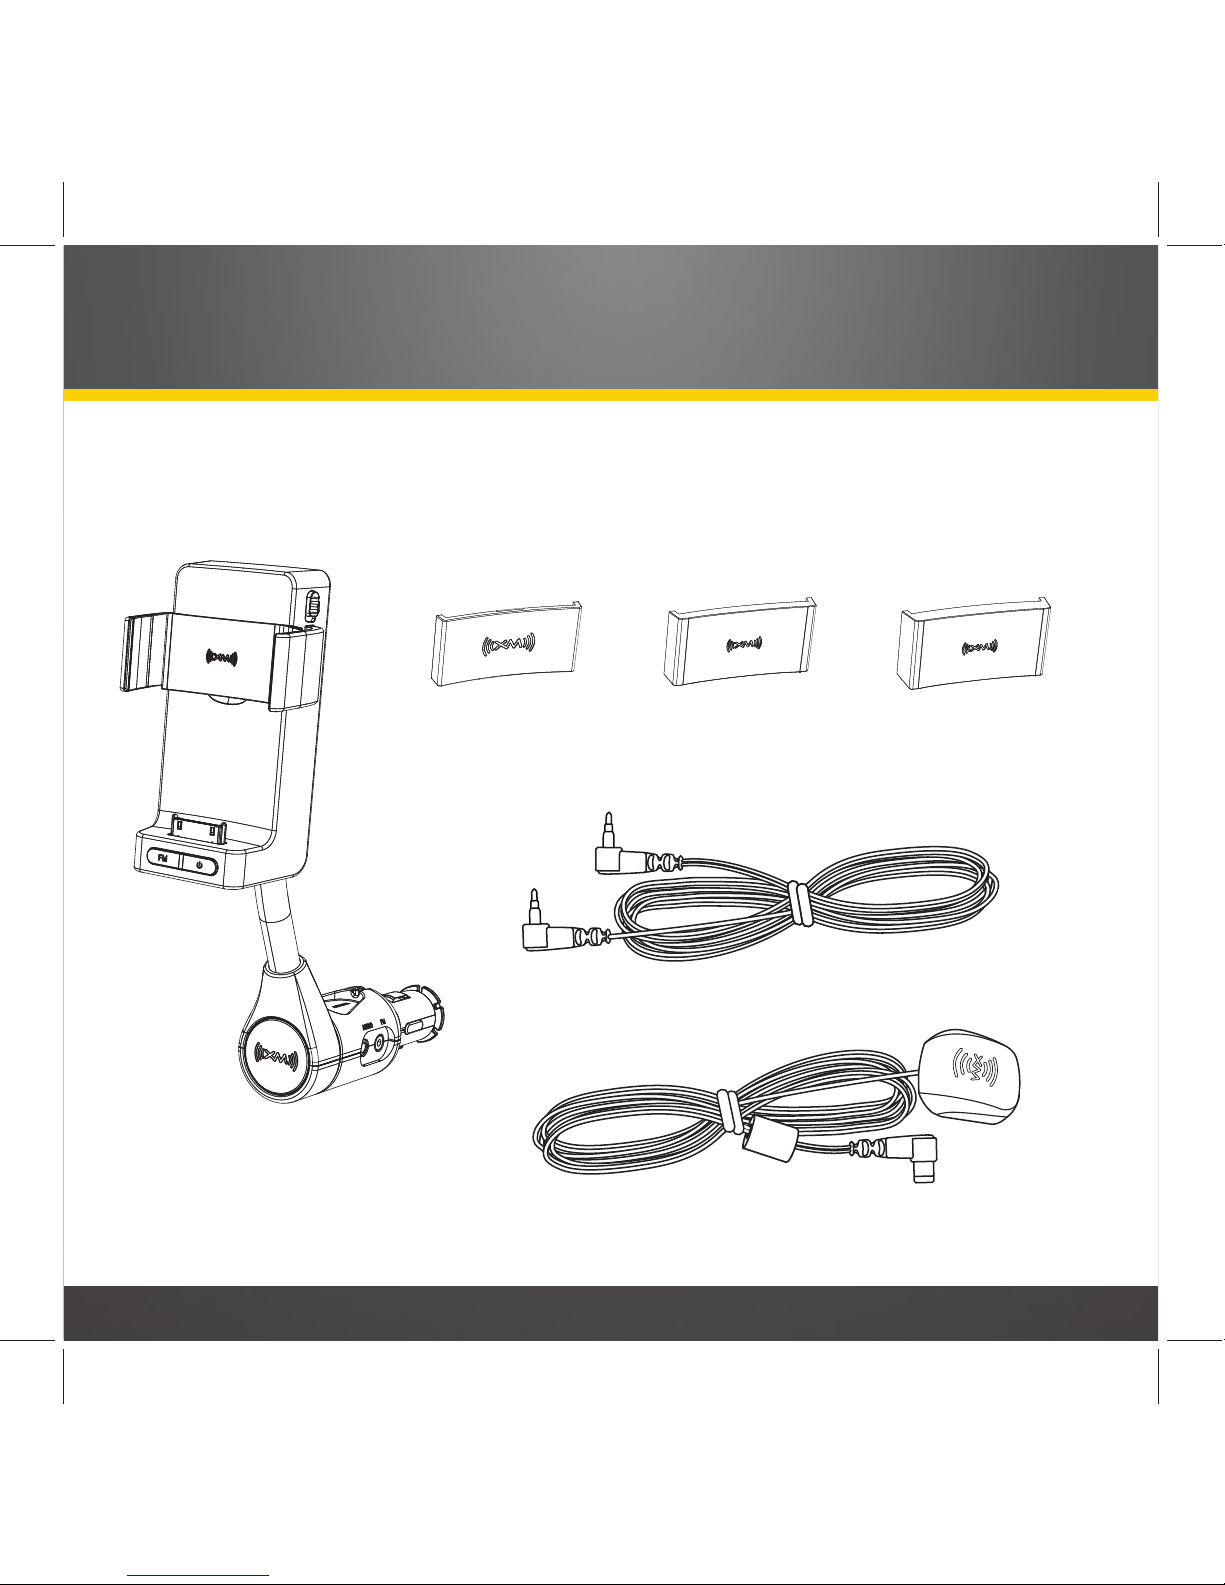
What’s in the box? . . . . . . . . . . . . . . . . .9
SkyDock Features and Controls. . . . . 10
SkyDock Features and Connections
. . .11
Vehicle Installation . . . . . . . . . . . . 12
Installing SkyDock in Your Vehicle . . . . . 13
Docking the iPhone in the SkyDock
. . . . .18
Downloading the XM SkyDock App
. . . . 22
Launching the XM SkyDock App
for the First Time . . . . . . . . . . . . . . .23
Activating Your XM Subscription. . . .24
Setting-up the FM Transmitter . . . . .26
Using Your SkyDock . . . . . . . . . . .28
Display Screen Information . . . . . . . .29
Channel List Screen . . . . . . . . . . . . . .3 1
Category List Screen . . . . . . . . . . . . .32
Direct Tuning . . . . . . . . . . . . . . . . . . . 34
Setting Your Favorite Channels. . . . 35
Song Tagging . . . . . . . . . . . . . . . . . . . .38
Sports Tagging . . . . . . . . . . . . . . . . . . 40
Displaying the Sports and
Stock Ticker . . . . . . . . . . . . . . . . . . 42
Setting up Your SkyDock
. . . . . . . . . 44
The Settings Menu. . . . . . . . . . . . . . . 45
My Account. . . . . . . . . . . . . . . . . . . . . 46
Table of Contents

4
Introduction

5
Introduction
Features
Congratulations on your purchase of the SkyDock!
The SkyDock™ has these exciting features to enhance your listening experience:
• Specialized Dock with built-in XM Radio tuner
• Compatible with iPhone and iPod touch (see page 6 for specific models)
• Controlled by XM SkyDock Application (downloadable free from App Store)
• Charges iPhone/iPod touch while docked
• All-in-one design allows for easy installation
• Rotates to view in portrait or landscape modes (automatic image orientation)
• Incorporates PowerConnect FM transmitter
• Audio Out connection (for AUX-IN ready vehicle audio systems)
• iTunes Song Tagging
• Artist/Song Alerts
• Game Alerts
• Stock and Sports Ticker
To get the most from your new SkyDock, please read this entire user guide.

6
Introduction
Compatibility
Your SkyDock will work with the following iPhone and iPod models
that have
OS 3.0 or higher
:
iPod is a trademark of Apple Inc., registered in the U.S. and other countries. iPhone
is a trademark of Apple, Inc. Apple is not responsible for the operation of this device,
or its compliance with safety and regulatory standards.

7
Safety and Care Information
IMPORTANT: Always read and understand all the instructions to avoid injury
to yourself and/or damage to your radio. XM Radio claims no responsibility for
damage from data loss due to breakdown, repair, or other causes.
• Do not expose to extreme temperatures (above 140°F or below -4°F, or above
60°C or below -20°C).
• Do not expose to moisture. Do not use device near or in water.
• Do not let any foreign matter spill into device.
• Do not store in dusty areas.
• Do not expose to chemicals such as benzene and thinners. Do not use liquid or
aerosol cleaners. Clean with a soft damp cloth only.
• Do not expose to direct sunlight, fire, flame or other heat sources for a
prolonged period.
• Do not try to disassemble and/or repair the device yourself.
• Do not drop the device or subject it to severe impact.
• Do not place heavy objects on the device.
• Do not subject the device to excessive pressure.

8
Introduction
WARNING
• Opening the case may result in electric shock.
• The uninsulated parts inside the SkyDock may cause electric shock or fire. For
your safety, please do not open the SkyDock. Do not let metallic objects, such
as necklaces or coins, come into contact with the SkyDock plug.
• To avoid electric shock, use the SkyDock only with a power outlet that matches
the shape of its plug.
• Make sure that you insert the SkyDock all the way into the power socket.
• Do not plug several devices into the same power outlet.
• Use the SkyDock away from water sources to avoid fire or electric shock.
• Do not touch the device with wet hands.
When using this product it is always important to keep your eyes on the road and
hands on the wheel. Not doing so could result in personal injury, death, and/or
damage to your device, accessories, and/or to your vehicle or other property.
Your device should be placed in your vehicle where it will not interfere with the
function of safety features, e.g., deployment of airbags. Failure to correctly
place this device may result in injury to you or others if the unit becomes
detached during an accident and/or obstructs the deployment of an airbag.

9
What’s in the Box?
SkyDock
(with Spacer 2
Attached)
Spacer 2
(shipped attached
to SkyDock)
Spacer 1 Spacer 3
Magnetic
Vehicle Antenna
Audio Cable

10
SkyDock Features and Controls
Introduction
Side Grip
Power Button
Power Indicator
Side Grip
Replaceable
Spacer
FM Button
Side Grip
Release Lever

11
SkyDock Features and Connections
Antenna Connector
Flexible Stalk
FM Out ConnectorAudio Connector

12
Vehicle Installation

13
Vehicle Installation
NOTE: A
LL
REFERENCES
TO
iPhone
IN
THIS
MANUAL
ALSO
APPLY
TO
THE
iPod touch
UNLESS
OTHERWISE
NOTED
.
Installing the SkyDock in Your Vehicle
Step 1: Finding a Location for the SkyDock
The SkyDock mounts into your vehicle’s cigarette lighter or 12V power socket.
If your vehicle has more than one 12V power socket, be sure to choose one that doesn’t
interfere with the driver’s vision or access to driving controls, doesn’t interfere
with the deployment of airbags or other safety equipment, and makes the iPhone
easily accessible for operation. Please see the safety warnings on page 8.
It will be easier to make connections to your SkyDock before you plug it into the power
socket, so we recommend completing
Step 2
and
Step 3
first.
Step 2: Mounting the Antenna and Routing the Cable
IMPORTANT: T
HE
S
KY
D
OCK
USES
A
UNIQUE
ANTENNA
. D
O
NOT
SUBSTITUTE
AN
ANTENNA
FROM
ANY
OTHER
XM
RADIO
FOR
THE
S
KY
D
OCK
ANTENNA
. R
EPLACEMENT
S
KY
D
OCK
ANTENNAS
ARE
AVAILABLE
FROM
WWW
.
XMRADIO
.
COM
.
a) Mount the antenna on the outside of your vehicle, on a
horizontal surface that will always face the sky. The
antenna contains a strong magnet that will stick to
any metal part of your vehicle. Leave at least 3” of
metal around at least three sides of the antenna. Magnet

14
Vehicle Installation
For most vehicles the best location is on the roof towards the front of the cab, above
the front windshield, as close to centered between the left and right sides as the
cable length will allow. For convertibles, locate the antenna on the trunk lid, at least
3” from any edge. (If the cable does not reach, locate the antenna on top of the front
windshield frame.)
Recommended Antenna Locations
Sedans and Coupes Pickups and SUVs
Convertibles*
* If the antenna will not reach the
trunk lid, mount it on the top of
the front windshield frame.

15
b)Route the antenna wire under the rubber molding around the front
windshield to the nearest corner. Then route the cable out of the windshield
molding and into the rubber weather stripping around the door opening. Lift the
weather stripping from the open-
ing and tuck the cable inside it,
then replace the weather strip-
ping. Run the cable inside of the
weather stripping to the bottom
of the door opening.
c) Recommended: Hide the antenna
wire inside the cabin. Pull the
cable out of the weather strip-
ping at the bottom of the door
opening and route it under the
carpet toward the 12V power
socket. Coil any excess cable in a
hidden location, such as under the
carpet, keeping it away from any
vehicle pedals or controls. Secure
the excess cable with wire ties.
TIP! Always be careful to include enough slack in your routing to accommodate open doors
or trunk lids. Use electrical tape to secure the cable in areas so that hinges do not pinch the
cable with the door.
Place Antenna
Closer to A-Pillar
if Cable Doesn’t Reach
Center of Roof
12V
Power Socket
Location

16
3. Connect the SkyDock to Your Audio System
a) Plug the Antenna into the
SkyDock’s ANTENNA CONNECTOR.
The antenna plug and cable will fit
into the recess on the top of the
SkyDock base.
b) If your vehicle’s audio system
has an audio input (for MP3
players, etc), connect the included
Audio Cable between it and the
SkyDock’s AUDIO CONNECTOR. This is
the best quality and easiest audio
connection for your SkyDock.
Vehicle Installation
Antenna
Connector
Antenna
Plug
Connecting the Antenna
Connecting the Audio Cable
Audio
Cable
Audio
Connector
Audio
Cable
Plug

17
c) If your vehicle’s audio system does not have an audio input, your SkyDock
incorporates a special FM transmitter called PowerConnect that will ‘broadcast’ its
audio to your vehicle’s FM radio through your vehicle’s power system. See
Setting-
Up the FM Transmitter
, on page 26, for details.
4. Plug the SkyDock Into the Vehicle’s 12V Power Socket
Make sure the SkyDock is inserted all the way into the power
socket.
NOTE: A
FTER
PLUGGING
THE
S
KY
D
OCK
INTO
THE
POWER
SOCKET
,
ALIGN
THE
CABLES
SO
THEY
DO
NOT
INTERFERE
WITH
THE
SAFE
OPERATION
OF
THE
VEHICLE
.
12V Power
Socket

18
Vehicle Installation
Docking the iPhone in the SkyDock
Inserting the Spacers
Your SkyDock comes with three numbered urethane spacers that assure a proper fit with
different iPhone and iPod touch models, with and without aftermarket skins (thin cases
that surround and protect the iPhone or iPod touch).
IMPORTANT: T
HE
S
KY
D
OCK
WILL
NOT
ACCOMMODATE
ALL
TYPES
OF
AFTERMARKET
SKINS
. C
OMPATIBLE
SKINS
MUST
NOT
BE
THICKER
THAN
2
MM
IN
ANY
DIRECTION
AND
MUST
HAVE
A
LARGE
ENOUGH
OPEN
AREA
AROUND
THE
CONNECTOR
AT
THE
BOTTOM
OF
THE
iPhone/iPod touch
TO
ALLOW
IT
TO
SEAT
PROPERLY
IN
THE
S
KY
D
OCK
.
Spacer 1: For iPhone with compatible skin
Spacer 2: For iPhone without skin; for iPod
touch with compatible skin
Spacer 3: For iPod touch without skin
Install the appropriate Spacer by inserting it all
the way into the recess in the SkyDock (
top
).
Removing the Spacers
1. Use one finger to apply sliding pressure on the
Spacer towards one of the Side Grip arms.
2. Using another finger, pry up under the edge of
the Spacer to release it (
bottom
).
Recess
Spacer
1. Press Spacer &
Slide Towards
Side Grip
2. Pry Spacer Up
and Remove

19
Inserting and Removing the iPhone
To insert the iPhone in the SkyDock: Insert the bottom of the iPhone straight down
onto the connector, making sure that the connection is solid. Gently squeeze the side
grips against the iPhone to secure it. Squeeze towards the rear of both side grips, as
shown in the diagram below.
1. Press iPhone
Down Onto
Connector
TO INSERT
iPHONE
2. Squeeze Grips
to Close
Squeeze
Grips
Here
DO NOT
Squeeze
Here

20
Vehicle Installation
To remove the iPhone: Slide the Side Grip Release Lever DOWN to spread the grips
apart. Then lift the iPhone off the connector and pull it straight up and out of the
SkyDock.
1. Slide Release
Lever Down
2. Lift iPhone Off
of Connector and
Out of SkyDock
TO REMOVE
iPHONE
Slide Lever
DOWN
Grips Will
Spread Apart
Table of contents