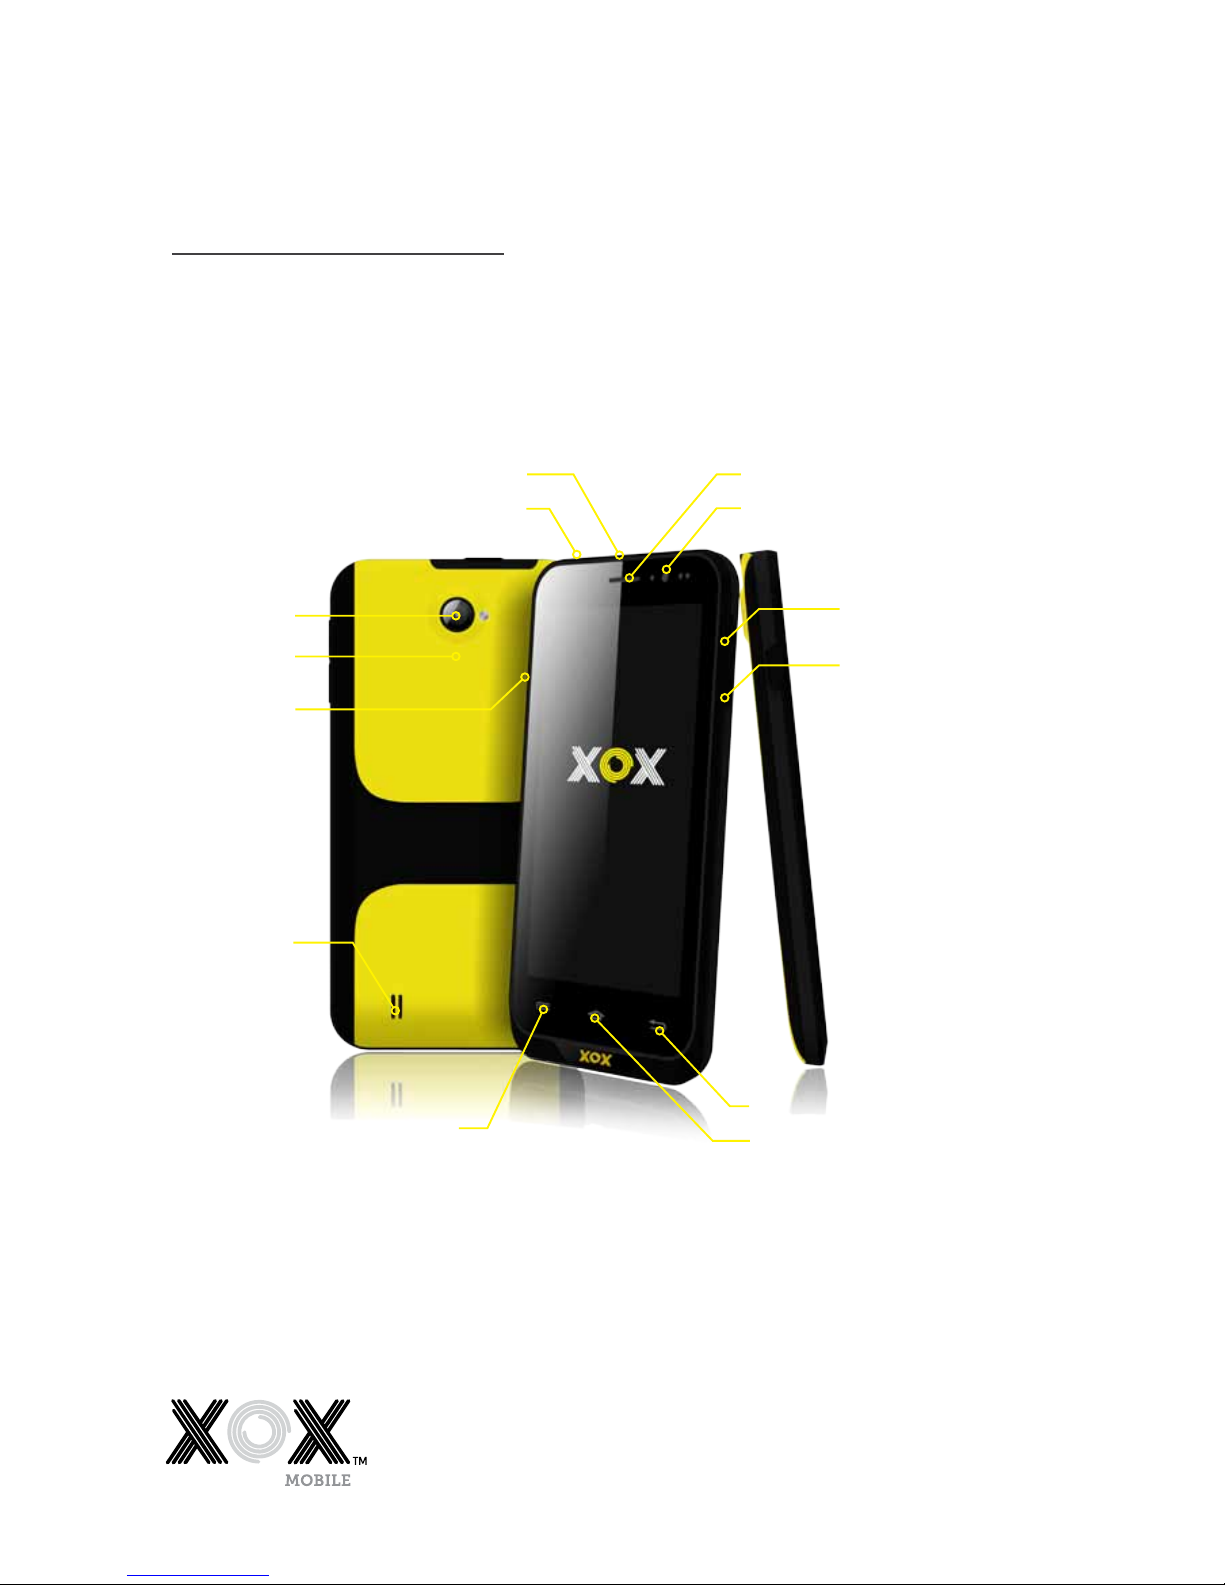
XOX GO Series User manual

User Guide
go phone
GO Series

GO Phone
Earphone
Camera
Power On/O
Camera
Volume +
Volume -
Menu Icon
Back icon
Speaker
EarpieceCharger/USB
Reset
Home Icon

1
Table of
Contents
1 General Information 2
1.1 Profile 2
1.2 Safety Notices 2
2 Your Mobile Phone 4
2.1 Mobile Phone overview 4
2.2 Functions of Keys 4
2.3 Functions of icons 4
3 Getting started 5
3.1 Installing the SIM Card and Battery 5
3.2 Charging the Battery 5
3.3 Linking to the Networks and devices 6
3.4 Using the touch screen 6
3.5 Using the onscreen keypad 7
3.6 Making Calls 7
4 Using the Menus 8
4.1 Browser 8
4.2 Calculator 9
4.3 Calendar 9
4.4 Camera 10
4.5 Clock 11
4.6 Contacts 11
4.7 Downloads 11
4.8 Email 12
4.9 ES File Manger 13
4.10 FM radio 13
4.11 Gallery 13
4.12 Gmail 14
4.13 Google search 14
4.14 Messenger 14
4.15 Local 14
4.16 Maps 14
4.17 Messaging 14
4.18 Music 14
4.19 News & Weather 15
4.20 Mobile Phone 15
4.21 Play store 15
4.22 Search 16
4.23 Settings 16
4.24 Sound Recorder 17
4.25 Talk 17
4.26 Voice search 17
4.27 YouTube 17
5 Specifications 18
6 Appendix 19

2
Thank you for choosing an XOX mobile phone. Your State of Independence.
Please read this manual carefully so you can maximise your XOX mobile
phone experience.
1.1 Profile
Our company may make changes to this mobile phone model without prior
written notice and reserves the final right to interpret the specifications and
performance of this mobile phone.
Due to dierent software and network operators, the information
displayed on your mobile phone may be dierent. Refer to your mobile
phone for details.
1.2 Safety Notices
Safety warning
> ROAD SAFETY COMES FIRST
Never use your mobile phone without a hands-free device when driving.
Please obey local trac laws for mobile phone use when driving.
> SWITCH OFF YOUR MOBILE PHONE IN-FLIGHT
Wireless devices can cause interference with aircraft electronic
equipment. Using a mobile phone in-flight is illegal and risky.
Please ensure your mobile phone is powered o and in Flight Mode
when instructed if you wish to use non-transmitting functions during
the flight.
> SWITCH OFF YOUR MOBILE PHONE BEFORE ENTERING HIGH RISK
AREAS
Strictly observe the relevant laws, codes, and regulations on the use of
mobile phones in high risk areas. Turn o your mobile phone before
entering a place susceptible to explosion. For example service stations,
oil tank farms, chemical plants, or areas where explosive blasting is
under way.
> AREAS WITH DESIGNATED REGULATIONS FOR MOBILE PHONE USE
Follow special regulations in areas such as hospitals, and always switch
o your mobile phone whenever it is forbidden to use it or, when it
may cause interference. Take care when using your mobile phone near
medical devices, such as pacemakers, hearing aids, and other electronic
medical devices, as it may cause interference.
> INTERFERENCE
The voice quality of your mobile phone may be aected by radio
interference. An antenna is built inside your mobile phone and located
below the microphone. Avoid touching the antenna area during a phone
conversation, as the conversation quality could deteriorate.
> QUALIFIED SERVICING OF YOUR MOBILE PHONE
Only qualified personnel should repair mobile phone equipment. Any
attempt to repair or tamper with your mobile phone will void your mobile
phone warranty.
General
Information
1.0

3
General
Information,
continued
> ACCESSORIES AND BATTERIES
Use only approved accessories and batteries.
> EMERGENCY CALLS
Ensure your mobile phone is switched on, in a mobile network coverage
area, and in service. Enter the emergency number for your country or
territory, then press the Dial Key. Give your location and state your
situation briefly. Do not end the call until told to do so.
Note: Some mobile networks do not support an emergency call service. Do not rely solely on your
mobile phone for critical communications. Please consult your mobile network operator for further
information on Emergency Call access and coverage.
Precautions
> Keep your mobile phone out of the reach of children.
> Keep your mobile phone dry. Keep away from rain, moisture, liquid or
other substances that could corrode electronic circuits.
> Do not use or store your mobile phone in dusty places.
> Do not expose your mobile phone to temperature extremes. Exposure to
high temperatures will shorten the life of electronic circuits, damage the
battery and some plastic parts. Cold temperatures may cause
condensation and moisture build up.
> Please take care of your mobile phone. Do not throw, knock or shock
your mobile phone. This could cause damage to the internal circuits and
high-precision components of your mobile phone.
SAR Value
Your mobile phone model has been designed to comply with applicable
safety requirements for exposure to radio waves. The radio wave exposure
guidelines employ a unit of measurement called Specific Absorption Rate
(SAR). The recommended SAR limit for mobile handset is 1.6 W/Kg averaged
over a 6 minute period and taken over a volume of 1g of human tissue.
Use your mobile phone when the signal strength is good. Keep your calls
short, consider using the headset, or send a text message. This advice applies
especially to children, adolescents, and pregnant women.
If using a Bluetooth headset device, please make sure it has a low
power emitter.
The below are the SAR values of this model:
900 HEAD: 0.656 W/kg BODY :0.463 W/kg
1800 HEAD: 0.809 W/kg BODY: 0.704 W/kg

4
2.0
Your
Mobile
Phone
2.1 Mobile Phone overview
2.2 Functions of Keys
Your mobile phone has the following keys:
> Power Key
The Power key is located at the top of your mobile phone.
While using your mobile phone you can use this key to lock your screen.
If you press and hold this key, an options list will pop up. You can adjust
your mobile phone to silent mode, airplane mode, or power o your
phone using the Power key.
> Volume Key
The volume key is on the right side of your mobile phone. You can adjust
the ringer volume by pressing this key up or down to increase and reduce
the volume.
2.3 Functions of icons
> Home Icon
Pressing this icon will take you to the home screen.
> Menu Icon
This icon provides access to the options available for the current function
you are using.
> Back Icon
This icon returns you to the previous screen.

5
3.1 Installing the SIM Card and Battery
A SIM card carries information, including your mobile phone number, PIN
(Personal Identification Number), PIN2, PUK (PIN Unlocking Key), PUK2
(PIN2 Unlocking Key), IMSI (International Mobile Subscriber Identity),
network information, contacts data, and short messages data.
Note: After powering o your mobile phone, wait for a few seconds before
removing or inserting a SIM card. Take care when handling a SIM card, as
friction or bending will damage the SIM card. Keep your mobile phone and
SIM card out of children’s reach.
Installation
> Hold the power key and select power o to turn your mobile phone o.
> Remove the back cover, and if installed, remove the battery.
> Carefully insert the SIM Card into the SIM Card slot. The corner cutting
of the SIM card should be aligned with the notch of the slot with the gold
terminal plate of the SIM card facing downward. When correctly installed
the SIM Card cannot be pushed in any further.
> To install the battery, the metallic contacts of the battery should face the
metallic contacts in the battery slot.
Note: Where supplied, keep the SD card out of the reach of children.
3.2 Charging the Battery
> The remaining battery charge is indicated by the battery level icon at the
upper right corner of the display screen.
> When the battery is low, your mobile phone will display “Battery low”.
> During charging, the battery level indicators on the battery icon
blink until the battery is fully charged, indicating the charging process
has ended.
Note: Before charging, ensure that the standard voltage and frequency of the local power supply
match the rated voltage and power of the charger.
Optimising battery life
You can extend your batteries life between charges by turning o features
that you don’t need. You can also monitor how applications and system
resources consume battery power.
To guarantee the optimal performance of your battery, please try
the following:
> Switch o functions you aren’t using such as Wi-Fi, Bluetooth,
or GPRS. Use the Settings Application to turn them o (Settings>
Wireless & networks).
> Turn down your mobile phones screen brightness and set a shorter
screen timeout.
> If you don’t require them, turn o automatic syncing for Gmail, Calendar,
Contacts, and other applications.
Note: On the Home screen, press the Menu Icon and select Settings > About phone > Battery use.
The Battery Use screen lists the applications that have been using the battery, from greatest to
least battery use. The top of the screen displays the time since you were last connected to a charger
or, if you are currently connected to one, and how long you were running on battery power for
before you connected to a charger. Each application or service that used battery power during that
time is displayed in order of the amount of power they used. Go to an application in the Battery Use
screen to learn details about its power consumption. Dierent applications oer dierent kinds
of information.
3.0
Getting
started

6
Getting
started,
continued
3.3 Linking to the Networks and devices
Your mobile phone can connect to a variety of networks and devices,
including mobile networks for voice and data transmission, Wi-Fi data
networks, and Bluetooth devices such as headsets. You can also connect your
mobile phone to a computer to transfer files from your mobile phone’s SD
card, and share your mobile phone’s data connection through a USB port.
Connecting to mobile networks
The SIM card is configured to use your provider’s mobile networks for
voice calls, and for transmitting data. The mobile provider’s network settings
should be loaded onto your mobile phone when the SIM card has been
inserted and activated on your provider’s network. If you have problems,
please consult with your network provider for their network settings.
Connecting to Wi-Fi networks
To activate the WiFi capability on you mobile phone:
> Go to Settings>Wireless & networks. Select Wi-Fi to turn it on. Your
mobile phone scans for available Wi-Fi networks and displays the names
of those it finds. Secured networks are indicated with a Lock Icon.
Note: If your mobile phone finds a network that you have previously connected to, it will
automatically connect to it. Click on a network to connect to it. If the network is open, you
are prompted to confirm that you want to connect to that network by touching Connect.
If the network is secured, you are prompted to enter a password or other credentials.
Connecting to Bluetooth devices
To activate the Bluetooth capability on you mobile phone:
> Go to Settings>Wireless & networks > Bluetooth. Select Bluetooth
to turn it on.
You must pair your mobile phone with a Bluetooth device before you can
connect to it. Once you pair your mobile phone with the Bluetooth device,
they stay paired unless you unpair them. Your mobile phone scans for and
displays the IDs of all available Bluetooth devices in range. If the device
you want to pair with isn’t in the list, make it discoverable.
Connecting to a computer through the USB
You can connect your mobile phone to a computer with a USB cable to
transfer music, pictures, and other files between your mobile phone’s SD card
and the computer.
3.4 Using the touch screen
Slide your finger left or right across the Home screen. These screens
provide space for more widgets, shortcuts, and other items. The small
dots at the lower left and right indicate which screen you are viewing.
The main way to control Android features is by using your finger to
manipulate icons, buttons, menu items, the onscreen keyboard, and
other items on the touch screen.
Touch
To select an icon or function simply touch your finger on the icon, letters
and symbols on the onscreen keyboard, or press onscreen buttons to utilise
the functions and applications on your mobile phone.

7
Touch and hold
Touch and hold an item on the screen by touching it and not lifting
your finger until an action occurs. For example, to open a menu for
customizing the Home screen, touch an empty area on the Home
screen until the menu opens.
To Drag an Icon
Touch and hold the icon for a moment and then, without lifting your
finger, move your finger on the screen until you reach the desired position
on the screen.
Swipe or slide
To swipe or slide, quickly move your finger across the surface of the screen,
without pausing when you first touch it (so you don’t drag an item instead).
For example, you slide the screen up or down to scroll a list.
3.5 Using the onscreen keypad
You enter text using the onscreen keyboard. Some applications open the
keyboard automatically. In others, you touch a text field where you want to
enter text to open the keyboard. You can also enter text by speaking instead
of typing.
Touch the keys on the keyboard to type.
The characters you have entered appear in the text field with suggestions for
the word you are typing below. Use the Delete icon to erase characters to the
left of the cursor. After you have finishing typing, touch Back icon to close
the keyboard.
3.6 Making Calls
> Making a call to a number in the contacts
Go to the phone icon or your phone application icon on the Home
screen, then select the Contacts tab. Swipe or slide upward/downward
to pick out the target contact. Then you can touch the dial icon to begin
a call.
> Making a call to a number in call log
Go to the phone icon or your phone application icon on the Home
screen, then select the call log tab. Swipe or slide upward/downward
to pick out and touch the target contact. Then you can begin a call.
> Answering incoming calls
Drag the Answer icon towards the right to answer an incoming call.
Touch the End icon to end the current conversation.
To reject an incoming call, drag the End icon towards the left.
> Managing multiple calls
If you accept a new call when you are already on a call, you can drag
the Answer icon towards the right to answer the current call.
Getting
started,
continued

8
4.1 Browser
You can use the Browser to view web pages and search for information
on the internet.
When you open the Browser, your home page opens. The web address (URL)
of the current page is displayed at the top of the window.
To go to a webpage or search the web
Go to the URL box at the top of the Browser screen. Enter the address (URL)
of a webpage, or enter the terms you want to search for. As you enter text,
your web search engine makes suggestions of web pages and queries.
To refresh the current page
Touch the Menu icon and an option interface appears, then you can touch
Refresh to update the current web page.
To zoom in or out on a webpage
Slide your finger slightly on the screen to reveal the Zoom control. Touch
the plus or minus side of the Zoom control to zoom in or out.
To find text on a webpage
Touch Menu icon and touch More > Find on page. Enter the text you’re
looking for. As you type, the first word with matching characters is
highlighted on the screen and subsequent matches are boxed. Touch
the left or right arrow to scroll to, and highlight the previous or next
word that matches.
To Copy text from a webpage
Open a webpage and scroll to the beginning of the text you want to copy,
touch the Menu icon and select More > Select text. Use your finger to drag
across the text you want to copy. Touch the text you selected and the text
will be copied to the clipboard.
To navigate among webpages
You can open links on a webpage, navigate back and forward, and review
your browsing history, just as in any web browser.
> To open a link: Touch a link to open it. Links that you touch
are highlighted in orange until the webpage they refer to opens
in the window.
> To go back and forward among the pages you’ve opened: Press back key
or touch menu icon> forward.
> To view your Browser history: As you browse the web, the browser keeps
track of the pages you visit, to help you find your way back later. Select
the icon at the right of the URL box, and select the History tab to view
your browser history. Select Most visited tab and you can view a list of
the most visited web pages.
Working with multiple browser windows
You can open up several Browser windows at once and switch among them.
> To open a new Browser window, Select the menu icon >Windows>new
window. New windows open with your home page.
> To switch Browser windows, Select the menu icon > windows. All of
your open windows are listed here. You can select these as you need.
> To close a Browser window, Select menu icon > windows. All of your
open windows are listed here. You can touch the close icon at the right
side of each open window to close it.
Using
the Menus
4.0

9
Downloading files
You can download files and applications from a webpage. The files that
you download are stored on your SD card.
To download a file, dierent web pages oer dierent mechanisms for
downloading pictures, documents, applications, and other files. To select,
touch and hold an image or a link to a file or to another webpage. In the
menu that opens, select Save. If the file is in a format supported by an
application on your mobile phone, it is downloaded to your SD card. Select
the menu icon, select More>downloads, to find a list of downloaded files.
If you want to delete a file, touch the indication box at the left of the
downloaded file, and an option box will pop out. You can select delete
to delete an unnecessary file.
Working with bookmarks
To open a bookmarked web page select the icon> Bookmarks, where you
can view thumbnails of your bookmarks.
Touch and hold a bookmark, and an option box will pop up. You can perform
the following operations on bookmarks: Open, open in new window, Edit a
bookmark, Add shortcut to the Home screen, Share a link, copy a link/URL,
Delete a bookmark and set the current bookmark as homepage.
4.2 Calculator
Enter numbers and arithmetic operators on the basic screen. Drag the basic
screen to the left to open the advanced screen, select Clear to delete the last
number or operator you entered. Select and hold Clear to delete everything
on the display. On the calculator screen, you can touch menu icon to clear
the history or access advanced panel.
4.3 Calendar
You can open the Calendar to view events you’ve created.
Select the Calendar icon in the main menu interface. Events from each
account you have added and configured to synchronize to your mobile
phone are displayed in Calendar.
Creating an event
You can use the Calendar on your mobile phone to create events. In any
calendar view, select the menu icon and then touch more> new event to
open an event details screen for a new event.
Or you can select and hold a spot in Day, Week, or Month view. Select New
event to open the Event details screen with that day and time already entered.
Enter the name, time, and additional details about the event. You can select
the Plus icon to add more reminders. In the Guests field, you can enter the
email address of people you want to invite to the event. Separate multiple
addresses with commas (,). If the people you send invitations to use Google
Calendar, they will receive an invitation in their Calendar and by email. Select
the menu icon and select Show extra options to add details about the event.
When you have completed all the details for the event, scroll to the bottom
of the Event details screen and select Done. The event will be added to
your calendar.
Using the
Menus,
continued

10
Change calendar view
In the Calendar screen, select the menu icon >Agenda, Day, Week, or Month.
Each view displays the events in your calendar for the period of time that you
specify. To view more information about an event in Agenda view, select the
event. To view the events of a day in Month view, touch a day.
Synchronizing and displaying calendars
When you add a Google Account or Microsoft Exchange ActiveSync account
to your mobile phone that includes a calendar service, and you configure
that account to synchronize calendar events to your mobile phone, the
events from that calendar are added and kept up to date in the Calendar
on your mobile phone.
In the calendar screen, select the menu icon and select More > Calendars,
where you can set whether calendars are stored on your mobile phone.
The Calendar screen displays all the calendars you’ve added or subscribed
to for each account synchronized to your mobile phone, organised by
account. Select the name of an account to show or hide its calendars on
your mobile phone. An icon to the right of each calendar indicates whether
its events are synchronized in your mobile phone and whether they are
visible in the Calendar.
Change Calendar settings
You can change the settings for how your Calendar displays an event, and
how your Calendar notifies you of upcoming events. Open a Calendar view,
select menu icon and select more>settings.
> Hide declined events: Select if you don’t want to see events that you
have declined.
> Home time zone: After turning on Use home time zone, you can set
home time zone through this function.
> Set alerts & notifications: You can configure event reminders to open an
alert, send you a notification, or turn o event notifications on your
mobile phone.
> Select ringtone: You can select the ringtone to sound when you receive
an event reminder.
> Vibrate: You can select the vibration mode when you receive an
event reminder.
> Default reminder time: You can select the default time before an event
for event reminders.
> Build version: The version of Calendar you are using.
4.4 Camera
The Camera is a combination camera and video recorder used to shoot
and share pictures and videos.
Select the Camera icon in the main menu, or on the home screen. The
camera opens in Landscape mode, ready to take a picture. In this mode,
press the round icon at the bottom of the screen to take a picture. To switch
between the camera and video recorder, press the icon on the left side
of the round icon to select the function you require.
You can use the setting icon to fine tune camera related parameters to
achieve better results.
Using the
Menus,
continued

11
4.5 Clock
Select the Clock icon on the Home screen or in the main menu interface.
Alarms
You can set an alarm by modifying an existing alarm or by adding a new
alarm. Note: Alarms that are set are underlined in green.
Gallery
You can view pictures through this function.
Music
You can play music on your mobile phone or through the SD card on your
mobile phone through this function.
Home
Select to get to the Home screen.
4.6 Contacts
In the contacts screen, select the menu icon to perform the following
operations:
> Search: Start entering the name of the contact you’re searching for.
As you type, contacts with matching names appear below the search
box. You can then select a matching contact in the list to perform
further operations.
> New contact: Select this function to add a new contact to contacts list.
> Display options: You can select the display options and choose contacts
to display.
> Contacts Groups: You can assign contacts to several caller groups.
> Delete Contacts: Select this function and highlight the contacts you want
to delete. To delete all contacts, select all at the top of contacts screen.
Select OK and confirm to Delete contacts.
> More: Through this function, you can perform following operations:
accounts and import/export.
> Favorites: You can add the contacts you communicate with most
frequently to favorites.
Note: Factory data reset enables you to erase all of your personal data from the internal
mobile phone storage, including all messages and contacts information stored in your
mobile phone memory.
4.7 Downloads
Through this function, you can view a list of files and applications which you
downloaded from a web page.
Using the
Menus,
continued

12
4.8 Email
You use the Email application to read and send email.
Opening Email and the Accounts screen
> To open Email
Select the Email icon on the Home screen or in the main menu interface.
The first time you open Email, a setup wizard opens to help you add an
email account. After the initial setup, Email opens to the last screen you
were viewing or, if you have not used Email recently, it displays the
contents of your Inbox (if you have only one account) or the Accounts
screen (if you have multiple accounts).
> To open the Accounts screen
The Accounts screen lists your Combined Inbox and each of your email
accounts. If you have starred (highlighted), drafted, or unsent messages
in any of your accounts, the folders for those items from all accounts are
also displayed. From a folder screen, select the menu icon >Accounts.
Each folder and account on the Accounts screen displays the number of
unread messages in green, or the total number of messages in grey. You
can select a combination folder, such as the Combined Inbox folder, to
view the messages it contains.
> To open combined inbox
If you have configured Email to send and receive email from more
than one account, you can view all messages sent to all accounts in
your Combined Inbox. Open the Accounts screen, and then select the
Combined Inbox.
> Reading your messages
You can read messages in your Combined Inbox, or in the Inbox, or
folder for an individual account. When you receive a new message, you
will receive a notification in the Status bar, unless you’ve turned o Email
notifications using the Email Account settings. You can also set whether
Email notifications vibrate your mobile phone, or pick a ringtone from
Email Account settings.
> Opening the Combined Inbox, an account’s Inbox,
or another folder of messages
Select the message to read. The message opens in a screen with
information about who sent it, the date it was sent, and related
information at the top, followed by the contents of the message.
You can reply to, or forward a message that you receive. You can
also delete messages and manage them in other ways.
> Starring emails
You can star an important message to highlight it, and make it easy to
keep track of. Once you star an email, a Starred folder is added to the
Accounts screen. While reading an email, select the star in its header
if you wish to highlight the email. Or you can select a message’s star
while viewing a list of messages in a folder. You can select an email’s
star again to un-star an email.
Using the
Menus,
continued

13
> Composing and sending email
You can send email to your contacts or to other people or groups.
Select menu icon >Compose. As you enter text, matching addresses are
oered from your Contacts. You can select the suggested address or enter
a new address. Separate multiple addresses with commas. Press menu
and select the Add Cc/Bcc to address a copy or blind copy of the message
select >Add Attachment to add an attachment to the email. Enter a
subject for the message. Enter the text of the message. After finishing,
select > Send to send the email.
> Adding a signature to your messages
You can add one or a few lines of text to every message you send from an
account, such as your name, contact information, etc. Open the Accounts
screen. Select and hold the account whose settings you want to change.
In the menu that opens, select Account settings>signature. Or you
can open the settings for an account while you’re viewing its inbox,
by selecting the menu icon and selecting Account settings>signature.
Enter a signature and confirm.
> Adding email accounts
The first time you open Email, you are prompted to set up an email
account. After that, you can configure Email to send and receive email
from additional accounts.
To add an email account: Open the Accounts screen. Select the menu
icon, and select Add account. In the Setup Email screen, enter your email
address and password. Select Next. If you need to enter email account
settings that the wizard can’t configure for you, select Manual setup,
you are prompted to enter your email account details. Enter any other
information requested by the type of account you are adding and select
Done. Enter a name for the account and select Done. Your email will start
downloading your email messages and you can start using it to send and
receive messages using the new account.
> To delete an email account
Open the Accounts screen. Select and hold the account to delete. Select
Remove account in the menu that opens. Select OK in the dialogue to
confirm that you want to delete the account.
4.9 ES File Manger
Your mobile phone supports an SD card. You can use the File Manager to
conveniently manage various directories and files on the SD card.
4.10 FM radio
Please plug in the compatible headphones to the device, and then turn on the
radio. The headphone cable is used as the FM Antenna. Please adjust it to the
appropriate volume when listening to the radio. Higher volumes are harmful
to your hearing.
4.11 Gallery
Both pictures and videos taken by the camera or that are stored on the SD
card can be viewed through this function.
Using the
Menus,
continued

14
4.12 Gmail
You can use Gmail to send and receive email.
4.13 Google search
You can use Google search through this function.
4.14 Messenger
An instant messaging service that provides both text and voice
communications by logging in through your google/gmail account.
4.15 Local
You can fix your location through this function.
4.16 Maps
You can enter Google Maps through this function.
4.17 Messaging
You can use Messaging to exchange text messages (SMS) and multimedia
messages (MMS) with your friends on their mobile phones.
Composing and sending a message
Select the Messaging icon on the home screen or in the main menu.
Select Compose new message to start composing a new text or multimedia
message. Multimedia (MMS) messages can contain text and a picture,
a voice recording, an audio file, a video, or a picture slideshow.
On the Messaging screen, select Compose new message. Enter a mobile
phone number in the To field. Select the composition text box to start
editing your message. During editing, you can select the menu icon to add
emoticons, attachments, or a subject line into the message. After finishing
editing, you can select the Back icon to exit the onscreen keypad.
Reply to message thread
If you’re working in a message window, messages that you receive are
displayed in it. Otherwise, you receive a new message notification, and
a new message icon appears in the Status bar. When you touch the new
message notification, the Message window opens, where you can reply
to the message.
4.18 Music
Music plays audio files that are stored on your mobile phone’s SD card, so
before you open Music, you must copy audio files from your computer onto
the SD card. Music supports a wide variety of audio file formats, so it can play
music that you purchase from online stores, music that you copy from your
CD collection, and so on.
Using the
Menus,
continued

15
To open Music and view your music library
Select the Music icon in the main menu interface, or on the Home screen.
When you copy music to your SD card, Music searches the card for music
files and builds a catalogue of your music based on information about each
file that is stored in the file itself. This can take from a few seconds to several
minutes, depending on how many files you have copied onto the SD card.
When the catalogue is complete, the Music library screen will open with tabs
that you can touch to view your music library. They will be organized by
Artists, Albums, Songs, or Playlists.
Note: If your mobile phone powers o due to a low battery while you are downloading music
using a USB cable, your mobile phone will prompt ‘ SD card error’ when you power on your mobile
phone. If you repower your mobile phone about 5 times, the same prompt may occur. Under this
circumstance, you should repower on your mobile phone until it prompts ‘SD card error. Format?’.
Please select format to format your SD card to ensure your mobile phone runs properly.
Any sudden interruption during downloading music using a USB cable may
result in damage to your SD card.
Play music
You can listen to music by using your mobile phone’s built-in speaker,
through a wired headset, or through a wireless Bluetooth stereo headset
or speaker.
Select a song in your library to listen to it. The Playback screen opens and the
song you selected starts to play. The Playback screen contains several icons
that you can select to control the playback of songs. On the right-top of the
playback screen, you will find three function icons. You can select them to
open the current playlist, shue the current playlist or repeat the current
playlist/repeat the current track (touch twice). Three function icons just
above the process bar can be used to control the playing process of the music
application. Their functions can be defined as the following: switch to last
song (select) /rewind (select and hold), play/pause and switch to next song
(select)/ fast forward (select and hold).
To delete a song from the SD card
You can delete music from the SD card. Select and hold a song in a library list.
In the menu that opens, select Delete.
4.19 News & Weather
You can view the latest news and weather through this function.
4.20 Mobile Phone
Select the Contacts icon on the Home screen, or in main menu interface.
Four tabs are listed at the top of the screen. Select your mobile phone tab
and you can find a dial pad screen where you can input a phone number
to start a call.
Note: During a conversation, you can start a new call by opening the dial pad, entering a number
and pressing the dial key. If you press dial key, the current conversation will hold.
4.21 Play store
You can download and manage media files through this application.
Using the
Menus,
continued

16
4.22 Search
The Search function enables you to open a search box for searching your
mobile phone and the web.
4.23 Settings
The Settings application contains most of the tools for customizing
and configuring your mobile phone.
Dual SIM settings
Through this function, you can set the standby SIM card setting,
data connection setting, voice call settings and MMS settings.
Wireless & Networks
You can use Wireless & Network settings to configure and manage
connections to networks and devices by using Wi-Fi, Bluetooth and
mobile networks. You can also use Wireless & Network settings to configure
connections between your mobile phone and virtual private networks (VPNs)
to connect your computer to the Internet using your mobile phone, and to
turn o all wireless and network transmitting functions with Airplane mode.
Call settings
Use Call settings to configure the mobile phone’s call settings such as a
voice call, Internet call, and other special features oered by your carrier.
You can also use Call settings to configure your mobile phone so that it
can place outgoing calls only to a fixed set of mobile phone numbers.
User profiles
You can activate the profiles according to dierent conditions.
Display
You can use the Display settings to configure the brightness, auto-rotate
screen, animation, proximity screen mode, and screen timeout of your
mobile phone.
Location & Security
You can activate this function by using the wireless networks.
You can also configure settings that help secure your mobile phone
and its data.
Note: You can delete all data and reset data storage by choosing Security > Clear storage.
Applications
You can use the Applications settings to view details about the applications
installed on your mobile phone, to manage their data and force the
application to stop, to view and control currently running services,
and to view the storage used by applications, etc.
Accounts & sync
> Background data: Check this to permit applications to synchronize
data in the background, whether or not you are actively working in them.
Un-checking this setting can save battery power and lowers (but does not
eliminate) data use.
> Auto-sync: Activate this function to permit applications to synchronize
data on their own schedule.
Using the
Menus,
continued

17
Privacy
You can use the Privacy settings to manage your personal information
and select to reset your mobile phone.
Storage
Use the Storage settings to monitor the used and available space on your
mobile phone and your SD card, and to manage your SD card.
Language & keyboard
Use the Language & Keyboard settings to select the language for the text
on your mobile phone, and for configuring the onscreen keyboard.
Accessibility
You use the Accessibility settings to configure any accessibility plug-ins
you have installed on your mobile phone.
Date & time
You can use Date & Time settings to set your preferences for how dates are
displayed. You can also use these settings to set your own time and time
zone, rather than obtaining the current time from the mobile network, etc.
About mobile phone
This function enables you to view some mobile phone related information.
4.24 Sound Recorder
Use this function to record audio files. Three function icons at the bottom
of the Recorder screen are corresponding to start recording, review recorded
file, and stop recording.
4.25 Talk
You will need to add a Google account first to use this function.
4.26 Voice search
You can search by voice through this function.
4.27 YouTube
You can log on to YouTube through this application.
Using the
Menus,
continued

18
DIMENSION (MM*MM*MM) 131x67x9.9mm
CAMERA 0.3MP Front, 8.0MP AF Rear
LCD 4.5” QHD 540x960 TFT, Capacitive Touch
OS Android 4.1 (upgradeable)
PROCESSOR Qualcomm S4 MSM8225Q 1.2GHz Quad Core Cortex-A5,
Adreno 203 GPU
MEMORY 512MB LPDDR2, 4GB Internal, Micro SD up to 32GB
BLUETOOTH BT 3.0
BATTERY 2000mAh, USB Charging
WLAN IEEE 802.11 b/g
WIRELESS
GSM/GPRS/EDGE 900/1800/1900MHz, WCDMA
850/1900/ 2100MHz (can be modified based on MOQ
over 20k) HSPA 7 2Mbps DL, 5.7Mbps DL, 5.7Mbps UL
SIM Dual SIM
CAMERA 0.3MP Front, 8.0MP AF Rear
SENSOR G-, Proximity, Light-sensor, GPS
WATERPROOF IP67
OTHERS Micro USB, Mono Speaker, Headset, Dual microphone
noise cancellation, Vibrator, FM Radio
Specifications
5.0
Table of contents
Other XOX Cell Phone manuals